Java 中的 Pipeline 设计模式
Posted 明明如月学长
tags:
篇首语:本文由小常识网(cha138.com)小编为大家整理,主要介绍了Java 中的 Pipeline 设计模式相关的知识,希望对你有一定的参考价值。
原文链接:https://www.baeldung.com/java-pipeline-design-pattern
1. 概述
在本教程中,我们将回顾一个不属于经典 GoF 模式的有趣模式 - Pipeline (管道)模式。
它功能强大,可以帮助解决棘手的问题并能帮助我们改进应用程序的设计。此外,Java 还有一些内置解决方案来帮助实现此模式,我们会在文末进行讨论。
2 相关模式
通常,我们会将管道模式与责任链进行比较。管道模式也与装饰器有许多共同点。在某些方面,它更接近装饰者而不是责任链。下面让我们回顾一下这些模式之间的异同。
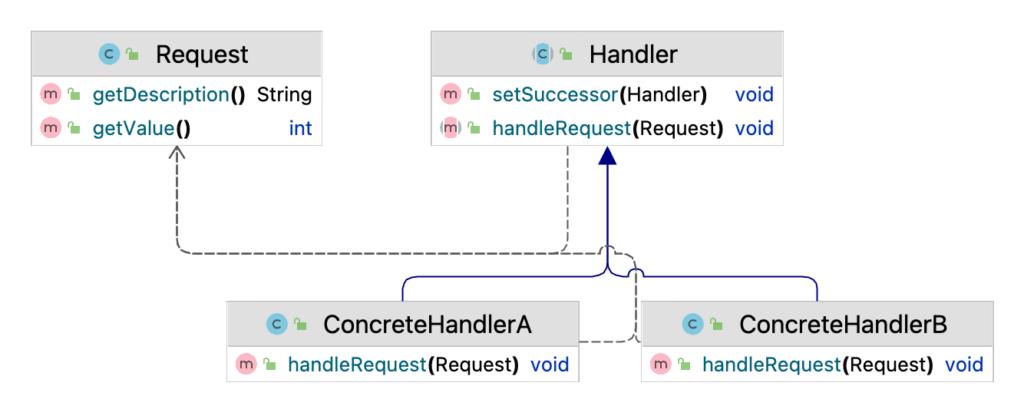
2.1 责任链模式
管道模式和责任链模式经常拿来在一起比较,因为这两种模式都显式声明了步骤编排。**管道模式和责任链模式的第一个区别是责任链模式的_ __handleRequest()_方法通常没有返回值:

但是,但这并不意味着_handleRequest()_方法不能有返回值。
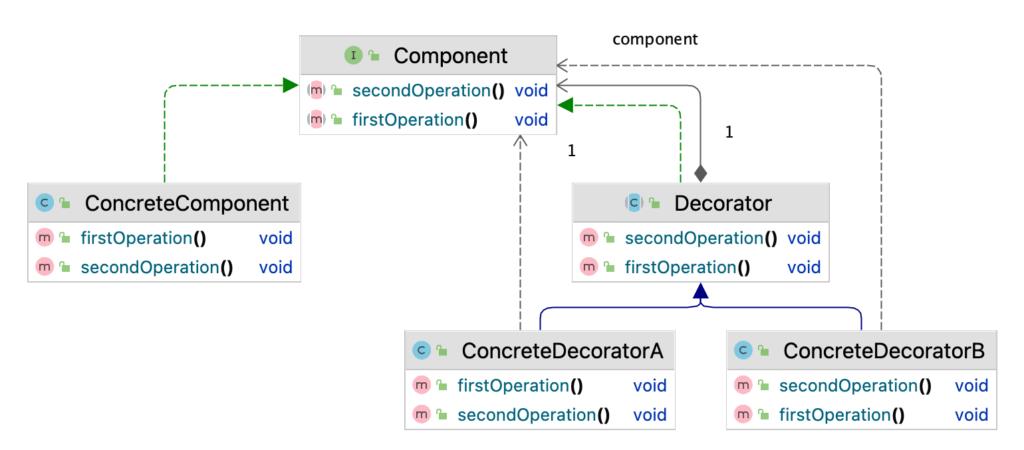
2.2 装饰器模式
装饰器模式与管道模式最大的区别在于,它没有明确的链式结构。但是,如果将其委派和递归嵌套,其行为与责任链或管道非常相似:

在经典 (GoF) 实现中,此模式通常是为了添加新的行为,并且没有操作的返回值。但是,这是更改对象状态或使用不同组件处理数据的明智选择。**通常,使用这种模式修改状态过于复杂,我们完全可以通过更直接的方式来实现。**同时,装饰器模式提供临时依赖关系的管理并维护执行顺序。
3. 管道设计模式
管道模式的主要思想是创建一组操作(管道)并将数据在这些操作中传递。虽然责任链和装饰者也能处理一些这类任务。但是管道设计模式却更加灵活。
责任链和装饰器模式通常仅可以返回 Handler和 Component 中定义的返回值类型。管道模式却可以处理任何类型的输入和输出。这种处理数据的灵活性是管道模式的一大特征。
3.1 不可变管道
接下来,给一个简单的不可变管道的示例。
我们先定义 Pipe 接口:
public interface Pipe<IN, OUT>
    OUT process(IN input);
这是一个只有一种方法的简单接口,它接受输入并产生输出。
**接口是参数化的,我们可以在其中提供任何实现。**另外,请注意,本文中的示例将与类型参数的官方命名约定有所不同。这是为了更好地区分方法级别和类级别参数。现在让我们创建一个类来保存管道中的管道:
public class Pipeline<IN, OUT>

    private Collection<Pipe<?, ?>> pipes;

    private Pipeline(Pipe<IN, OUT> pipe)
        pipes = Collections.singletonList(pipe);


    private Pipeline(Collection<Pipe<?, ?>> pipes)
        this.pipes = new ArrayList<>(pipes);


    public static <IN, OUT> Pipeline<IN, OUT> of(Pipe<IN, OUT> pipe)
        return new Pipeline<>(pipe);


    public <NEW_OUT> Pipeline<IN, NEW_OUT> withNextPipe(Pipe<OUT, NEW_OUT> pipe)
        final ArrayList<Pipe<?, ?>> newPipes = new ArrayList<>(pipes);
        newPipes.add(pipe);
        return new Pipeline<>(newPipes);


    public OUT process(IN input)
        Object output = input;
        for (final Pipe pipe : pipes)
            output = pipe.process(output);

        return (OUT) output;
构造函数和静态工厂非常简单,所以让我们专注于 _withNextPipe_ 方法:
public <NEW_OUT> Pipeline<IN, NEW_OUT> withNextPipe(Pipe<OUT, NEW_OUT> pipe)
    final ArrayList<Pipe<?, ?>> newPipes = new ArrayList<>(pipes);
    newPipes.add(pipe);
    return new Pipeline<>(newPipes);
由于我们需要一定级别的类型安全,并且不允许管道失败,因此我们需要存储有关当前输入和输出类型的信息。**此信息存储在 Pipeline 对象中。但是,在添加新管道 Pipe 时,我们需要更新此信息_,_并且我们不能在同一对象上执行此操作。 这就是让 Pipeline 不可变添加新的 Pipe 将产生一个新的单独 Pipeline 的原因。
_Pipeline _的 process 部分非常简单:
public OUT process(IN input)
    Object output = input;
    for (final Pipe pipe : pipes)
        output = pipe.process(output);

    return (OUT) output;
但是,在这种情况下,我们需要使用原始类型。我们确保 Pipes 可以正常通过。最终,我们必须将结果转换为预期的数据类型(OUT)。
编者补充:我们可以编写代码进行测试:
public class PipeDemo
    public static void main(String[] args)
        // 第 1 个 pipe,输入字符串转为其长度
        Pipe<String, Integer> firstPipe = String::length;
        // 第 2 个 pipe, 将输入的数字*2
        Pipe<Integer, Integer> secondPipe = (input) -> input * 2;

        // 编排 pipeline
        Pipeline<String, Integer> pipeline = Pipeline.of(firstPipe).withNextPipe(secondPipe);

        // 输入 “abc” 执行管道
        Integer result = pipeline.process("abc");

        // 经过两个 pipe 最终返回 6
        assertEquals((int) result, 6);
3.2. 简单管道
我们可以简化上面的例子,完全摆脱 Pipeline 类:
public interface Pipe<IN, OUT>
    OUT process(IN input);

    default <NEW_OUT> Pipe<IN, NEW_OUT> add(Pipe <OUT, NEW_OUT> pipe)
        return input -> pipe.execute(execute(input));
此实现更接近前面讨论的模式(装饰器和责任链),因为它具有从一个管道委派到另一个管道的递归结构。**但是,在此实现中,所有管道都隐藏在方法调用中,因此很难获取整个管道。**同时,与之前使用管道实现相比,此解决方案非常简单灵活_。_
3.3. 函数式解决方案
让我们重新看下 Pipe 接口:
public interface Pipe<IN, OUT>
    OUT process(IN input);

    default <NEW_OUT> Pipe<IN, NEW_OUT> add(Pipe <OUT, NEW_OUT> pipe)
        return input -> pipe.execute(execute(input));
该接口拥有一个 default 方法和 Function 接口类似:
public interface Function<T, R>
    //...
    R apply(T t);
    //...
Function 接口还提供了很多好用的方法,如 andThen:
default <V> Function<T, V> andThen(Function<? super R, ? extends V> after)
    Objects.requireNonNull(after);
    return (T t) -> after.apply(apply(t));
我们可以用该方法来取代我们前面定义的 add方法。Function还提供了讲一个 function 添加到 pipeline 头部的方法。
default <V> Function<V, R> compose(Function<? super V, ? extends T> before)
    Objects.requireNonNull(before);
    return (V v) -> apply(before.apply(v));
通过 Function 的使用,我们就可以打造出非常灵活易用的 pipeline:
@Test
void whenCombiningThreeFunctions_andInitializingPipeline_thenResultIsCorrect()
    Function<Integer, Integer> square = s -> s * s;
    Function<Integer, Integer> half = s -> s / 2;
    Function<Integer, String> toString = Object::toString;
    Function<Integer, String> pipeline = square.andThen(half)
        .andThen(toString);
    String result = pipeline.apply(5);
    String expected = "12";
    assertEquals(expected, result);
有了 Function 的加持,管道直接获取参数,这种写法非常简洁。此外,我们还可以使用 BiFunction来拓展 pipeline:
@Test
void whenCombiningFunctionAndBiFunctions_andInitializingPipeline_thenResultIsCorrect()
    BiFunction<Integer, Integer, Integer> add = Integer::sum;
    BiFunction<Integer, Integer, Integer> mul = (a, b) -> a * b;
    Function<Integer, String> toString = Object::toString;
    BiFunction<Integer, Integer, String> pipeline = add.andThen(a -> mul.apply(a, 2))
        .andThen(toString);
    String result = pipeline.apply(1, 2);
    String expected = "6";
    assertEquals(expected, result);
因为 Function**的 andThen* 方法只支持 Function**作为入参_,_所以我们必须使用将_mul_ _BiFunction _转换为 **Function来使用。尽管上面例子存在函数内部传参的情况,而像传统的 pipeline 模式那样仅需在调用时传参,但此解决方案非常简单明了。Stream API 中使用类似的方法,流中的一系列操作封装为 pipeline。
4. 结论
在本文中,我们讨论了不是很流行,也不包含在已知模式的经典 (GoF) 列表中,但非常强大的管道模式。
我们可以通过各种方式实现这种设计模式,通过 Stream API 来实现管道模式也非常赞。 在大多数情况下,Java 提供的解决方案就足够了。如果有特殊的需求,可以自行设计管道。
这种模式的主要好处是它允许简化逻辑,并使代码更易于维护,同时简洁明了。此示例的完整源代码可在 GitHub 上找到。
以上是关于Java 中的 Pipeline 设计模式的主要内容,如果未能解决你的问题,请参考以下文章