编译安装LAMP环境:httpd-2.4+mysql5.6+php5.5
Posted
tags:
篇首语:本文由小常识网(cha138.com)小编为大家整理,主要介绍了编译安装LAMP环境:httpd-2.4+mysql5.6+php5.5相关的知识,希望对你有一定的参考价值。
本文大纲:
1、安装前准备
2、编译安装Apache
3、安装mysql数据库
4、编译安装php
5、配置httpd服务,使其支持php
6、安装Xcache加速器
7、启用服务器状态页面
8、PHP连接Mysql测试
所有软件包的网站下载地址:
apr和apr-util:http://apr.apache.org/
httpd:http://httpd.apache.org/
三条主线:2.0/2.2/2.4/
mysql:http://dev.mysql.com/downloads/mysql/
现在页面默认是5.7,也可以在页面里选择5.6/5.5的版本,源码安装选择最下面的Source Code,然后选择最下面的tar.gz的压缩包
libmcrypt和libmcrypt-devel:https://pkgs.org/
php:http://php.net/downloads.php
xcache:http://xcache.lighttpd.net
wordpress:https://cn.wordpress.org/
本文档中所有软件包集合下载地址:
https://pan.baidu.com/s/1pLpSy5l
1、安装前准备
修改yum源
[[email protected] ~]# wget -O /etc/yum.repos.d/CentOS-Base.repo
[[email protected] ~]# vim /etc/yum.repos.d/CentOS-Base.repo
# 在末行模式下执行%s/$releasever/6.8/g,6.8为6系列中最新的版本号,如果是CentOS6,不需要执行这一项
[[email protected] ~]# yum clean all
[[email protected] ~]# yum makecache
卸载原有httpd-2.2
[[email protected] ~]# cp /etc/init.d/httpd /etc/init.d/httpd.bak    # 备份这个文件后面做服务器脚本文件
[[email protected] ~]# yum remove httpd -y
安装编译工具
[[email protected] ~]# yum groupinstall -y "Development Tools" "Server Platform Development"
关闭SElinux
[[email protected] ~]# vim /etc/selinux/config
SELINUX=disabled    # 从新启动
关闭防火墙
[[email protected] ~]# /etc/init.d/iptables stop
[[email protected] ~]# chkconfig iptables off
[[email protected] ~]# chkconfig --list | grep iptables
iptables       	0:off	1:off	2:off	3:off	4:off	5:off	6:off
修改主机名
[[email protected] ~]# hostname WebServer
[[email protected] ~]# vim /etc/sysconfig/network
HOSTNAME=WebServer
[[email protected] ~]# vim /etc/hosts
127.0.0.1   WebServer WebServer.wlm.com localhost4 localhost4.localdomain4
::1         localhost localhost.localdomain localhost6 localhost6.localdomain6
从新启动
2、编译安装Apache
1)解决依赖关系
httpd-2.4.23需要较新版本的apr和apr-util,因此需要事先对其进行升级。升级方式有两种,一种是通过源代码编译安装,一种是直接升级rpm包。
(1)编译安装apr
[[email protected] ~]# cd apr-1.5.2
[[email protected] ~]# tar -zxvf apr-1.5.2.tar.gz
[[email protected] ~]# ./configure --prefix=/usr/local/apr    # 设置安装路径
[[email protected] ~]# make && make install
(2)编译安装apr-util
[[email protected] ~]# tar -zxvf apr-util-1.5.4.tar.gz
[[email protected] ~]# cd apr-util-1.5.4
[[email protected] ~]# ./configure --prefix=/usr/local/apr-util --with-apr=/usr/local/apr
# --prefix指定安装路径;--with-apr指定apr的安装路径,apr-util依赖于apr
[[email protected] ~]# make && make install
(3)httpd-2.4.23编译过程也要依赖于pcre-devel软件包和openssl,需要事先安装。
[[email protected] ~]# yum install pcre-devel
[[email protected] ~]# yum install openssl-devel -y
2)编译安装httpd-2.4.23
[[email protected] ~]# tar -zxvf httpd-2.4.23.tar.gz
[[email protected] ~]# cd httpd-2.4.23
[[email protected] httpd-2.4.23]# ./configure --prefix=/usr/local/apache --sysconfdir=/etc/httpd --enable-so --enable-ssl --enable-cgi --enable-cgid --enable-modules=most --enable-mods-shared=most --enable-rewrite --with-zlib --with-pcre --with-apr=/usr/local/apr --with-apr-util=/usr/local/apr-util --enable-mpms-shared=all --with-mpm=event
--sysconfdir=/etc/httpd  :指定配置文件安装位置
--enable-so              :支持动态共享模块如果没有这个模块PHP将无法与apache结合工作
--enable-ssl             :启用支持ssl
--enable-cgi             :支持cgi
--enable-rewrite         :支持URL重写
 --with-zlib             :压缩库,在互联网上传播时可节约带宽
--with-apr=/usr/local/apr :指定apr路径
--with-apr-util=/usr/local/apr-util :指定apr-util路径
--enable-mpms-shared=all  :支持多道处理模块
--with-mpm=event         :设定默认的模块

[[email protected] httpd-2.4.23]# make && make install    # 编译和安装
动态模块和静态模块的说明:
(1)构建MPM为静态模块
在全部平台中,MPM都可以构建为静态模块。在构建时选择一种MPM,链接到服务器中。如果要改变MPM,必须重新构建。为了使用指定的MPM,请在执行configure脚本 时,使用参数 --with-mpm=NAME。NAME是指定的MPM名称。编译完成后,可以使用 httpd -l 来确定选择的MPM。 此命令会列出编译到服务器程序中的所有模块,包括 MPM。
(2)构建 MPM 为动态模块
在Unix或类似平台中,MPM可以构建为动态模块,与其它动态模块一样在运行时加载。 构建 MPM 为动态模块允许通过修改LoadModule指令内容来改变MPM,而不用重新构建服务器程序。在执行configure脚本时,使用--enable-mpms-shared选项即可启用此特性。当给出的参数为all时,所有此平台支持的MPM模块都会被安装。还可以在参数中给出模块列表。默认MPM,可以自动选择或者在执行configure脚本时通过--with-mpm选项来指定,然后出现在生成的服务器配置文件中。编辑LoadModule指令内容可以选择不同的MPM。
3)修改httpd的主配置文件,设置其Pid文件的路径
[[email protected] httpd-2.4.23]# cd /etc/httpd/
[[email protected] httpd]# cp httpd.conf httpd.conf.bak
[[email protected] httpd]# vim httpd.conf
说明:手动编译安装后,httpd.pid文件是存放在/usr/local/apache/logs/目录下的,这个位置未免有些不方便。
在配置文件中找一个位置定义一下Pid文件路径就可以了
Pidfile "/var/run/httpd.pid"
4)提供SysV服务脚本/etc/init.d/httpd
[[email protected] ~]# cp /etc/init.d/httpd.bak /etc/init.d/httpd
[[email protected] ~]# vim /etc/init.d/httpd # 此脚步是系统默认安装了httpd2.2自带的脚本,如果没有这个脚本,可以直接复制下面的代码
#!/bin/bash
#
# chkconfig: - 85 15
# description: Apache is a World Wide Web server.  It is used to serve . /etc/rc.d/init.d/functions      ## -----读取函数
if [ -f /etc/sysconfig/httpd ]; then
        . /etc/sysconfig/httpd
fi
# Start httpd in the C locale by default.
HTTPD_LANG=${HTTPD_LANG-"C"}
# This will prevent initlog from swallowing up a pass-phrase prompt if
# mod_ssl needs a pass-phrase from the user.
INITLOG_ARGS=""
# Set HTTPD=/usr/sbin/httpd.worker in /etc/sysconfig/httpd to use a server
# with the thread-based "worker" MPM; BE WARNED that some modules may not
# work correctly with a thread-based MPM; notably PHP will refuse to start.
# Path to the apachectl script, server binary, and short-form for messages.
apachectl=/usr/local/apache/bin/apachectl   # -----指定apachectl程序位置
httpd=${HTTPD-/usr/local/apache/bin/httpd} # -------httpd程序位置
prog=httpd
pidfile=${PIDFILE-/var/run/httpd.pid}  # ----如果文件存在就使用存在文件路径,如果不存在就使用/var/rum/httpd.pid
lockfile=${LOCKFILE-/var/lock/subsys/httpd} ## --------创建的锁文件
RETVAL=0
start() {
        echo -n $"Starting $prog: "
        LANG=$HTTPD_LANG daemon --pidfile=${pidfile} $httpd $OPTIONS ## ----以$pidfile文件执行httpd 并且使用选项start
        RETVAL=$?  ## ------定义执行状态返回值
        echo
        [ $RETVAL = 0 ] && touch ${lockfile} ## -----成功时创建锁文件
        return $RETVAL
}
stop() {
       echo -n $"Stopping $prog: "
       killproc -p ${pidfile} -d 10 $httpd
       RETVAL=$?
       echo
       [ $RETVAL = 0 ] && rm -f ${lockfile} ${pidfile}
}
reload() {
    echo -n $"Reloading $prog: "
    if ! LANG=$HTTPD_LANG $httpd $OPTIONS -t >&/dev/null; then
        RETVAL=$?
        echo $"not reloading due to configuration syntax error"
        failure $"not reloading $httpd due to configuration syntax error"
    else
        killproc -p ${pidfile} $httpd -HUP
        RETVAL=$?
    fi
    echo
}
# See how we were called.
case "$1" in
  start)
       start
       ;;
  stop)
       stop
       ;;
  status)
        status -p ${pidfile} $httpd
       RETVAL=$?
       ;;
  restart)
       stop
       start
       ;;
  condrestart)
       if [ -f ${pidfile} ] ; then
              stop
              start
       fi
       ;;
  reload)
        reload
       ;;
  graceful|help|configtest|fullstatus)
       $apachectl [email protected]
       RETVAL=$?
       ;;
  *)
       echo $"Usage: $prog {start|stop|restart|condrestart|reload|status|fullstatus|graceful|help|configtest}"
       exit 1
esac
exit $RETVAL
[[email protected] ~]# chmod +x /etc/init.d/httpd # 添加执行权限
[[email protected] ~]# chkconfig httpd --add    # 开启自动启动
[[email protected] ~]# chkconfig httpd on
[[email protected] ~]# chkconfig httpd --list
httpd          	0:off	1:off	2:on	3:on	4:on	5:on	6:off
5)为httpd服务的相关命令添加环境变量
[[email protected] ~]# vim /etc/profile.d/httpd.sh
export PATH=$PATH:/usr/local/apache/bin
[[email protected] ~]# source /etc/profile.d/httpd.sh
# 测试一下
httpd: Could not reliably determine the server‘s fully qualified domain name, using 127.0.0.1 for ServerName
Syntax OK
# 似乎报错了,这个可以忽略不计,没有设置ServerName,不影响使用,可以设置一下:
[[email protected] ~]# vim /etc/httpd/httpd.conf
ServerName
 [[email protected] ~]# httpd -t
Syntax OK
[[email protected] ~]# /etc/init.d/httpd restart
Stopping httpd:                                            [FAILED]
Starting httpd:                                            [  OK  ]
[[email protected] ~]# /etc/init.d/httpd reload
Reloading httpd:
6)启动apache并测试
[[email protected] ~]# /etc/init.d/httpd restart    # 重启
Stopping httpd:                                            [  OK  ]
Starting httpd:
使用浏览器访问:
3、安装Mysql数据库
1)前期准备
查看是否已经安装了mysql,如果已经安装,卸载mysql
rpm -qa | grep mysql    # 查看
yum remove mysql -y     # 卸载
安装编译源码所需的工具和库
yum install gcc gcc-c++ ncurses-devel perl cmake libaio
说明:从mysql5.5起,mysql源码安装开始使用cmake来设置源码编译配置脚本。
准备mysql数据存放的文件系统,由于mysql的数据文件是会增长的,而且占用空间很大。数据文件要放在一个单独的
LVM分区上。这里就不做lvm逻辑卷了。直接创建一个目录替代。
[[email protected] ~]# mkdir -p  /mydata/data    # 数据存储目录
[[email protected] ~]# mkdir /usr/local/mysql    # mysql程序目录
创建mysql的系统用户组和系统用户
[[email protected] ~]# groupadd -r mysql
[[email protected] ~]# useradd -g mysql -r -s /sbin/nologin -M -d /mydata/data mysql
[[email protected] ~]# chown -R mysql:mysql /mydata/data    # 修改目录权限
[[email protected] ~]# chown mysql.mysql /usr/local/mysql/
从官网下载mysql源码包(最后是手动从官网下载,如果官网页面变更,这个路径就不对了)
[[email protected] src]# wget http://101.96.8.140/dev.mysql.com/get/Downloads/MySQL-5.6/mysql-5.6.34.tar.gz
2)使用cmake编译安装并初始化mysql5.6.34
(1)编译安装
说明:mysql 安装包有三种式,rpm,源码包,二进制包(已编译好,解压后简单配置一下就可以用),我这里用的就是源码包编译安装
[[email protected] src]# tar -zxvf mysql-5.6.34.tar.gz  # 解压
[[email protected] src]# cd mysql-5.6.34
#使用cmake生成配置脚本。设置编译参数:
[[email protected] mysql-5.6.34]# cmake -DCMAKE_INSTALL_PREFIX=/usr/local/mysql  -DMYSQL_UNIX_ADDR=/usr/local/mysql/mysql.sock -DDEFAULT_CHARSET=utf8 -DDEFAULT_COLLATION=utf8_general_ci -DWITH_INNOBASE_STORAGE_ENGINE=1 -DWITH_ARCHIVE_STORAGE_ENGINE=1 -DWITH_BLACKHOLE_STORAGE_ENGINE=1 -DMYSQL_DATADIR=/data/mysqldb -DMYSQL_TCP_PORT=3306 -DENABLE_DOWNLOADS=1

配置说明:
-DCMAKE_INSTALL_PREFIX=dir_name         # 设置mysql安装目录
-DMYSQL_UNIX_ADDR=file_name             # 设置监听套接字路径,这必须是一个绝对路径名。默认为/tmp/mysql.sock
-DDEFAULT_CHARSET=charset_name    # 设置服务器的字符集。缺省情况下,MySQL使用latin1的(CP1252西欧)字符集。cmake/character_sets.cmake文件包含允许的字符集名称列表。也可以设置为UTF-8:-DDEFAULT_CHARSET=utf8
-DDEFAULT_COLLATION=collation_name  # 设置服务器的排序规则。
-DWITH_INNOBASE_STORAGE_ENGINE=1
-DWITH_ARCHIVE_STORAGE_ENGINE=1
-DWITH_BLACKHOLE_STORAGE_ENGINE=1
-DWITH_PERFSCHEMA_STORAGE_ENGINE=1
存储引擎选项:
MyISAM,MERGE,MEMORY,和CSV引擎是默认编译到服务器中,并不需要明确地安装。
静态编译一个存储引擎到服务器,使用-DWITH_engine_STORAGE_ENGINE= 1,可用的存储引擎值有:ARCHIVE, BLACKHOLE, EXAMPLE, FEDERATED, INNOBASE (InnoDB), PARTITION (partitioning support), 和PERFSCHEMA (Performance Schema)
-DMYSQL_DATADIR=dir_name                     设置mysql数据库文件目录
-DMYSQL_TCP_PORT=port_num                 设置mysql服务器监听端口,默认为3306
-DENABLE_DOWNLOADS=bool                    是否要下载可选的文件。例如,启用此选项(设置为1),cmake将下载谷歌所使用的测试套件运行单元测试。
注意:重新运行配置,需要删除CMakeCache.txt文件
[[email protected] mysql-5.6.34]# rm -f CMakeCache.txt
编译安装
[[email protected] mysql-5.6.34]# make && make install # 过程有些漫长
(2)初始化mysql5.6.34
[[email protected] ~]# cd /usr/local/mysql/
[[email protected] mysql]# chown -R mysql.mysql .
# 因为是root用户下编译安装完成的,mysql下所有文件默认属组和属主是root
[[email protected] mysql]# ll
total 68
drwxr-xr-x.  2 mysql mysql  4096 Oct 15 00:13 bin
-rw-r--r--.  1 mysql mysql 17987 Sep 30 19:41 COPYING
drwxr-xr-x.  3 mysql mysql  4096 Oct 15 00:13 data
drwxr-xr-x.  2 mysql mysql  4096 Oct 15 00:13 docs
drwxr-xr-x.  3 mysql mysql  4096 Oct 15 00:13 include
drwxr-xr-x.  3 mysql mysql  4096 Oct 15 00:13 lib
drwxr-xr-x.  4 mysql mysql  4096 Oct 15 00:13 man
drwxr-xr-x. 10 mysql mysql  4096 Oct 15 00:13 mysql-test
-rw-r--r--.  1 mysql mysql  2496 Sep 30 19:41 README
drwxr-xr-x.  2 mysql mysql  4096 Oct 15 00:13 scripts
drwxr-xr-x. 28 mysql mysql  4096 Oct 15 00:14 share
drwxr-xr-x.  4 mysql mysql  4096 Oct 15 00:14 sql-bench
drwxr-xr-x.  2 mysql mysql  4096 Oct 15 00:14 support-files
初始化data存放目录设置
[[email protected] mysql]# scripts/mysql_install_db --user=mysql --datadir=/mydata/data/
# 初始化mysqldata存放位置
[[email protected] mysql]# ls /mydata/data/ # 有数据说明初始化成功
ibdata1  ib_logfile0  ib_logfile1  mysql  performance_schema  test
初始化完成后mysql中目录文件的属主应改回成root,以免被别人攻破mysql用户密码而带来数据破坏等
[[email protected] mysql]# pwd
/usr/local/mysql
[[email protected] mysql]# chown root -R /usr/local/mysql/*
3)为mysql提供主配置文件
初始化后会自动在当前目录下创建一个my.cnf配置文件,直接修改就可以(在mysql 5.6 以后配置文件自动生成,不需要我们再进行复制),但是/usr/local/mysql/support-files目录下,有默认配置的配置文件,可以拷贝过去。
[[email protected] mysql]# cd support-files/
[[email protected] support-files]# ls
binary-configure  my-default.cnf       mysql-log-rotate
magic             mysqld_multi.server  mysql.server
[[email protected] support-files]# cp my-default.cnf /etc/my.cnf
cp: overwrite `/etc/my.cnf‘? y
修改配置文件
[[email protected] mysql]# vim /etc/my.cnf    # [mysqld]后添加以下三项
[mysqld]
datadir = /mydata/data
innodb_file_per_table = ON
skip_name_resolve = ON
4)为mysql提供sysv服务脚本并启动服务
[[email protected] support-files]# pwd
/usr/local/mysql/support-files
[[email protected] support-files]# cp mysql.server /etc/init.d/mysqld    # mysql源码包自带服务脚本
[[email protected] support-files]# chkconfig --add mysqld
[[email protected] support-files]# chkconfig mysqld on
[[email protected] support-files]# chkconfig mysqld --list
mysqld         	0:off	1:off	2:on	3:on	4:on	5:on	6:off
[[email protected] support-files]# /etc/init.d/mysqld start
Starting MySQL....
[[email protected] support-files]# netstat -tulnp | grep mysql    # 已经监听
tcp        0      0 :::3306                     :::*                        LISTEN      19605/mysqld
5)输出mysql的man手册至man命令的查找路径
[[email protected] support-files]# vim /etc/man.config
MANPATH /usr/local/mysql/man
6)输出mysql的头文件至系统头文件路径/usr/include
[[email protected] mysql]# ln -sv /usr/local/mysql/include/ /usr/include/mysql
`/usr/include/mysql‘ -> `/usr/local/mysql/include/‘
7)输出mysql的库文件给系统库查找路径
[[email protected] mysql]# vim /etc/ld.so.conf.d/mysql.conf
/usr/local/mysql/lib    # 在系统的库文件自动加载目录下新建mysql.conf文件,直接将mysql的库路径路径写入
[[email protected] mysql]# ldconfig -v    #  让系统重新读取库文件
8)修改PATH环境变量,让系统可以直接使用mysql的相关命令
[[email protected] mysql]# vim /etc/profile.d/mysql.sh     # 添加环境变量(与添加httpd是一样的)
export PATH=$PATH:/usr/local/mysql/bin
[[email protected] mysql]# source /etc/profile.d/mysql.sh    # 重新读取一下环境变量
9)重启mysql,测试并连接mysql
[[email protected] mysql]# /etc/init.d/mysqld restart
Shutting down MySQL..                                      [  OK  ]
Starting MySQL.                                            [  OK  ]
[[email protected] mysql]# mysql
Welcome to the MySQL monitor.  Commands end with ; or \g.
Your MySQL connection id is 1
Server version: 5.6.34 Source distribution

Copyright (c) 2000, 2016, Oracle and/or its affiliates. All rights reserved.

Oracle is a registered trademark of Oracle Corporation and/or its
affiliates. Other names may be trademarks of their respective
owners.

Type ‘help;‘ or ‘\h‘ for help. Type ‘\c‘ to clear the current input statement.

mysql> show databases;
+--------------------+
| Database           |
+--------------------+
| information_schema |
| mysql              |
| performance_schema |
| test               |
+--------------------+
4 rows in set (0.00 sec)
4、编译安装PHP
个人觉得php的编译安装不是非常必要,除非要用到比较新版的php,而系统默认的版本有太低。
如果不编译安装,直接yum安装即可
yum install -y php php-mysql
(1)安装图片资源软件
[[email protected] src]# yum -y install gd gd-devel libjpeg libjpeg-devel libpng libpng-devel freetype freetype-devel libpng libpng-devel
(2)安装libxml(扩展标记语言)库
[[email protected] src]# yum -y install libxml2 libxml2-devel
(3)安装bzip2压缩库
[[email protected] src]# yum install -y bzip2 bzip2-devel
(4)安装mcrypt加密库(这个是从网上下载的,下载路径在文档开头已经说过了)
[[email protected] src]# rpm -ivh libmcrypt-2.5.8-9.el6.x86_64.rpm
warning: libmcrypt-2.5.8-9.el6.x86_64.rpm: Header V3 RSA/SHA256 Signature, key ID 0608b895: NOKEY
Preparing...                ########################################### [100%]
   1:libmcrypt              ########################################### [100%]
[[email protected] src]# rpm -ivh libmcrypt-devel-2.5.8-9.el6.x86_64.rpm
warning: libmcrypt-devel-2.5.8-9.el6.x86_64.rpm: Header V3 RSA/SHA256 Signature, key ID 0608b895: NOKEY
Preparing...                ########################################### [100%]
   1:libmcrypt-devel        ########################################### [100%]
(5)编译安装php 5.4.16
[[email protected] src]# tar -zxvf php-5.5.38.tar.gz ^C
[[email protected] src]# cd php-5.5.38
[[email protected] php-5.5.38]# ./configure --prefix=/usr/local/php --with-mysql=/usr/local/mysql --with-openssl --with-mysqli=/usr/local/mysql/bin/mysql_config --enable-mbstring --with-gd --with-freetype-dir --with-jpeg-dir --with-png-dir --with-zlib --with-libxml-dir=/usr --enable-xml  --enable-sockets --with-apxs2=/usr/local/apache/bin/apxs --with-mcrypt --with-config-file-path=/etc --with-config-file-scan-dir=/etc/php.d --with-bz2  --enable-maintainer-zts
--with-mysql=/usr/local/mysql :mysql相关
--with-openssl :让其能够支持openssl功能
--with-mysqli=/usr/local/mysql/bin/mysql_config :mysql的另外一个接口,让mysql与php交互的接口;接口程序是mysql_config,是个二进制程序
--enable-mbstring :多字节string,支持中文或者是非一个字节能够表示的语言
--with-gd : 支持gd库
--with-freetpye-dir:支持freetype功能,freetype:自由的可移植的字体库,可以实现去引用特定字体的
--with-jpeg-dir:支持jpeg图片
--with-png-dir:支持png图片
--with-zlib:互联网上常用的,通用格式的压缩库,让数据文件先压缩再传送给客户端
--with-libxml-dir:xml(扩展标记语言),现在的很多系统在实现数据交互的时候,都要基于xml来实现,所以要php支持xml,并且让其知道其库文件所在位置
--enable-sockets:让php支持基于套接字的通信
--with-apxs2:基于apxs实现让php编译成apace模块
--with-mcrypt:支持加密功能的,额外的加密库
--with-config-file-path :php配置文件的路径放在了什么地方 主配置文件是php.ini
--with-config-file-scan :主配置文件的片段,也是配置文件,这个路径下以.ini结尾的都是配置文件片段
--with-bz2 :压缩库
--enable-maintainer-zts :这一项的使用取决于apache是什么类型的,apache使用的是prefork就不需要;如果使用的是event或者是worker就要添加这一项;apache以线程工作就必须编译这一项

[[email protected] php-5.5.38]# make && make install # 编译安装
(6)为php提供配置文件
[[email protected] php-5.5.38]# ls | grep php.ini
php.ini-development    # 用于开发环境
php.ini-production     # 用于生产环境:把这项复制到/etc/目录下重命名为php.ini即可;不需要启动服务,因为已经编译成apache模块了;是否启动服务要看工作模型,当做成fastcgi要启动服务
[[email protected] php-5.5.38]# cp php.ini-production /etc/php.ini
# 在编译的时候已经指定了配置文件的路径,所以php会自动到/etc/目录下去找其配置文件
5、配置httpd服务,使其支持php
1)编辑apache配置文件httpd.conf,以apache支持php
(1)首先要在httpd配置文件中定义,使httpd能够处理php结尾的文件 ,全文查找AddType字段,添加以下内容
[[email protected] ~]# vim /etc/httpd/httpd.conf    # 添加三行
AddType application/x-compress .Z .php
AddType application/x-gzip .gz .tgz .phps
PHPIniDir "/usr/local/php"
(2)定位至DirectoryIndex index.html修改为
DirectoryIndex index.html index.php
2)重启httpd服务
[[email protected] ~]# httpd -t
Syntax OK
[[email protected] ~]# /etc/init.d/httpd reload
Reloading httpd:
[[email protected] ~]# /etc/init.d/httpd restart
Stopping httpd:                                            [  OK  ]
Starting httpd:
3)添加测试文件,测试
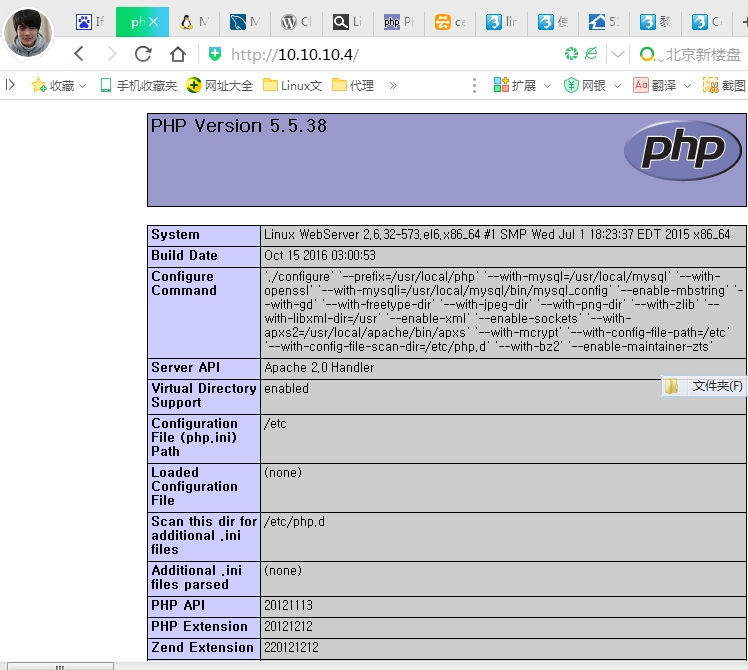
[[email protected] ~]# vim /usr/local/apache/htdocs/index.php     # 默认路径
<?
        phpinfo();
?>
测试页面
6、安装Xcache加速器
1)下载Xcache,解压
[[email protected] xcache-3.2.0]# wget http://xcache.lighttpd.net/pub/Releases/3.2.0/xcache-3.2.0.tar.gz
[[email protected] xcache-3.2.0]# tar -zxvf xcache-3.2.0.tar.gz
[[email protected] xcache-3.2.0]# cd xcache-3.2.0
2)编译安装Xcache 3.2
[[email protected] xcache-3.2.0]# ./configure --enable-xcache --with-php-config=/usr/local/php/bin/php-config
[[email protected] xcache-3.2.0]# make && make install
3)编辑php.ini,整合php和xcache
[[email protected] xcache-3.2.0]# mkdir /etc/php.d
[[email protected] xcache-3.2.0]# cp xcache.ini /etc/php.d/ # 也可以直接把xcache.ini配置信息直接追加到php.ini配置文件中

[[email protected] xcache-3.2.0]# /usr/local/php/bin/phpize
Configuring for:
PHP Api Version:         20121113
Zend Module Api No:      20121212 # 查看模块NO号
Zend Extension Api No:   220121212

[email protected] xcache-3.2.0]# vim /etc/php.d/xcache.ini # 把extension = 后填写如下格式
[xcache-common]
;; non-Windows example:
extension = /usr/local/php/lib/php/extensions/no-debug-zts-20121212/xcache.so    # 这个根据实际路径下文件的名称来填写
;; Windows example:
; extension = php_xcache.dll
4)重启apache并测试
[[email protected] xcache-3.2.0]# httpd -t
Syntax OK
[[email protected] xcache-3.2.0]# /etc/init.d/httpd restart
Stopping httpd:                                            [  OK  ]
Starting httpd:
测试页面,有xcache版本号,说明从,如下:
7、启用服务器状态页面
说明:
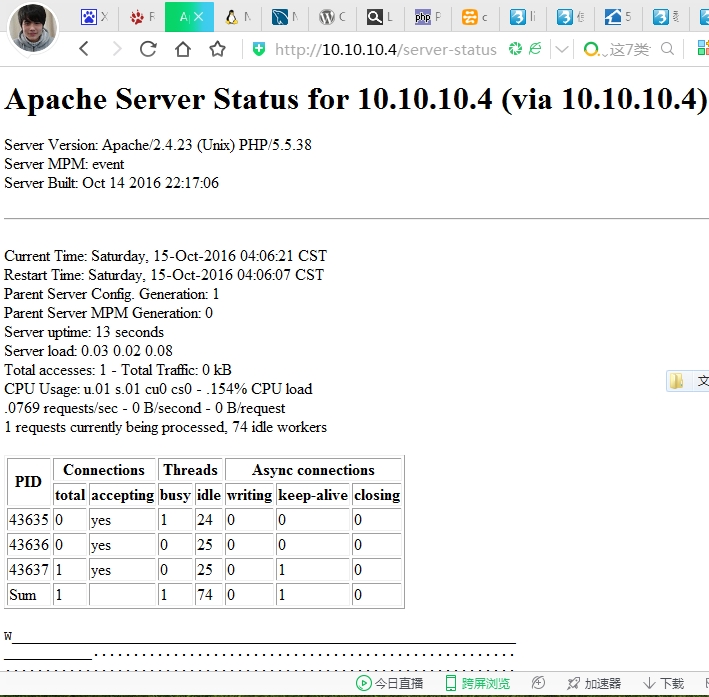
mod_status模块可以让管理员查看服务器的执行状态,它通过一个HTML页面展示了当前服务器的统计数据。这些数据通常包括但不限于:
(1) 处于工作状态的worker进程数;
(2) 空闲状态的worker进程数;
(3) 每个worker的状态,包括此worker已经响应的请求数,及由此worker发送的内容的字节数;
(4) 当前服务器总共发送的字节数;
(5) 服务器自上次启动或重启以来至当前的时长;
(6) 平均每秒钟响应的请求数、平均每秒钟发送的字节数、平均每个请求所请求内容的字节数;
启用状态页面的方法很简单,只需要在主配置文件中添加如下内容即可:
[ro[email protected] ~]# vim /etc/httpd/httpd.conf
<Location /server-status>
    SetHandler server-status
    Require all granted
</Location>
需要提醒的是,这里的状态信息不应该被所有人随意访问,因此,应该限制仅允许某些特定地址的客户端查看。比如使用Require ip 172.16.0.0/16来限制仅允许指定网段的主机查看此页面。
效果图:
8、PHP连接Mysql测试
编辑apache的默认页面/usr/local/apache/htdocs/index.php
[[email protected] ~]# vim /usr/local/apache/htdocs/index.php
<?
        $conn=mysql_connect(‘localhost‘,‘root‘,‘‘);
        if ($conn)
                echo "Success";
        else
                echo "Failure";
?>
测试页面,连接mysql成功
8、安装部署WordPress
本文出自 “汪立明” 博客,请务必保留此出处http://afterdawn.blog.51cto.com/7503144/1876171
以上是关于编译安装LAMP环境:httpd-2.4+mysql5.6+php5.5的主要内容,如果未能解决你的问题,请参考以下文章


