本地手动一步步搭建WNMP环境(nginx+php+mysql) Windows平台
Posted 蓝天上的云℡
tags:
篇首语:本文由小常识网(cha138.com)小编为大家整理,主要介绍了本地手动一步步搭建WNMP环境(nginx+php+mysql) Windows平台相关的知识,希望对你有一定的参考价值。
环境:Windows 10 x64
参考文章: WNMP完整教程 windows下PHP环境的搭建
我自定义安装后的目录结构:
+WNMP
++mysql_Server-8.0.13
++nginx-1.15.8
++php-7.3.1
++www
\\wnmp WNMP总目录 ├─MySQL_Server-8.0.13 MySQL安装目录 ├─nginx Nginx1.15.8安装目录 ├─php PHP7.3.1安装目录 ├─www 网站目录C:\\WNMP\\MySQL_Server-8.0.13\\bin;C:\\WNMP\\nginx;C:\\WNMP\\php;
一、下载
MySQL下载:https://www.mysql.com/why-mysql/windows/
(我选的是MySQL Installer for Windows)关于web版和普通版的区别,只需要注意看下载页的说明。官网有帮助可以看。
PHP下载:https://windows.php.net/download/
我选的是x64最新版的Non Thread Safe版
(在Windows下是用FastCGI模式运行php,所以就没必要使用线程安全检查,选用非线程安全版效率会高一些。) 区别在此
Nginx下载:https://nginx.org/en/download.html
我选了 nginx/Windows-1.15.8
二、安装/配置
1,MySQL8的msi包安装
更详细的安装可看Windows上安装MySQL
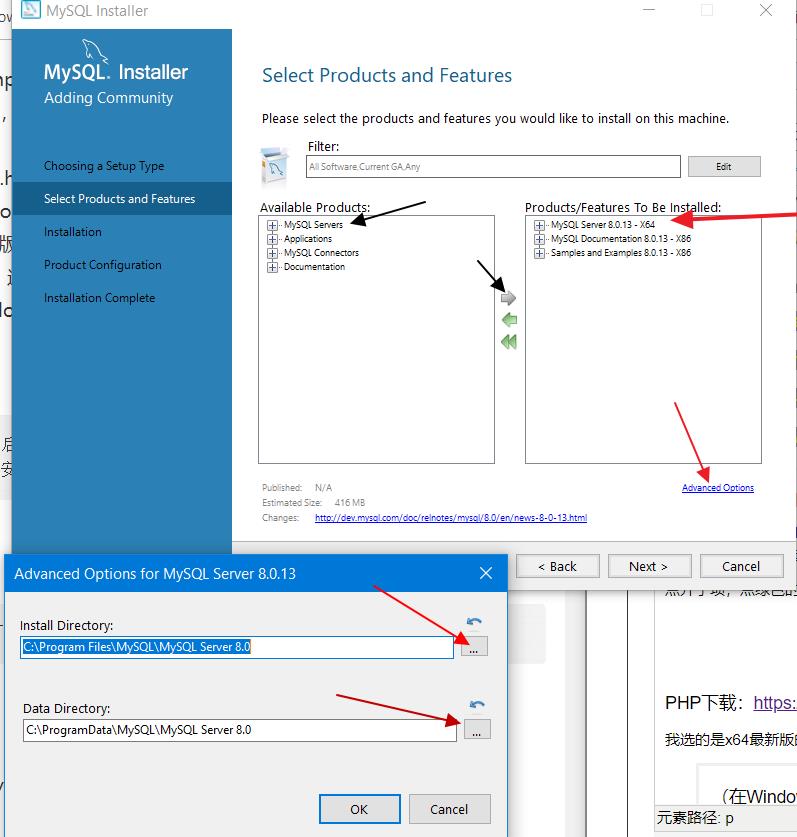
安装过程我选了自定义安装,Server和一些示例帮助
点开子项,点绿色的箭头就是添加功能。然后点右侧功能就能Advanced Options自定义安装路径
我只改了安装路径为*WNMP\\MySQL_Server-8.0.13

然后一路确定到Accounts and Roles那一步,好了,现在设置你想要的root账号密码,并添加一个常用非root用户,然后就一路确定到底。最后它会让你测试连接到你刚安装好的MySQL服务。最后本地MySQL服务器配置完成,它会给你一个log(可在log里搜索一下是否有错误)
2,安装PHP
解压php压缩包到wnmp目录下,复制粘贴php安装目录(我的是php)里的php.ini-development为php.ini
[文章引用]
逐一查找到如下代码修改并将前面的分号去掉(具体含义请谷歌百度必应)
    ;extension_dir = "ext"
  ;date.timezone =
    ;cgi.force_redirect = 1
    ;cgi.fix_pathinfo=1
    ;fastcgi.impersonate = 1
    ;cgi.rfc2616_headers = 0
改为:
    extension_dir = "C:/WNMP/php/ext"  也就是 你的php安装目录/ext
    date.timezone = Asia/Shanghai
  cgi.force_redirect = 1
    cgi.fix_pathinfo=1
    fastcgi.impersonate = 1
    cgi.rfc2616_headers = 0
3,安装Nginx
[文章引用自韶华倾负]1.将Nginx压缩包解压到建好的wnmp/nginx文件夹中; 2.打开nginx/conf/nginx.conf进行配置 将 server { listen 80; server_name localhost; #charset koi8-r; #access_log logs/host.access.log main; location / { root html; index index.html index.htm; } # pass the PHP scripts to FastCGI server listening on 127.0.0.1:9000 # #location ~ \\.php$ { # root html; # fastcgi_pass 127.0.0.1:9000; # fastcgi_index index.php; # fastcgi_param SCRIPT_FILENAME /scripts$fastcgi_script_name; # include fastcgi_params; #} } 注:
【由于80和默认IIS冲突,我自己的改成了listen 82端口】
配置文件修改: server { listen 80; server_name localhost; #charset koi8-r; #access_log logs/host.access.log main; location / { root C:/WNMP/www; index index.html index.htm index.php; } # pass the PHP scripts to FastCGI server listening on 127.0.0.1:9000 # location ~ \\.php$ { root C:/WNMP/www; fastcgi_pass 127.0.0.1:9000; fastcgi_index index.php; fastcgi_param SCRIPT_FILENAME $document_root$fastcgi_script_name; include fastcgi_params; } } 保存后双击nginx.exe就可以直接运行Nginx服务器(双击nginx.exe),打开浏览器输入localhost就可以看到欢迎页。
配置成功效果:

附上Nginx命令
切换到nginx目录重载nginx :
nginx -s reload
三、测试
配置环境后查看版本号
mysqld --version
nginx -v
php -v
1,打开cmd,切换到php-cgi.exe所在目录:
php-cgi.exe -b 127.0.0.1:9000 -c php.ini
启动后最小化,再新开一个cmd,输入
netstat -a|findstr "9000"
查看9000端口是否被监听,是则说明cgi运行成功。
2.在www目录下新建index.php<?php phpinfo(); ?>
测试MySQL:
再nginx的html目录(即WNMP\\www)下新建MySqltest.php
<?php
$link = new mysqli(\'localhost\', \'root\', \'root\');
if(!$link) {
    echo "FAILD!";
} else {
    echo "OK!";
}
红色部分的请填写自己的服务器地址(我的是localhost:82)、数据库用户名、密码
内容含义参考:https://www.w3schools.com/php/func_mysqli_connect.asp浏览器访问 http://localhost/sqltest.php (如果nginx用82端口,请访问http://localhost:82/sqltest.php)
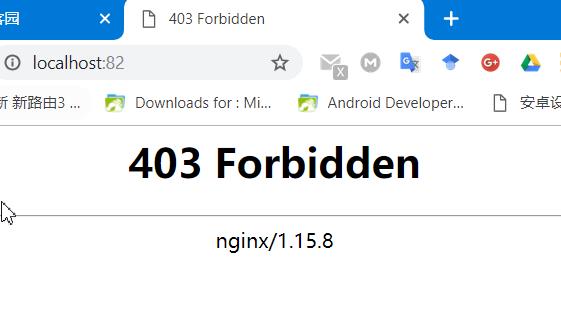
若结果如下,即红色部分填写出错(登录数据库失败)

如果没问题,那本地WNMP就初步配置好了。
附上:Nginx开发从入门到精通 淘宝工程师
以上是关于本地手动一步步搭建WNMP环境(nginx+php+mysql) Windows平台的主要内容,如果未能解决你的问题,请参考以下文章