ubuntu 搭建php7-memcached和memcache扩展
Posted 付俊捷
tags:
篇首语:本文由小常识网(cha138.com)小编为大家整理,主要介绍了ubuntu 搭建php7-memcached和memcache扩展相关的知识,希望对你有一定的参考价值。
参考链接1:https://serversforhackers.com/c/installing-php-7-with-memcached
参考链接2:https://hanxv.cn/archives/25.html
环境:ubuntu16.04, php7.0, apache2
安装 phpize
- # phpize 是用来扩展 php 扩展模块的
- # php7.0 的 phpize 包含在 php7.0-dev 里面
- sudo apt-get install php7.0-dev
- # 使用
- phpize 或 /usr/bin/phpize
安装 memcached
- # 安装依赖
- sudo apt-get install memcached
- sudo apt-get install libmemcached11 libmemcached-dev libmemcachedutil2
* 安装 memcached 扩展*
- # 查看 php7.-0 的软件包
- apt-cache search -n php7.0
- # 下载 memcached 到本地仓库,并切换到 php7 版本
- git clone https://github.com/php-memcached-dev/php-memcached.git
- cd php-memcached/
- git checkout php7
- # 执行配置文件,注意:这一步可能会出错,原因可能是缺少 memcached 依赖, 安装上面安装便可
- phpize
- #大写的注意!!
- ./configure --disable-memcached-sasl
- 注意:ubuntu提示checking for pkg-config... nopkg-config not found
- configure: error: Please reinstall the pkg-config distribution
- 解决:安装pkg-config
- sudo apt-get install pkg-config
- 再次执行
- ./configure --disable-memcached-sasl 命令即可
- # 编译安装
- make && make install
- 编译安装完成后会返回 buil completed 提示信息以及你的扩展地址
- ##一定要记住!很重要!返回的扩展地址 Installing shared extensions: /usr/lib/php/20151012/
- #把扩展添加进php中
- vi /etc/php/7.0/fpm/conf.d/memcached.ini
- 写入:extension=/usr/lib/php/20151012/memcached.so
- vi /etc/php/7.0/apache2/php.ini 中
- 写入:extension=/usr/lib/php/20151012/memcached.so
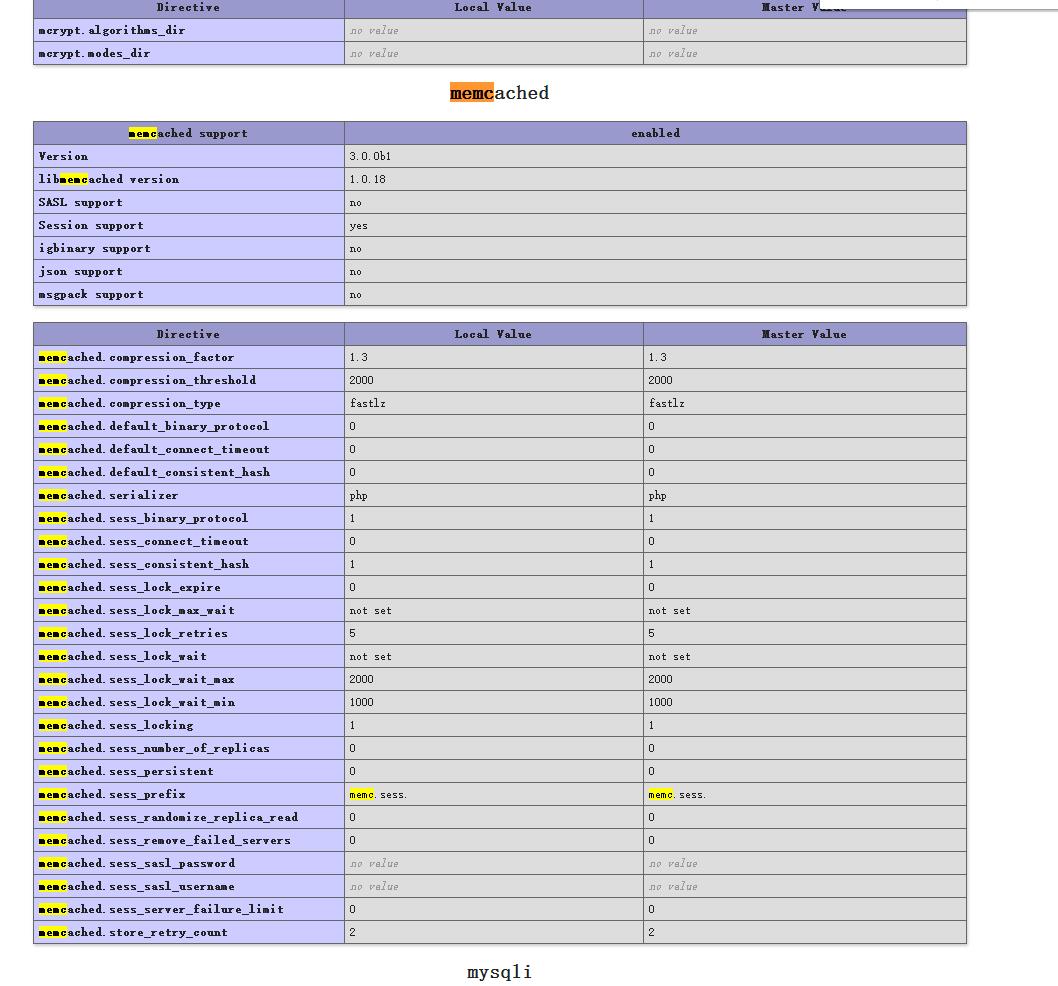
- # 执行 phpinfo.php 查看 memcached 是否被添加

Memcache存放Session
1、如果你能修改到服务器配置文件,那就打开打开php.ini(ubuntu php7 在/etc/php/7.0/apache2/php。ini)
- vi /etc/php/7.0/apache2/php.ini
- 重启服务sudo /etc/init.d/apache2 restart
- 找到session.save_handler,并设为 session.save_handler = memcache,把session.save_path前面的分号去掉,并设置为 session.save_path = “tcp://127.0.0.1:11211″
- session.save_handler = memcache
- session.save_path = “tcp://127.0.0.1:11211″
- 重启服务sudo service apache2 restart
查看phpinfo 中的设置

之后记得要重启apache服务器
重启服务sudo service apache2 restart
查看一下phpinfo()中的 “Registered save handlers” 会有 “files user memcache” 这3个可用。如果没有的话重新安装一下或者确定自己是否有重启apache服务器。
或者某个目录下的 .htaccess :
php_value session.save_handler “memcache”
php_value session.save_path “tcp://127.0.0.1:11211″
再或者在某个一个应用中:
ini_set(“session.save_handler”, “memcache”);
ini_set(“session.save_path”, “tcp://127.0.0.1:11211″);
注意:
使用多个 memcached server 时用逗号”,”隔开,并且和 Memcache::addServer() 文档中说明的一样,可以带额外的参数”persistent”、”weight”、”timeout”、”retry_interval” 等等,类似这样的:”tcp://host1:port1?persistent=1&weight=2,tcp://host2:port2″ 。
二:php安装memcace扩展
安装过程如下所示
- [root@VM_114_93_centos local]# git clone https://github.com/websupport-sk/pecl-memcache memcache
- [root@VM_114_93_centos memcache-3.0.8]# cd memcache
- [root@VM_114_93_centos memcache-3.0.8]# phpize
- [root@VM_114_93_centos memcache-3.0.8]# whereis php-config
- php-config: /usr/bin/php-config /usr/share/man/man1/php-config.1.gz
- [root@VM_114_93_centos memcache-3.0.8]# ./configure --enable-memcache --with-php-config=/usr/bin/php-config --with-zlib-dir
- [root@VM_114_93_centos memcache-3.0.8]# make
- [root@VM_114_93_centos memcache-3.0.8]# make install
- 安装编译完成(吐槽,这个资源找了2小时恶心,以后一定要读php源码 memcache扩展没更新到php7,所以以前的一直安装失败)
- 安装成功提示信息,你的扩展位置 Installing shared extensions: /usr/lib/php/20151012/
- 可以切换进入查看下你的memcache.so 是否有
- cd /usr/lib/php/20151012
- ls
- 提示如下图

########################################################################
老方法的安装memcache会报错!
这段不要操作
这段不要操作
这段不要操作
这段不要操作
这段不要操作
这段不要操作
这段不要操作
如果make完以后报错如下(是因为
还不支持在 PHP7 下安装 memcache 扩展,
https://pecl.php.net/package/memcache
2013年以来为更新过。此路不通只能另想办法,同样是到 github 上碰碰运气。搜索 pecl memcache
https://github.com/search?utf8=%E2%9C%93&q=pecl+memcache&type=Repositories&ref=searchresults
其中第一个(https://github.com/websupport-sk/pecl-memcache)就是想要的,并且代码已经支持到 PHP7,立即下载代码编译:
)
请进行上面的安装方法。
- make: *** [memcache_pool.lo] Error 1
- 1
是因为没有安装zlib,执行以下命令后,重新安装
- yum -y install zlib-devel
这段不要操作
这段不要操作
这段不要操作
这段不要操作
这段不要操作
这段不要操作
###################################################################
此时就可以在相关目录中看到memcache.so
在php.ini中加入以下配置:
- extension=/usr/lib/php/20151012/memcache.so
- 1
然后重启Apache,看phpinfo中

工作到这里 完美!看上图
http://blog.csdn.net/qq_28602957/article/details/52781222
http://www.lnmp.cn/install-memcache-and-memcached-extends-under-php7.html
https://github.com/websupport-sk/pecl-memcache
问题:我phpinfo中已经有了memcache 和memcached扩展
但是无法new他 提示没有这个类
答!
请不要使用命令行php test.php 来测试 肯定找不到!!!

你用浏览器打开一切正常!!!

PHP 连接 Memcached
<?php
$memcache = new Memcache; //创建一个memcache对象
$memcache->connect(\'localhost\', 11211) or die ("Could not connect"); //连接Memcached服务器
$memcache->set(\'key\', \'test\'); //设置一个变量到内存中,名称是key 值是test
$get_value = $memcache->get(\'key\'); //从内存中取出key的值
echo $get_value;
?>
查看成功!

接下来就开始使用PHP操作Memcached啦!
1.创建一个Memcached对象
- $m = new Memcached();
- 1
2.传入一台或多台服务器
- //传入一台服务器
- $m->addServer(\'127.0.0.1\',\'11211\');
- //传入多台服务器
- $servers = array(
- array(\'127.0.0.1\',\'11211\'),
- array(\'127.0.0.2\',\'11211\')
- );
- $m->addServers($servers);
- //查看一下运行状态
- print_r($m->getStats());
显示结果为空。因为报错了
多台会报错的,注释掉多台服务器,链接成功

以上是关于ubuntu 搭建php7-memcached和memcache扩展的主要内容,如果未能解决你的问题,请参考以下文章