OSS(Object Storage Service)进行上传图片,下载图片(详细看文档可以完成操作)
Posted 有时间指导毕业设计
tags:
篇首语:本文由小常识网(cha138.com)小编为大家整理,主要介绍了OSS(Object Storage Service)进行上传图片,下载图片(详细看文档可以完成操作)相关的知识,希望对你有一定的参考价值。
文章目录
1.单体前后端项目上传
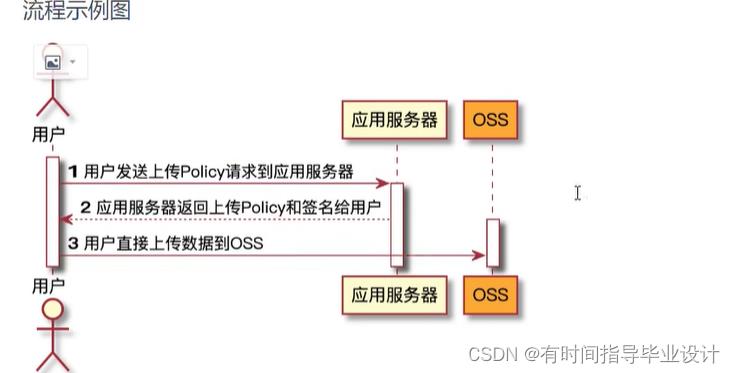
1.上传流程
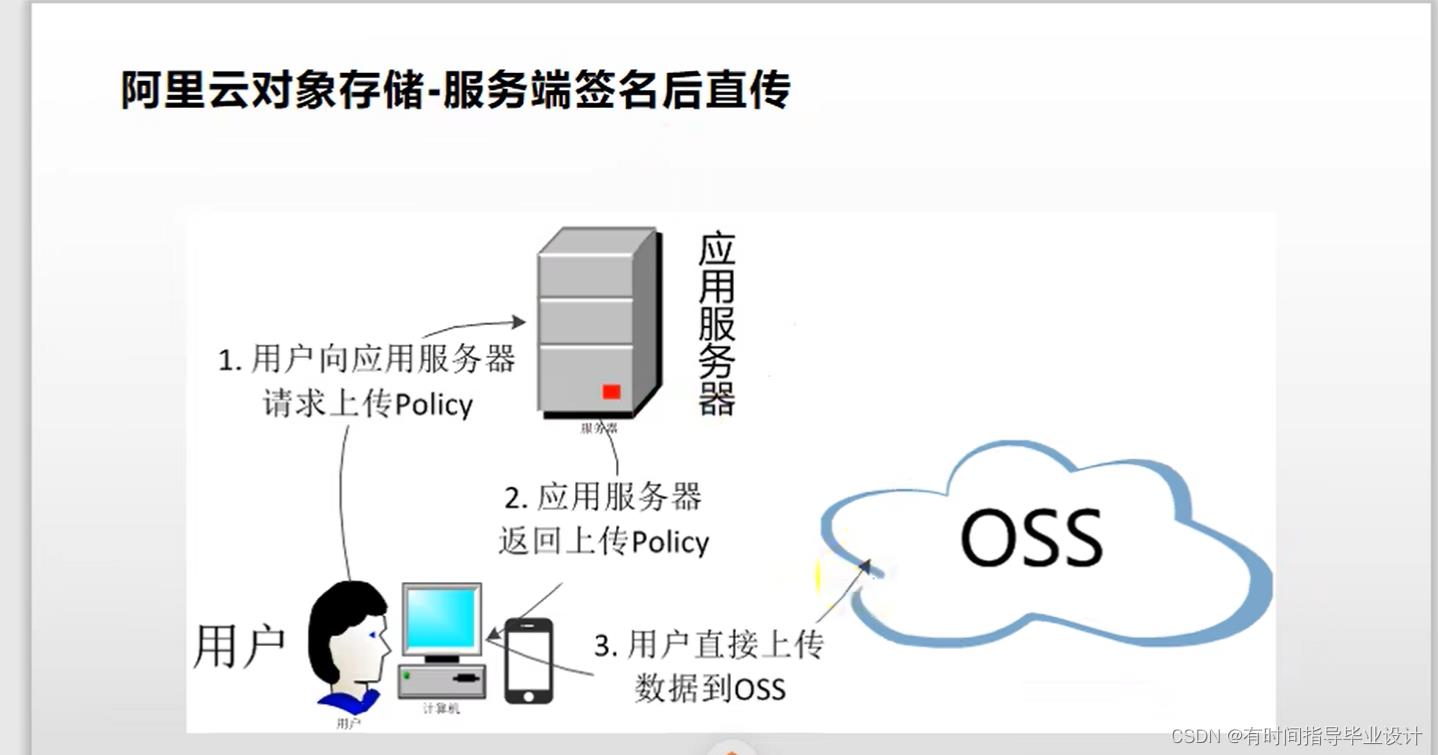
这样有利于保护自己的账号和密码不被泄露,通过账号密码生成的防伪笔名进行验证是否正确
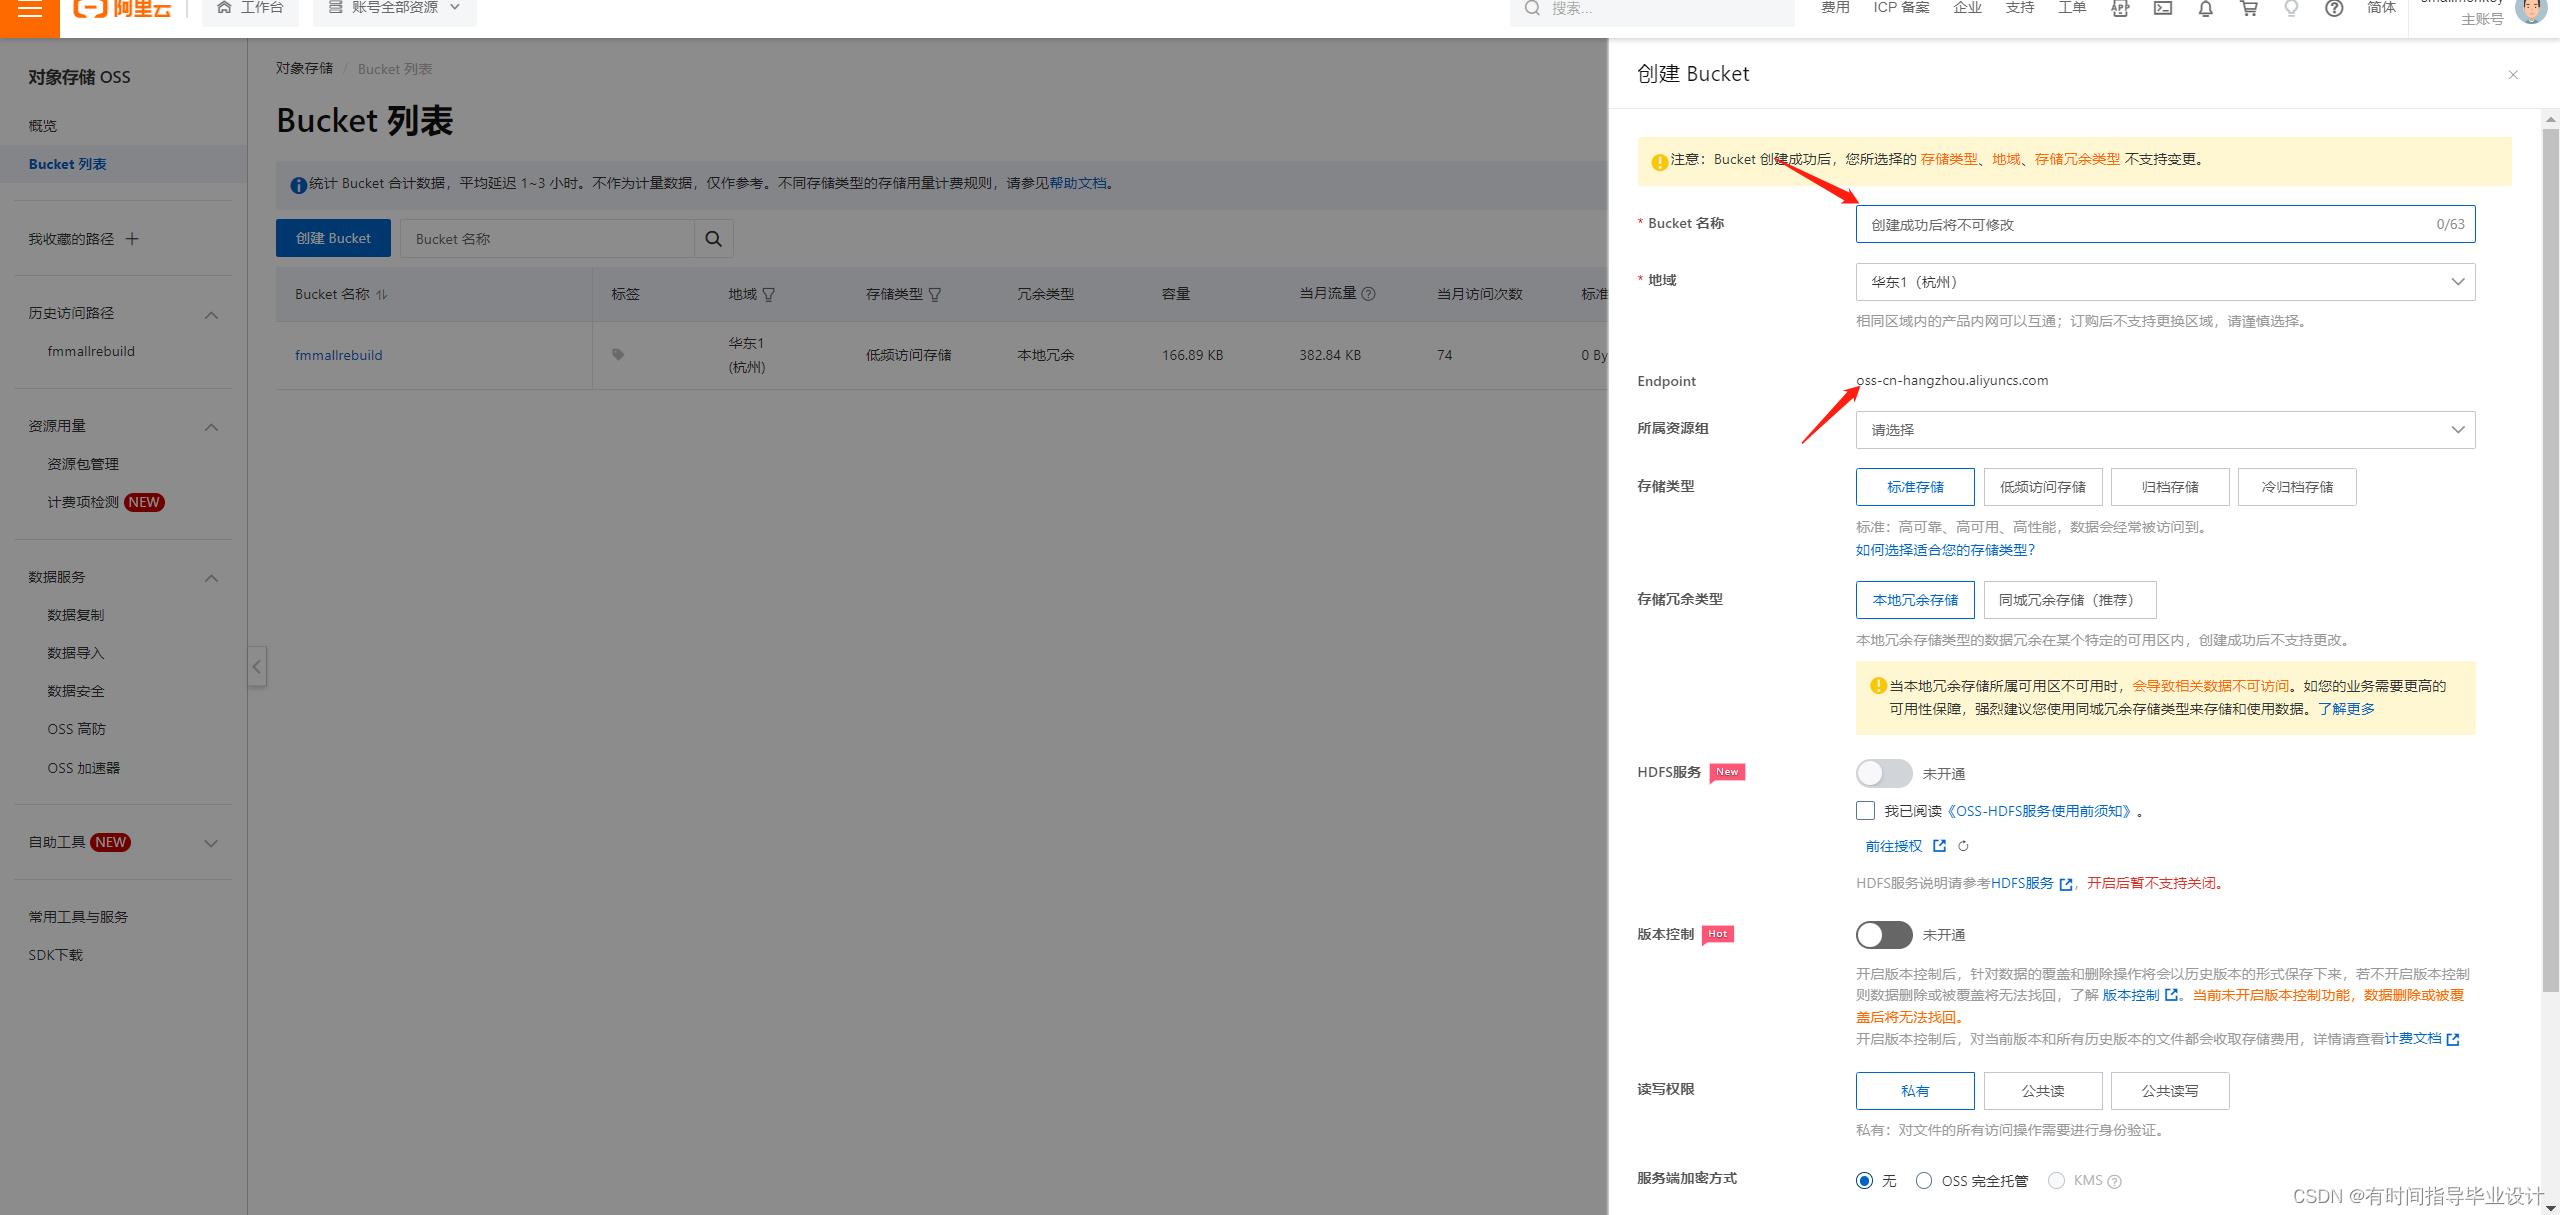
2. BuckName 和EndPoint
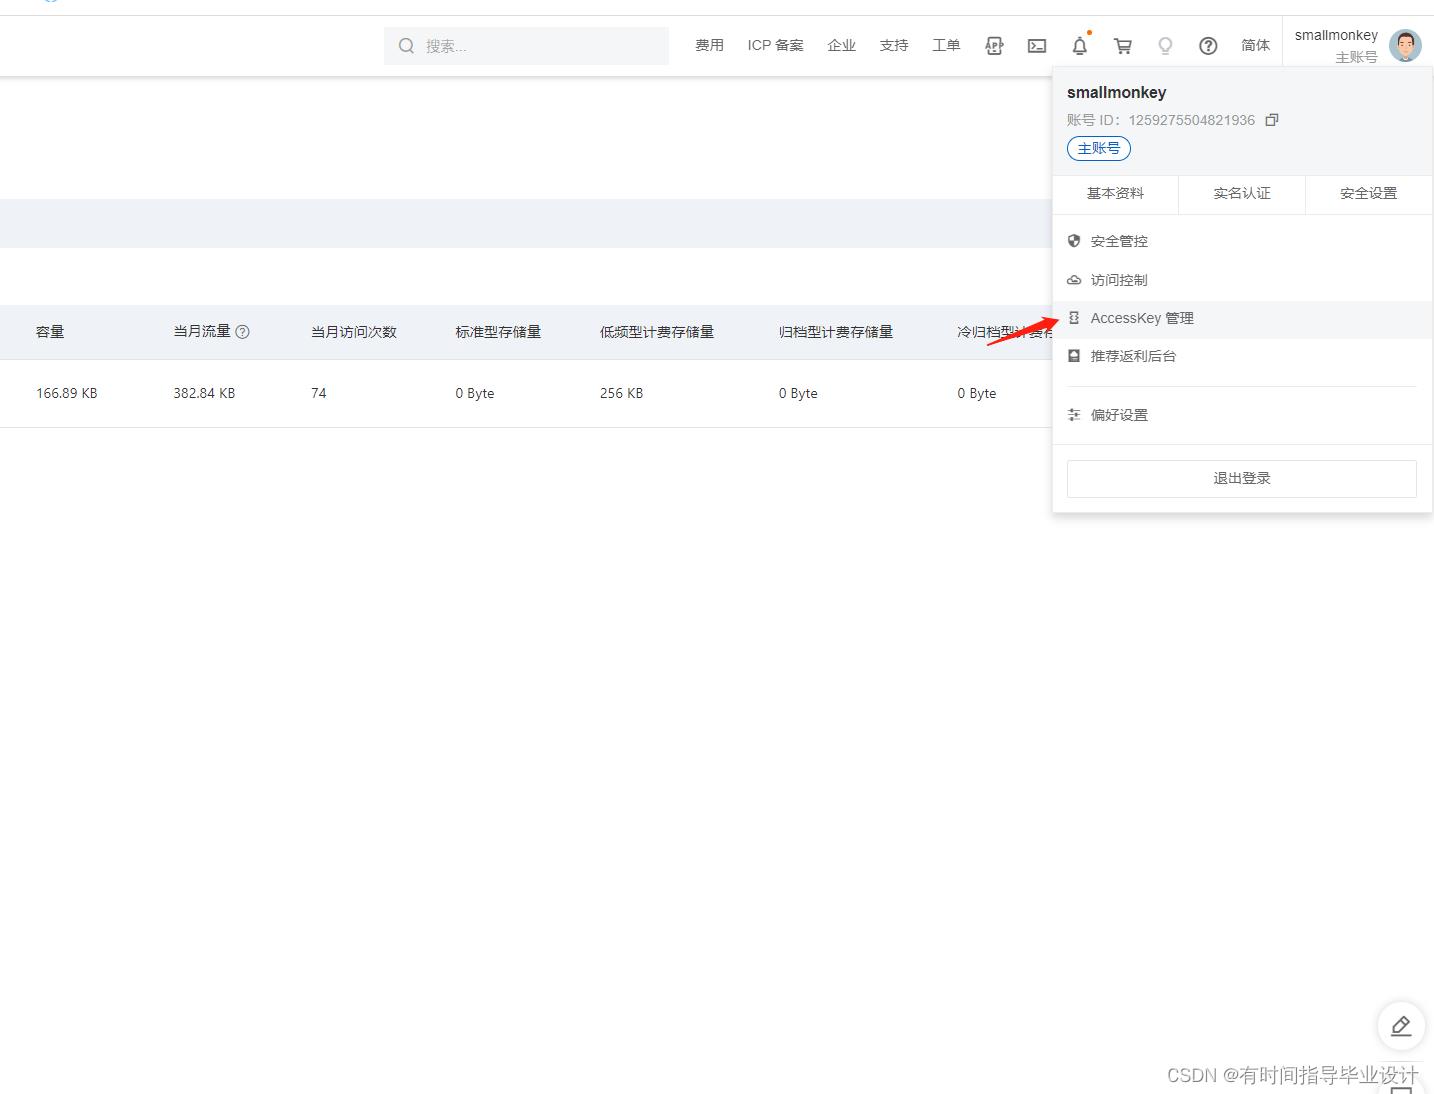
3. AccessKey 和Access Secret(创建RAM(Resource Access Manage)的子账号,然后可以获得Accesskey和Acess Secret)
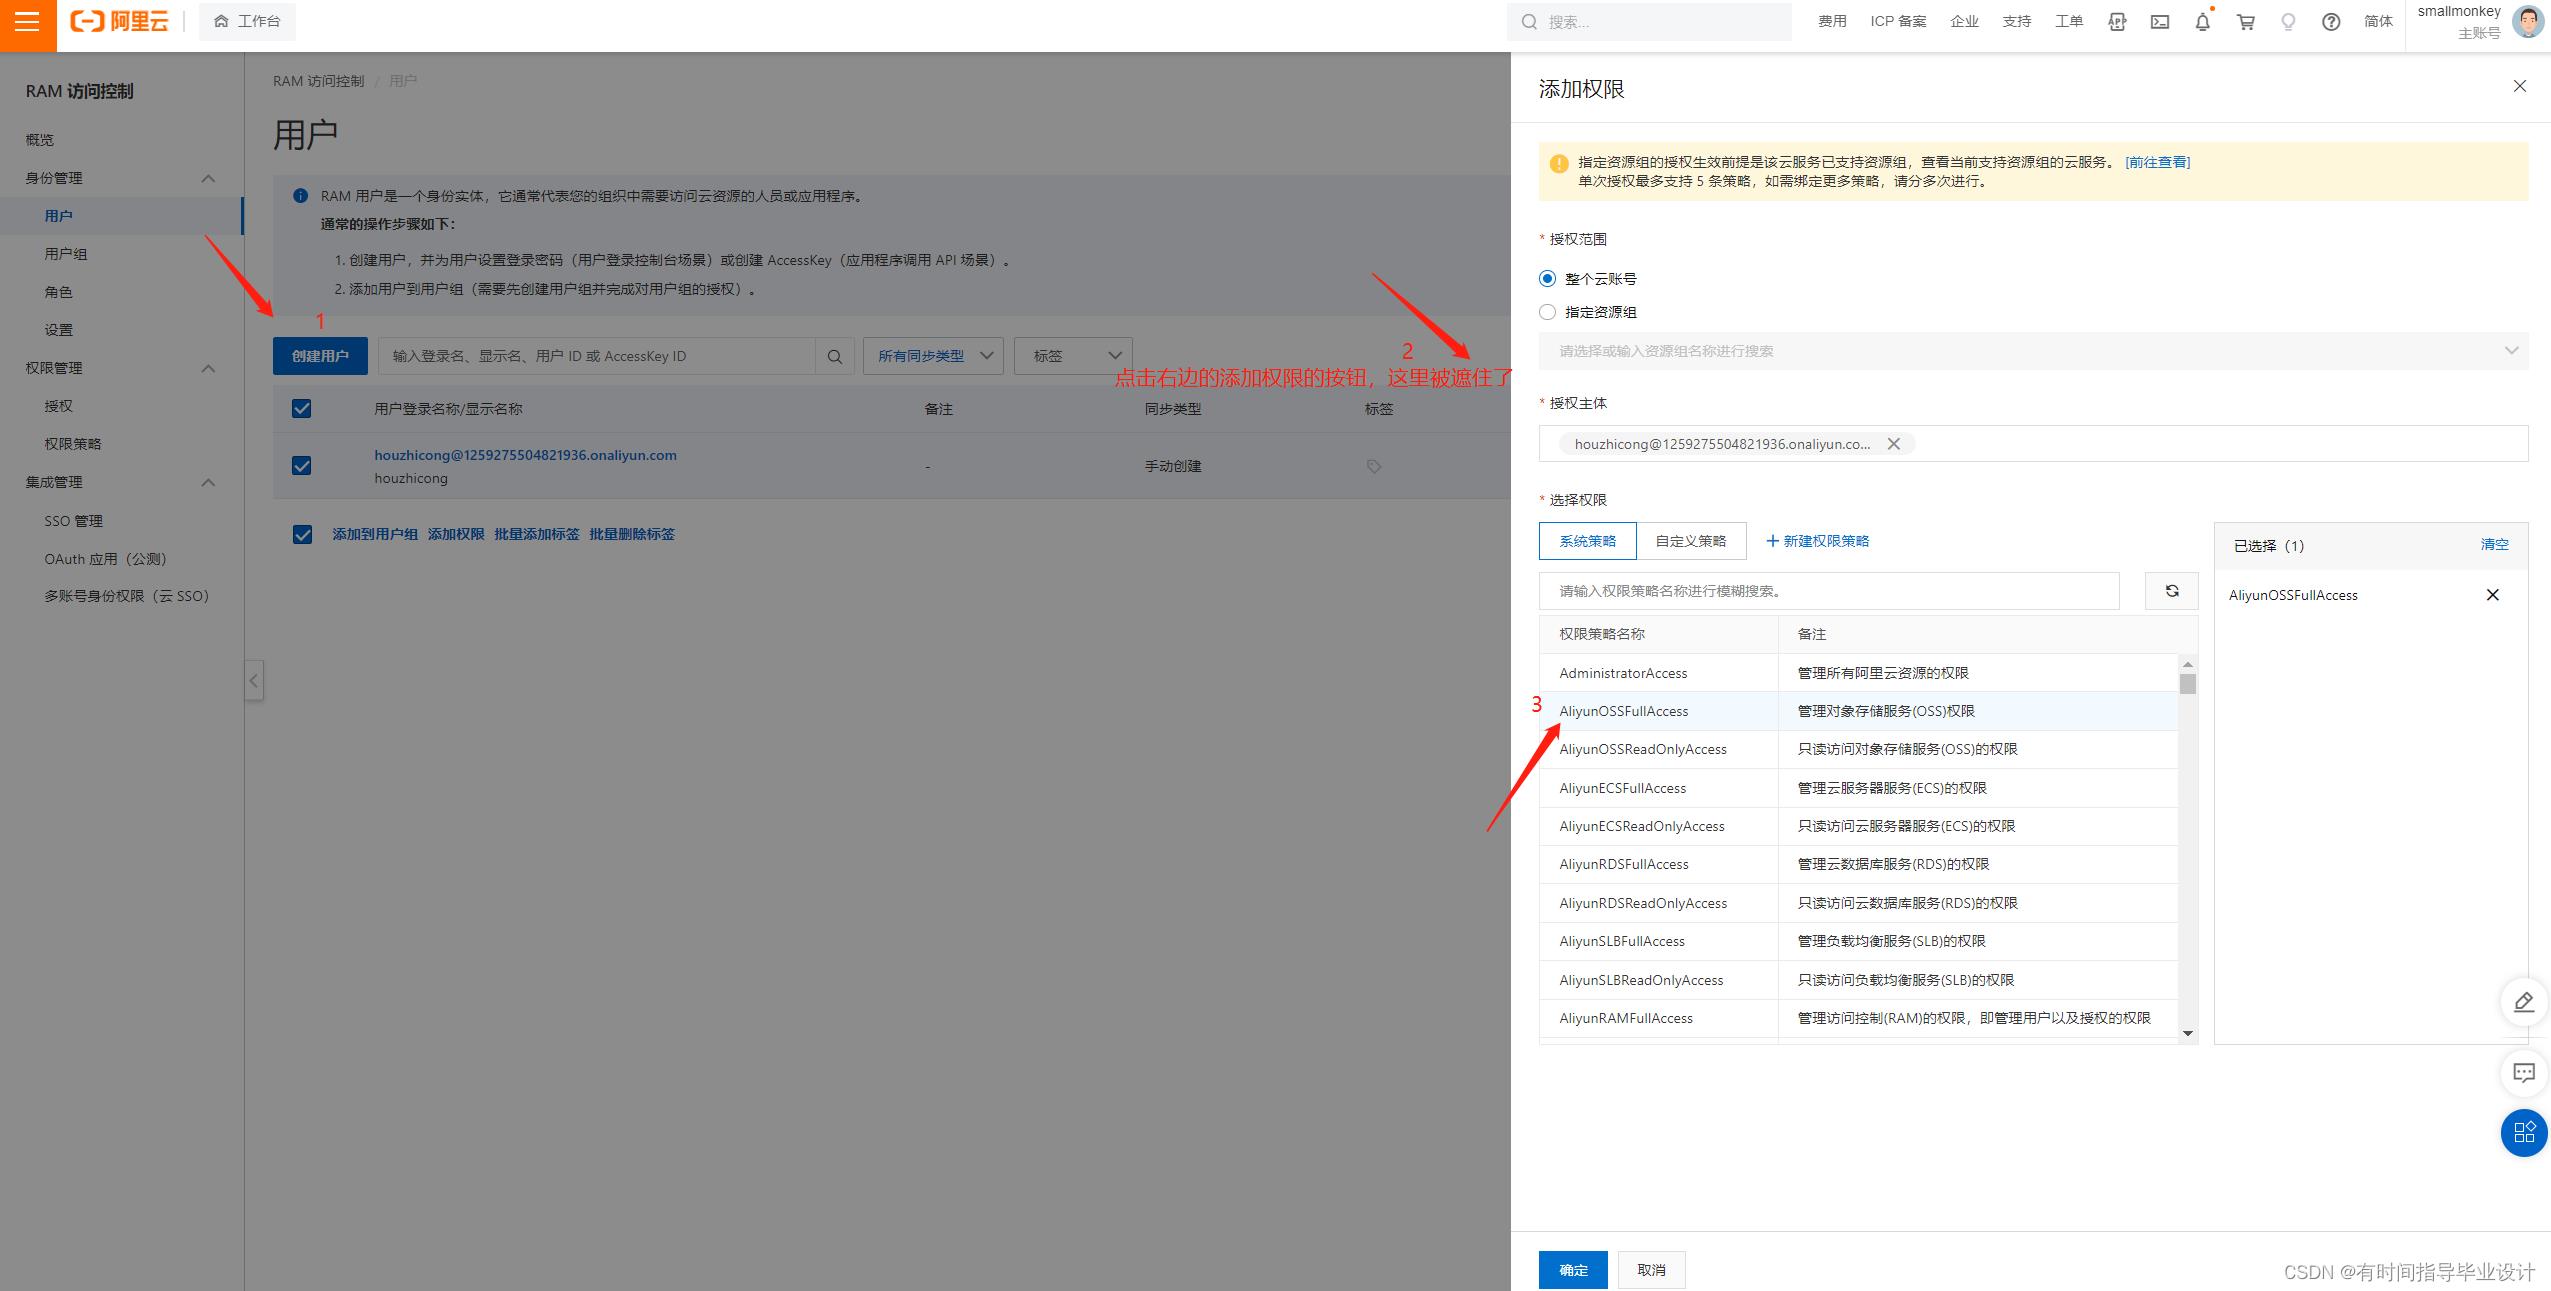
3.根据创建的子账号分配OSS的所有权限(可以对文件进行上传,下载,删除的权限)
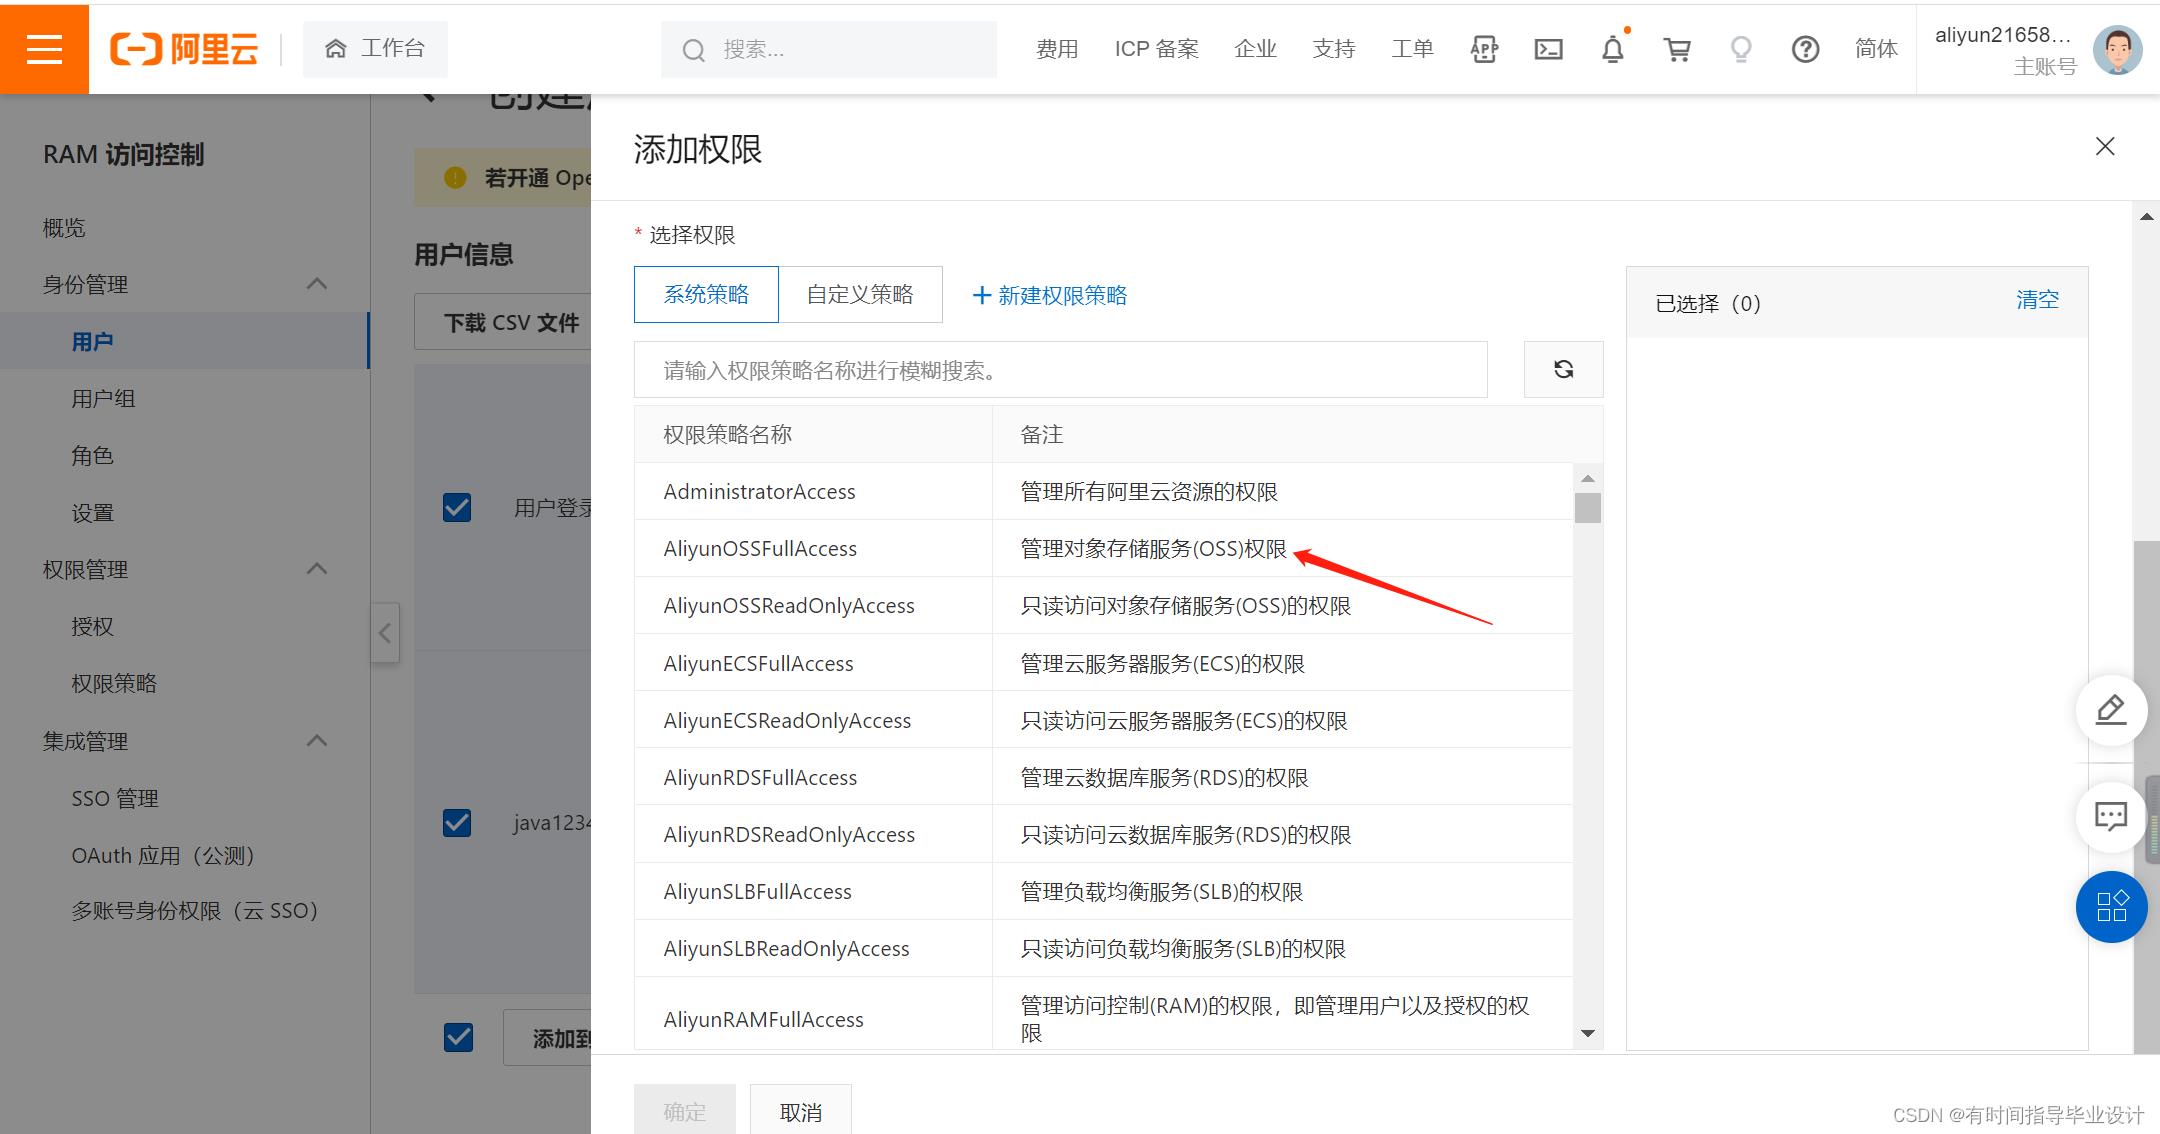
4.采用上传的方式(服务器直传,服务器得签名后后端直传,前端直传)
前端直传:不好,用户可以直接f12找到我们的endpoint,bucketName,和重要的Acesskey,AccessSecret,不安全,导致我们的信息泄露。
服务器直传:会造成性能瓶颈,给服务器造成压力。
服务器得签名后后端直传:这种方法可以,可以加密我们的签名之后进行上传。如果想了解用户上传了什么东西可以设计 上传回调
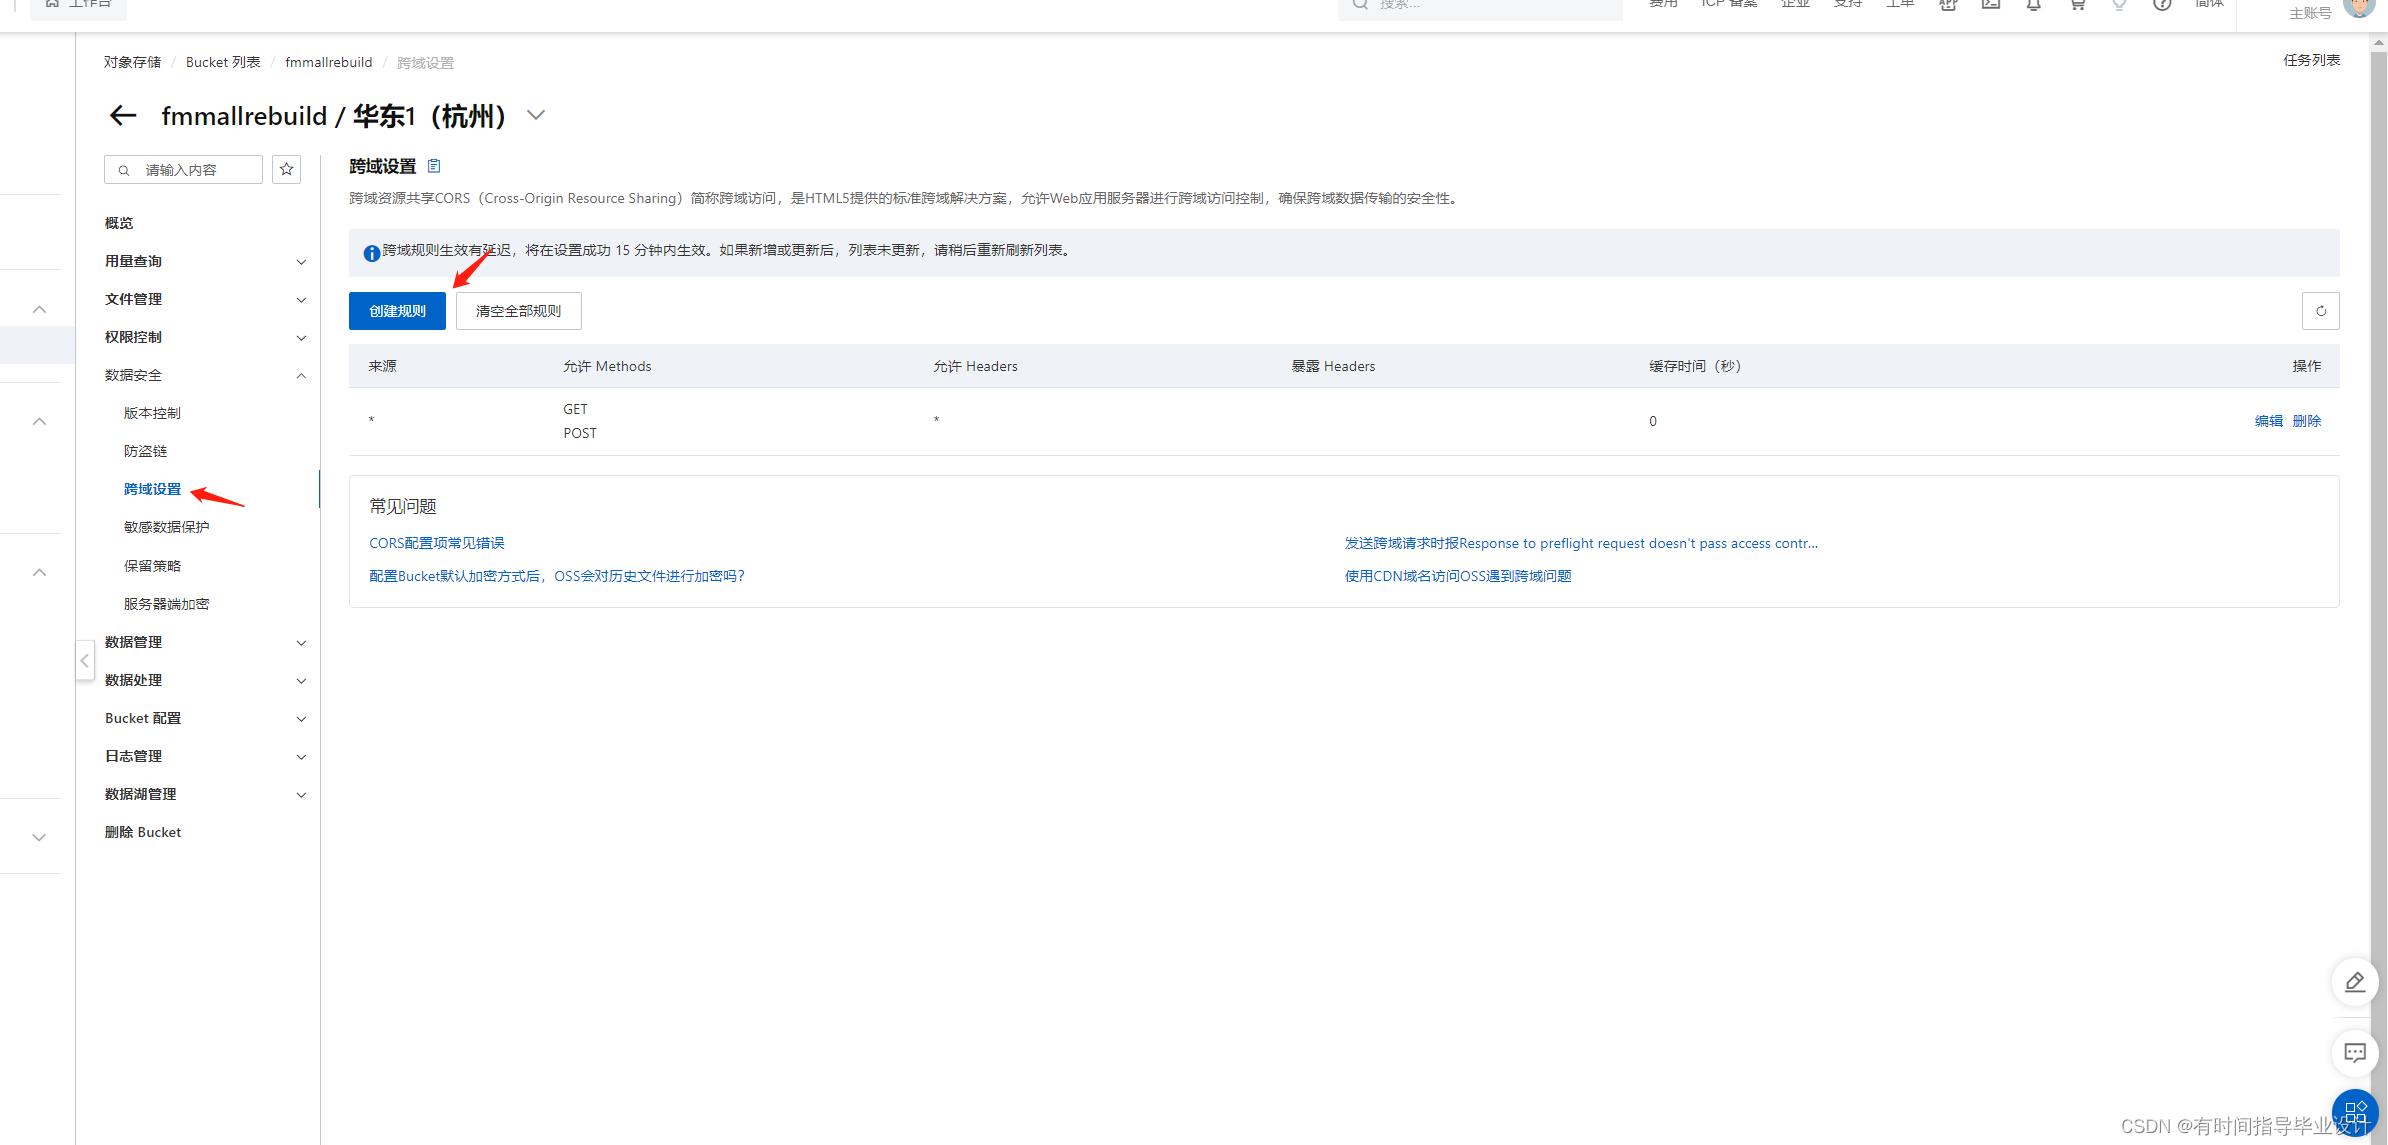
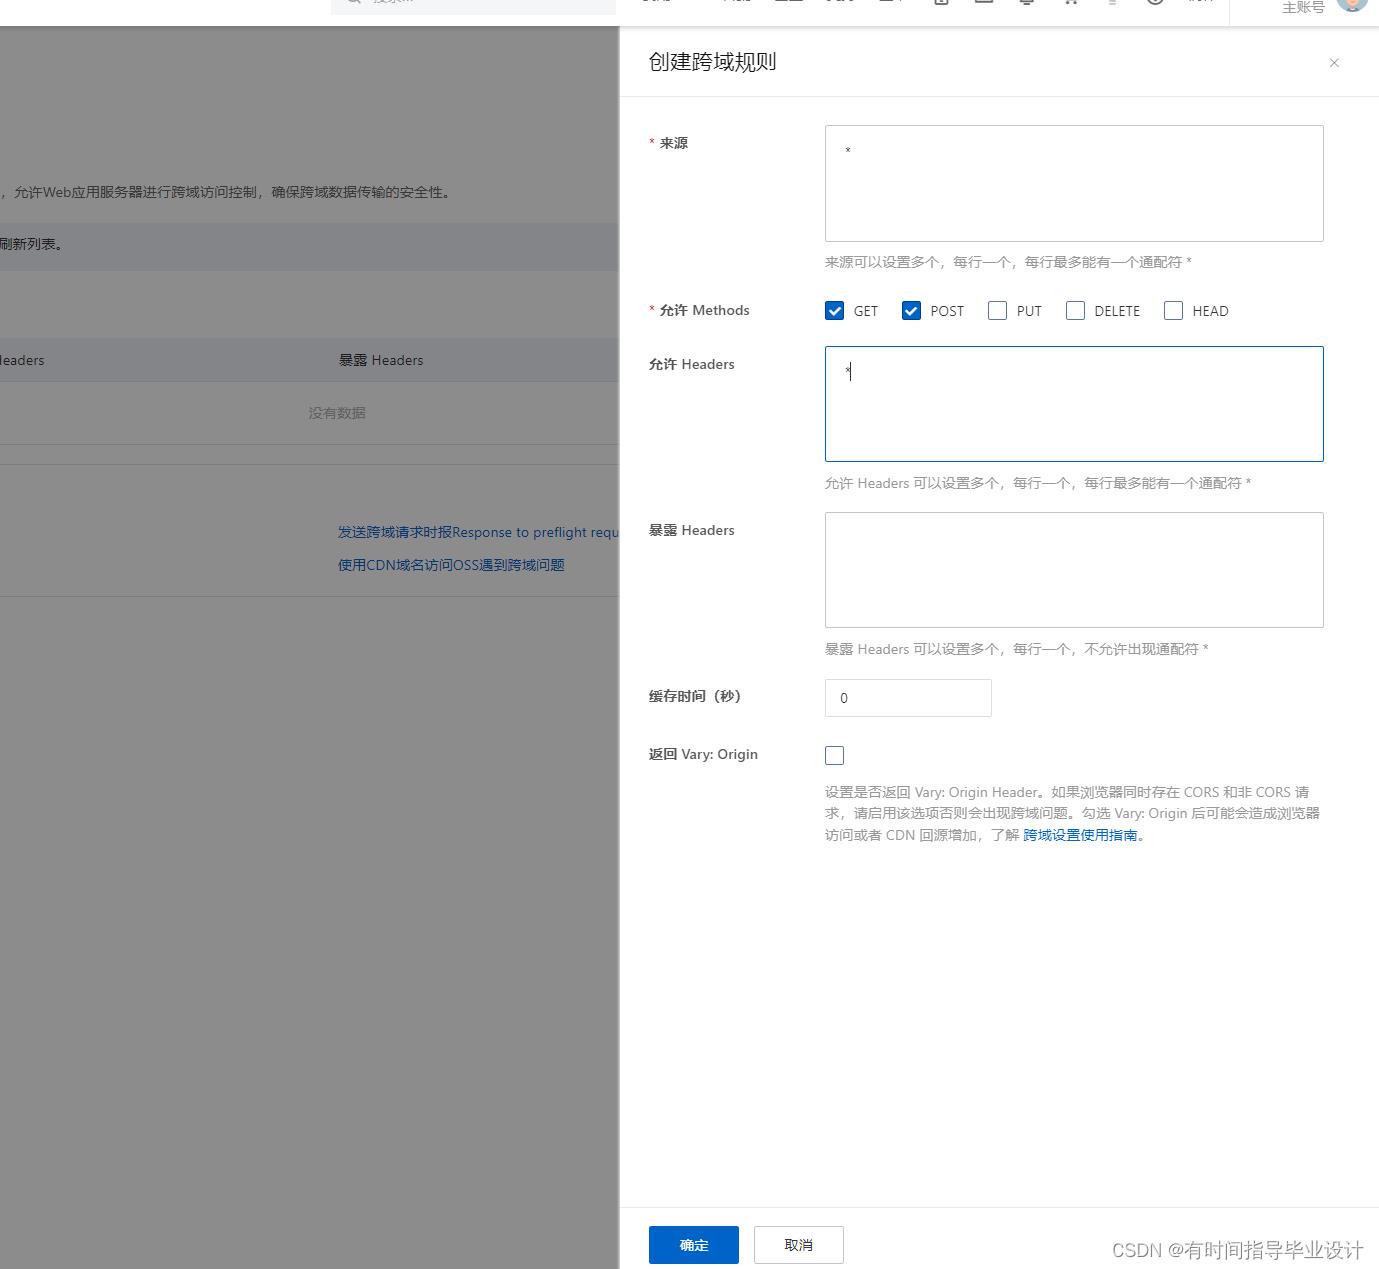
5. 出现跨域问题解决
引入依赖
    <dependency>
            <groupId>com.aliyun.oss</groupId>
            <artifactId>aliyun-sdk-oss</artifactId>
            <version>3.15.0</version>
        </dependency>
        <dependency>
6.前端实现code
<!DOCTYPE html>
<html lang="en">
<head>
    <meta charset="UTF-8">
    <meta http-equiv="X-UA-Compatible" content="IE=edge">
    <meta name="viewport" content="width=device-width, initial-scale=1.0">
    <title>oss测试上传</title>
    <script src="static/js/vue.min.js"></script>

<script src="https://cdn.jsdelivr.net/npm/vue@2/dist/vue.js"></script>
    <!-- 引入样式 -->
<link rel="stylesheet" href="https://unpkg.com/element-ui/lib/theme-chalk/index.css">
 <!-- 引入组件库 -->
<script src="https://unpkg.com/element-ui/lib/index.js"></script>

</head>
<body>
    <div id="app">
          <!-- <form action="/upload/oss" method="post" enctype="multipart/form-data">
        <input type="file" name="file" value="选择文件上传">
        <input type="submit" name="提交"/>
    </form> -->
    <el-upload
    draggable="true"
  class="upload-demo"
  :action="obj.host"
  :before-upload="ossPolicy"
  :on-success="onsuccess"
  //上传时绑定的数据
  :data="obj"
  :limit="2"
  :file-list="fileList"
  list-type="picture">
  <el-button size="small" type="primary">点击上传</el-button>
  <div slot="tip" class="el-upload__tip">只能上传jpg/png文件,且不超过500kb</div>
</el-upload>
    </div>

    <script src="static/js/axios.min.js"></script>
<script type="text/javascript ">
    var vm=new Vue(
    el:"#app",
    data:
        fileList: [name: 'food.jpeg', url: 'https://fuss10.elemecdn.com/3/63/4e7f3a15429bfda99bce42a18cdd1jpeg.jpeg?imageMogr2/thumbnail/360x360/format/webp/quality/100'],
        obj:
            OSSAccessKeyId:"",
            policy:"",
            signature:"",
            key:"",
            host:"",
            dir:"",

    ,
    methods:

      ossPolicy(file)
        // 上传前,获取服务器给的签名
        axios(
				url:"http://localhost:8080/oss/policy",
				method:"get",
			).then(res=>
                console.log("come in ---------",res.data)
                this.obj.OSSAccessKeyId = res.data.accessId;
                this.obj.policy = res.data.policy;
                this.obj.dir = res.data.dir;
                this.obj.signature = res.data.signature;
                //传到oss的服务器地址
                this.obj.host = res.data.host;
                this.obj.key =res.data.dir + "$filename";

      )
    ,
    //文件上传成功时调用
    onsuccess(response, file, fileList)
        console.log("response",response)
        console.log(file)

    ,


)
</script>

</body>
</html>
6.1 单个文件上传
<template>
  <div>
    <el-upload
      :action="dataObj.host"
      :data="dataObj"
      list-type="picture"
      :multiple="false" :show-file-list="showFileList"
      :file-list="fileList"
      :before-upload="beforeUpload"
      :on-remove="handleRemove"
      :on-success="handleUploadSuccess"
      :on-preview="handlePreview">
      <el-button size="small" type="primary">点击上传</el-button>
      <div slot="tip" class="el-upload__tip">只能上传jpg/png文件,且不超过10MB</div>
    </el-upload>
    <el-dialog :visible.sync="dialogVisible">
      <img width="100%" :src="fileList[0].url" alt="">
    </el-dialog>
  </div>
</template>
<script>
   import policy from './policy'
   import  getUUID  from '@/utils'

  export default
    name: 'singleUpload',
    props:
      value: String
    ,
    computed:
      imageUrl()
        return this.value;
      ,
      imageName()
        if (this.value != null && this.value !== '')
          return this.value.substr(this.value.lastIndexOf("/") + 1);
         else
          return null;

      ,
      fileList()
        return [
          name: this.imageName,
          url: this.imageUrl
        ]
      ,
      showFileList:
        get: function ()
          return this.value !== null && this.value !== ''&& this.value!==undefined;
        ,
        set: function (newValue)


    ,
    data()
      return
        dataObj:
          policy: '',
          signature: '',
          key: '',
          ossaccessKeyId: '',
          dir: '',
          host: '',
          // callback:'',
        ,
        dialogVisible: false,
        url:'',
      ;
    ,
    methods:
      emitInput(val)
        this.$emit('input', val)
      ,
      handleRemove(file, fileList)
        this.emitInput('');
      ,
      handlePreview(file)
        this.dialogVisible = true;
      ,
      beforeUpload(file)
        let _self = this;
        return new Promise((resolve, reject) =>
          policy().then(response =>
            console.log("响应的数据",response);
            _self.dataObj.policy = response.data.policy;
            _self.dataObj.signature = response.data.signature;
            _self.dataObj.ossaccessKeyId = response.data.accessid;
            _self.dataObj.key = response.data.dir +getUUID()+'_$filename';
            _self.dataObj.dir = response.data.dir;
            _self.dataObj.host = response.data.host;
            console.log("响应的数据222。。。",_self.dataObj);
            resolve(true)
          ).catch(err =>
            reject(false)
          )
        )
      ,
      handleUploadSuccess(res, file)
        console.log("上传成功...")
        this.showFileList = true;
        this.fileList.pop();
        this.fileList.push(name: file.name, url: this.dataObj.host + '/' + this.dataObj.key.replace("$filename",file.name) );
        this.url = this.fileList[0].url;
        this.emitInput(this.fileList[0].url);


</script>
<style>

</style>
可以用一个url变量接收我们的上传之后成功的图片路径,点击保存的时间可以将这个url传到数据库中去,前端在直接通过单向绑定:src =“显示数据库中保存的url”
6.2多个文件上传
<template>
<div>
<el-upload
action="http://+`你的bucketName` + '.' +'你的endpoint'"
:data="dataObj"
:list-type="listType"
:file-list="fileList"
:before-upload="beforeUpload"
:on-remove="handleRemove"
:on-success="handleUploadSuccess"
:on-preview="handlePreview"
:limit="maxCount"
:on-exceed="handleExceed"
:show-file-list="showFile"
>
<i class="el-icon-plus"></i>
</el-upload>
<el-dialog :visible.sync="dialogVisible">
<img width="100%" :src="dialogImageUrl" alt />
</el-dialog>
</div>
</template>
<script>
import policy from "./policy";
import getUUID from '@/utils'
export default
name: "multiUpload",
props:
//图片属性数组
value: Array,
//最大上传图片数量
maxCount:
type: Number,
default: 30
,
listType:
type: String,
default: "picture-card"
,
showFile:
type: Boolean,
default: true
,
data()
return
dataObj:
policy: "",
signature: "",
key: "",
ossaccessKeyId: "",
dir: "",
host: "",
uuid: ""
,
dialogVisible: false,
dialogImageUrl: null
;
,
computed:
fileList()
let fileList = [];
for (let i = 0; i < this.value.length; i++)
fileList.push( url: this.value[i] );
return fileList;
,
mounted() ,
methods:
emitInput(fileList)
let value = [];
for (let i = 0; i < fileList.length; i++)
value.push(fileList[i].url);
this.$emit("input", value);
,
handleRemove(file, fileList)
this.emitInput(fileList);
,
handlePreview(file)
this.dialogVisible = true;
this.dialogImageUrl = file.url;
,
beforeUpload(file)
let _self = this;
return new Promise((resolve, reject) =>
policy()
.then(response =>
console.log("这是什么$filename");
_self.dataObj.policy = response.data.policy;
_self.dataObj.signature = response.data.signature;
_self.dataObj.ossaccessKeyId = response.data.accessid;
_self.dataObj.key = response.data.dir +getUUID()+"_$filename";
_self.dataObj.dir = response.data.dir;
_self.dataObj.host = response.data.host;
resolve(true);
)
.catch(err =>
console.log("出错了...",err)
reject(false);
);
);
,
handleUploadSuccess(res, file)
this.fileList.push(
name: file.name,
// url: this.dataObj.host + "/" + this.dataObj.dir + "/" + file.name; 替换$filename为真正的文件名
url: this.dataObj.host + "/" + this.dataObj.key.replace("$filename",file.name)
);
this.emitInput(