PHP原生文件上传(单文件多文件均可)简单案例
Posted 心雨星空
tags:
篇首语:本文由小常识网(cha138.com)小编为大家整理,主要介绍了PHP原生文件上传(单文件多文件均可)简单案例相关的知识,希望对你有一定的参考价值。

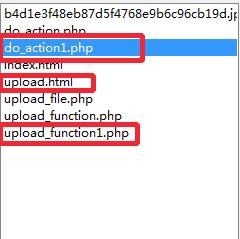
本案例共三个文件,目录结构如下图所示:

do_action1.php(前台页面)页面的代码如下:
<?php
header("content-type:text/html;charset=utf-8;");
echo "<pre>";
//print_r($_FILES);
require_once "upload_function1.php";
$files=getFiles();
//print_r($files);
foreach($files as $fileInfo){
    $res=uploadFile($fileInfo);
    echo $res[\'mes\'],\'<br/>\';
    //$uploadFiles[]=@$res[\'dest\'];
    if(isset($res[\'dest\'])) {
        $uploadFiles[]=$res[\'dest\'];
    }else{
        continue;
    }
}
//$uploadFiles=array_values(array_filter($uploadFiles)); 过滤数组中的空值并从新排序
print_r($uploadFiles);
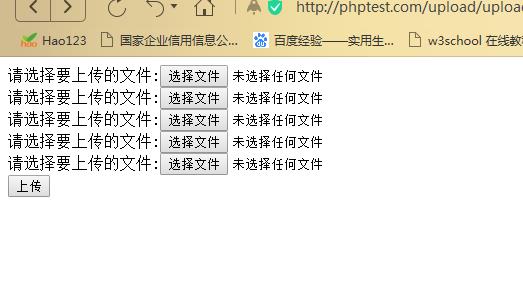
upload.html(后台页面)页面的代码如下:
<html>
<head>
<meta charset="utf-8">
</head>
<body>

<form action="do_action1.php" method="post"
enctype="multipart/form-data">
<!--<input type="hidden" name="MAX_FILE_SIZE" value="176942">-->
<label for="file">请选择要上传的文件:</label><input type="file" name="file1" id="file" accept="image/jpeg,image/gif,image/png"/> <br />
<label for="file">请选择要上传的文件:</label><input type="file" name="file2" id="file" /> <br />
<label for="file">请选择要上传的文件:</label><input type="file" name="file[]" id="file" /> <br />
<label for="file">请选择要上传的文件:</label><input type="file" name="file[]" id="file" /> <br />
<label for="file">请选择要上传的文件:</label><input type="file" name="file[]" id="file" multiple /> <br />
<input type="submit" name="submit" value="上传" />
</form>

</body>
</html>
upload_function1.php(功能函数)页面的代码如下:
<?php
//构建上传文件的信息
function getFiles(){
    $i=0;
    foreach($_FILES as $file){
        if(is_string($file[\'name\'])){
            $files[$i]=$file;
            $i++;
        }elseif(is_array($file[\'name\'])){
            foreach($file[\'name\'] as $key=>$value){
                $files[$i][\'name\']=$file[\'name\'][$key];
                $files[$i][\'type\']=$file[\'type\'][$key];
                $files[$i][\'tmp_name\']=$file[\'tmp_name\'][$key];
                $files[$i][\'error\']=$file[\'error\'][$key];
                $files[$i][\'size\']=$file[\'size\'][$key];
                $i++;
                }
        }
    }
    return $files;
}
//得到文件扩展名
function getExt($filename){
    return strtolower(pathinfo($filename,PATHINFO_EXTENSION));
}
//产生唯一字符串
function getUniName(){
    return md5(uniqid(microtime(true),true));
}
function uploadFile($fileInfo,$uploadPath="uploads",$maxSize=2097152,$flag=false,$allowExt=array("jpeg","jpg","png","gif")){
    //$flag=true;//是否检测图片是否是真实的图片类型
    $allowExt=array(\'jpeg\',\'jpg\',\'gif\',\'png\');
    if($fileInfo[\'error\']==UPLOAD_ERR_OK){
       //检测上传文件大小
       if($fileInfo[\'size\']>$maxSize){
           $res[\'mes\']=\'上传文件过大\';
       }
       //检测上传文件的文件类型
       $ext=getExt($fileInfo[\'name\']);//得到上传文件的后缀
       if(!in_array($ext,$allowExt)){
           $res[\'res\']=\'非法文件类型\';
       }
       if($flag){
           if(!getimagesize($fileInfo[\'tmp_name\'])){
               $res[\'mes\']=\'不是真实的图片类型\';
           }
       }
       //检测文件是否是通过HTTP POST上传上来的
       if(!is_uploaded_file($fileInfo[\'tmp_name\'])){
           $res[\'mes\']=\'文件不是通过HTTP POST方式上传上来的\';
       }
       if(isset($res)) return $res;
       $path=\'./uploads\';
       if(!file_exists($path)){
           mkdir($path,0777,true);
           chmod($path,0777);
       }
       $uniName=getUniName();
       $destination=$path.\'/\'.$uniName.\'.\'.$ext;
       if(!move_uploaded_file($fileInfo[\'tmp_name\'],$destination)){
           $res[\'mes\']=$fileInfo[\'name\'].\'文件移动失败\';
       }
       $res[\'mes\']=$fileInfo[\'name\'].\'上传成功\';
       $res[\'dest\']=$destination;
       return $res;
    }else{
        switch($fileInfo[\'error\']){
            case 1:
                 $res[\'mes\']="上传文件超出了php配置中upload_max_filesize选项的值";
                break;
            case 2:
                 $res[\'mes\']="超出了表单MAX_FILE_SIZE限制的大小";
                break;
            case 3:
                 $res[\'mes\']="文件部分被上传";
                break;
            case 4:
                 $res[\'mes\']="没有选择上传文件";
                break;
            case 6:
                 $res[\'mes\']="没找到临时目录";
                break;
            case 7:
                 $res[\'mes\']="";
                break;
            case 8:
                 $res[\'mes\']="系统错误";
                break;
        }
        return $res;
    }
}

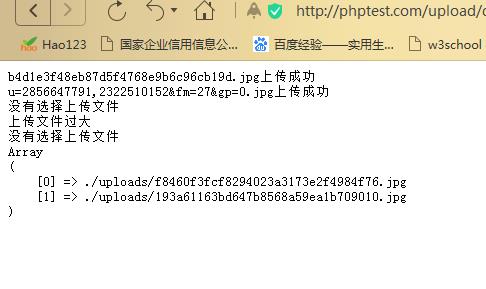
本案例最终可以得到上传成功的图片的存储位置以数组方式存储方便后期与数据库对接,稍微改造即可拿去用了!
以上是关于PHP原生文件上传(单文件多文件均可)简单案例的主要内容,如果未能解决你的问题,请参考以下文章