结合源码剖析Oauth2分布式认证与授权的实现流程
Posted 张子行的博客
tags:
篇首语:本文由小常识网(cha138.com)小编为大家整理,主要介绍了结合源码剖析Oauth2分布式认证与授权的实现流程相关的知识,希望对你有一定的参考价值。
前言
之前负责登录、注册、鉴权相关的任务,由于是分布式项目编码起来稍许复杂,其中遇到了些许难题,自己debug了一遍相关的源码,特此记录一下感悟以及心得。
Oauth2 密码模式认证介绍
Oauth2 常用的俩种授权模式,其一:密码模式,其二:授权码模式。可能很多人对这俩种模式不是很熟希,下面将简短的介绍一下。
-
授权码模式:微信扫码登录就是一个很好的例子,第三方应用想要高效快速的开发出一套登录系统,但是不想花太多时间去深层次开发自己的认证中心,微信作为一个拥有众多用户使用的一款app,它里面的用户都是真实的用户,于是乎微信利用Oauth2 为这些第三方应用提供了一个接入点,只要是能微信扫码登录的用户即是真实用户,用户成功登录并授权后(在微信app内扫码去请求微信的认证中心),微信那边知道了这个第三方网站是该用户信任的网站,随即给第三方应用一定的操作权限去访问获取一些用户数据。详情可以参阅 通过微信扫码登录剖析 oauth2 认证授权技术(简而言之就是认证中心和客户端不是同一家公司开发的使用授权码模式)
-
密码模式:微信的客户端使用微信账号经过微信的认证中心授权,可以正常登录。第三方应用的客户端使用第三方账号经过微信的认证中心授权,将不能登录。(简而言之就是认证中心和客户端是同一家公司开发的使用密码模式)
Oauth2基本配置概览
先来简要的对oauth2进行一下配置,都是一些配置性的代码,如果读者着急整合,直接copy到自己的项目中即可,下文会对这些配置做一个详细的分析介绍。当然结合代码中的注释阅读本文效果更佳。
@Configuration
@EnableAuthorizationServer
public class Oauth2ServerConfig extends AuthorizationServerConfigurerAdapter
    @Autowired
    private PasswordEncoder passwordEncoder;
    @Autowired
    private UserDetailsServiceImpl userDetailsService;
    @Autowired
    private AuthenticationManager authenticationManager;
    @Autowired
    private JwtTokenEnhancer jwtTokenEnhancer;
    @Autowired
    private StringRedisTemplate stringRedisTemplate;
    private TokenGranter tokenGranter;

    @Override
    public void configure(ClientDetailsServiceConfigurer clients) throws Exception
        clients.inMemory().withClient("client-zzh")
                .secret(passwordEncoder.encode("123456"))
                .scopes("all")
                //配置支持的认证模式
                .authorizedGrantTypes("password", "captcha", "refresh_token")
                //配置token失效时间
                .accessTokenValiditySeconds(60 * 2).refreshTokenValiditySeconds(3600 * 4);


    @Override
    public void configure(AuthorizationServerEndpointsConfigurer endpoints) throws Exception
        TokenEnhancerChain enhancerChain = new TokenEnhancerChain();
        List<TokenEnhancer> delegates = new ArrayList<>();
        delegates.add(jwtTokenEnhancer);
        delegates.add(accessTokenConverter());
        enhancerChain.setTokenEnhancers(delegates); //配置JWT的内容增强器
        endpoints.authenticationManager(authenticationManager).userDetailsService(userDetailsService) //配置加载用户信息的服务
                .accessTokenConverter(accessTokenConverter()).tokenEnhancer(enhancerChain).tokenGranter(tokenGranter(endpoints)).reuseRefreshTokens(false);


    @Override
    public void configure(AuthorizationServerSecurityConfigurer security) throws Exception
        security.allowFormAuthenticationForClients();
        //开启check_token接口的访问权限
        security.checkTokenAccess("permitAll()");


    /**
     * 配置jwt转换器
     */
    @Bean
    public JwtAccessTokenConverter accessTokenConverter()
        JwtAccessTokenConverter jwtAccessTokenConverter = new JwtAccessTokenConverter();
        jwtAccessTokenConverter.setKeyPair(keyPair());
        return jwtAccessTokenConverter;


    @Bean
    public KeyPair keyPair()
        //从classpath下的证书中获取秘钥对
        KeyStoreKeyFactory keyStoreKeyFactory = new KeyStoreKeyFactory(new ClassPathResource("jwt.jks"), "123456".toCharArray());
        return keyStoreKeyFactory.getKeyPair("jwt", "123456".toCharArray());


    /**
     * 自定义provider实现
     */
    @Bean
    public AuthenticationProvider customAuthenticationProvider()
        CustomAuthenticationProvider customAuthenticationProvider = new CustomAuthenticationProvider();
        customAuthenticationProvider.setUserDetailsService(userDetailsService);
        customAuthenticationProvider.setHideUserNotFoundExceptions(false);
        customAuthenticationProvider.setPasswordEncoder(passwordEncoder);
        return customAuthenticationProvider;


    public TokenGranter tokenGranter(AuthorizationServerEndpointsConfigurer endpoints)
        if (tokenGranter == null)
            tokenGranter = new TokenGranter()
                private CompositeTokenGranter delegate;

                /**
                 * 利用delegate(委托模式)重写认证方法
                 * @param grantType
                 * @param tokenRequest
                 * @return
                 */
                @Override
                public OAuth2AccessToken grant(String grantType, TokenRequest tokenRequest)
                    if (delegate == null)
                        delegate = new CompositeTokenGranter(getDefaultTokenGranters(endpoints));

                    return delegate.grant(grantType, tokenRequest);

            ;

        return tokenGranter;


    private List<TokenGranter> getDefaultTokenGranters(AuthorizationServerEndpointsConfigurer endpoints)
        AuthorizationServerTokenServices tokenServices = endpoints.getTokenServices();
        AuthorizationCodeServices authorizationCodeServices = endpoints.getAuthorizationCodeServices();
        OAuth2RequestFactory requestFactory = endpoints.getOAuth2RequestFactory();
        ClientDetailsService clientDetailsService = endpoints.getClientDetailsService();
        List<TokenGranter> tokenGranters = new ArrayList();
        /**
         * 添加oauth2自带的四种授权模式。以及我们自定义的授权模式,根绝需求注入不同的实参大家自行可以扩展,这里我注入了一个RedisTemplate
         */
        tokenGranters.add(new AuthorizationCodeTokenGranter(tokenServices, authorizationCodeServices, clientDetailsService, requestFactory));
        tokenGranters.add(new RefreshTokenGranter(tokenServices, clientDetailsService, requestFactory));
        tokenGranters.add(new ImplicitTokenGranter(tokenServices, clientDetailsService, requestFactory));
        tokenGranters.add(new ClientCredentialsTokenGranter(tokenServices, clientDetailsService, requestFactory));
        /**
         * 添加我们自定义的授权模式,根绝需求注入不同的实参大家自行可以扩展,这里我注入了一个RedisTemplate
         */
        tokenGranters.add(new CaptchaTokenGranter(tokenServices, clientDetailsService, requestFactory, authenticationManager, stringRedisTemplate));
        if (authenticationManager != null)
            // 添加密码模式
            tokenGranters.add(new ResourceOwnerPasswordTokenGranter(authenticationManager, tokenServices, clientDetailsService, requestFactory));

        return tokenGranters;
Spring Security 配置
这里主要是针对一些静态资源、Http请求做一个白名单放行的配置,读者根据自己的需求做对应的配置即可。
/**
 * SpringSecurity配置
 */
@Configuration
@EnableWebSecurity
public class WebSecurityConfig extends WebSecurityConfigurerAdapter

    @Override
    protected void configure(AuthenticationManagerBuilder auth) throws Exception
        super.configure(auth);


    /**
     * 配置一些web的白名单访问路劲
     */
    @Override
    public void configure(WebSecurity web) throws Exception
        web.ignoring().antMatchers(
                "/v2/api-docs",
                "/swagger-resources/configuration/ui",
                "/swagger-resources",
                "/swagger-resources/configuration/security",
                "/swagger-ui.html",
                "/css/**",
                "/js/**",
                "/images/**",
                "/webjars/**",
                "**/favicon.ico",
                "/index"
        );


    /**
     * 配置http请求的白名单
     */
    @Override
    protected void configure(HttpSecurity http) throws Exception
        http.authorizeRequests()
                .requestMatchers(EndpointRequest.toAnyEndpoint()).permitAll()
                .antMatchers("/user/getUserInfo").permitAll()
                .antMatchers("/oauth/token").permitAll()
                .antMatchers("/rsa/publicKey").permitAll()
                .antMatchers("/oauth/login").permitAll()
                .antMatchers("/oauth/verifyCharge").permitAll()
                .antMatchers("/oauth/logout").permitAll()
                .antMatchers("/oauth/isOnLine").permitAll()
                .antMatchers("/oauth/loginConfirm").permitAll()
                .antMatchers("/user/rsa/pubKey").permitAll()
                .antMatchers("/login_url").permitAll()
                .anyRequest().authenticated()
                .and().csrf().disable();


    @Bean
    @Override
    public AuthenticationManager authenticationManagerBean() throws Exception
        return super.authenticationManagerBean();
JWT增强器介绍
在配置Oauth2中的 AuthorizationServerEndpointsConfigurer的时候,我们可以将 JwtTokenEnhancer 配置进去,JwtTokenEnhancer 的功能就是为我们提供了一个扩展点,可以对那些已经生成好的 Jwt 中,额外添加一些我们自定义的参数进去。
/**
 * JWT内容增强器:自定义添加额外的参数塞进去JWT中
 */
@Component
public class JwtTokenEnhancer implements TokenEnhancer
    @Override
    public OAuth2AccessToken enhance(OAuth2AccessToken accessToken, OAuth2Authentication authentication)
        SecurityUser securityUser = (SecurityUser) authentication.getPrincipal();
        Map<String, Object> info = new HashMap<>();
        //把用户userName设置到JWT中
        info.put("userName", securityUser.getUsername());
        info.put("roles", securityUser.getAuthorities());
        System.err.println(info);
        ((DefaultOAuth2AccessToken) accessToken).setAdditionalInformation(info);
        return accessToken;
重写获取 Token 的接口
简单编写一个 Controller,编写路径为 /oauth/token 的一个接口,目的就是为了覆盖框架帮我编写好的那个 /oauth/token 接口。
@Api(tags = "认证中心")
@Slf4j
@RequestMapping("/oauth")
@RestController
@RefreshScope
public class AuthController

    @Autowired
    private TokenEndpoint tokenEndpoint;

    @Autowired
    private RedisTemplate redisTemplate;


    @ApiOperation(value = "  获取token", notes = "")
    @PostMapping("/token")
    public Result getToken(@RequestParam Map<String, String> parameters, Principal principal) throws Exception
        String username = parameters.get("username");
        parameters.put("password", ""); //require
        OAuth2AccessToken oAuth2AccessToken = tokenEndpoint.postAccessToken(principal, parameters).getBody();
        Oauth2TokenDto oauth2TokenDto = Oauth2TokenDto.builder()
                .token(oAuth2AccessToken.getValue())
                .refreshToken(oAuth2AccessToken.getRefreshToken().getValue())
                .expiresIn(oAuth2AccessToken.getExpiresIn())
                .tokenHead("Bearer ").build();
        JWSObject jwsObject = JWSObject.parse(oAuth2AccessToken.getValue());
        String payload = jwsObject.getPayload().toString();
        JSONObject jsonObject = JSONUtil.parseObj(payload);
        String jti = jsonObject.getStr(AuthConstants.JWT_JTI);
        redisTemplate.opsForValue().set(RedisConstants.USER_LOGIN_JTI + jti, username);
        log.info("Response-> url =/token,Parameters:" + parameters + ",Result:" + oauth2TokenDto + "");
        return Result.success(oauth2TokenDto);
如果不重写 /oauth/token 接口,默认走下图中的代码,直接在 this.postAccessToken(principal, parameters) 处颁发生成 token。同理我们重写此方法,其颁发 token 的核心代码没有做出改动,也是通过注入 TokenEndpoint ,调用里面的 postAccessToken 方法生成 token ,我们只是在前后做出了一些业务逻辑的扩展。读者根据自己需求去扩展

好了大致的准备工作已经差不多了,现在开始进行深入的进行定制化一些功能吧。
深入分析 postAccessToken
可以看到颁发 token 的代码也就是对请求的参数进行了一个校验,
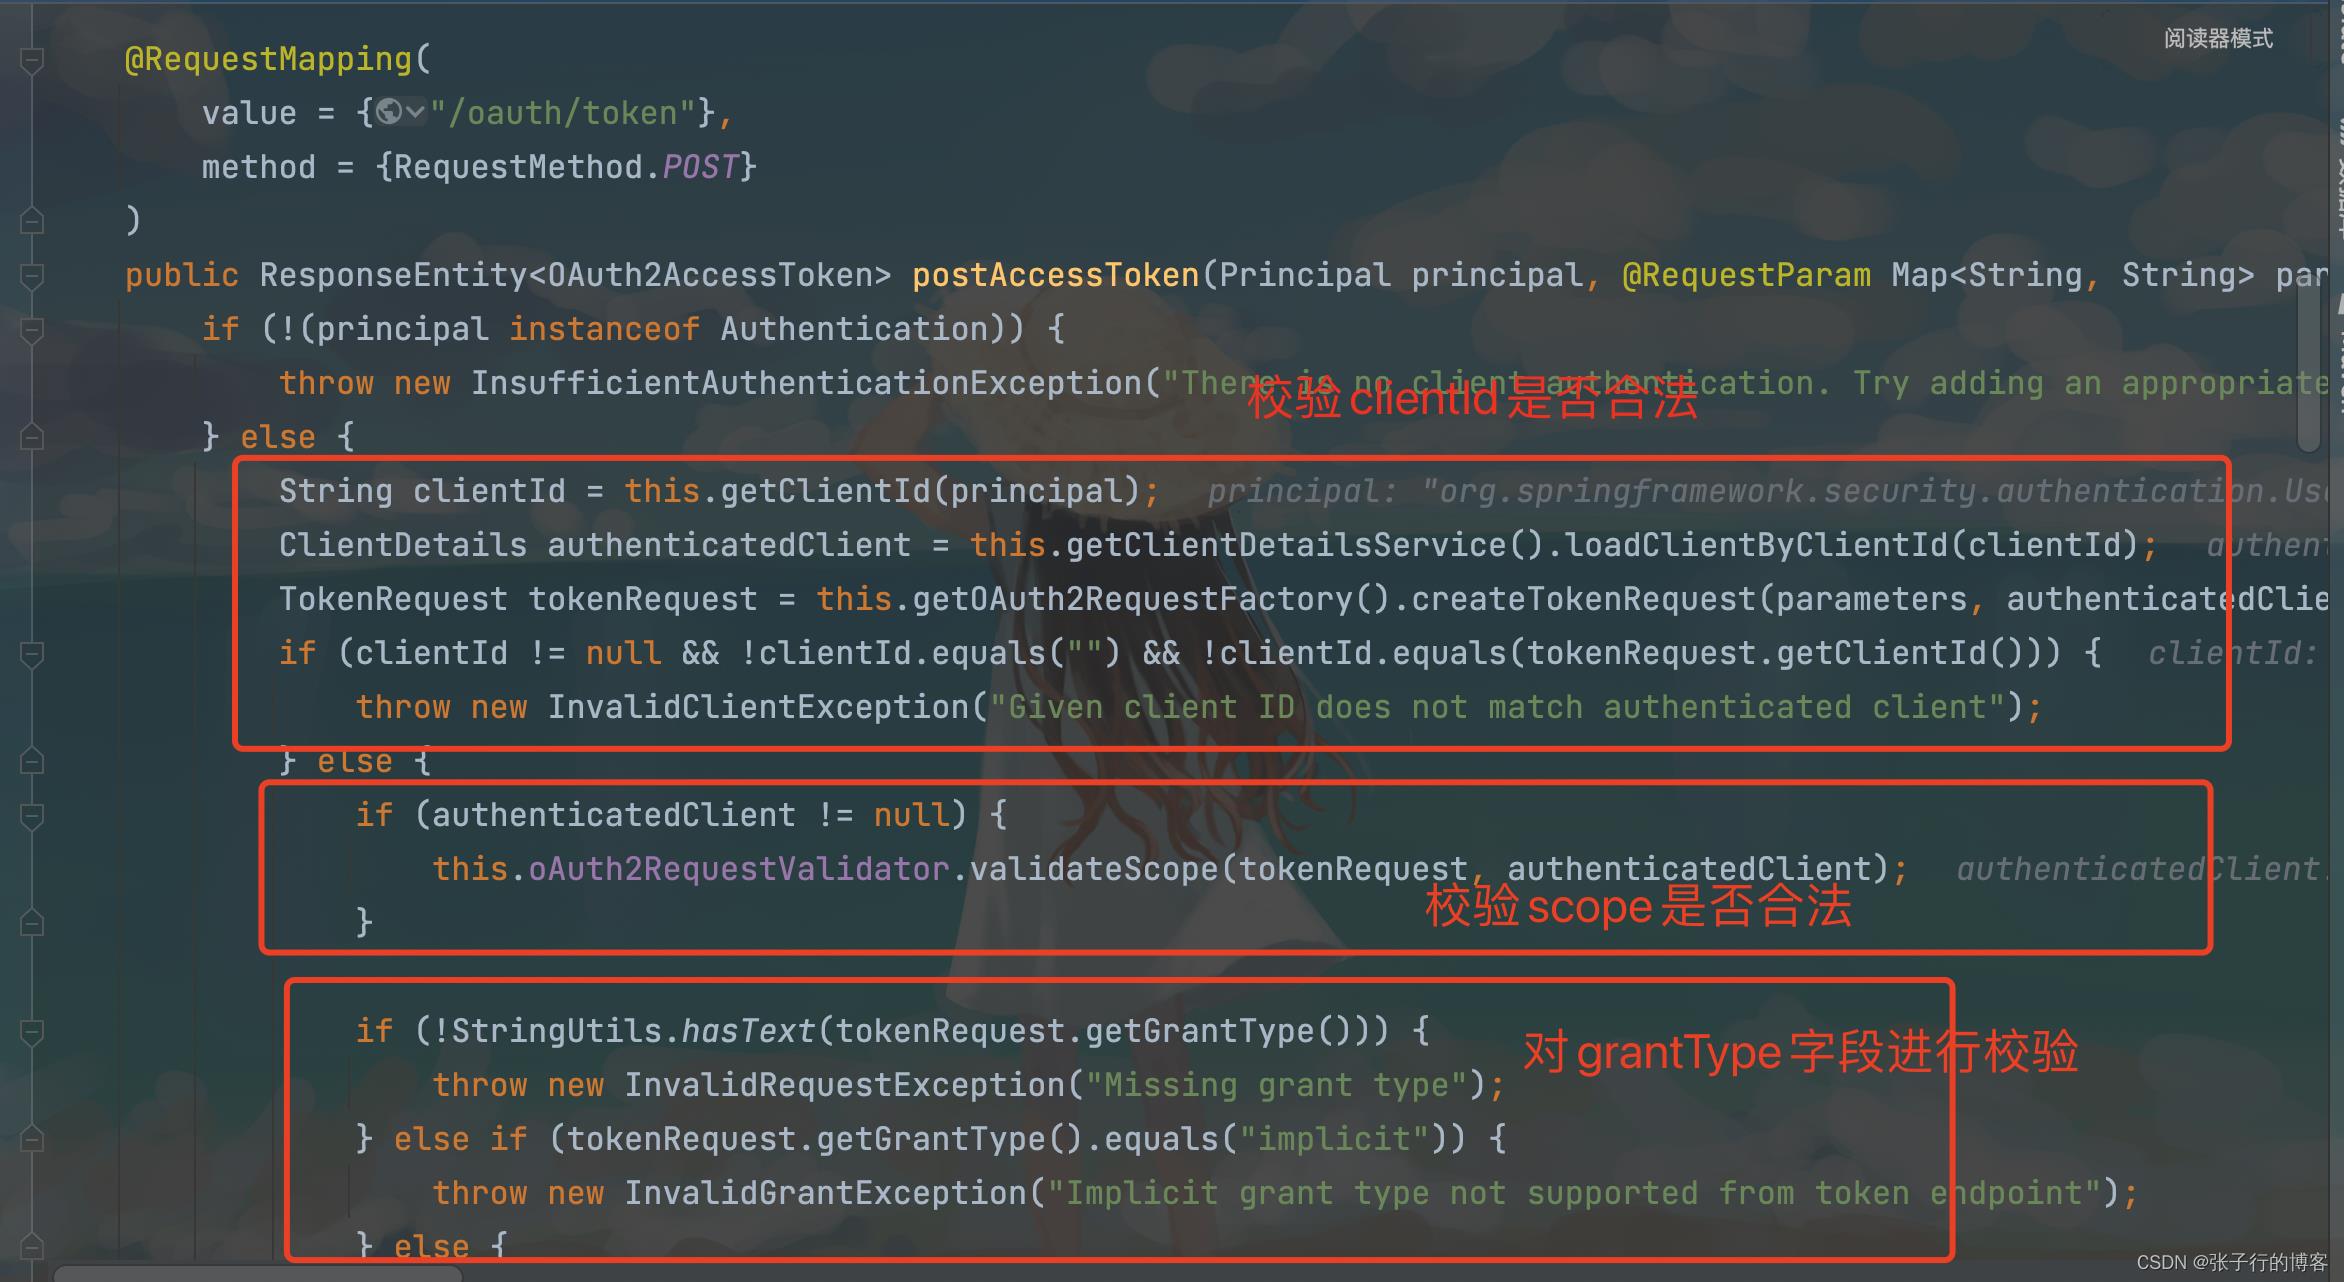
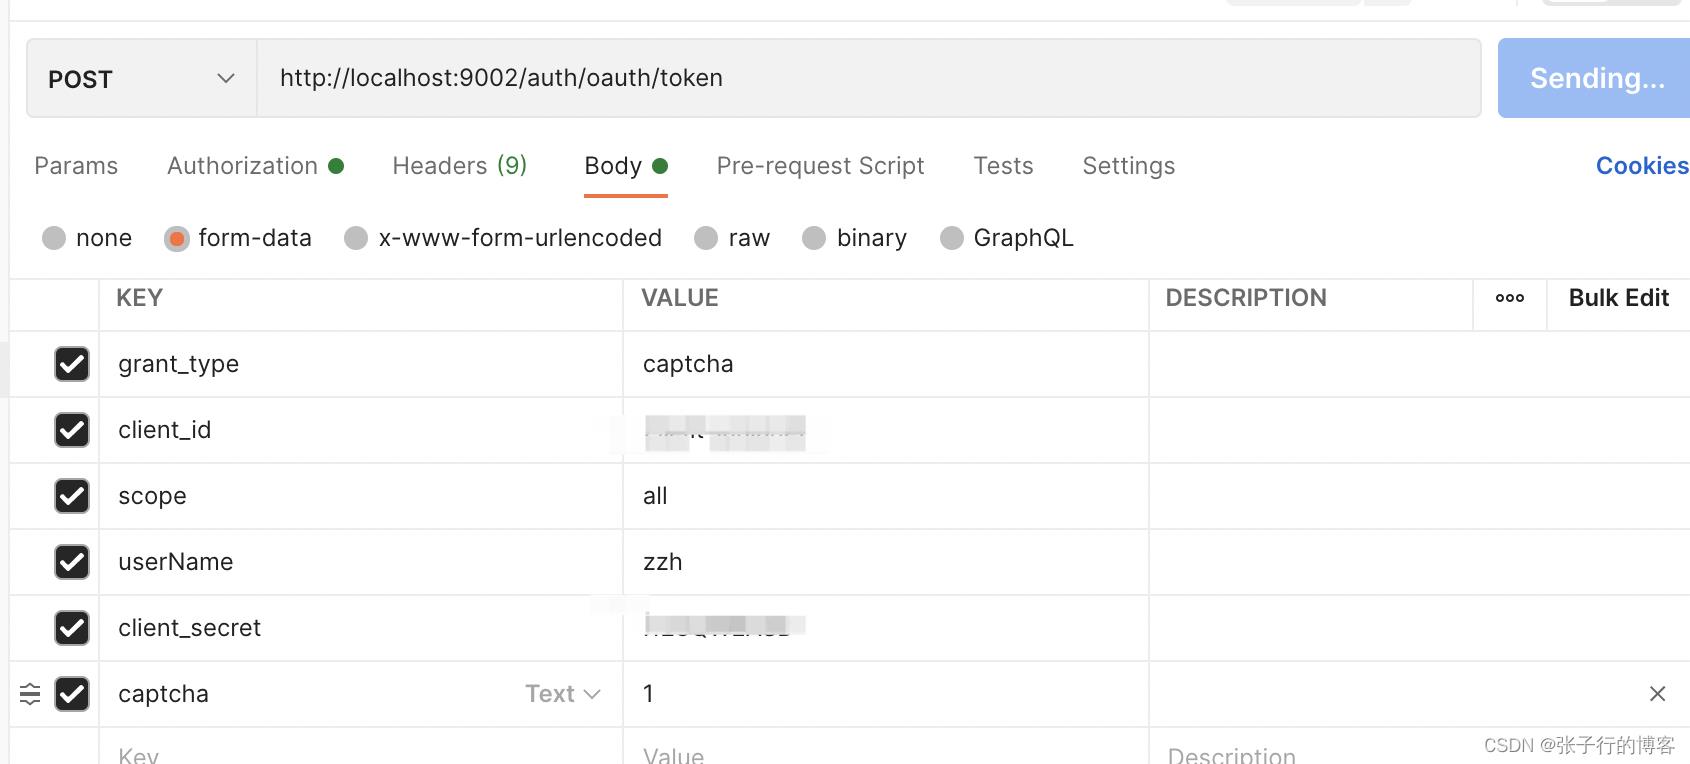
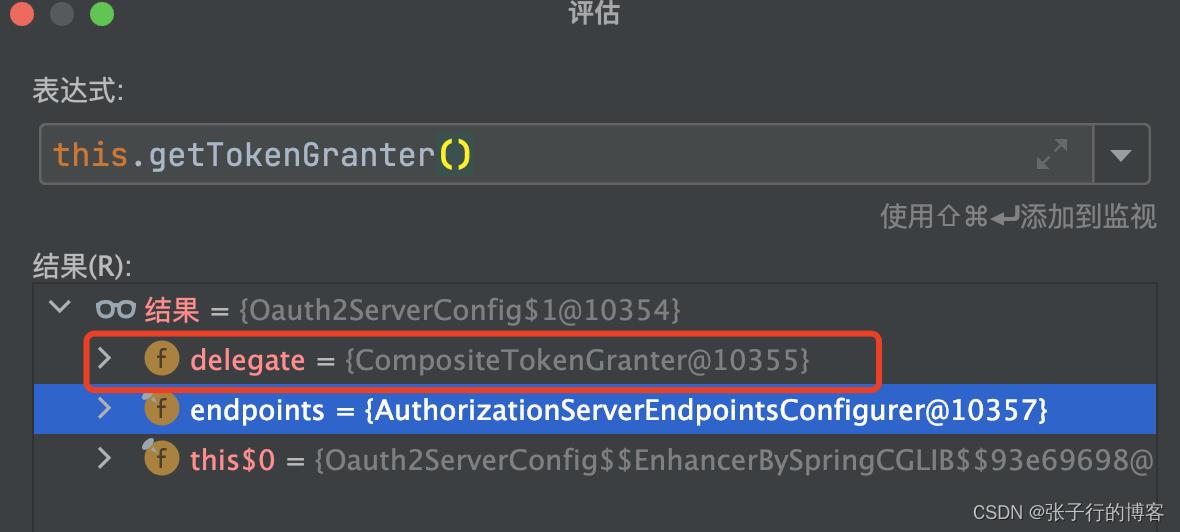
接着往下 debug 会发现我们来到了下图,参数校验通过了,紧接着开始授权操作。不着急我们接着往下走。

仔细观察一下这个 this.getTokenGranter() 方法,是不是看着有点眼熟呢,没错这个TokenGranter 在上文 Oauth2基本配置概览 小节中已经配置过了。一开始可能有的小伙伴对里面的配置觉得太过于深奥了,其实不然,仔细阅读下文定会更加豁然开朗。
Oauth2授权部分源码剖析
由于文章开头已经配置过了 TokenGranter 这个Bean并且重写了 grant()方法,如下。发现里面嵌套了一个叫做 CompositeTokenGranter 的东西,授权啥的都是走 CompositeTokenGranter 中的 grant()方法,于是接下来我们开始研究 CompositeTokenGranter 。

CompositeTokenGranter(委托模式,源码设计精髓!!)
当我第一次看到这个类的时候,感觉这个代码写的有点东西哈,里面封装了一个 list
集合用来暂存我们所有的 TokenGrant ,遍历执行对应的 grant 方法。
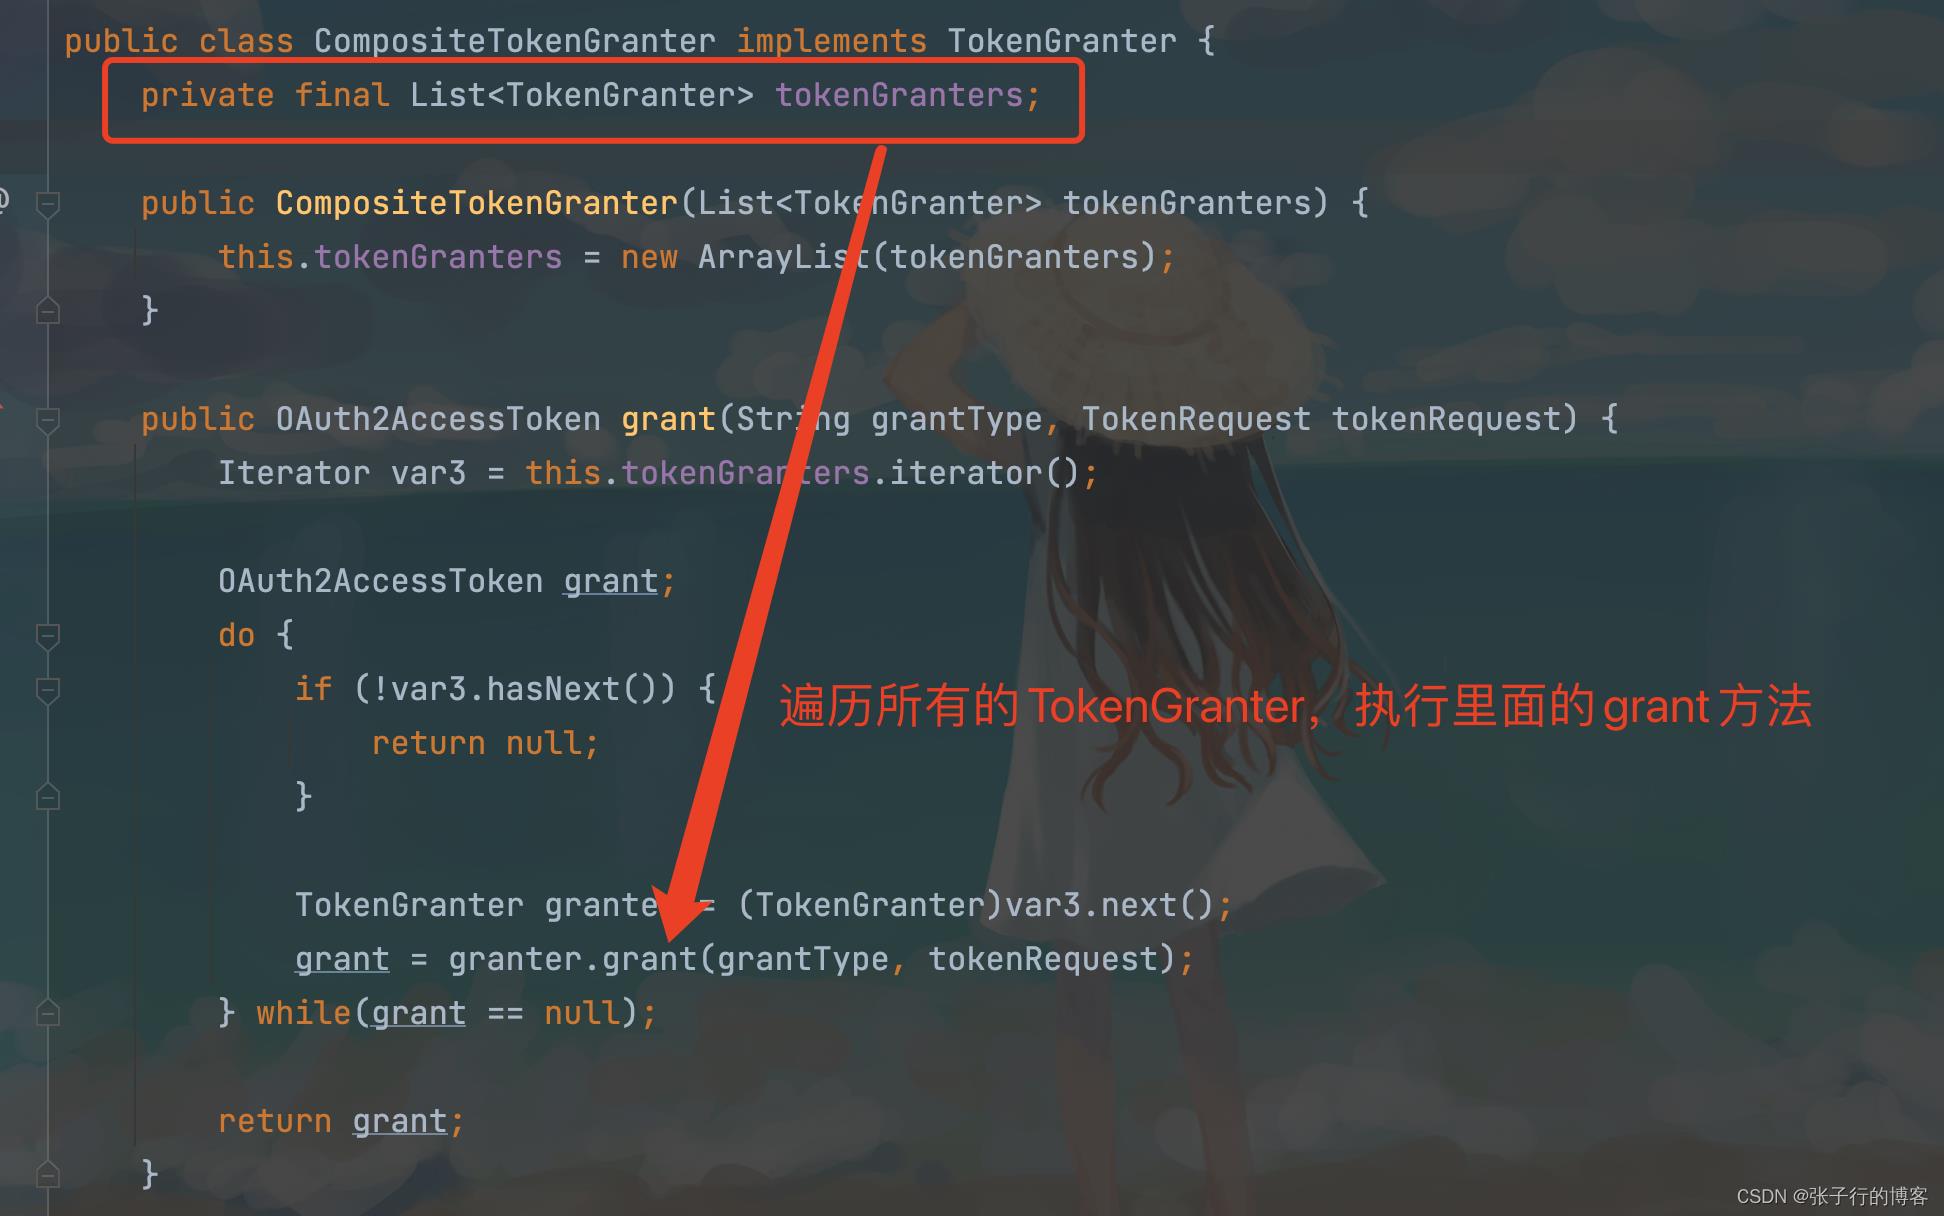
到这我们已经知道了 Oauth2 授权的时机了,我们是不是也可以通过自己扩展 TokenGrant ,自己实现一种授权模式呢?观察Oauth2基本配置概览小节中的代码,不禁感叹,原来我们当时配这个玩意是在这里生效的啊。

自定义验证码授权模式(扩展点)
通过剖析源码,我们直接拷贝一份密码模式中的源码,稍加改进,在里面加入自己校验验证码的业务逻辑,再将此 Cranter 织入到 AuthorizationServerEndpointsConfigurer 中即可生效了。不要问我为啥织入到 AuthorizationServerEndpointsConfigurer 中,而不是织入到其他的地方,因为 AuthorizationServerEndpointsConfigurer.tokenGranter(tokenGranter(endpoints)) 懂我意思吧。感兴趣的读者可以研究一下里面的源码哦。读者看完如下代码,结合 Oauth2基本配置概览 小节 知道为什么 CaptchaTokenGranter 会生效以及生效的时机 就行。
public class CaptchaTokenGranter extends AbstractTokenGranter

/**
* 自定义验证码授权模式
*/
    private static final String GRANT_TYPE = "captcha";
    private final AuthenticationManager authenticationManager;
    private StringRedisTemplate redisTemplate;

    public CaptchaTokenGranter(AuthorizationServerTokenServices tokenServices, ClientDetailsService clientDetailsService,
                               OAuth2RequestFactory requestFactory, AuthenticationManager authenticationManager,
                               StringRedisTemplate redisTemplate
    )
        super(tokenServices, clientDetailsService, requestFactory, GRANT_TYPE);
        this.authenticationManager = authenticationManager;
        this.redisTemplate = redisTemplate;


    @Override
    protected OAuth2Authentication getOAuth2Authentication(ClientDetails client, TokenRequest tokenRequest)

        Map<String, String> parameters = new LinkedHashMap(tokenRequest.getRequestParameters());
        String captcha = parameters.get("captcha");
        //验证码不为1,提示验证码失败
        if (!"1".equals(captcha) || StringUtils.isEmpty(captcha)) throw new InvalidGrantException("验证码错误");
        String username = parameters.get("username");
        String password = parameters.get("password");


        // 和密码模式一样的逻辑
        Authentication userAuth = new UsernamePasswordAuthenticationToken(username, password);
        ((AbstractAuthenticationToken) userAuth).setDetails(parameters);

        try
            userAuth = this.authenticationManager.authenticate(userAuth);
         catch (AccountStatusException var8)
            throw new InvalidGrantException(var8.getMessage());
         catch (BadCredentialsException var9)
            throw new InvalidGrantException(var9.getMessage());


        if (userAuth != null && userAuth.isAuthenticated())
            OAuth2Request storedOAuth2Request = this.getRequestFactory().createOAuth2Request(client, tokenRequest);
            return new OAuth2Authentication(storedOAuth2Request, userAuth);
         else
            throw new InvalidGrantException("Could not authenticate user: " + username);
授权->认证(ProviderManager)
走完我们自定义的 Grant()流程后,将会顺势执行ProviderManager 中的 authenticate() 方法,开始进行认证
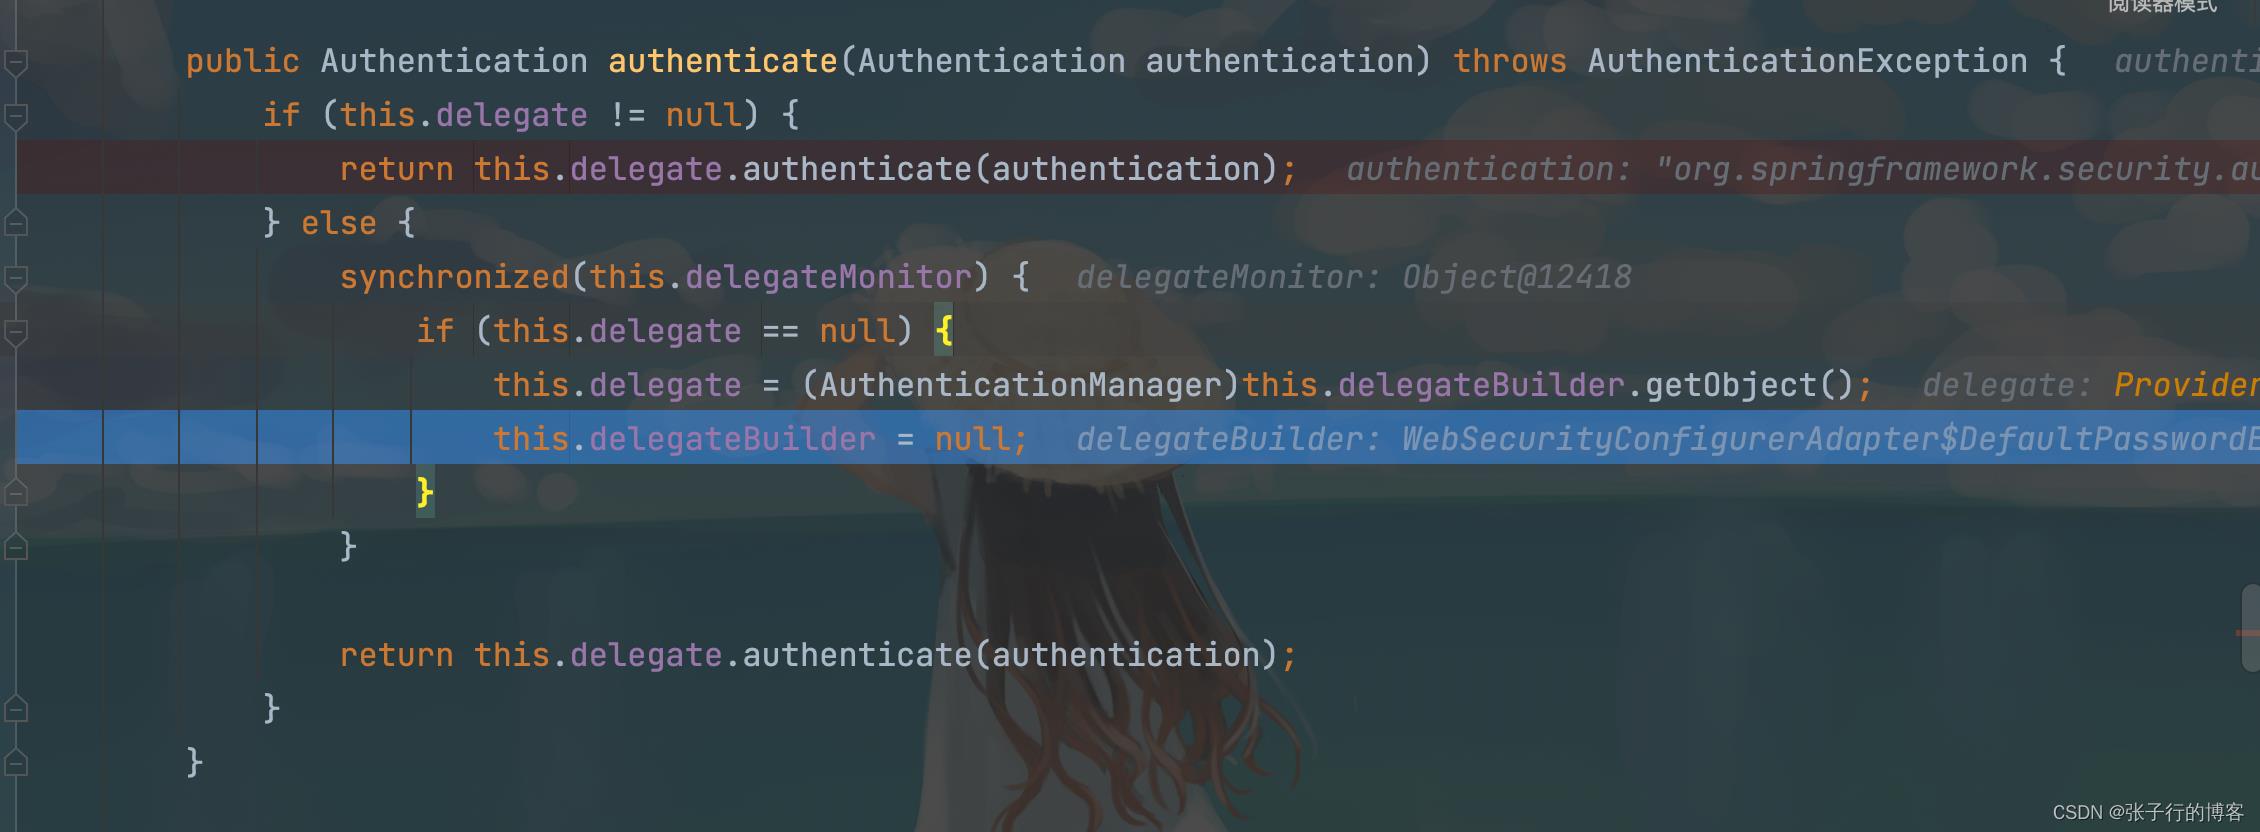

认证过程(存在扩展点)
遍历所有的 Providers,先看看有没有合适的 Provider 可以利用,如果没有,再从 praent 中尝试获取 Privider 进行之后的认证操作。小本本记住,这个 praent 是一个可以扩展的点。

由于我自己扩展了认证的逻辑最终会执行到 CustomAuthenticationProvider 中的 retrieveUser()方法中。

扩展 retrieveUser 方法()
不知道是否在屏幕前的小伙伴们,被 UserDetails 的loadUserByUsername方法只能传 username 的烦恼困惑过,我tm的公司要搞多用户登录啊,一个username不够用啊,哈哈哈哈哈,没事,咱们现在扩展了,你传100个参数咱们的 loadUserByUsername 方法都能接受到了。
public class CustomAuthenticationProvider extends AbstractUserDetailsAuthenticationProvider
private static final String USER_NOT_FOUND_PASSWORD = "userNotFoundPassword";
private PasswordEncoder passwordEncoder;
private volatile String userNotFoundEncodedPassword;
private CustomUserDetailsService userDetailsService;
private UserDetailsPasswordService userDetailsPasswordService;
public 以上是关于结合源码剖析Oauth2分布式认证与授权的实现流程的主要内容,如果未能解决你的问题,请参考以下文章