基于 KNN 和 人体关键点的动作分类 - Pose classification
Posted 炼丹狮
tags:
篇首语:本文由小常识网(cha138.com)小编为大家整理,主要介绍了基于 KNN 和 人体关键点的动作分类 - Pose classification相关的知识,希望对你有一定的参考价值。
动作分类
0. 摘要
手部动作分类具有多种应用场景,例如手语识别、手势识别等,本文主要利用KNN算法和已经生成好的手部关键点的数据进行动态的动作分类。
1. 介绍
1.1 KNN
最近邻 (k-Nearest Neighbors, KNN) 算法是一种分类算法, 1968年由 Cover和 Hart 提出, 应用场景有字符识别、 文本分类、 图像识别等领域。
该算法的思想是: 一个样本与数据集中的k个样本最相似, 如果这k个样本中的大多数属于某一个类别, 则该样本也属于这个类别。
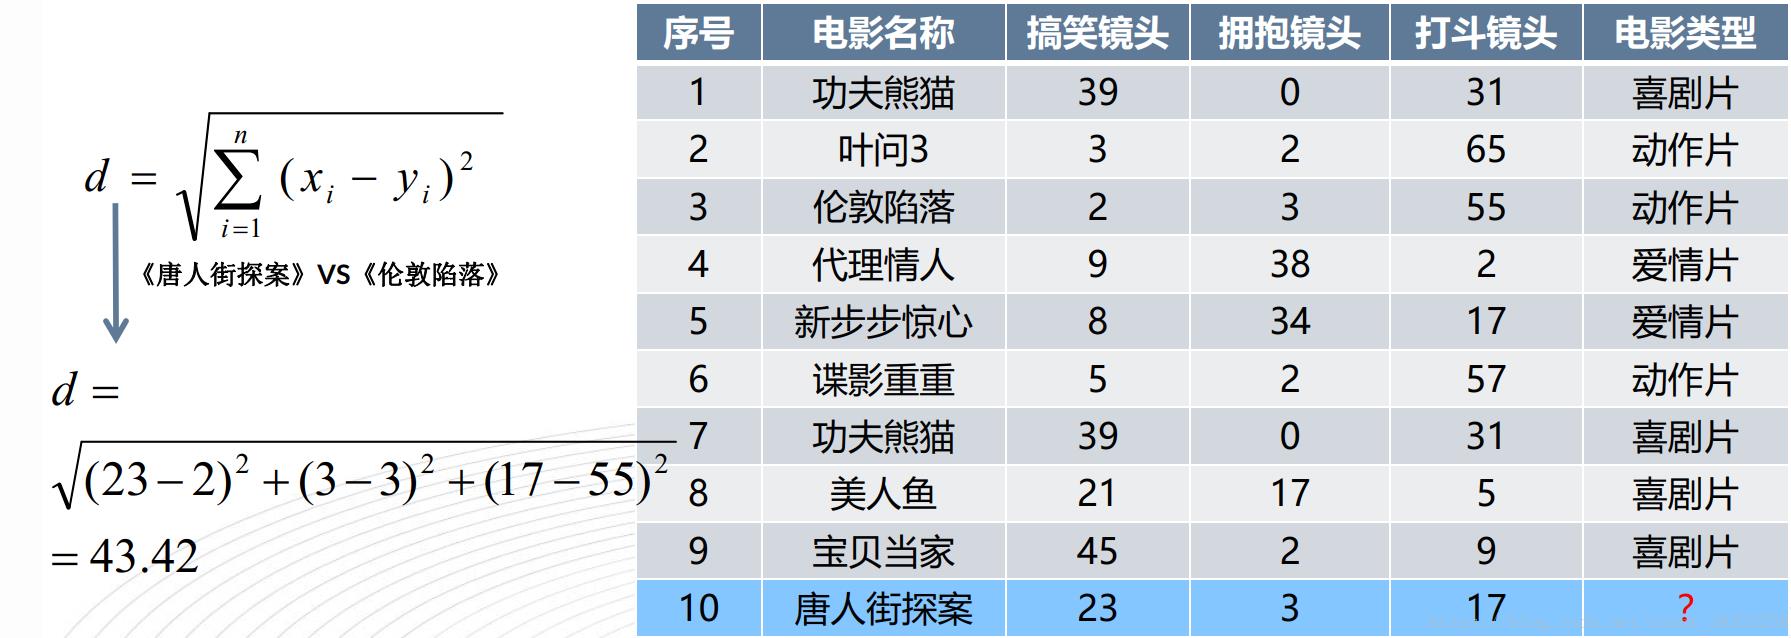
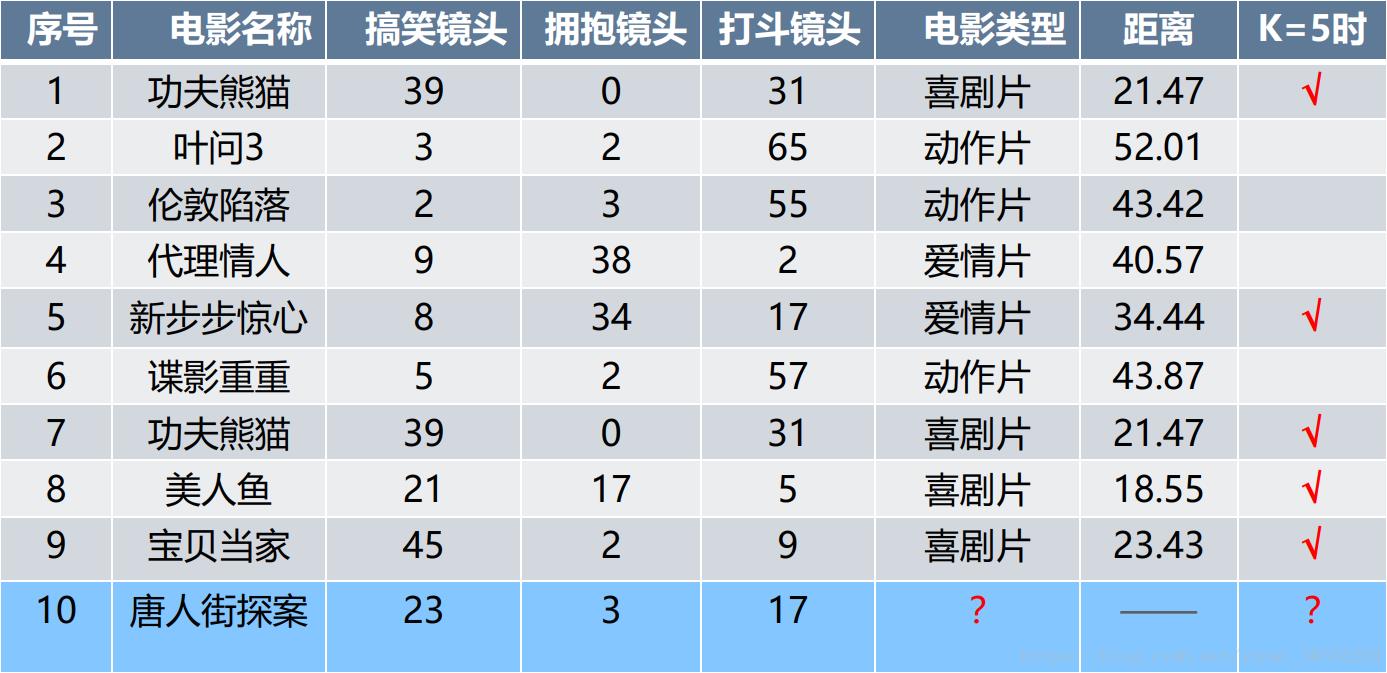
距离越近,就越相似,属于这一类的可能性就越大,举例说明:
- 例子中样本间的距离使用二范数,也就是欧氏距离


实验代码如下,可以自行调整k值:
import math

movie_data = "宝贝当家": [45, 2, 9, "喜剧片"],
              "美人鱼": [21, 17, 5, "喜剧片"],
              "澳门风云3": [54, 9, 11, "喜剧片"],
              "功夫熊猫3": [39, 0, 31, "喜剧片"],
              "谍影重重": [5, 2, 57, "动作片"],
              "叶问3": [3, 2, 65, "动作片"],
              "伦敦陷落": [2, 3, 55, "动作片"],
              "我的特工爷爷": [6, 4, 21, "动作片"],
              "奔爱": [7, 46, 4, "爱情片"],
              "夜孔雀": [9, 39, 8, "爱情片"],
              "代理情人": [9, 38, 2, "爱情片"],
              "新步步惊心": [8, 34, 17, "爱情片"]

# 测试样本  唐人街探案": [23, 3, 17, "?片"]
#下面为求与数据集中所有数据的距离代码:
x = [23, 3, 17]
KNN = []
for key, v in movie_data.items():
    d = math.sqrt((x[0] - v[0]) ** 2 + (x[1] - v[1]) ** 2 + (x[2] - v[2]) ** 2)
    KNN.append([key, round(d, 2), v[3]])

#按照距离小到大进行递增排序
KNN.sort(key=lambda dis: dis[1])

# 输出所用电影到 唐人街探案的距离
print(KNN)

#选取距离最小的k个样本,这里取k=5;
KNN=KNN[:5]
print(KNN)

#确定前k个样本所在类别出现的频率,并输出出现频率最高的类别
labels = "喜剧片":0,"动作片":0,"爱情片":0
for s in KNN:
    label = movie_data[s[0]]
    labels[label[3]] += 1
labels =sorted(labels.items(),key=lambda l: l[1],reverse=True)
print('归类:', labels)
print('预测结果:',labels[0][0])
K = 5 时候,预测结果是 :【喜剧片】

K = 1 时候,预测结果是 :【喜剧片】

KNN有几个特点:
(1)KNN属于惰性学习(lazy-learning)
这是与急切学习(eager learning)相对应的,因为KNN没有显式的学习过程!也就是说没有训练阶段,从上面的例子就可以看出,数据集事先已有了分类和特征值,待收到新样本后直接进行处理。
(2)KNN的计算复杂度较高
我们从上面的例子可以看到,新样本需要与数据集中每个数据进行距离计算,计算复杂度和数据集中的数据数目n成正比,也就是说,KNN的时间复杂度为O(n),因此KNN一般适用于样本数较少的数据集。
(3)k取不同值时,分类结果可能会有显著不同。
上例中,如果k取值为k=1,那么分类就是动作片,而不是喜剧片。一般k的取值不超过20,上限是n的开方。
例子来源 KNN算法详解,想看KNN详细介绍的小伙伴可以参看这个博主的介绍,写的非常好。
2. 代码
2.1 安装 MediaPipe 环境
启动 anaconda 环境, 创建名叫 mediapipe 虚拟环境
conda create -n mediapipe python=3.8
激活环境
conda activate mediapipe
安装mediapipe
pip install mediapipe
安装依赖
pip install pillow
pip install matplotlib
pip install numpy
pip install tqdm
pip install requests
2.2 训练数据
采集不同动作的数据,放到指定的文件夹下,然后调用训练代码,把图片转换成关键点的 embedder
3. 实验
3.1 生成训练数据结果
主要目的是根据采集好的训练数据,生成样本的csv文件,便于下面根据csv里面的样本数据进行动作分类。
# -*- coding: utf-8 -*-
"""
@Description :
@File        : handspose_csv.py
@Project     : poseclassification
@Time        : 2021/11/28 11:09
@Author      : ChenPengYe
@contact     : chenpengye@buaa.edu.cn
@Software    : PyCharm
"""

import os
from posecls.core.helper import BootstrapHelper
from posecls.core.classification_onepose import PoseClassifierOnePose
from posecls.core.handembedding import HandPoseEmbedder
from posecls.core.dumpcsv import DumpCsv

# 图片文件夹需要的结构如下,文件名称都可以自定义:
#
#   datasets/              : 生成关键点csv文件的原始训练数据
#     a/                   : 动作1:向上的动作
#       image_001.jpg
#       image_002.jpg
#       ...
#     down/         : 动作2:向下的动作
#       image_001.jpg
#       image_002.jpg
#       ...
#     ...
bootstrap_images_in_folder = 'datasets/a'

# 生成的图片和csv文件的文件夹
bootstrap_images_out_folder = 'poses_images_out'
bootstrap_csvs_out_folder = 'poses_csvs_out'

# 初始化Helper类
bootstrap_helper = BootstrapHelper(
    images_in_folder=bootstrap_images_in_folder,
    images_out_folder=bootstrap_images_out_folder,
    csvs_out_folder=bootstrap_csvs_out_folder,
)

# 遍历输入的数据集,检查有多少姿势类别,并打印该动作类别的图片数量
bootstrap_helper.print_images_in_statistics()

# 根据原始数据集,生成渲染后的图片 + 人体关键点数据的csv文件 【per_pose_class_limit这参数用来debug的时候看数据方便】
bootstrap_helper.bootstrap(per_pose_class_limit=None, pose_type="hand")

# 检查不同的动作,逐个在图片输出文件夹中生成了多少张图片
bootstrap_helper.print_images_out_statistics()

# 对齐 csv 文件数据和输出图片数据
bootstrap_helper.align_images_and_csvs(print_removed_items=True)
bootstrap_helper.print_images_out_statistics()

# 查找不好的数据:照片没有拍全的,关键点没有找全的等

# 把关键点数据转换成 embedding
pose_embedder = HandPoseEmbedder()

# 初始化动作分类器
pose_classifier = PoseClassifierOnePose(
    pose_samples_folder=bootstrap_csvs_out_folder,
    pose_embedder=pose_embedder,
    top_n_by_max_distance=30,
    top_n_by_mean_distance=10,
    n_landmarks=21)

# 查找异常数据
outliers = pose_classifier.find_pose_sample_outliers()
print('异常数据数量: ', len(outliers))

# 对异常数据进行分析
bootstrap_helper.analyze_outliers(outliers)

# 移除所有的异常图片
bootstrap_helper.remove_outliers(outliers)

# 对齐CSV文件中的样本和图片的样本
bootstrap_helper.align_images_and_csvs(print_removed_items=False)
bootstrap_helper.print_images_out_statistics()

# dump 合并所有样本数据:相当于把所有动作的样本数据都合并到一个文件
DumpCsv(bootstrap_csvs_out_folder, "hands_poses_csvs_out.csv")
3.2 根据训练集的样本来预测测试视频的动作
根据生成的样本文件,调用不同的分类器、计数器来对动作进行分类和计数,识别出来到底是哪个动作
# -*- coding: utf-8 -*-
"""
@Description :
@File        : fullbodypose-cls.py
@Project     : poseclassification
@Time        : 2021/11/28 17:28
@Author      : ChenPengYe
@contact     : chenpengye@buaa.edu.cn
@Software    : PyCharm
"""
import cv2
import tqdm
import numpy as np
import mediapipe as mp
from PIL import Image
from PIL import ImageFont
from PIL import ImageDraw

from mediapipe.python.solutions import drawing_utils as mp_drawing
from posecls.core.smoothing import EMADictSmoothing
from posecls.core.handembedding import HandPoseEmbedder
from posecls.core.classification_onepose import PoseClassifierOnePose
from posecls.core.counter_onpose import RepetitionCounterOnePose
from posecls.core.visualizer_onepose import PoseClassificationVisualizerOnePose
from posecls.common.common import show_image
from mediapipe.python.solutions import hands as mp_hands

mp_drawing_styles = mp.solutions.drawing_styles


class HandPoseClassificationMultiPose(object):
    """多种手部动作分类"""

    def __init__(self, video_path, class_names, pose_samples_folders, debug=False):
        # 初始化基本参数
        self._video_path = video_path
        self._class_names = class_names  # 多个动作类别
        self._pose_samples_folders = pose_samples_folders  # 多个样本的目录

        # 读取视频
        self.video_cap = cv2.VideoCapture(self._video_path)

        # 为生成有分类的视频准备一些参数
        self._video_n_frames = self.video_cap.get(cv2.CAP_PROP_FRAME_COUNT)  # 输入视频的帧数
        self._video_fps = self.video_cap.get(cv2.CAP_PROP_FPS)  # 输入视频的帧率
        self._video_width = int(self.video_cap.get(cv2.CAP_PROP_FRAME_WIDTH))  # 输入视频的宽
        self._video_height = int(self.video_cap.get(cv2.CAP_PROP_FRAME_HEIGHT))  # 输入视频的高

        # 初始化多个动作分类公用的组件:人体关键点跟踪器、关键点动作嵌入器
        self._init_common_componet()

        # 初始化和动作相关的组件包括分类器,计数器,渲染器、平滑器
        self._init_components()

        self._debug = debug


    def _init_common_componet(self):
        """初始化公共组件"""
        # 初始化MediaPipe的人体关键点跟踪器
        self._hands_tracker = mp_hands.Hands(static_image_mode=True, max_num_hands=1, min_detection_confidence=0.5)

        # 初始化手部嵌入器
        self._pose_embedder = HandPoseEmbedder()


    def _init_components(self):
        """ 初始化和动作相关的组件包括分类器,计数器,渲染器 """

        self._pose_classifiers = []
        self._repetition_counters = []
        self._pose_classification_visualizers = []
        self._pose_classification_filters = []

        # 遍历多个动作,初始化分类器和计数器
        for idx, class_name in enumerate(self._class_names):
            # 初始化分类器,注意一定要和做数据预处理的时候用的相同的参数
            pose_classifier = PoseClassifierOnePose(
                pose_samples_folder=self._pose_samples_folders[idx],
                pose_embedder=self._pose_embedder,
                top_n_by_max_distance=30,
                top_n_by_mean_distance=10,
                n_landmarks=21)
            self._pose_classifiers.append(pose_classifier)

            # 初始化计数器
            repetition_counter = RepetitionCounterOnePose(
                class_name=self._class_names[idx],
                enter_threshold=6,  # 进入该动作的阈值
                exit_threshold=4)  # 离开该动作的阈值
            self._repetition_counters.append(repetition_counter)

            # 初始化渲染类
            pose_classification_visualizer = PoseClassificationVisualizerOnePose(
                class_name=class_name,
                plot_x_max=self._video_n_frames,
                # Graphic looks nicer if it's the same as `top_n_by_mean_distance`.
                plot_y_max=10)
            self._pose_classification_visualizers.append(pose_classification_visualizer)

            # 初始化 EMA smoothing 类
            pose_classification_filter = EMADictSmoothing(
                window_size=10,
                alpha=0.2)
            self._pose_classification_filters.append(pose_classification_filter)


    def __call__(self):
        # OpenCV 打开输出视频
        if self._debug:
            out_video = cv2.VideoWriter(self._video_path + "-out.mp4", cv2.VideoWriter_fourcc('m', 'p', '4', 'v'),
                                        self._video_fps, (self._video_width * (len(self._class_names) + 1), self._video_height))
        else:
            out_video = cv2.VideoWriter(self._video_path + "-out.mp4", cv2.VideoWriter_fourcc('m', 'p', '4', 'v'),
                                        self._video_fps, (self._video_width, self._video_height))

        frame_idx = 0
        output_frame = None
        output_str = ""
        font_size = int(self._video_height * 0.05)
        counter_font = ImageFont.truetype("../Roboto-Regular.ttf", size=font_size)

        with tqdm.tqdm(total=self._video_n_frames, position=0, leave=True) as pbar:
            while True:
                # 获取视频的下一帧
                success, input_frame = self.video_cap.read()
                if not success:
                    break

                # 在当前帧上面执行关键点的推理
                input_frame = cv2.cvtColor(input_frame, cv2.COLOR_BGR2RGB)
                result = self._hands_tracker.process(input_frame)
                if result.multi_hand_landmarks is None:
                    continue

                pose_landmarks = result.multi_hand_landmarks[0]
                # 在当前帧上画上关键点
                output_frame = input_frame.copy()
                if pose_landmarks is not None:
                    mp_drawing.draw_landmarks(
                        output_frame,
                        pose_landmarks,
                        mp_hands.HAND_CONNECTIONS,
                        mp_drawing_styles.get_default_hand_landmarks_style(),
                        mp_drawing_styles.get_default_hand_connections_style())


                # 如果当前帧检测到了手部关键点
                pose_classification_list = []
                pose_classification_filtered_list = []
                repetitions_count_list = []
                if pose_landmarks is not None:
                    # 获取当前帧的关键点
                    frame_height, frame_width = output_frame.shape[0], output_frame.shape[1]
                    pose_landmarks = np.array([[lmk.x * frame_width, lmk.y * frame_height, lmk.z * frame_width]
                                               for lmk in pose_landmarks.landmark], dtype=np.float32)
                    assert pose_landmarks.shape == (21, 3), 'Unexpected landmarks shape: '.format(
                        pose_landmarks.shape)

                    # 对当前帧进行多分类
                    for idx, cls_name in enumerate(self._class_names):
                        pose_classification = self._pose_classifiers[idx](pose_landmarks)
                        pose_classification_list.append(pose_classification)
                        # 对预测结果进行平滑处理
                        pose_classification_filtered = self._pose_classification_filters[idx](pose_classification)
                        pose_classification_filtered_list.append(pose_classification_filtered)
                        # 对当前结果进行计数
                        repetitions_count = self._repetition_counters[idx](pose_classification_filtered)
                        repetitions_count_list.append(repetitions_count)
                        # print(frame_idx, cls_name," :pose_classification = ", pose_classification)

                # 如果当前帧没有检测到人体关键点
                else:

                    # 对当前帧进行多分类
                    for idx, cls_name in enumerate(self._class_names):
                        # 当前帧就没有分类预测结果
                        pose_classification = None
                        pose_classification_list.append(pose_classification)

                        # 仍然把空的分类结果送入到平滑器里面,为了下一帧可以正常的运行
                        pose_classification_filtered = self._pose_classification_filters[idx](dict())
                        pose_classification_filtered = None
                        pose_classification_filtered_list.append(pose_classification_filtered)

                        # Don't update the counter presuming that person is 'frozen'. Just
                        # take the latest repetitions count.
                        repetitions_count = self._repetition_counters[idx].n_repeats
                        repetitions_count_list.append(repetitions_count)

                if self._debug:
                    # 在当前帧上画分类的图和计数
                    concat_img = None
                    for idx, cls_name in enumerate(self._class_names):
                        vis_frame = self._pose_classification_visualizers[idx](
                            frame=output_frame,
                            pose_classification=pose_classification_list[idx],
                            pose_classification_filtered=pose_classification_filtered_list[idx],
                            repetitions_count=repetitions_count_list[idx])
                        if concat_img is None:
                            concat_img = vis_frame
                        else:
                            concat_img = np.concatenate((concat_img, vis_frame), axis=1)
                    output_frame = np.concatenate((concat_img, output_frame), axis=1)

                else:
                    # 处理输出字符
                    for idx, cls_name in enumerate(self._class_names):
                        output_str = output_str + self._repetition_counters[idx].output_character

                    # 画计数.
                    output_frame = Image.fromarray(output_frame)
                    output_img_draw = ImageDraw.Draw(output_frame, mode='RGB')

                    output_width = output_frame.size[0]
                    output_height = output_frame.size[1]

                    output_img_draw.text((output_width * 0.05,
                                          output_height * 0.05),
                                         str(output_str),
                                         font=counter_font,
                                         fill='red')

                # 保存输出的帧
                out_video.write(cv2.cvtColor(np.array(output_frame), cv2.COLOR_RGB2BGR))

                # Show intermediate frames of the video to track progress.
                if frame_idx % 50 == 0:
                    show_image(output_frame)

                frame_idx += 1
                pbar.以上是关于基于 KNN 和 人体关键点的动作分类 - Pose classification的主要内容,如果未能解决你的问题,请参考以下文章