Tomcat架构解析-----BIONIONIO2APR
Posted 阿里-马云的学习笔记
tags:
篇首语:本文由小常识网(cha138.com)小编为大家整理,主要介绍了Tomcat架构解析-----BIONIONIO2APR相关的知识,希望对你有一定的参考价值。
对于应用服务器来说,性能是非常重要的,基本可以说决定着这款应用服务器的未来。通常从软件角度来说,应用服务器性能包括如下几个方面:
1、请求处理的并发程度,当前主流服务器均采用异步的方式处理客户端的请求;
2、减少网络传输的数据量,提高网络利用率;
3、降低新建网络链接的开销,以实现链接在多个请求之间的复用;
4、选择合适的I/O方式,例如NIO等。
一、阻塞与非阻塞、同步与异步
                                       ------同步:发出一个调用时,没有得到结果之前,该调用不返回,由调用者主动等待调用结果。
                                      |
 关注的是消息通信机制---------------------|
                                      |
                                       ------异步:调用发出之后,调用直接返回,此时不会拿到返回结果。被调用者通过状态通知调用者或回调函数处理这个调用。


                                       ------阻塞:调用结果返回之前,当前线程会被挂起。
                                      |
 关注的是程序在等待调用结果时的状态---------|
                                      |
                                       ------非阻塞:调用返回结果之前,当前线程不会被挂起。
二、BIO
概念:bio基于流,是同步阻塞IO模式,数据的读取写入必须阻塞在一个线程内等待其完成。这里使用那个经典的烧开水例子,这里假设一个烧开水的场景,有一排水壶在烧开水,BIO的工作模式就是, 叫一个线程停留在一个水壶那,直到这个水壶烧开,才去处理下一 个水壶。但是实际上线程在等待水壶烧开的时间段什么都没有做。不知道io操作中什么时候有数据可读,所以一直是阻塞的模式。
缺点:当并发数达到一定量时,并且服务端需要一定的时间去处理请求时,例如1-2s,这时需要开启非常多的线程数,并且这些线程啥事不干,都是等着请求返回,大大浪费了系统资源,而且在线程切换上下文的过程中,也会浪费很多的资源
BIO是阻塞式I/O,通过socket在客户端与服务端建立双向链接以实现通信,主要步骤如下:
- a、服务端监听某个端口是否有链接请求;
- b、客户端向服务端发出链接请求;
- c、服务端向客户端返回accept()消息,此时链接成功;
- d、客户端和服务端通过send()、write()等方法与对方通信;
- e、关闭链接
eg:简单的网络通信如下:
服务端:
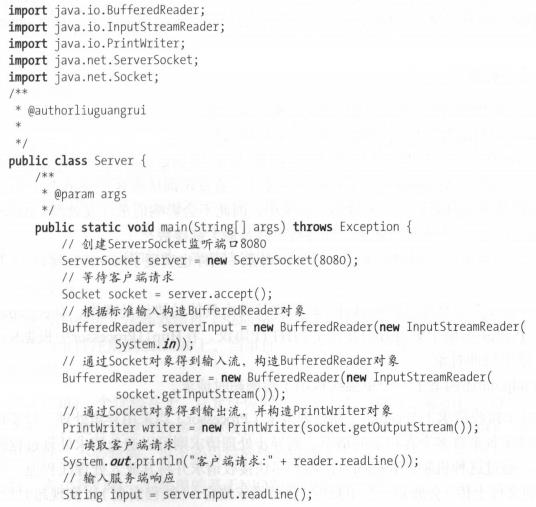
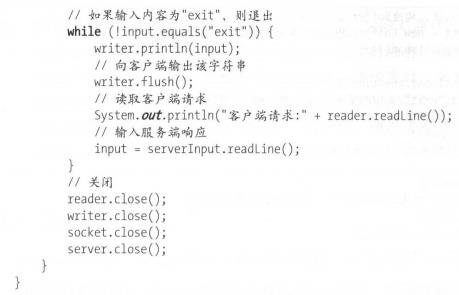
客户端:
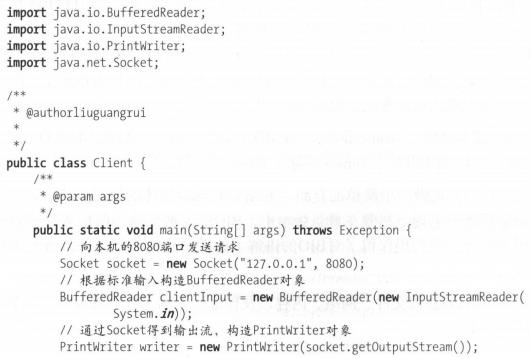

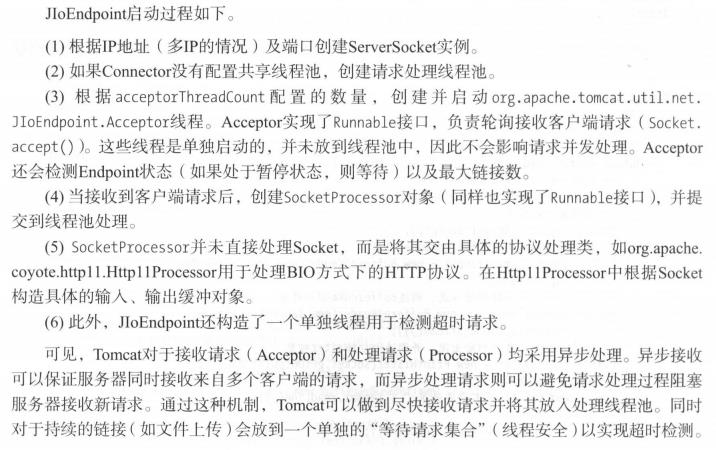
这种简单的示例只支持一个客户端链接到一个服务端,现实情况是N个客户端链接到服务端。Tomcat是这么实现的:
三、NIO
概念:bio的性能是相对较差的,在NIO中,基于块的概念,可以在不编写本地代码的情况下利用底层优化。
NIO结构图:

来个复杂点的:

selectionKey则是用来描述相关事件。
1、通道(channel)

2、缓冲区(buffer)

3、选择器(selector)

简单的NIO示例:
服务端:Nioserver
package com.ty.server;

import java.io.IOException;
import java.net.InetSocketAddress;
import java.net.ServerSocket;
import java.nio.ByteBuffer;
import java.nio.channels.SelectionKey;
import java.nio.channels.Selector;
import java.nio.channels.ServerSocketChannel;
import java.nio.channels.SocketChannel;
import java.util.Iterator;
import java.util.Set;

/**
 * 服务端
 */
public class NIOServer {

    /**
     * 定义服务端的selector,
     * 主要作用:
     * 1、将各种事件注册到selector中,selector监控各种事件的发生,例如accept、read等
     * 2、将不同事件分配到不同的channel
     */
    private Selector selector;

    //服务端初始化
    public void init() throws IOException {
        //创建一个selector对象
        this.selector = Selector.open();
        //创建serverSocketChanel对象
        ServerSocketChannel serverSocketChanel = ServerSocketChannel.open();
        //设置为非阻塞
        serverSocketChanel.configureBlocking(false);
        //通过serverSocketChannel对象获取serverSocket
        ServerSocket serverSocket = serverSocketChanel.socket();
        //绑定端口
        InetSocketAddress address = new InetSocketAddress(8080);
        serverSocket.bind(address);
        //注册accept事件到selector中,accept用于获取客户端请求
        serverSocketChanel.register(selector, SelectionKey.OP_ACCEPT);
    }

    //服务端启动服务
    public void start() throws IOException {
        //这地方只做一个最简单的示例,不考虑服务端stop
        while(true) {
            /**
             * selector监控客户端是否有对应事件发生,例如accept、read等等。
             * 注:此方法是阻塞的,当客户端一直没有事件触发,线程一直挂起,直到至少有一事件触发,走后续流程
             */
            selector.select();

            //获取该selector监控到的所有触发的事件
            Set<SelectionKey> selectionKeys = selector.selectedKeys();
            //拿到迭代器,循环所有监控到的事件
            Iterator<SelectionKey> iterator = selectionKeys.iterator();
            while(iterator.hasNext()) {
                //事件用SelectionKey描述,主要包括connect、accept、read、write事件
                SelectionKey selectionKey = iterator.next();
                //每种事件只处理一次,避免重复处理
                iterator.remove();
                if(selectionKey.isAcceptable()) {
                    accept(selectionKey);
                }
                if(selectionKey.isReadable()) {
                    read(selectionKey);
                }
            }
        }
    }

    private void accept(SelectionKey selectionKey) throws IOException {
        /**
         * 从selectionkey中获取serverSocketChannel。
         * ServerSocketChannel 是一个可以监听新进来的TCP连接的通道, 就像标准IO中的ServerSocket一样
         */
        ServerSocketChannel serverSocketChannel = (ServerSocketChannel) selectionKey.channel();
        //serverSocketChannel监听到新连接后,会创建socketChannel。获取socketChannel
        SocketChannel socketChannel = serverSocketChannel.accept();
        //设置为非阻塞
        socketChannel.configureBlocking(false);
        socketChannel.register(selector, SelectionKey.OP_READ);
    }

    private void read(SelectionKey selectionKey) throws IOException {
        /**
         * SocketChannel是一个连接到TCP网络套接字的通道,就像标准IO中的socket
         * 创建方式:可以通过以下2种方式创建SocketChannel
         * 1、打开一个SocketChannel并连接到互联网上的某台服务器。
         * 2、一个新连接到达ServerSocketChannel时,会创建一个SocketChannel。
         */
        SocketChannel socketChannel = (SocketChannel) selectionKey.channel();
        //创建读取缓冲区
        ByteBuffer byteBuffer = ByteBuffer.allocate(1024);
        //通过socketChannel.read()获取客户端的请求数据
        socketChannel.read(byteBuffer);
        String request = new String(byteBuffer.array()).trim();
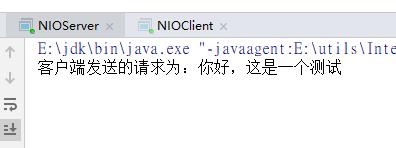
        System.out.println("客户端发送的请求为:" + request);
        //将一个数组包装成ByteBuffer
        ByteBuffer outBuffer = ByteBuffer.wrap("请求收到啦!".getBytes());
        //数据发送到客户端
        socketChannel.write(outBuffer);
    }

    public static void main(String[] args) throws IOException {
        NIOServer server = new NIOServer();
        server.init();
        server.start();
    }
}
客户端:NIOClient
package com.ty.client;

import java.io.BufferedReader;
import java.io.IOException;
import java.io.InputStreamReader;
import java.net.InetSocketAddress;
import java.nio.ByteBuffer;
import java.nio.channels.SelectionKey;
import java.nio.channels.Selector;
import java.nio.channels.SocketChannel;
import java.util.Iterator;

public class NIOClient {

    private Selector selector;

    private BufferedReader clientInput = new BufferedReader(new InputStreamReader(System.in));

    public void init() throws IOException {
        //创建selector
        this.selector = Selector.open();
        //创建SocketChannel
        SocketChannel socketChannel = SocketChannel.open();
        socketChannel.configureBlocking(false);
        socketChannel.connect(new InetSocketAddress("127.0.0.1", 8080));
        //注册connect事件
        socketChannel.register(selector, SelectionKey.OP_CONNECT);
    }

    public void start() throws IOException {
        while(true) {
            selector.select();
            Iterator<SelectionKey> iterator = selector.selectedKeys().iterator();
            while(iterator.hasNext()) {
                SelectionKey selectionKey = iterator.next();
                iterator.remove();
                if(selectionKey.isConnectable()) {
                    connect(selectionKey);
                }
                if(selectionKey.isReadable()) {
                    read(selectionKey);
                }
            }
        }
    }

    public void connect(SelectionKey selectionKey) throws IOException {
        SocketChannel socketChannel = (SocketChannel) selectionKey.channel();
        //如果客户端正在链接
        if(socketChannel.isConnectionPending()) {
            //如果客户端已经链接成功
            if(socketChannel.finishConnect()) {
                socketChannel.configureBlocking(false);
                //链接成功后自然要获取服务端的返回,因此注册read事件
                socketChannel.register(selector, SelectionKey.OP_READ);
                String request = clientInput.readLine();
                //数据发送到服务端
                socketChannel.write(ByteBuffer.wrap(request.getBytes()));
            }else {
                //事件未注册成功,取消掉
                selectionKey.cancel();
            }
        }
    }

    public void read(SelectionKey selectionKey) throws IOException {
        //socketChannel与服务端的对应,双方友好建立一个通道
        SocketChannel socketChannel = (SocketChannel) selectionKey.channel();
        ByteBuffer byteBuffer = ByteBuffer.allocate(1024);
        socketChannel.read(byteBuffer);
        System.out.println("服务端响应为:" + new String(byteBuffer.array()).trim());
        String request = clientInput.readLine();
        socketChannel.write(ByteBuffer.wrap(request.getBytes()));
    }

    public static void main(String[] args) throws IOException {
        NIOClient client = new NIOClient();
        client.init();
        client.start();
    }
}
测试结果:
服务端:
客户端:
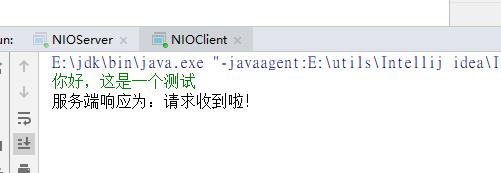
这样通过NIO,客户端与服务端即可正常通信。
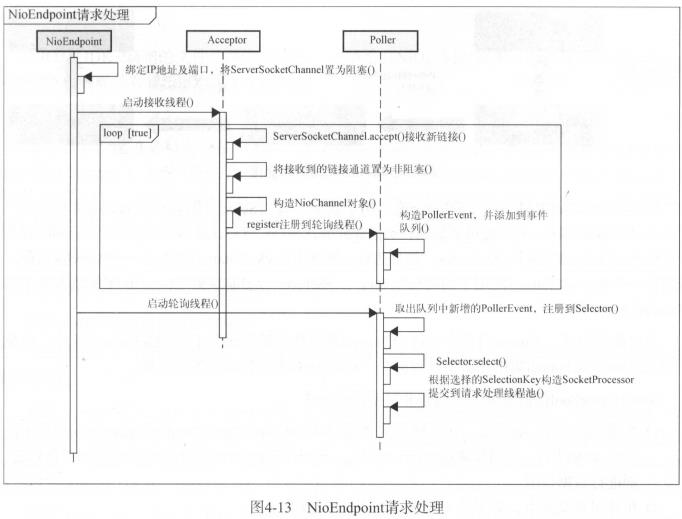
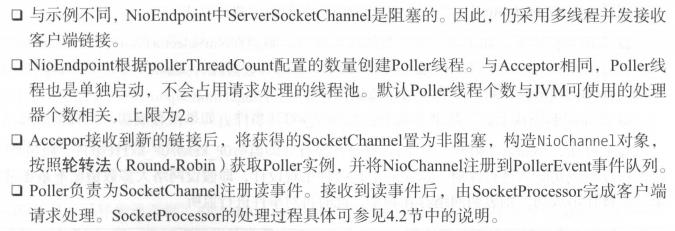
Tomcat中的NIO实现:

以上是关于Tomcat架构解析-----BIONIONIO2APR的主要内容,如果未能解决你的问题,请参考以下文章