环境准备—之—linux下安装svn
Posted 你是猪啊!
tags:
篇首语:本文由小常识网(cha138.com)小编为大家整理,主要介绍了环境准备—之—linux下安装svn相关的知识,希望对你有一定的参考价值。
借鉴自
http://www.cnblogs.com/liuxianan/p/linux_install_svn_server.html 这个很详细,但不是我的风格
https://blog.csdn.net/bluishglc/article/details/42245065
安装,使用yum安装svn服务
[root@bogon /]# yum install subversion
groupadd svn #为运行svn设置专用的用户组,非必须操作,但推荐
useradd -d /var/svn -g svn svn #为运行svn设置专用的用户,同时指定home目录为:/var/svn 非必须操作,但推荐
passwd svn #为运行svn专用用户设置密码,非必须操作,但推荐
su -l svn #开始切换为svn用户进行后续操作
创建代码库的文件夹
[root@bogon home]# mkdir -p /home/svn/default-repo #
创建代码库
[root@bogon home]# svnadmin create /home/svn/default-repo/  #建立代码库,/home/svn/default-repo/为代码库所在文件夹

[root@bogon home]# cd /home/svn/default-repo
[root@bogon default-repo]# ll
总用量 8
drwxr-xr-x. 2 root root  54 2月   6 22:36 conf
drwxr-sr-x. 6 root root 233 2月   6 22:36 db
-r--r--r--. 1 root root   2 2月   6 22:36 format
drwxr-xr-x. 2 root root 231 2月   6 22:36 hooks
drwxr-xr-x. 2 root root  41 2月   6 22:36 locks
-rw-r--r--. 1 root root 229 2月   6 22:36 README.txt
配置文件
配置svnserve.conf
[root@bogon default-repo]# cd conf
[root@bogon conf]# ll
总用量 12
-rw-r--r--. 1 root root 1080 2月   6 22:36 authz  #权限控制文件
-rw-r--r--. 1 root root  309 2月   6 22:36 passwd #是帐号密码文件
-rw-r--r--. 1 root root 3090 2月   6 22:36 svnserve.conf  #是SVN服务配置文件
[root@bogon conf]# vim svnserve.conf

打开下面的5个注释
anon-access = read  #匿名用户可读
auth-access = write #授权用户可写
password-db = passwd #使用哪个文件作为账号文件
authz-db = authz #使用哪个文件作为权限文件
realm = /home/svn/default-repo # 认证空间名,版本库所在目录
2点注意:
- 最后一行的realm记得改成你的svn目录
- 打开注释时切记前面不要留有空格,否则可能有问题(网上说的,我没有亲测)
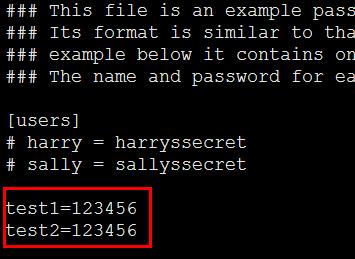
配置passwd
[root@bogon conf]# vim passwd
[users]
test1=123456
test2=123456
上面的例子中我们创建了2个用户,一个test1,一个test2

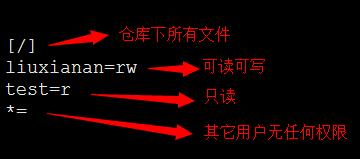
配置authz
[root@bogon conf]# vim authz
插入以下信息
[/]
test1=rw
test2=r
*=
上面配置的含义是,liuxianan对/home/svn/下所有文件具有可读可写权限,test只有只读权限,除此之外,其它用户均无任何权限,最后一行*=很重要不能少。

拓展:使用用户分组
这个一般不用,但是记录下来。
还是这个文件:
[root@localhost conf]# vi authz
[groups]
group1 = liuxianan
group2 = test1,test2
[/]
@group1 = rw
@group2 = r
* =
上面配置中创建了2个分组,分组1的用户可读可写,分组2的用户只读。
格式说明:
版本库目录格式:
[<版本库>:/项目/目录]
@<用户组名> = <权限>
<用户名> = <权限>
启动与停止
[root@localhost conf]# svnserve -d -r /home/svn/default-repo #(启动)默认端口3690[root@localhost conf]# killall svnserve(停止)上述启动命令中,-d表示守护进程, -r 表示在后台执行。停止还可以采用杀死进程的方式:
注:同一台服务器可以运行多个svnserver,只需要启动时换一个端口即可:svnserve -d -r /home/svn/another-repo/ --listen-port 3691
Linux服务器端设置svn开机启动(非centos7以上版本)
ps:非centos7以上版本
开机启动来源自 https://www.cnblogs.com/zengjiqiang/p/7413910.html
(1)在Linux服务器跟目录((/root路径下))创建一个脚本文件
# touch svn.sh
(2) 进入脚本文件
# vim svn.sh
(3)添加一下内容
#!/bin/bash
/usr/bin/svnserve -d -r /home/svn/default-repo
解释一下:
这里的svnserve路径保险起见,最好写绝对路径,因为启动的时候,环境变量也许没加载。
绝对路径怎么查?
# which svnserve
(4)改该脚本的执行权限
# chmod 777 svn.sh
(5)加入自动运行
# vi /etc/rc.d/rc.local
在末尾添加脚本的路径:
/root/svn.sh
(6)重启Linux服务器,重启后查看svn服务器是否已经开启
# ps -ef|grep svnserve
Linux服务器端设置svn开机启动---centos7
出自 https://www.cnblogs.com/keta/p/8629450.html
安装好 svn 服务后,默认是没有随系统启动自动启动的, CentOS 7 的 /etc/rc.d/rc.local 是没有执行权限的, 系统建议创建 systemd service 启动服务
方法一:
1、使用systemctl cat svnserve.service,查找环境配置文件,得到 默认位置 在这个目录下 /etc/sysconfig/svnserve
[root@bogon ~]# systemctl cat svnserve.service
这个命令就是为了查看这个红色路径
Warning: svnserve.service changed on disk. Run \'systemctl daemon-reload\' to reload units.
# /usr/lib/systemd/system/svnserve.service #svnserve.service服务的地址
[Unit]
Description=Subversion protocol daemon
After=syslog.target network.target

[Service]
Type=forking
EnvironmentFile=/etc/sysconfig/svnserve   #环境文件
ExecStart=/usr/bin/svnserve --daemon --pid-file=/run/svnserve/svnserve.pid $OPTIONS
#ExecStart=/usr/bin/svnserve --daemon --pid-file=/run/svnserve/svnserve.pid  -d -r /home/svn/default-repo

[Install]
WantedBy=multi-user.target
[root@bogon ~]#
[Unit]:服务的说明
Description:描述服务After:描述服务类别
[Service]服务运行参数的设置
Type=forking是后台运行的形式
ExecStart为服务的具体运行命令
ExecReload为重启命令
ExecStop为停止命令
PrivateTmp=True表示给服务分配独立的临时空间注意:
[Service]的启动、重启、停止命令全部要求使用绝对路径
2、修改/etc/sysconfig/svnserver
[root@bogon ~]# vim /etc/sysconfig/svnserve

# OPTIONS is used to pass command-line arguments to svnserve.
#
# Specify the repository location in -r parameter:
OPTIONS="-r /var/svn"   #将这个路径改为版本库的路径
#这里需要改成如下
OPTIONS="-r /home/svn/default-repo"
3、服务命令:
启动svnserve服务---systemctl start svnserve.service
设置开机自启动----systemctl enable svnserve.service
停止开机自启动----systemctl disable svnserve.service
查看服务当前状态----systemctl status svnserve.service
重新启动服务---systemctl restart svnserve.service
查看所有已启动的服务---systemctl list-units --type=service
4、重启机器,查看svn服务是否启动
---------------------
作者:这个码农有点笨
来源:CSDN
原文:https://blog.csdn.net/NDF923/article/details/74171867
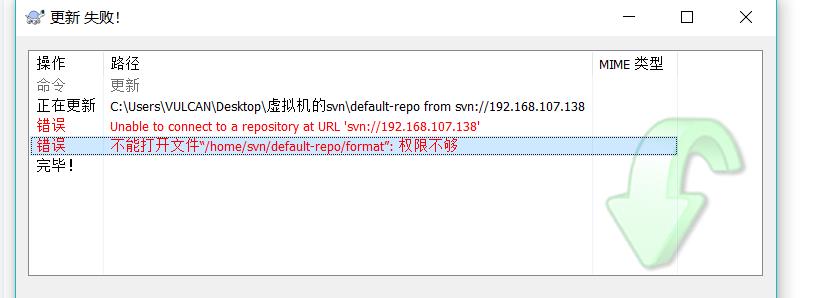
报错

服务开机自启了,但是使用的时候报这个错误!

解决方法
https://blog.csdn.net/qq_32596527/article/details/82780595
https://blog.csdn.net/qq_32596527/article/details/82773584
关闭selinux:
临时关闭:
[root@CSDNBolg ~]# setenforce 0
[root@CSDNBolg ~]# getenforce
Permissive
这时使用命令开启SVN可以正常使用:
[root@CSDNBolg ~]# systemctl start svnserve.service
永久关闭:
需要重启:
[root@CSDNBolg ~]# vim /etc/selinux/config
修改为:
SELINUX=disabled
---------------------
作者:徐晓伟
来源:CSDN
原文:https://blog.csdn.net/qq_32596527/article/details/82773584
版权声明:本文为博主原创文章,转载请附上博文链接!
常用命令
svnserve -d -r /home/svn/default-repo #启动svn,默认端口3690
svnserve -d -r /home/svn/another-repo/ --listen-port 3691
ps -ef | grep svnserve
systemctl status firewalld.service 查看防火墙状态
systemctl stop/start firewalld.service 关闭/开启防火墙
systemctl disable firewalld.service 禁止防火墙服务启动
https://jingyan.baidu.com/article/ff42efa9fd8c1cc19e2202bb.html
以上是关于环境准备—之—linux下安装svn的主要内容,如果未能解决你的问题,请参考以下文章