VGG-pytorch实现
Posted TOPthemaster
tags:
篇首语:本文由小常识网(cha138.com)小编为大家整理,主要介绍了VGG-pytorch实现相关的知识,希望对你有一定的参考价值。
VGG
1.网络结构


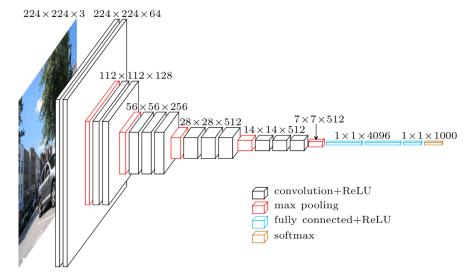
如图可见,VGG网络的构造很简单,通过不断地卷积,池化,扩大通道数,降低宽高,最终平展为一维数据再进行softmax分类。相较于AlexNet而言,VGG最大的特征就是降低了卷积核尺寸,增加了卷积核的深度层数,拥有更多的非线性变换,增加了CNN对特征的学习能力。
2.pytorch网络设计
这里采用的数据集为FashionMNIST数据集,慢慢地往后的文章也会引入更多的数据集使用,Fashion MNIST包含了10种类别70000个不同时尚穿戴品的图像,整体数据结构上跟MNIST完全一致。每张图像的尺寸同样是28*28,但下载下来的数据通道数为1。
#定义块
def vgg_block(num_convs, in_channels, num_channels):
    layers = []
    for i in range(num_convs):
        layers += [nn.Conv2d(in_channels=in_channels, out_channels=num_channels, kernel_size=3, padding=1)]
        in_channels = num_channels
    layers += [nn.ReLU()]
    layers += [nn.MaxPool2d(kernel_size=2, stride=2)]
    return nn.Sequential(*layers)


# 网络定义
class VGG(nn.Module):
    def __init__(self):
        super(VGG, self).__init__()
        # 这里适配输入为3x224x224的图片
        self.conv_arch = ((1, 3, 64), (1, 64, 128), (2, 128, 256), (2, 256, 512), (2, 512, 512))
        self.conv_arch_28x28 =((2, 256, 512), (2, 512, 512))
        # 这里为了适配1x28x28的输入图片大小,对原始网络层做些修改
        #前四层不做池化,保留原始特征

        self.conv_28x28=nn.Conv2d(in_channels=1, out_channels=64, kernel_size=3, padding=1)
        self.conv_28x28_2 = nn.Conv2d(in_channels=64, out_channels=128, kernel_size=3, padding=1)
        self.conv_28x28_3 = nn.Conv2d(in_channels=128, out_channels=256, kernel_size=3, padding=1)
        self.conv_28x28_4 = nn.Conv2d(in_channels=256, out_channels=256, kernel_size=3, padding=1)
        #后4层使用VGG块构造
        layers = []
        for (num_convs, in_channels, num_channels) in self.conv_arch_28x28:
            layers += [vgg_block(num_convs, in_channels, num_channels)]
        self.features = nn.Sequential(*layers)
        self.Linear = nn.Linear(512 * 7 * 7, 4096)
        self.drop1 = nn.Dropout(0.5)
        self.Linear2 = nn.Linear(4096, 4096)
        self.drop2 = nn.Dropout(0.5)
        self.Linear3 = nn.Linear(4096, 10)

    def forward(self, x):
        x=F.relu(self.conv_28x28(x))
        x = F.relu(self.conv_28x28_2(x))
        x = F.relu(self.conv_28x28_3(x))
        x = F.relu(self.conv_28x28_4(x))
        x = self.features(x)
        x = x.view(-1, 512 * 7 * 7)
        x = self.Linear3(self.drop2(F.relu(self.Linear2(self.drop1(F.relu(self.Linear(x)))))))
        return x
3.网络测试
1.数据集读取分类
# 数据增强
draw = draw_tool.draw_tool()
device = torch.device("cuda:0" if torch.cuda.is_available() else "cpu")
transform = transforms.Compose(
    [
        transforms.RandomHorizontalFlip(),
        transforms.RandomGrayscale(),
        transforms.ToTensor()])
# 验证集不增强
transform1 = transforms.Compose(
    [
        transforms.ToTensor()])

train_set = torchvision.datasets.FashionMNIST(root='F:\\\\pycharm\\\\dataset', train=True,
                                              download=True, transform=transform)
train_loader = torch.utils.data.DataLoader(train_set, batch_size=30,
                                           shuffle=True, num_workers=2)

test_set = torchvision.datasets.FashionMNIST(root='F:\\\\pycharm\\\\dataset', train=False,
                                             download=True, transform=transform1)
test_loader = torch.utils.data.DataLoader(test_set, batch_size=30,
                                          shuffle=False, num_workers=2)
2.模型训练设置
model = VGG()

criterion = torch.nn.CrossEntropyLoss()
optimizer = optim.SGD(model.parameters(), lr=0.01, momentum=0.5)
model = model.to(device)
3.训练
if __name__ == '__main__':
    for epoch in range(4):
        train(epoch)
        torch.save(model.state_dict(), "minist_last.pth")

    draw.show()
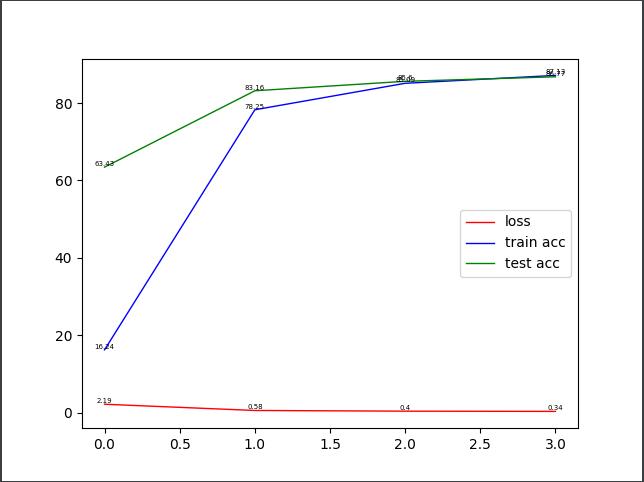
训练部分,可能是由于网络太大,或者是数据集太多的缘故,跑得非常慢,所以这里只针对整个数据集进行了4个epoch训练,训练测试结果如下:


最后一次训练的精度达到了86.77%,但明显可以看出还可以继续增加。
4.总结
VGG16相比AlexNet的一个改进是采用连续的几个3x3的卷积核代替AlexNet中的较大卷积核(11x11,7x7,5x5)。对于给定的感受野,采用堆积的小卷积核是优于采用大的卷积核,因为多层非线性层可以增加网络深度来保证学习更复杂的模式,而且代价还比较小(参数更少)。
在VGG中,使用了3个3x3卷积核来代替7x7卷积核,使用了2个3x3卷积核来代替5*5卷积核,这样做的主要目的是在保证具有相同感知野的条件下,提升了网络的深度,在一定程度上提升了神经网络的效果。这点我认为应该是把卷积宽高改革为卷积层数,能更好地去调整参数。
使用3x3卷积核的好处:减少了总体传入显卡的参数,且有利于保护图像的原始性质。
最后非常希望有一样的初学者或者大佬能多评论留言,一起分享一下过程和经历,感激不尽。
5.补充
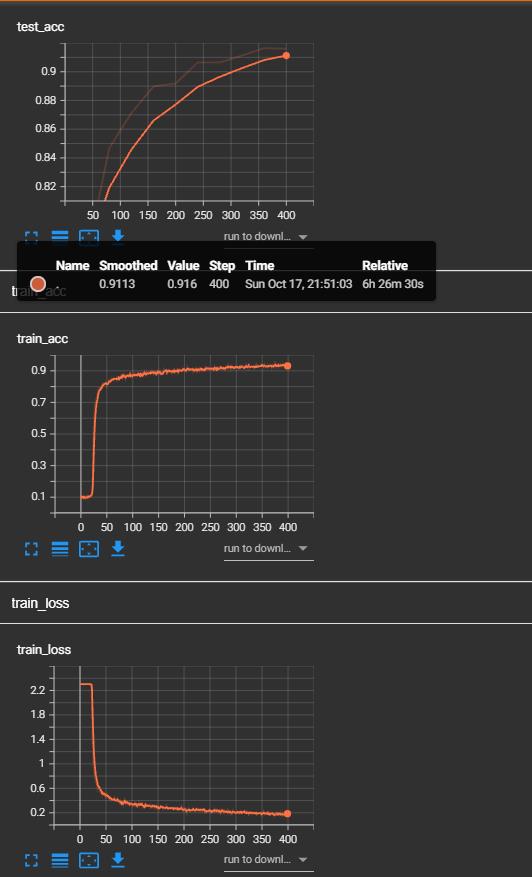
最近学着用tensorboard,又跑了一遍,记录一下效果。

以上是关于VGG-pytorch实现的主要内容,如果未能解决你的问题,请参考以下文章