小程序实现城市地区三级联动
Posted 10后程序员劝退师
tags:
篇首语:本文由小常识网(cha138.com)小编为大家整理,主要介绍了小程序实现城市地区三级联动相关的知识,希望对你有一定的参考价值。
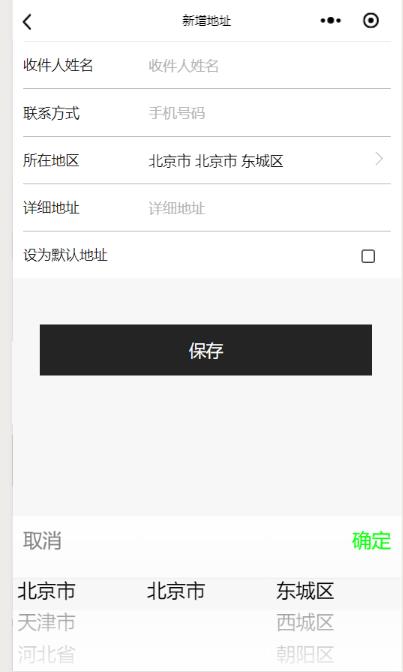
效果:
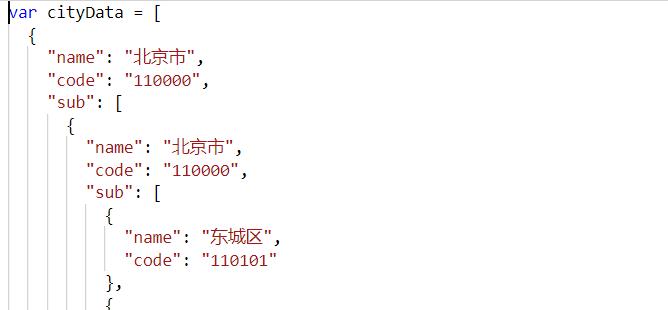
首先我建议城市那些数据最好不用接口拿,那么多数据第一次请求怕是直接会卡死,可以在网上找到一份城市的json数据格式的js
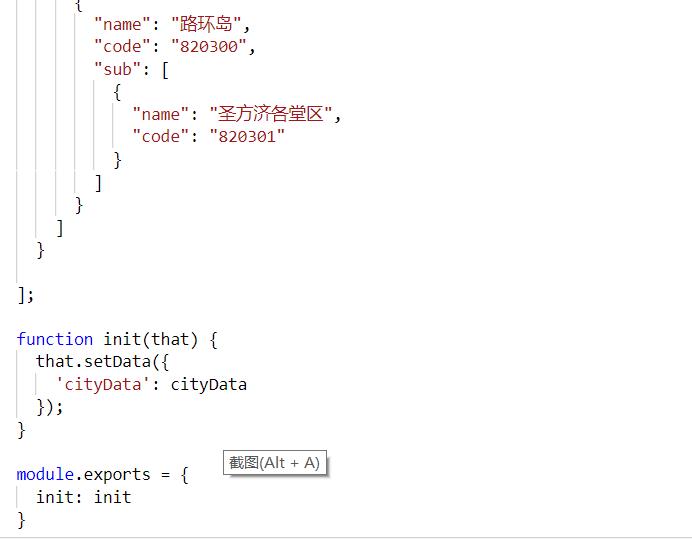
引用: var tcity = require("../../utils/citys.js")

结尾导出:

wxml中 :使用小程序的picker-view这个组件
 <view class=\'addAddress detailplace\'>
     <text class=\'header\'>所在地区</text>
     <input type=\'text\' placeholder=\'请选择所在区域\' class=\'edit\' placeholder-class="phcolor" bindblur=\'getUserInfo3\' value="{{province}} {{city}} {{county}}" focus="{{focus}}" bindfocus="open" disabled="true"></input>
     <button type="primary"  class=\'watchLocation\' bindtap="open"></button>
  </view>

这里是弹出的城市选择:
<view wx:if="{{condition}}" class="citypicker">
  <picker-view indicator-style="height: 50rpx;" style="width: 100%; height: 300rpx;" value="{{value}}" bindchange="bindChange" class="citybody">
    <view class="cityheader">
      <view bindtap="open" class="city-cancel">取消</view>
      <view bindtap="open" class="city-true">确定</view>
    </view>
    <picker-view-column class=\'picker-one\'>
      <view wx:for="{{provinces}}" wx:key="item" style="line-height: 50rpx;padding-left:10rpx;">{{item}}</view>
    </picker-view-column>
    <picker-view-column  class=\'picker-one\'>
      <view wx:for="{{citys}}" wx:key="item" style="line-height: 50rpx;padding-left:10rpx;">{{item}}</view>
    </picker-view-column>
    <picker-view-column  class=\'picker-one\'>
      <view wx:for="{{countys}}" wx:key="item" style="line-height: 50rpx;padding-left:10rpx;">{{item}}</view>
    </picker-view-column>
  </picker-view>
</view>

js中:
data:{
   // 城市三级联动
    provinces: [],
    province: "",
    citys: [],
    city: "",
    countys: [],
    county: \'\',
    value: [0, 0, 0],
    values: [0, 0, 0],
    condition: false
}

 bindChange: function (e) {
    //console.log(e);
    var val = e.detail.value
    var t = this.data.values;
    var cityData = this.data.cityData;

    if (val[0] != t[0]) {
      console.log(\'province no \');
      const citys = [];
      const countys = [];


      for (let i = 0; i < cityData[val[0]].sub.length; i++) {
        citys.push(cityData[val[0]].sub[i].name)
      }
      for (let i = 0; i < cityData[val[0]].sub[0].sub.length; i++) {
        countys.push(cityData[val[0]].sub[0].sub[i].name)
      }


      this.setData({
        province: this.data.provinces[val[0]],
        city: cityData[val[0]].sub[0].name,
        citys: citys,
        county: cityData[val[0]].sub[0].sub[0].name,
        countys: countys,
        values: val,
        value: [val[0], 0, 0]
      })


      return;
    }
    if (val[1] != t[1]) {
      console.log(\'city no\');
      const countys = [];


      for (let i = 0; i < cityData[val[0]].sub[val[1]].sub.length; i++) {
        countys.push(cityData[val[0]].sub[val[1]].sub[i].name)
      }


      this.setData({
        city: this.data.citys[val[1]],
        county: cityData[val[0]].sub[val[1]].sub[0].name,
        countys: countys,
        values: val,
        value: [val[0], val[1], 0]
      })
      return;
    }
    if (val[2] != t[2]) {
      console.log(\'county no\');
      this.setData({
        county: this.data.countys[val[2]],
        values: val
      })
      return;
    }


  },
  open: function () {
    this.setData({
      condition: !this.data.condition
    })
  },
  onLoad: function () {
    console.log("onLoad");
    var that = this;


    tcity.init(that);


    var cityData = that.data.cityData;


    const provinces = [];
    const citys = [];
    const countys = [];


    for (let i = 0; i < cityData.length; i++) {
      provinces.push(cityData[i].name);
    }
    console.log(\'省份完成\');
    for (let i = 0; i < cityData[0].sub.length; i++) {
      citys.push(cityData[0].sub[i].name)
    }
    console.log(\'city完成\');
    for (let i = 0; i < cityData[0].sub[0].sub.length; i++) {
      countys.push(cityData[0].sub[0].sub[i].name)
    }


    that.setData({
      \'provinces\': provinces,
      \'citys\': citys,
      \'countys\': countys,
      \'province\': cityData[0].name,
      \'city\': cityData[0].sub[0].name,
      \'county\': cityData[0].sub[0].sub[0].name
    })
    console.log(\'初始化完成\');
  }

wxss:
.citypickers{
  position: fixed;
  height: 100%;
  width: 100%;
  min-height: 100%;
  background-color: #ff0;
}
.citybody {
  position: fixed;
  bottom: 0px;
}
.cityheader {
  position: absolute;
  top:0rpx;
  width: 100%;
  z-index: 5;
}
.city-cancel {
  float: left;
  margin: 20rpx;
  color: #828282;
}
.city-true {
  float: right;
  margin: 20rpx;
  color: #10FF10;
}
.section .picker {
  background-color: #fff;
  border-bottom: 2px #cccccc solid;
  border-top: 2px #d9d9d9 solid;
  padding: 20rpx;
}
以上是关于小程序实现城市地区三级联动的主要内容,如果未能解决你的问题,请参考以下文章