linux上lvm扩容
Posted 鵷虹hw
tags:
篇首语:本文由小常识网(cha138.com)小编为大家整理,主要介绍了linux上lvm扩容相关的知识,希望对你有一定的参考价值。
1--创建LVM分区
方法和创建其他一般分区的方式是一样的,区别仅仅是LVM的分区类型为8e.
查看已有分区
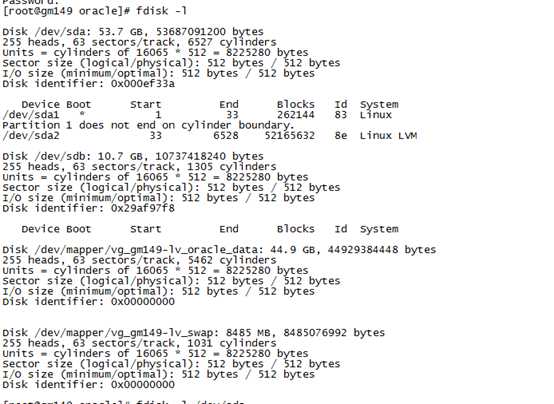
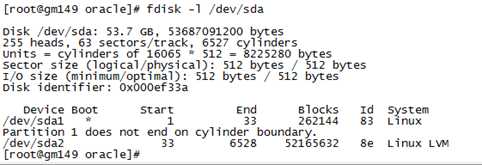

使用fdisk创建分区,根据设备文件的绝对路径(/dev/)进入分区管理
fdisk /dev/sdb
[[email protected] ~]# fdisk /dev/sdb
WARNING: DOS-compatible mode is deprecated. It‘s strongly recommended to
switch off the mode (command ‘c‘) and change display units to
sectors (command ‘u‘).
Command (m for help): p--查看分区信息
Disk /dev/sdb: 10.7 GB, 10737418240 bytes
255 heads, 63 sectors/track, 1305 cylinders
Units = cylinders of 16065 * 512 = 8225280 bytes
Sector size (logical/physical): 512 bytes / 512 bytes
I/O size (minimum/optimal): 512 bytes / 512 bytes
Disk identifier: 0x29af97f8
Device Boot Start End Blocks Id System
Command (m for help): n--新建分区
Command action
e extended
p primary partition (1-4)
p --选择分区类型为主分区
Partition number (1-4): 1--分区号为1
First cylinder (1-1305, default 1): --使用默认值
Using default value 1
Last cylinder, +cylinders or +size{K,M,G} (1-1305, default 1305): --使用默认值(最大值)
Using default value 1305
Command (m for help): p--查看分区信息
Disk /dev/sdb: 10.7 GB, 10737418240 bytes
255 heads, 63 sectors/track, 1305 cylinders
Units = cylinders of 16065 * 512 = 8225280 bytes
Sector size (logical/physical): 512 bytes / 512 bytes
I/O size (minimum/optimal): 512 bytes / 512 bytes
Disk identifier: 0x29af97f8
Device Boot Start End Blocks Id System
/dev/sdb1 1 1305 10482381 83 Linux
Command (m for help): t --修改分区格式
Selected partition 1 --这里需要指定分区,只有一个默认选1
Hex code (type L to list codes): 8e --类型改为8e,LVM
Changed system type of partition 1 to 8e (Linux LVM)
Command (m for help): p--查看当前分区
Disk /dev/sdb: 10.7 GB, 10737418240 bytes
255 heads, 63 sectors/track, 1305 cylinders
Units = cylinders of 16065 * 512 = 8225280 bytes
Sector size (logical/physical): 512 bytes / 512 bytes
I/O size (minimum/optimal): 512 bytes / 512 bytes
Disk identifier: 0x29af97f8
Device Boot Start End Blocks Id System
/dev/sdb1 1 1305 10482381 8e Linux LVM
Command (m for help): w --保存
The partition table has been altered!
Calling ioctl() to re-read partition table.
Syncing disks.
[[email protected] ~]# fdisk -l /dev/sdb
Disk /dev/sdb: 10.7 GB, 10737418240 bytes
255 heads, 63 sectors/track, 1305 cylinders
Units = cylinders of 16065 * 512 = 8225280 bytes
Sector size (logical/physical): 512 bytes / 512 bytes
I/O size (minimum/optimal): 512 bytes / 512 bytes
Disk identifier: 0x29af97f8
Device Boot Start End Blocks Id System
/dev/sdb1 1 1305 10482381 8e Linux LVM
一定要指定分区的格式为8e,这是LVM的分区格式
[[email protected] ~]# partprobe --使分区表生效,无需重启
2—格式化
查看格式化信息

将新的磁盘格式化
[[email protected] /]# mkfs -t ext4 /dev/sdb1
mke2fs 1.41.12 (17-May-2010)
Filesystem label=
OS type: Linux
Block size=4096 (log=2)
Fragment size=4096 (log=2)
Stride=0 blocks, Stripe width=0 blocks
655360 inodes, 2620595 blocks
131029 blocks (5.00%) reserved for the super user
First data block=0
Maximum filesystem blocks=2684354560
80 block groups
32768 blocks per group, 32768 fragments per group
8192 inodes per group
Superblock backups stored on blocks:
32768, 98304, 163840, 229376, 294912, 819200, 884736, 1605632
Writing inode tables: done
Creating journal (32768 blocks): done
Writing superblocks and filesystem accounting information: done
This filesystem will be automatically checked every 23 mounts or
180 days, whichever comes first. Use tune2fs -c or -i to override.
[[email protected] /]#
#查看硬盘的分区表及使用情况
[[email protected] /]# partx /dev/sdb
# 1: 63- 20964824 ( 20964762 sectors, 10733 MB)
# 2: 0- -1 ( 0 sectors, 0 MB)
# 3: 0- -1 ( 0 sectors, 0 MB)
# 4: 0- -1 ( 0 sectors, 0 MB)
3—创建物理卷PV à逻辑卷组 VG à逻辑卷LV
pvdisplay --查看物理卷PV

也可以使用pvs查看PV
[[email protected] /]# pvs --查看PV
PV VG Fmt Attr PSize PFree
/dev/sda2 vg_gm149 lvm2 a--u 49.75g 0
查看系统的逻辑卷组vg和逻辑卷lv
[[email protected] ~]# vgs --查看逻辑卷组vg
VG #PV #LV #SN Attr VSize VFree
vg_gm149 1 2 0 wz--n- 49.75g 0
[[email protected] ~]# lvs --查看逻辑卷lv
LV VG Attr LSize Pool Origin Data% Meta% Move Log Cpy%Sync Convert
lv_oracle_data vg_gm149 -wi-ao---- 41.84g
lv_swap vg_gm149 -wi-ao---- 7.90g
或者使用vgdisplay和lvdisplay
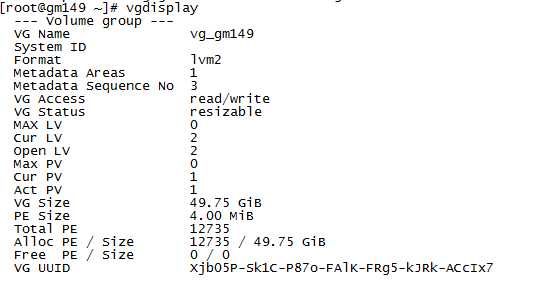
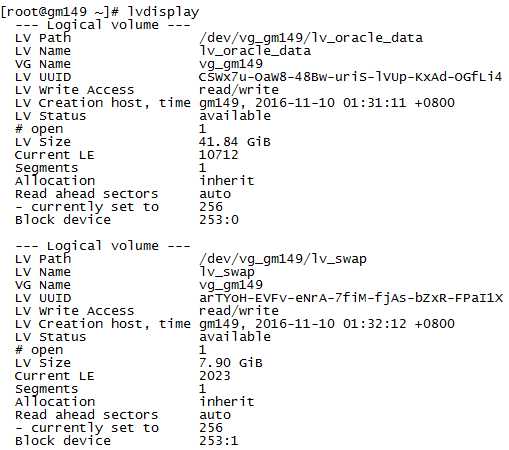
创建PV
[[email protected] /]# pvcreate /dev/sdb1 --创建新的物理卷PV
Physical volume "/dev/sdb1" successfully created
[[email protected] /]# pvdisplay --查看物理卷PV
--- Physical volume ---
PV Name /dev/sda2
VG Name vg_gm149
PV Size 49.75 GiB / not usable 3.00 MiB
Allocatable yes (but full)
PE Size 4.00 MiB
Total PE 12735
Free PE 0
Allocated PE 12735
PV UUID XGyuAh-ZnzL-i7Mo-NULN-B7g1-MTiQ-k6goqM
"/dev/sdb1" is a new physical volume of "10.00 GiB"
--- NEW Physical volume ---
PV Name /dev/sdb1
VG Name
PV Size 10.00 GiB
Allocatable NO
PE Size 0
Total PE 0
Free PE 0
Allocated PE 0
PV UUID sY4qe3-djgI-eBm6-SqFk-X1Bo-JmpL-FSclOz
[[email protected] /]#
扩容VG
扩展卷组vgextend,将某个物理卷添加到一个已存在的卷组
[[email protected] ~]# vgs --查看当前的VG信息
VG #PV #LV #SN Attr VSize VFree
vg_gm149 1 2 0 wz--n- 49.75g 0
[[email protected] /]# vgextend vg_gm149 /dev/sdb1 --扩展当前的VG:vg_gm149
Volume group "vg_gm149" successfully extended
[[email protected] /]# vgs
VG #PV #LV #SN Attr VSize VFree
vg_gm149 2 2 0 wz--n- 59.74g 9.99g
[[email protected] /]#
扩容LV
[[email protected] /]# lvs --查看当前的LV信息
LV VG Attr LSize Pool Origin Data% Meta% Move Log Cpy%Sync Convert
lv_oracle_data vg_gm149 -wi-ao---- 41.84g
lv_swap vg_gm149 -wi-ao---- 7.90g
[[email protected] /]# lvextend -L +9.98g /dev/vg_gm149/lv_oracle_data /dev/sdb1 --扩展LV
Rounding size to boundary between physical extents: 9.98 GiB.
Size of logical volume vg_gm149/lv_oracle_data changed from 41.84 GiB (10712 extents) to 51.82 GiB (13267 extents).
Logical volume lv_oracle_data successfully resized.
[[email protected] /]# lvs
LV VG Attr LSize Pool Origin Data% Meta% Move Log Cpy%Sync Convert
lv_oracle_data vg_gm149 -wi-ao---- 51.82g
lv_swap vg_gm149 -wi-ao---- 7.90g
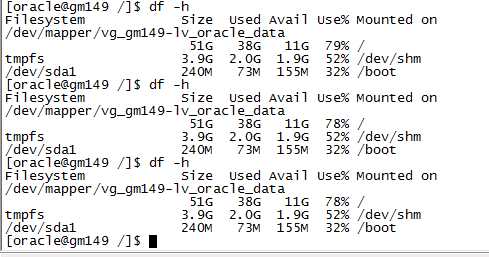
使用resize2fs更新系统识别的文件系统大小,立即生效
是增加的逻辑卷立即生效
[[email protected] oracle]# df -h
Filesystem Size Used Avail Use% Mounted on
/dev/mapper/vg_gm149-lv_oracle_data
42G 38G 1.4G 97% /
tmpfs 3.9G 2.0G 1.9G 52% /dev/shm
/dev/sda1 240M 73M 155M 32% /boot
[[email protected] oracle]# resize2fs /dev/vg_gm149/lv_oracle_data
resize2fs 1.41.12 (17-May-2010)
Filesystem at /dev/vg_gm149/lv_oracle_data is mounted on /; on-line resizing required
old desc_blocks = 3, new_desc_blocks = 4
Performing an on-line resize of /dev/vg_gm149/lv_oracle_data to 13585408 (4k) blocks.
The filesystem on /dev/vg_gm149/lv_oracle_data is now 13585408 blocks long.
[[email protected] oracle]#
删除物理卷
删除卷LVM管理中的命令vgreduce, pvremove:
vgreduce:通过删除LVM卷组中的物理卷来减少卷组容量。注意:不能删除LVM卷组中剩余的最后一个物理卷
pvremove: 用于删除一个存在的物理卷。使用pvremove指令删除物理卷时,它将LVM分区上的物理卷信息删除,使其不再被视为一个物理卷。
[[email protected] ~]# pvremove /dev/sdb1
Labels on physical volume "/dev/sdb1" successfully wiped
在删除物理卷PV之前,必须将服务器的分区信息、卷组信息、物理卷信息、逻辑卷信息都掌握清楚,避免出现失误或误操作。
参考文档:
http://www.cnblogs.com/gaojun/archive/2012/08/22/2650229.html
以上是关于linux上lvm扩容的主要内容,如果未能解决你的问题,请参考以下文章