FastDFS+nginx+keepalived集群搭建
Posted cac2020
tags:
篇首语:本文由小常识网(cha138.com)小编为大家整理,主要介绍了FastDFS+nginx+keepalived集群搭建相关的知识,希望对你有一定的参考价值。
安装环境
nginx-1.6.2
libfastcommon-master.zip
FastDFS_v5.05.tar.gz(http://sourceforge.net/projects/fastdfs/files/)
fastdfs-nginx-module_v1.16.tar.gz
ngx_cache_purge-2.3.tar.gz(用于清除指定url的缓存)
keepalived
VM虚拟机redhat6.5-x64:192.168.1.201、192.168.1.202、192.168.1.203、192.168.1.204、
192.168.1.201、192.168.1.202、192.168.1.203、192.168.1.204、
Xshell4
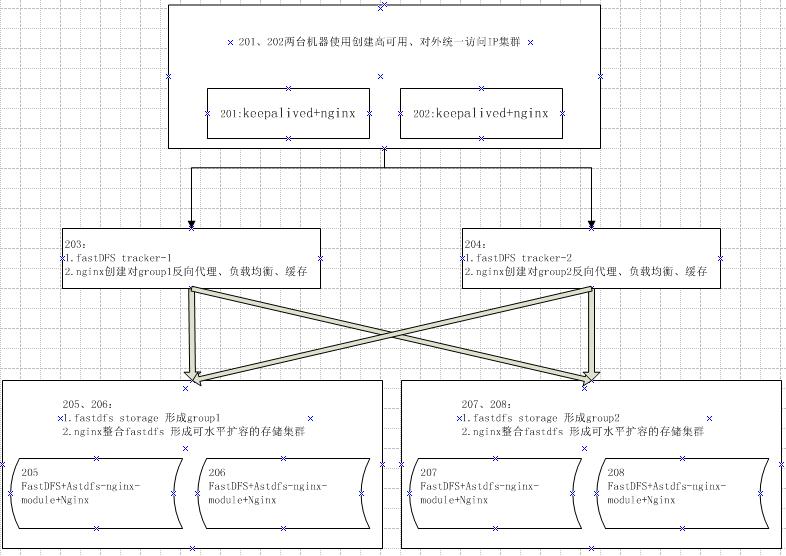
部署方案

安装步骤
步骤一:203、204、205、206、207、208安装FastDFS
参考:https://www.cnblogs.com/cac2020/p/9534967.html
步骤二:配置跟踪器(192.168.1.203 、192.168.1.204 节点)
    mkdir -p /fastdfs/tracker&& cp /etc/fdfs/tracker.conf.sample tracker.conf && vim /etc/fdfs/tracker.conf
修改内容:
    base_path=/fastdfs/tracker
    #关键点:轮询分配到各个group里
    store_lookup=0
启动:
    /etc/init.d/fdfs_trackerd start
步骤三:配置FastDFS存储(192.168.1.205-208)
205、206作为group1 , 207、208作为group2
mkdir -p /fastdfs/storage && cp /etc/fdfs/storage.conf.sample storage.conf && vim /etc/fdfs/storage.conf
修改内容:
disabled=false
group_name=group1      #组名,第一组(205、206)为 group1 第二组(207、208)为 group2
port=23000             #storage 端口号,同组的端口号必须相同
base_path=/fastdfs/storage
store_path_count=1     #存储路径个数 需要和 store_path 个数匹配
store_path0=/fastdfs/storage #设置存储路径
tracker_server=192.168.1.203:22122 #tracker 服务器的 ip 和端口
tracker_server=192.168.1.204:22122 #多个 tracker 直接添加多条记录
http.server_port=8888  #设置 http 端口号
启动:
/etc/init.d/fdfs_storaged start
到此为止我们的 FastDFS 集群环境已经搭建完成!!!!
--------------------------------------------------------------------------------------------------------------------------------------------------------------------------------------------------------------------------------
步骤四:4个存储节点(205 206 207 208)整合Nginx
1.安装整合包fastdfs-nginx-module_v1.16.tar.gz
tar -zxvf /usr/local/software/fastdfs-nginx-module_v1.16.tar.gz -C /usr/local/fast/
vim /usr/local/fast/fastdfs-nginx-module/src/config
修改内容:去掉第四行中的 local 文件层次

2.安装Nginx 加载fastdfs-nginx-module模块
tar -zxvf /usr/local/software/nginx-1.6.2.tar.gz -C /usr/local
cd /usr/local/nginx-1.6.2 && ./configure --add-module=/usr/local/fast/fastdfs-nginx-module/src/
重新编译命令: make && make install

3.修改整合模块配置
cp /usr/local/fast/fastdfs-nginx-module/src/mod_fastdfs.conf /etc/fdfs/  && vim /etc/fdfs/mod_fastdfs.conf
修改内容:
注意:第一组(205、206)和第二组(207、208) 节点修改内容,只有组名不同
connect_timeout=10
tracker_server=192.168.1.203:22122
tracker_server=192.168.1.204:22122
storage_server_port=23000
url_have_group_name = true
store_path0=/fastdfs/storage
group_name=group1 #第一组为 group1  第二组为 group2
group_count = 2


#追加以下内容
[group1]
group_name=group1
storage_server_port=23000
store_path_count=1
store_path0=/fastdfs/storage

[group2]
group_name=group2
storage_server_port=23000
store_path_count=1
store_path0=/fastdfs/storage
4.复制配置文件
cd /usr/local/fast/FastDFS/conf/ && cp http.conf mime.types /etc/fdfs/
5.创建软连接,在/fastdfs/storage 文件存储目录下创建软连接,将其链接到实际存放数据的目录。
命令: ln -s /fastdfs/storage/data/ /fastdfs/storage/data/M00
6.修改 Nginx 配置文件4个节点
命令:vim usr/local/nginx.conf
修改内容:
listen 8888;
server_name localhost;
location ~/group([0-9])/M00 {
    #alias /fastdfs/storage/data;
    ngx_fastdfs_module;
}
启动4个节点Nginx: /usr/local/nginx/sbin/nginx
步骤五:在2个跟踪器节点上安装nginx为4个存储节点提供负载均衡
1.安装ngx_cache_purge-2.3.tar.gz(清除指定url的缓存)
tar -zxvf /usr/local/software/ngx_cache_purge-2.3.tar.gz –C /usr/local/fast/

2.安装Nginx  加入 ngx_cache_purge (加入清除缓存模块)
tar -zxvf /usr/local/software/nginx-1.6.2.tar.gz -C /usr/local
cd /usr/local/nginx-1.6.2 && ./configure --add-module=/usr/local/fast/ngx_cache_purge-2.3/src/
重新编译命令: make && make install

3.修改nginx配置
vim /usr/local/nginx/conf/nginx.conf
修改内容:
events {
    worker_connections  1024;
    use epoll;
}
http {
    include       mime.types;
    default_type  application/octet-stream;
    sendfile        on;
    tcp_nopush     on;
    keepalive_timeout  65;
    #设置缓存
    server_names_hash_bucket_size 128;
    client_header_buffer_size 32k;
    large_client_header_buffers 4 32k;
    client_max_body_size 300m;

    proxy_redirect off;
    proxy_set_header Host $http_host;

    proxy_set_header Cookie $http_cookie;

    proxy_set_header X-Real-IP $remote_addr;

    proxy_set_header X-Forwarded-For $proxy_add_x_forwarded_for;

    proxy_connect_timeout 90;
    proxy_read_timeout 90;
    proxy_send_timeout 90;
    proxy_buffer_size 16k;
    proxy_buffers 4 64k;
    proxy_busy_buffers_size 128k;
    proxy_temp_file_write_size 128k;
    #设置缓存存储路径、存储方式、分配内存大小、磁盘最大空间、缓存期限
    proxy_cache_path /fastdfs/cache/nginx/proxy_cache levels=1:2
    keys_zone=http-chche:200m max_size=1g inactive=30d;
    proxy_temp_path /fastdfs/cache/nginx/proxy_cache/tmp;

    # weight 权重  max_fails 失败重试次数 fail_timeout 连接失败超时时间
    #设置 group1 的服务器
    upstream fdfs_group1 {
         server 192.168.1.205:8888 weight=1 max_fails=2 fail_timeout=30s;
         server 192.168.1.206:8888 weight=1 max_fails=2 fail_timeout=30s;
    }

    #设置 group2 的服务器
    upstream fdfs_group2 {
         server 192.168.1.207:8888 weight=1 max_fails=2 fail_timeout=30s;
         server 192.168.1.208:8888 weight=1 max_fails=2 fail_timeout=30s;
    }


 server {
        listen       8000;
        server_name  localhost;
        #charset koi8-r;
        #access_log  logs/host.access.log  main;

        #设置 group 的负载均衡参数
        location /group1/M00 {
           proxy_next_upstream http_502 http_504 error timeout invalid_header;
            proxy_cache http-cache;
            proxy_cache_valid  200 304 12h;
            proxy_cache_key $uri$is_args$args;
            proxy_pass http://fdfs_group1;
            expires 30d;
        }

         location /group2/M00 {
            proxy_next_upstream http_502 http_504 error timeout invalid_header;
            proxy_cache http-cache;
            proxy_cache_valid 200 304 12h;
            proxy_cache_key $uri$is_args$args;
            proxy_pass http://fdfs_group2;
            expires 30d;
        }


        #设置清除缓存的访问权限
        location ~/purge(/.*) {
            allow 127.0.0.1;
            allow 192.168.1.0/24;
            deny all;
            proxy_cache_purge http-cache $1$is_args$args;
        }
        #error_page  404              /404.html;
        # redirect server error pages to the static page /50x.html
        #
        error_page   500 502 503 504  /50x.html;
        location = /50x.html {
            root html;
        }
}


4.按以上nginx 配置文件的要求,创建对应的缓存目录2个跟踪器节点都需要:
mkdir -p /fastdfs/cache/nginx/proxy_cache
mkdir -p /fastdfs/cache/nginx/proxy_cache/tmp
启动ngnix:/usr/local/nginx/sbin/nginx
步骤六:201、202节点安装keepalived+nginx,对203、204提供负载均衡并对外外提供统一访问IP
1.安装nginx
修改nginx配置
vim /usr/local/nginx/conf/nginx.conf
修改内容:
upstream fastdfs_tracker {
    server 192.168.1.203:8000 weight=1 max_fails=2 fail_timeout=30s;
    server 192.168.1.204:8000 weight=1 max_fails=2 fail_timeout=30s;
}
server {
        listen       80;
        server_name  localhost;
        location / {
            root html;
            index  index.html index.htm;
        }
        error_page   500 502 503 504  /50x.html;
        location = /50x.html {
            root html;
        }

        ## FastDFS Proxy 代理路径设置为 /fastdfs
        location /fastdfs {
            root   html;
            index  index.html index.htm;
            proxy_pass  http://fastdfs_tracker/;
            proxy_set_header Host  $http_host;
            proxy_set_header Cookie $http_cookie;
            proxy_set_header X-Real-IP $remote_addr;
            proxy_set_header X-Forwarded-For $proxy_add_x_forwarded_for;
            proxy_set_header X-Forwarded-Proto $scheme;
            client_max_body_size  300m;
        }
}

2.安装keepalived
修改keepalived配置
参考:https://www.cnblogs.com/cac2020/p/9528106.html
最后注意:千万不要使用 kill -9 命令强杀 FastDFS 进程,否则可能会导致 binlog 数据丢失
关闭集群步骤:
1、201 202 两台一级负载节点
关闭 keepalived 命令:service keepalived stop
关闭 nginx 命令:/usr/local/nginx/sbin/nginx –s stop

2、203 204 两台二级负载节点,跟踪器节点
关闭 nginx 命令:/usr/local/nginx/sbin/nginx –s stop
关闭 trackerd 跟踪器命令:/etc/init.d/fdfs_trackerd stop

3、205 206 207 208 四台三级负载节点,存储节点
关闭 nginx 命令:/usr/local/nginx/sbin/nginx –s stop
关闭 storage 存储器命令: /etc/init.d/fdfs_storaged stop
注意:千万不要使用 kill -9 命令强杀 FastDFS 进程,否则可能会导致 binlog 数据丢失
以上是关于FastDFS+nginx+keepalived集群搭建的主要内容,如果未能解决你的问题,请参考以下文章
高可用高性能分布式文件系统FastDFS进阶keepalived+nginx对多tracker进行高
Linux安装Tomcat-Nginx-FastDFS-Redis-Solr-集群——第十一集补充:修改fastdfs的http.conf文件进行防盗链,重启nginx失败