Nginx 代理以及HTTPS
Posted 男刀,你就这样过你的一生。
tags:
篇首语:本文由小常识网(cha138.com)小编为大家整理,主要介绍了Nginx 代理以及HTTPS 相关的知识,希望对你有一定的参考价值。
一、HTTPS解析
https 加密
私钥
公钥
http 的握手 是确认网络是连通的。
https 的握手 是一个加密的过程 加密图
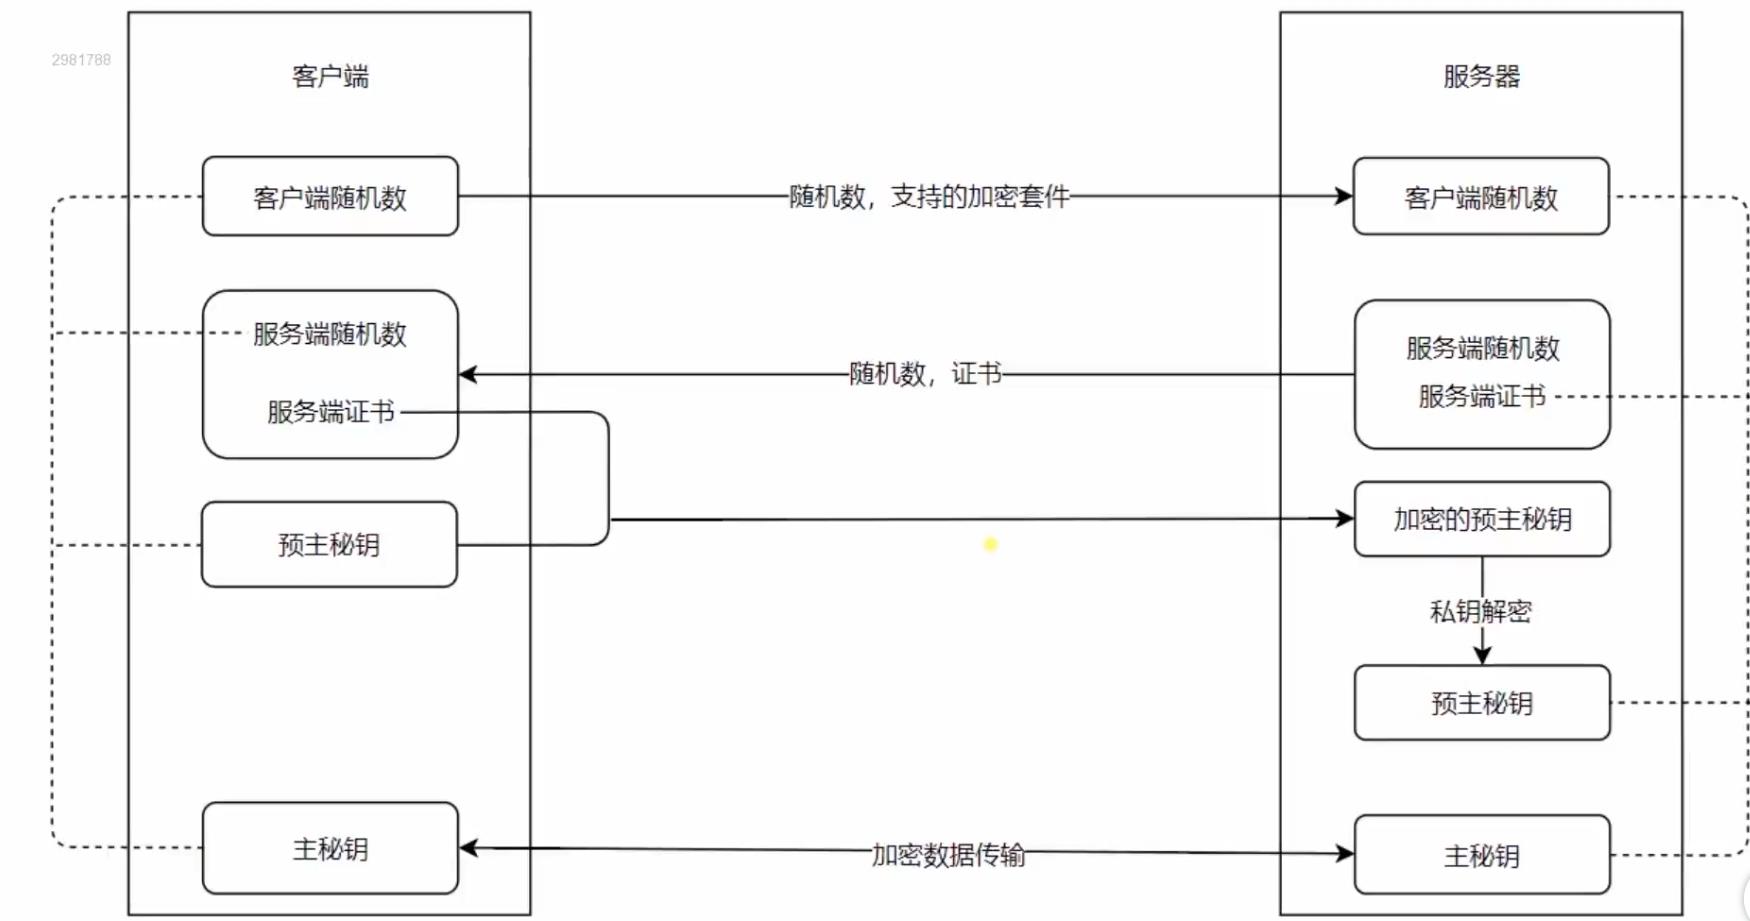
二、 使用nginx 部署HTTPS 服务
1.证书生成命令(https://gist.github.com/Jokcy/5e73fd6b2a9b21c142ba2b1995150808) copy 里面的命令 在 Git上面运行
2.访问网站获得的命令
openssl req -x509 -newkey rsa:2048 -nodes -sha256 -keyout localhost-privkey.pem -out localhost-cert.pem
3.在 git 上运行此命令

就会生成如下两个文件:
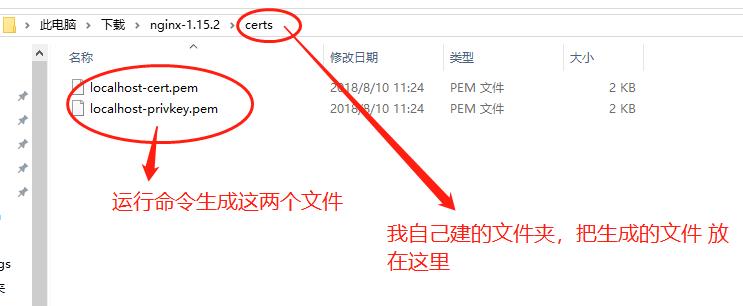
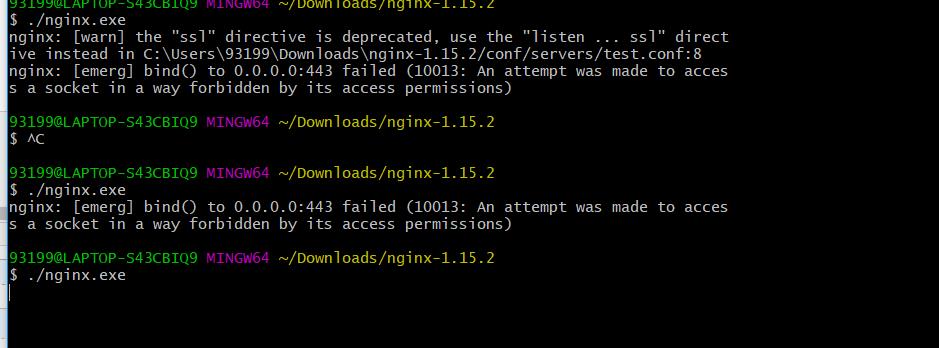
4. 启动 nginx 报错:bind() to 0.0.0.0:443 failed (10013: An attempt was made to access a socket in a way forbidden by its access permissions
这是由于其他进程占用了nginx 的端口。
解决办法:
运行 cmd, 输入netstat -aon|findstr "443"
找到 0.0.0.0:443,找到 PID,在任务管理器结束进程。 vmware-hostd.exe
5.成功启动Nginx
5.启动一个 nodejs 的服务:
然后再浏览器输入test,默认跳转https 服务。
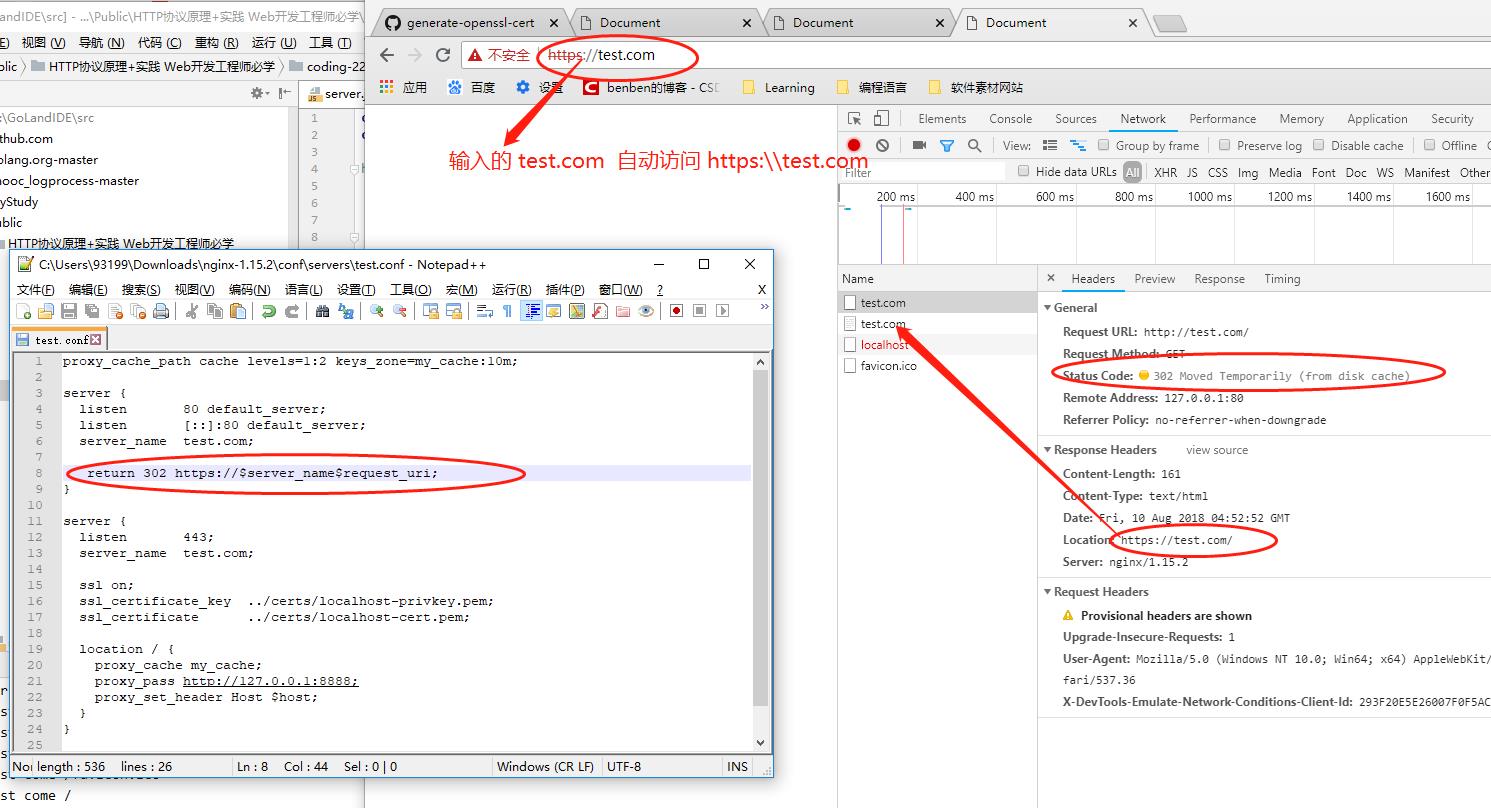
2.配置 Nginx 代码
proxy_cache_path cache levels=1:2 keys_zone=my_cache:10m;

# 把http变为 https
server {
  listen       80 default_server;
  listen       [::]:80 default_server;
  server_name  test.com;

  return 302 https://$server_name$request_uri;

}

server {
  listen       443;
  server_name  test.com;

#开启https验证
  ssl on; #Nginx 1.5 以后 不需要 ssl on  直接删除这行代码即可(但是删除以后就不会出现https 服务了,所以还是不要删除)
  ssl_certificate_key  ../certs/localhost-privkey.pem;
  ssl_certificate      ../certs/localhost-cert.pem;

  location / {
    proxy_cache my_cache;
    proxy_pass http://127.0.0.1:8888;
    proxy_set_header Host $host;
  }
}
三、HTTP2的优势和Nginx配置HTTP2的简单实用
1.优势:
信道复用
分帧传输
Server Push
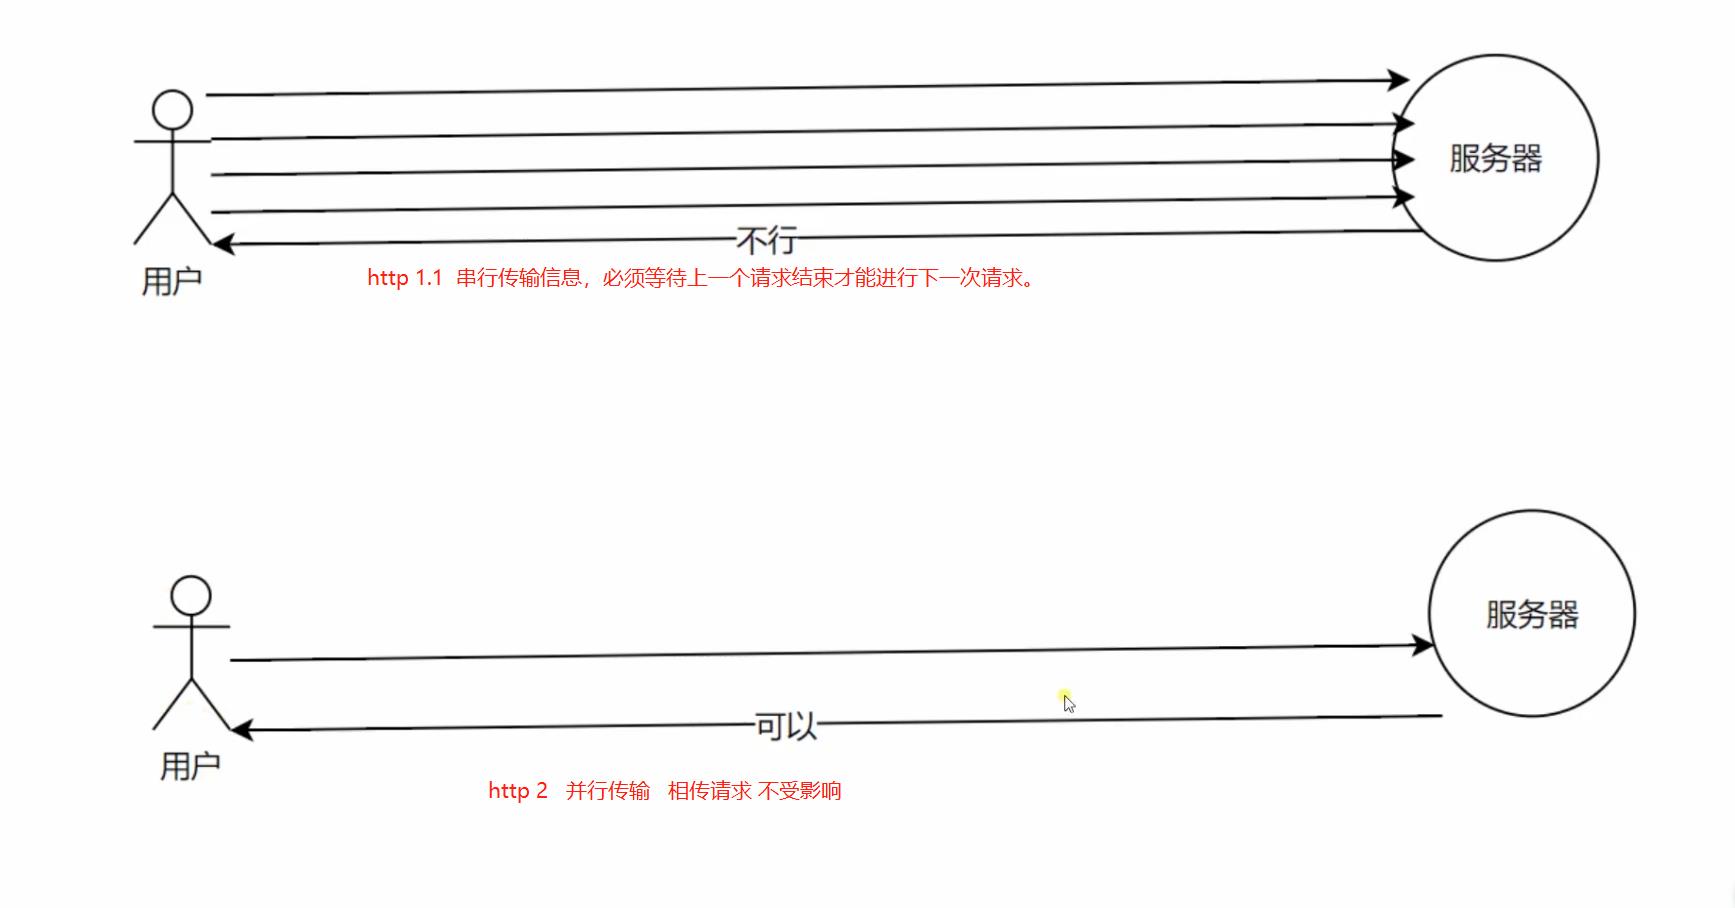
2.开启 http2 协议 仅仅支持在https协议。
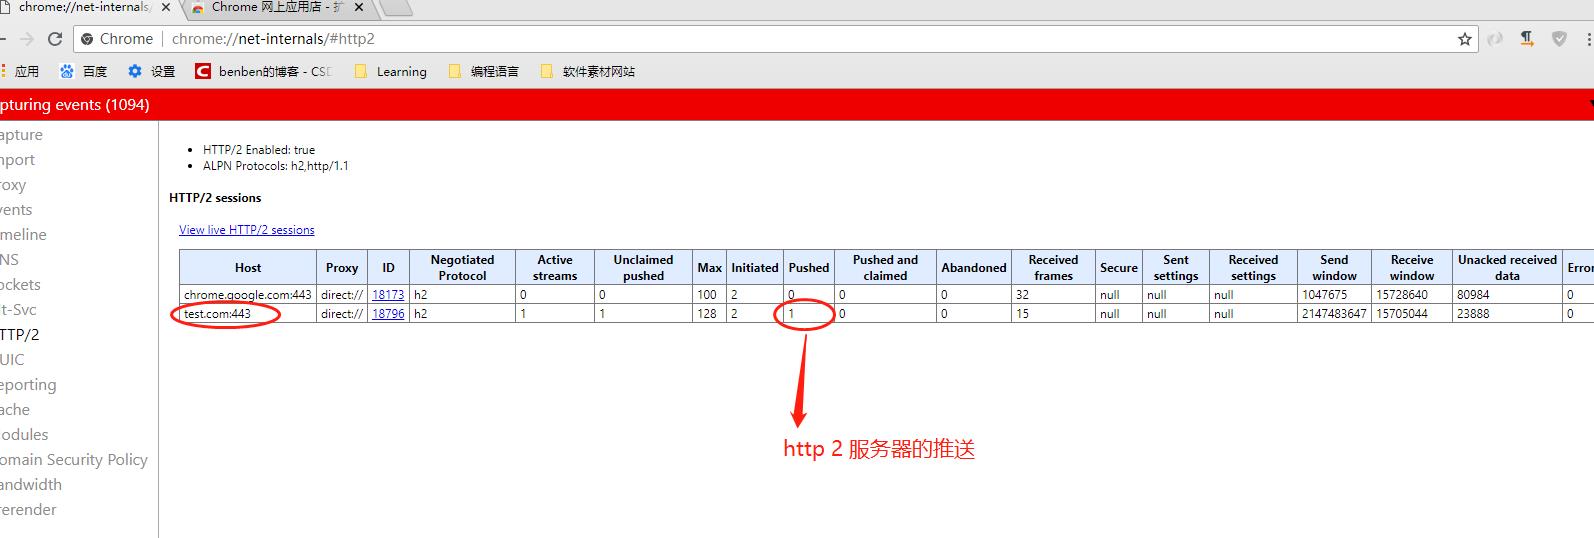
效果图:

查看http 2 的push 服务端推送特性 chrome://net-internals/#events
server.js 代码:
const http = require(\'http\')
const fs = require(\'fs\')

http.createServer(function (request, response) {
  console.log(\'request come\', request.url)

  const html = fs.readFileSync(\'test.html\', \'utf8\')
  const img = fs.readFileSync(\'test.jpg\')
  if (request.url === \'/\') {
    response.writeHead(200, {
      \'Content-Type\': \'text/html\',
      \'Connection\': \'keep-alive\',
      \'Link\': \'</test.jpg>; as=image; rel=preload\' //路径 格式 服务器加载方式
    })
    response.end(html)
  } else {
    response.writeHead(200, {
      \'Content-Type\': \'image/jpg\',
      \'Connection\': \'keep-alive\' // or close
    })
    response.end(img)
  }

}).listen(8888)

console.log(\'server listening on 8888\')
test.html 代码:
<!DOCTYPE html>
<html lang="en">
<head>
  <meta charset="UTF-8">
  <meta name="viewport" content="width=device-width, initial-scale=1.0">
  <meta http-equiv="X-UA-Compatible" content="ie=edge">
  <title>Document</title>
</head>
<body>
  <img src="/test.jpg" alt="">
</body>
</html>
test.jpg

.conf
proxy_cache_path cache levels=1:2 keys_zone=my_cache:10m;

server {
  listen       80 default_server;
  listen       [::]:80 default_server;
  server_name  test.com;

   return 302 https://$server_name$request_uri;
}

server {
  listen       443 http2;
  server_name  test.com;
  http2_push_preload on;


  ssl on;
  ssl_certificate_key  ../certs/localhost-privkey.pem;
  ssl_certificate      ../certs/localhost-cert.pem;

  location / {
    proxy_cache my_cache;
    proxy_pass http://127.0.0.1:8888;
    proxy_set_header Host $host;
  }
}
以上是关于Nginx 代理以及HTTPS 的主要内容,如果未能解决你的问题,请参考以下文章