全文检索:Apache Lucene框架入门实例
Posted
tags:
篇首语:本文由小常识网(cha138.com)小编为大家整理,主要介绍了全文检索:Apache Lucene框架入门实例相关的知识,希望对你有一定的参考价值。
一 简介
Lucene属于Apache开源项目的一部分,是一个开源的全文检索引擎工具包,但它不是一个完整的全文检索引擎,而是一个全文检索引擎的架构,提供了完整的查询引擎和索引引擎,部分文本分析引擎(英文与德文两种西方语言)
Lucene的目的是为软件开发人员提供一个简单易用的工具包,以方便在目标系统中实现全文检索的功能,或者是以此为基础建立起完整的全文检索引擎。在Java开发环境里Lucene是一个成熟的免费开源工具。就其本身而言,Lucene是当前以及最近几年最受欢迎的免费Java信息检索程序库。人们经常提到信息检索程序库,虽然与搜索引擎有关,但不应该将信息检索程序库与搜索引擎相混淆
注:以上介绍参考至百度百科
在使用Lucene建立索引时,可以选择将索引文件存储在内存中或者磁盘里。下面我将分别介绍基于这两种存储方式的全文索引的创建与检索
二 基于内存的索引创建与检索
首先需要做的是下载相关的jar包,下载地址是:http://lucene.apache.org/core/downloads.html
其次,在正式介绍下面的内容之前,至少需要导入以下三个jar包:
lucene-analyzers-common-6.2.1.jar
lucene-core-6.2.1.jar
lucene-queryparser-6.2.1.jar
基于内存的全文索引示例代码如下:
package cn.zifangsky.lucene;

import java.io.IOException;
import java.util.HashMap;
import java.util.Map;
import java.util.Map.Entry;

import org.apache.lucene.analysis.Analyzer;
import org.apache.lucene.analysis.standard.StandardAnalyzer;
import org.apache.lucene.document.Document;
import org.apache.lucene.document.Field;
import org.apache.lucene.document.StringField;
import org.apache.lucene.document.TextField;
import org.apache.lucene.index.DirectoryReader;
import org.apache.lucene.index.IndexReader;
import org.apache.lucene.index.IndexWriter;
import org.apache.lucene.index.IndexWriterConfig;
import org.apache.lucene.queryparser.classic.ParseException;
import org.apache.lucene.queryparser.classic.QueryParser;
import org.apache.lucene.search.IndexSearcher;
import org.apache.lucene.search.Query;
import org.apache.lucene.search.ScoreDoc;
import org.apache.lucene.store.Directory;
import org.apache.lucene.store.RAMDirectory;

public class Demo1 {

	/**
	 * 创建索引
	 *
	 * @param sourceMap
	 *            待索引的内容
	 * @return
	 */
	public static Directory createIndex(Map<String, String> sourceMap) {
		//1 创建一个默认的词法分析器
		Analyzer analyzer = new StandardAnalyzer();

		//2 设置索引文件存储位置,可以存储到磁盘和内存中,这里设置为存储到内存
		Directory directory = new RAMDirectory(); // 存储到内存

		//3 索引的写入
		IndexWriterConfig config = new IndexWriterConfig(analyzer);
		try {
			IndexWriter indexWriter = new IndexWriter(directory, config);

			//将内容添加到索引中,每本书表示一个“文档”,并将每个文档进行存储
			if (!sourceMap.isEmpty()) {
				for (Entry<String, String> source : sourceMap.entrySet()) {
					Document document = new Document();
					//标题需要分词,使用TextField
					document.add(new TextField("title", source.getKey(), Field.Store.YES));
					//作者不需要分词,使用StringField
					document.add(new StringField("author", source.getValue(), Field.Store.YES));
					indexWriter.addDocument(document);
				}
			}
			indexWriter.close();
		} catch (IOException e) {
			e.printStackTrace();
		}
		return directory;
	}

	/**
	 * 搜索
	 *
	 * @param directory
	 * @param searchWord
	 *            搜索关键词
	 */
	public static void readIndex(Directory directory, String searchWord) {
		int preHits = 10; //获取前面多少个结果

		try {
			//1 打开一个文档
			IndexReader indexReader = DirectoryReader.open(directory);
			IndexSearcher indexSearcher = new IndexSearcher(indexReader);
			Analyzer analyzer = new StandardAnalyzer();

			//2 设置使用关键字检索,这里是检索标题
			QueryParser parser = new QueryParser("title", analyzer);
			Query query = parser.parse(searchWord);

			//3 获取检索到的结果
			System.out.println("总共有 " + indexSearcher.count(query) + " 个结果");
			ScoreDoc[] hits = indexSearcher.search(query, preHits).scoreDocs;

			System.out.println("当前有 " + hits.length + " 个结果,内容分别如下:");
			//遍历检索到的“文档”
			for (int i = 0; i < hits.length; i++) {
				int docId = hits[i].doc;
				Document hitDoc = indexSearcher.doc(docId);
				System.out.println("《 " + hitDoc.get("title") + "》    作者: " + hitDoc.get("author"));
			}
			indexReader.close();
		} catch (IOException | ParseException e) {
			e.printStackTrace();
		}
	}

	public static void main(String[] args) {
		Map<String, String> books = new HashMap<>();
		books.put("Java编程思想", "Bruce Eckel");
		books.put("Java8实战", "Raoul-Gabriel Urma");
		books.put("Spring入门经典", "Mert Caliskan");
		books.put("Spring实战", "Craig Walls");
		books.put("Spring Boot实战", "汪云飞");
		books.put("Redis实战", "Josiah L. Carlson");

		Directory directory = Demo1.createIndex(books);
		Demo1.readIndex(directory, "Spring");
//		Demo1.readIndex(directory, "实战");
	}
}
上面代码并不复杂,而且还有详细的注释,因此一些细节流程我就不多做介绍了。只是需要强调的一点是:
在创建索引时使用了这样的代码:
document.add(new TextField("title", source.getKey(), Field.Store.YES));其中,上面的Field.Store.YES表示在创建索引的同时将内容的原文(也就是:source.getKey())也存储到内存中。如果我们选择了Field.Store.NO,在创建索引和检索的时候都是没问题的,但是在最后是没法提取检索关键字所在的原文内容的
最后的输出结果如下:
总共有 3 个结果
当前有 3 个结果,内容分别如下:
《 Spring Boot实战》    作者: 汪云飞
《 Spring实战》    作者: Craig Walls
《 Spring入门经典》    作者: Mert Caliskan
三 基于磁盘的索引创建与检索
示例代码如下:
package cn.zifangsky.lucene;

import java.io.BufferedReader;
import java.io.File;
import java.io.FileReader;
import java.io.FilenameFilter;
import java.io.IOException;
import java.util.ArrayList;
import java.util.List;

import org.apache.lucene.analysis.Analyzer;
import org.apache.lucene.analysis.standard.StandardAnalyzer;
import org.apache.lucene.document.Document;
import org.apache.lucene.document.Field.Store;
import org.apache.lucene.document.StringField;
import org.apache.lucene.document.TextField;
import org.apache.lucene.index.DirectoryReader;
import org.apache.lucene.index.IndexWriter;
import org.apache.lucene.index.IndexWriterConfig;
import org.apache.lucene.queryparser.classic.QueryParser;
import org.apache.lucene.search.IndexSearcher;
import org.apache.lucene.search.Query;
import org.apache.lucene.search.ScoreDoc;
import org.apache.lucene.store.Directory;
import org.apache.lucene.store.FSDirectory;

public class Demo2 {

	public static void main(String[] args) {
		Demo2.createIndex("D:/test/source", "D:/test/index");
		Demo2.searchIndex("D:/test/index", "apache");
	}

	/**
	 * 给一个目录下的所有文本文件创建索引
	 *
	 * @param sourceDir
	 *            待索引的文件目录
	 * @param indexDir
	 *            索引文件存储目录
	 * @return
	 */
	public static void createIndex(String sourceDir, String indexDir) {
		List<File> fileList = getFileList(sourceDir);

		if (fileList.size() > 0) {
			// 遍历文件并分别创建索引
			for (File file : fileList) {
				StringBuffer stringBuffer = new StringBuffer();
				stringBuffer.append(getFileContent(file));

//				System.out.println("fileName: " + file.getName() + "    filePath: " + file.getPath());

				Analyzer analyzer = new StandardAnalyzer();
				try {
					File indexFile = new File(indexDir);
					if (!indexFile.exists()) {
						indexFile.mkdirs();
					}

					//存储到文件中
					Directory directory = FSDirectory.open(new File(indexDir).toPath());
					IndexWriterConfig config = new IndexWriterConfig(analyzer);
					IndexWriter indexWriter = new IndexWriter(directory, config);

					Document document = new Document();
					document.add(new TextField("fileName", file.getName(), Store.YES));
					document.add(new TextField("content", stringBuffer.toString(), Store.YES));
					document.add(new StringField("path", file.getPath(), Store.YES));

					indexWriter.addDocument(document);
					indexWriter.commit();

					indexWriter.close();
				} catch (IOException e) {
					e.printStackTrace();
				}
			}
		}
	}

	/**
	 * 在索引目录下检索关键字
	 *
	 * @param indexDir
	 *            索引文件存储目录
	 * @param searchWord
	 *            搜索的关键字
	 */
	public static void searchIndex(String indexDir, String searchWord) {
		Analyzer analyzer = new StandardAnalyzer();

		try {
			//从一个磁盘目录中检索
			Directory directory = FSDirectory.open(new File(indexDir).toPath());
			DirectoryReader directoryReader = DirectoryReader.open(directory);
			IndexSearcher indexSearcher = new IndexSearcher(directoryReader);

			// 检索正文
			QueryParser queryParser = new QueryParser("content", analyzer);
			Query query = queryParser.parse(searchWord);

			// 检索前1000个结果
			System.out.println("总共有 " + indexSearcher.count(query) + " 个结果");
			ScoreDoc[] hits = indexSearcher.search(query, 1000).scoreDocs;

			System.out.println("当前有 " + hits.length + " 个结果,分别如下:");
			for (int i = 0; i < hits.length; i++) {
				int docId = hits[i].doc;
				Document hitDoc = indexSearcher.doc(docId);
				System.out.println("文件名: " + hitDoc.get("fileName") + "    路径: " + hitDoc.get("path"));
				// System.out.println(hitDoc.get("content"));
			}
			directoryReader.close();
			directory.close();
		} catch (Exception e) {
			e.printStackTrace();
		}
	}

	/***
	 * 获取一个目录下的所有文件
	 *
	 * @param sourceDir
	 *            文件目录
	 * @return 所有文件的集合
	 */
	private static List<File> getFileList(String sourceDir) {
		File dir = new File(sourceDir);
		if (dir.isDirectory()) {
			// 返回指定格式的文本文件
			File[] files = dir.listFiles(new FilenameFilter() {

				public boolean accept(File dir, String name) {
					return name.endsWith(".txt") || name.endsWith(".log") || name.endsWith(".xml");
				}
			});

			List<File> fileList = new ArrayList<File>();
			if (files.length > 0) {
				for (File tmpFile : files) {
					fileList.add(tmpFile);
				}
			}
			return fileList;
		}
		return null;
	}

	/**
	 * 获取一个文本文件的所有内容
	 *
	 * @param file
	 * @return
	 */
	private static StringBuffer getFileContent(File file) {
		try {
//			BufferedReader reader = new BufferedReader(new InputStreamReader(new FileInputStream(file), "UTF-8"));
			BufferedReader reader = new BufferedReader(new FileReader(file));
			String line = null;
			StringBuffer stringBuffer = new StringBuffer();
			while ((line = reader.readLine()) != null) {
				stringBuffer.append(line + "\n");
			}

			reader.close();
			return stringBuffer;
		} catch (Exception e) {
			e.printStackTrace();
		}
		return null;
	}
}
从上面的代码可以看出,索引存储到内存或者磁盘上,其基本步骤是差不多的,只是使用的类稍有区别。同时多了一些基本的IO操作代码,包括文件的读写等操作
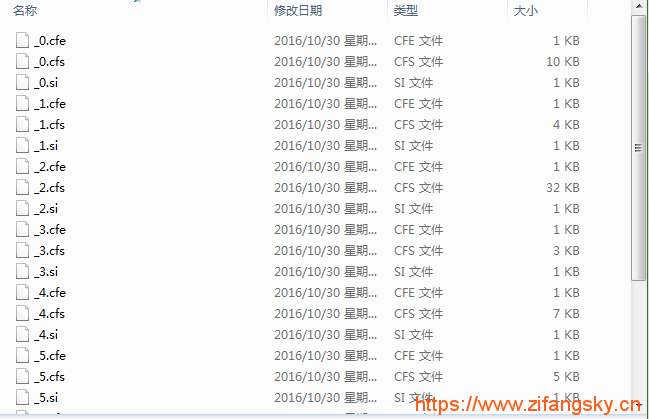
运行上面的索引创建方法之后,打开磁盘上的“D:/test/index”,可以发现多了很多这样的文件:
最后,检索关键字“apache”,检索到的结果如下:
总共有 3 个结果
当前有 3 个结果,分别如下:
文件名: Lucene简介.txt    路径: D:\test\source\Lucene简介.txt
文件名: H5_ws.log    路径: D:\test\source\H5_ws.log
文件名: Shiro简介.txt    路径: D:\test\source\Shiro简介.txt
可以发现,有三个文件包含“apache”这个关键字
至此,Lucene的入门介绍到此结束
参考文章:
PS:上面图片中的水印是我个人博客的域名,因此还请管理员手下留情不要给我标为“转载文章”,谢谢!!!
本文出自 “zifangsky的个人博客” 博客,请务必保留此出处http://983836259.blog.51cto.com/7311475/1880295
以上是关于全文检索:Apache Lucene框架入门实例的主要内容,如果未能解决你的问题,请参考以下文章
