appium 常用api介绍
Posted Olive.Xiao
tags:
篇首语:本文由小常识网(cha138.com)小编为大家整理,主要介绍了appium 常用api介绍相关的知识,希望对你有一定的参考价值。
前言:android手机大家都很熟悉,操作有按键、触摸、点击、滑动等,各种操作方法可以通过api的方法来实现。
参考博文:http://blog.csdn.net/bear_w/article/details/50330565
1.click
click(self):
Clicks the element(点击元素 )
用法 element.click()
driver.find_element_by_id(\'com.huawei.camera:id/shutter_button\').click()
2.shake
shake(self):
Shake the device(摇一摇手机 )
用法 driver.shake()
driver.shake()
3.close
close(self):
Closes the current window(关闭当前窗口 )
用法: driver.close()
driver.close()
4.quit
quit(self):
Quits the driver and closes every associated window(退出脚本运行并关闭每个相关的窗口连接 )
用法: driver.quit()
driver.quit()
5.size
size(self):
The size of the element【获取元素的大小(高和宽)】
new_size["height"] = size["height"]
new_size["width"] = size["width"]
用法 driver.element.size
driver.get_window_size()[\'width\']
driver.get_window_size()[\'height\']
函数的写法
#创建一个size方法获取手机屏幕大小x,y的函数
def getSize():
    x = driver.get_window_size()[\'width\']
    y = driver.get_window_size()[\'height\']
    return (x, y)
#调取函数
w_size=getSize()
6. swipe
swipe(self, start_x, start_y, end_x, end_y, duration=None):
Swipe from one point to another point, for an optional duration(从A点滑动至B点,滑动时间为毫秒)
:Args: - start_x - x-coordinate at which to start (滑动起点x坐标)
- start_y - y-coordinate at which to start(滑动起点y坐标)
- end_x - x-coordinate at which to stop(滑动终点x坐标)
- end_y - y-coordinate at which to stop(滑动终点y坐标)
- duration - (optional) time to take the swipe, in ms.(滑动时间设定,单位ms,默认5ms)
:Usage: driver.swipe(start_x, start_y, end_x, end_y,duration)
用法 driver.swipe(x1,y1,x2,y2,500)
swipe方法需要确定滑动的起点和终点坐标,由于不同手机的分辨率有可能不同,如果指定一个固定的坐标,在其他手机上不一定适用,所以最好结合上面的size方法来获取手机屏幕大小,使用相对坐标定位滑动。
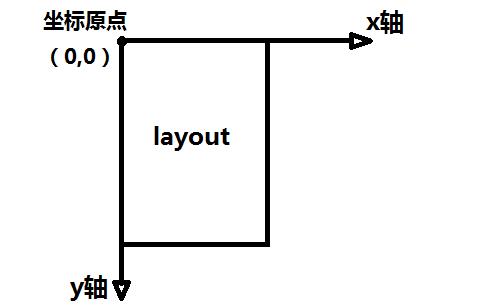
android系统的坐标系,左上角是坐标原点,水平方向是x轴,垂直方向是y轴,如下图所示:

下面代码是结合size方法对四个方向滑动举例:
#size方法获取屏幕大小
def getSize():
    x = driver.get_window_size()[\'width\']
    y = driver.get_window_size()[\'height\']
    return (x, y)

#屏幕向上滑动,x轴不变,y轴从大变小
def swipeUp(t):
    w_size = getSize()
    x1 = int(w_size[0] * 0.5)    #获取x坐标,根据实际调整相乘参数
    y1 = int(w_size[1] * 0.8)    #获取起始y坐标,根据实际调整相乘参数
    y2 = int(w_size[1] * 0.2)    #获取终点y坐标,根据实际调整相乘参数
    driver.swipe(x1, y1, x1, y2,t)

#屏幕向下滑动,x轴不变,y轴从小变大
def swipeDown(t):
    w_size = getSize()
    x1 = int(w_size[0] * 0.5)    #获取x坐标,根据实际调整相乘参数
    y1 = int(w_size[1] * 0.2)    #获取起始y坐标,根据实际调整相乘参数
    y2 = int(w_size[1] * 0.8)    #获取终点y坐标,根据实际调整相乘参数
    driver.swipe(x1, y1, x1, y2,t)

#屏幕向左滑动,y轴不变,x轴从大变小
def swipeLeft(t):
    w_size = getSize()
    x1 = int(w_size[0] * 0.8)    #获取起始x坐标,根据实际调整相乘参数
    x2 = int(w_size[0] * 0.05)   #获取终点x坐标,根据实际调整相乘参数
    y1 = int(w_size[1] * 0.5)    #获取y坐标,根据实际调整相乘参数
    driver.swipe(x1,y1,x2,y1,t)

#屏幕向右滑动,y轴不变,x轴从小变大
def swipeRight(t):
    w_size = getSize()
    x1 = int(w_size[0] * 0.05)   #获取起始x坐标,根据实际调整相乘参数
    x2 = int(w_size[0] * 0.8)    #获取终点x坐标,根据实际调整相乘参数
    y1 = int(w_size[1] * 0.5)    #获取y坐标,根据实际调整相乘参数
    driver.swipe(x1,y1,x2,y1,t)

#调用向上滑动,滑动时间参数为500ms
swipeUp(500)
sleep(2)
#调用向下滑动,滑动时间参数为500ms
swipeDown(500)
sleep(2)
#调用向左滑动,滑动时间参数为500ms
swipeLeft(500)
sleep(2)
#调用向右滑动,滑动时间参数为500ms
swipeRight(500)
7.flick
flick(self, start_x, start_y, end_x, end_y):
Flick from one point to another point(按住A点后快速滑动至B点)
:Args: - start_x - x-coordinate at which to start(滑动起点x坐标)
- start_y - y-coordinate at which to start(滑动起点y坐标)
- end_x - x-coordinate at which to stop(滑动终点x坐标)
- end_y - y-coordinate at which to stop(滑动终点y坐标)
:Usage: driver.flick(100, 100, 100, 400)
用法:driver.flick(start_x,start_y,end_x,end_y)
flick方法和swipe方法一样需要确定起点和终点坐标,只是没有时间参数,相对坐标的获取可以参考swipe方法
大概坐标的快速滑动
driver.flick(100,100,100,600)
结合size方法的快速滑动
#size方法获取屏幕大小
def getSize():
    x = driver.get_window_size()[\'width\']
    y = driver.get_window_size()[\'height\']
    return (x, y)

#快速向上滑动,x轴不变,y轴从大变小
def flickUp():
    w_size = getSize()
    x1 = int(w_size[0] * 0.5)    #获取x坐标,根据实际调整相乘参数
    y1 = int(w_size[1] * 0.8)    #获取起始y坐标,根据实际调整相乘参数
    y2 = int(w_size[1] * 0.2)    #获取终点y坐标,根据实际调整相乘参数
    driver.flick(x1, y1, x1, y2)

#调用快速向上滑动
flickUp()
8. keyevent
keyevent(self, keycode, metastate=None):
Sends a keycode to the device. Android only. Possible keycodes can be found in http://developer.android.com/reference/android/view/KeyEvent.html【发送按键码(安卓仅有),按键码可以上网址中找到 】
:Args:
- keycode - the keycode to be sent to the device
- metastate - meta information about the keycode being sent
用法 :driver.keyevent(‘4’)
keyevent方法直接发送按键码就可以了,如返回键操作
driver.keyevent(\'4\') #返回键操作
下面是按键码列表
电话键
KEYCODE_CALL (拨号键) : 5
KEYCODE_ENDCALL (挂机键) : 6
KEYCODE_HOME (按键Home) : 3
KEYCODE_MENU (菜单键) : 82
KEYCODE_BACK (返回键) : 4
KEYCODE_SEARCH (搜索键) : 84
KEYCODE_CAMERA (拍照键) : 27
KEYCODE_FOCUS (拍照对焦键) :80
KEYCODE_POWER (电源键) : 26
KEYCODE_NOTIFICATION (通知键) : 83
KEYCODE_MUTE (话筒静音键) : 91
KEYCODE_VOLUME_MUTE (扬声器静音键) : 164
KEYCODE_VOLUME_UP (音量增加键) : 24