Pointer Event Api-整合鼠标事件触摸和触控笔事件
Posted 风雨后见彩虹
tags:
篇首语:本文由小常识网(cha138.com)小编为大家整理,主要介绍了Pointer Event Api-整合鼠标事件触摸和触控笔事件相关的知识,希望对你有一定的参考价值。
Pointer Events API 是Hmtl5的事件规范之一,它主要目的是用来将鼠标(Mouse)、触摸(touch)和触控笔(pen)三种事件整合为统一的API。
Pointer Event
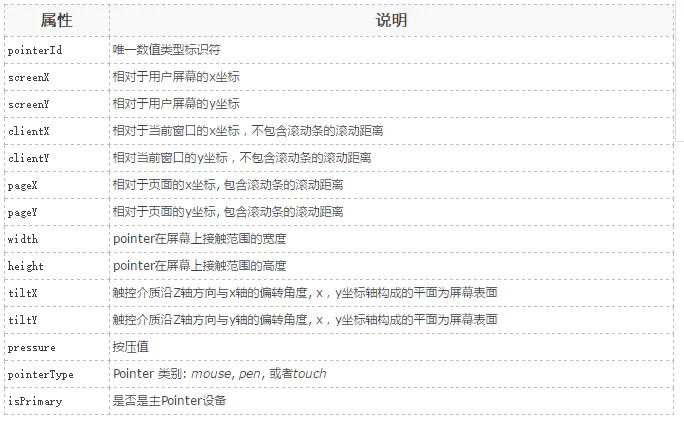
Pointer指可以在屏幕上反馈一个指定坐标的输入设备。Pointer Event事件和Touch Event API对应的触摸事件类似,它继承扩展了Touch Event,因此拥有Touch Event的常用属性。Pointer属性如下图:

说明:
pointerId:代表每一个独立的Pointer。根据id,我们可以很轻松的实现多点触控应用。
width/height:Mouse Event在屏幕上只能覆盖一个点的位置,但是一个Pointer可能覆盖一个更大的区域。
isPrimary:当有多个Pointer被检测到的时候(比如多点触摸),对每一种类型的Pointer会存在一个Primary Poiter。只有Primary Poiter会产生与之对应的Mouse Event。
Pointer Event API核心事件:

Mouse events, pointer events和touch events 对照表

Pointer API 的好处
Poiter API 整合了鼠标、触摸和触控笔的输入,使得我们无需对各种类型的事件区分对待。
目前不论是web还是本地应用都被设计成跨终端(手机,平板,PC)应用,鼠标多数应用在桌面应用,触摸则出现在各种设备上。过去开发人员必须针对不同的输入设备写不同的代码,或者写一个polyfill 来封装不同的逻辑。Pointer Events 改变了这种状况。
Pointer API实例
使用canvas画布来展示追踪一个pointer移动轨迹:
<canvas id="mycanvas" width="400px" height="500px" style="border: 1px solid #000"></canvas>
<script type="text/javascript">
var DrawFigure = (function(){
    function DrawFigure(canvas,options) {
        var _this = this;
        this.canvas = canvas;
        this._ctx = this.canvas.getContext(\'2d\');
        this.lastPt = null;
        if(options === void 0) {
            options = {};
        }
        this.options = options;
        this._handleMouseDown = function(event) {
            _this._mouseButtonDown = true;
        }
        this._handleMouseMove = function(event) {
            if(_this._mouseButtonDown) {
                var event = window.event || event;
                if(_this.lastPt !== null) {
                    _this._ctx.beginPath();
                    _this._ctx.moveTo(_this.lastPt.x,_this.lastPt.y);
                    _this._ctx.lineTo(event.pageX,event.pageY);
                    _this._ctx.strokeStyle = _this.options.strokeStyle || \'green\';
                    _this._ctx.lineWidth = _this.options.lineWidth || 3;
                    _this._ctx.stroke();
                }
                _this.lastPt = {
                    x: event.pageX,
                    y: event.pageY
                }
            }
        }
        this._handleMouseUp = function(event) {
            _this._mouseButtonDown = false;
            _this.canvas.removeEventListener(\'pointermove\',_this.__handleMouseMove,false);
            _this.canvas.removeEventListener(\'mousemove\',_this.__handleMouseMove,false);
            _this.lastPt = null;
            console.log(\'移除事件\');
        }

        DrawFigure.prototype.init = function() {
            this._mouseButtonDown = false;
            if(window.PointerEvent) {
                this.canvas.addEventListener(\'pointerdown\',this._handleMouseDown,false);
                this.canvas.addEventListener(\'pointermove\',this._handleMouseMove,false);
                this.canvas.addEventListener(\'pointerup\',this._handleMouseUp,false);
            } else {
                this.canvas.addEventListener(\'mousedownn\',this._handleMouseDown,false);
                this.canvas.addEventListener(\'mousemove\',this._handleMouseMove,false);
                this.canvas.addEventListener(\'mouseup\',this._handleMouseUp,false);
            }
        }

    }
    return DrawFigure;
}());
window.onload = function() {
    var canvas = document.getElementById(\'mycanvas\');
    var drawFigure = new DrawFigure(canvas);
    drawFigure.init();
}
</script>
结果如图所示:

多点触控实例
首先初始一个多个颜色的数组,用来追踪不同的pointer。
var colours = [\'red\', \'green\', \'blue\', \'yellow\',\'black\'];
画线的时候通过pointer的id来取色。
 multitouchctx.strokeStyle = colours[id%5];
 multitouchctx.lineWidth = 3;
在这个demo中,我们要追踪每一个pointer,所以需要分别保存每一个pointer的相关坐标点。这里我们使用关联数组来存储数据,每个数据使用pointerId做key,我们使用一个Object对象作为关联数组,用如下方法添加数据:
// This will be our associative array
var multiLastPt=new Object();
...
// Get the id of the pointer associated with the event
var id = e.pointerId;
...
// Store coords
multiLastPt[id] = {x:e.pageX, y:e.pageY};
完整代码:
<!DOCTYPE html>
<html>
<head>
<title>test</title>
<meta charset="utf-8">
<meta name="viewport" content="width=device-width,initial-scale=1.0,minimum-scale=1.0,maximum-scale=1.0,user-scalable=no" />
<style>
    html,body{
        margin:0;
        padding:0;
        width: 100%;
        height: 100%;
        overflow: hidden;
    }
</style>
</head>
<body ontouchstart="return false;">
<canvas id="mycanvas"></canvas>
<script type="text/javascript">
var DrawFigure = (function(){
    function DrawFigure(canvas,options) {
        var _this = this;
        this.canvas = canvas;
        this.canvas.width = document.documentElement.clientWidth;
        this.canvas.height = document.documentElement.clientHeight;
        this._ctx = this.canvas.getContext(\'2d\');
        this.lastPt = {};
        if(options === void 0) {
            options = {};
        }
        this.options = options;
        this.colours = [\'red\', \'green\', \'blue\', \'yellow\', \'black\']; // 初始一个多个颜色的数组,用来追踪不同的pointer
        this._handleMouseDown = function(event) {
            _this._mouseButtonDown = true;
        }
        this._handleMouseMove = function(event) {
            var id = event.pointerId;
            if(_this._mouseButtonDown) {
                var event = window.event || event;
                if(_this.lastPt[id]) {
                    _this._ctx.beginPath();
                    _this._ctx.moveTo(_this.lastPt[id].x,_this.lastPt[id].y);
                    _this._ctx.lineTo(event.pageX,event.pageY);
                    _this._ctx.strokeStyle = _this.colours[id%5]; // 画线的时候通过pointer的id来取色
                    _this._ctx.lineWidth = _this.options.lineWidth || 3;
                    _this._ctx.stroke();
                }
                _this.lastPt[id] = {
                    x: event.pageX,
                    y: event.pageY
                }
            }
        }
        this._handleMouseUp = function(event) {
            var id = event.pointerId;
            _this._mouseButtonDown = false;
            _this.canvas.removeEventListener(\'pointermove\',_this.__handleMouseMove,false);
            _this.canvas.removeEventListener(\'mousemove\',_this.__handleMouseMove,false);
             delete _this.lastPt[id];
        }

        DrawFigure.prototype.init = function() {
            this._mouseButtonDown = false;
            if(window.PointerEvent) {
                this.canvas.addEventListener(\'pointerdown\',this._handleMouseDown,false);
                this.canvas.addEventListener(\'pointermove\',this._handleMouseMove,false);
                this.canvas.addEventListener(\'pointerup\',this._handleMouseUp,false);
            } else {
                this.canvas.addEventListener(\'mousedownn\',this._handleMouseDown,false);
                this.canvas.addEventListener(\'mousemove\',this._handleMouseMove,false);
                this.canvas.addEventListener(\'mouseup\',this._handleMouseUp,false);
            }
        }

    }
    return DrawFigure;
}());
window.onload = function() {
    var canvas = document.getElementById(\'mycanvas\');
    var drawFigure = new DrawFigure(canvas);
    drawFigure.init();
}
</script>
</body>
</html>
手机效果如图所示:

参考地址:
以上是关于Pointer Event Api-整合鼠标事件触摸和触控笔事件的主要内容,如果未能解决你的问题,请参考以下文章