Linux性能优化从入门到实战:20 综合篇:网络丢包
Posted qccz123456
tags:
篇首语:本文由小常识网(cha138.com)小编为大家整理,主要介绍了Linux性能优化从入门到实战:20 综合篇:网络丢包相关的知识,希望对你有一定的参考价值。
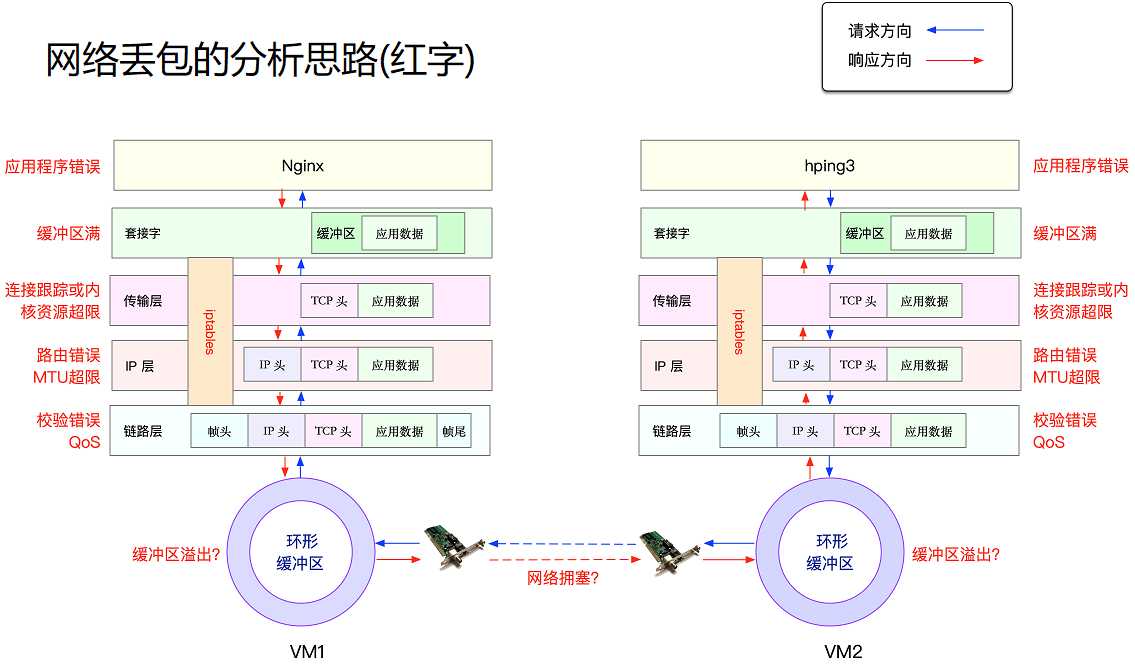
网络丢包问题的分析思路
ping 基于 ICMP 协议,hping3 可以基于 TCP 协议。
hping3 实际上只发送了 SYN 包;
curl 在发送 SYN 包后,还会发送 HTTP GET 请求。
# -c 表示发送 10 个请求,-S 表示使用 TCP SYN,-p 指定端口为 80
$ hping3 -c 10 -S -p 80 192.168.0.30
HPING 192.168.0.30 (eth0 192.168.0.30): S set, 40 headers + 0 data bytes
len=44 ip=192.168.0.30 ttl=63 DF id=0 sport=80 flags=SA seq=3 win=5120 rtt=7.5 ms
...
--- 192.168.0.30 hping statistic ---
10 packets transmitted, 5 packets received, 50% packet loss
round-trip min/avg/max = 3.0/609.7/3027.2 ms

$ curl --max-time 3 http://192.168.0.30

(1)链路层
# 查看网卡的丢包记录
$ netstat -i
Kernel Interface table
Iface      MTU    RX-OK RX-ERR RX-DRP RX-OVR    TX-OK TX-ERR TX-DRP TX-OVR Flg
eth0       100       31      0      0 0             8      0      0      0 BMRU
lo       65536        0      0      0 0             0      0      0      0 LRU

#  tc 规则(用于QoS)导致的丢包(不包含在网卡的统计信息中)
$ tc -s qdisc show dev eth0
qdisc netem 800d: root refcnt 2 limit 1000 loss 30%
 Sent 432 bytes 8 pkt (dropped 4, overlimits 0 requeues 0)
 backlog 0b 0p requeues 0
# 解决方法:删掉 netem 模块
$ # tc qdisc del dev eth0 root netem loss 30%
(2)网络层和传输层
$ netstat -s
Ip:
    Forwarding: 1					// 开启转发
    31 total packets received		// 总收包数
    0 forwarded						// 转发包数
    0 incoming packets discarded	// 接收丢包数
    25 incoming packets delivered	// 接收的数据包数
    15 requests sent out			// 发出的数据包数
Icmp:
    0 ICMP messages received		// 收到的 ICMP 包数
    0 input ICMP message failed		// 收到 ICMP 失败数
    ICMP input histogram:
    0 ICMP messages sent			//ICMP 发送数
    0 ICMP messages failed			//ICMP 失败数
    ICMP output histogram:
Tcp:
    0 active connection openings	// 主动连接数
    0 passive connection openings	// 被动连接数
    11 failed connection attempts	// 失败连接尝试数
    0 connection resets received	// 接收的连接重置数
    0 connections established		// 建立连接数
    25 segments received			// 已接收报文数
    21 segments sent out			// 已发送报文数
    4 segments retransmitted		// 重传报文数
    0 bad segments received			// 错误报文数
    0 resets sent					// 发出的连接重置数
Udp:
    0 packets received
    ...
TcpExt:
    11 resets received for embryonic SYN_RECV sockets	// 半连接重置数
    0 packet headers predicted
    TCPTimeouts: 7		// 超时数
    TCPSynRetrans: 4	//SYN 重传数
	...
(3)iptables
# 查询 NAT 连接跟踪数
$ sysctl net.netfilter.nf_conntrack_max
net.netfilter.nf_conntrack_max = 262144
$ sysctl net.netfilter.nf_conntrack_count
net.netfilter.nf_conntrack_count = 182

$ iptables -t filter -nvL
Chain INPUT (policy ACCEPT 25 packets, 1000 bytes)
 pkts bytes target     prot opt in     out     source               destination
    6   240 DROP       all  --  *      *       0.0.0.0/0            0.0.0.0/0            statistic mode random probability 0.29999999981

Chain FORWARD (policy ACCEPT 0 packets, 0 bytes)
 pkts bytes target     prot opt in     out     source               destination

Chain OUTPUT (policy ACCEPT 15 packets, 660 bytes)
 pkts bytes target     prot opt in     out     source               destination
    6   264 DROP       all  --  *      *       0.0.0.0/0            0.0.0.0/0            statistic mode random probability 0.29999999981
# 解决方法:两条 DROP 规则统计数值不为0,所以删除它们
$ iptables -t filter -D INPUT -m statistic --mode random --probability 0.30 -j DROP
$ iptables -t filter -D OUTPUT -m statistic --mode random --probability 0.30 -j DROP

# MTU 问题与解放方法:eth0 的 MTU 只有 100,而以太网的 MTU 默认值是 1500
$ ifconfig eth0 mtu 1500
以上是关于Linux性能优化从入门到实战:20 综合篇:网络丢包的主要内容,如果未能解决你的问题,请参考以下文章