微信小程序(15)--上传图片公用组件
Posted
tags:
篇首语:本文由小常识网(cha138.com)小编为大家整理,主要介绍了微信小程序(15)--上传图片公用组件相关的知识,希望对你有一定的参考价值。
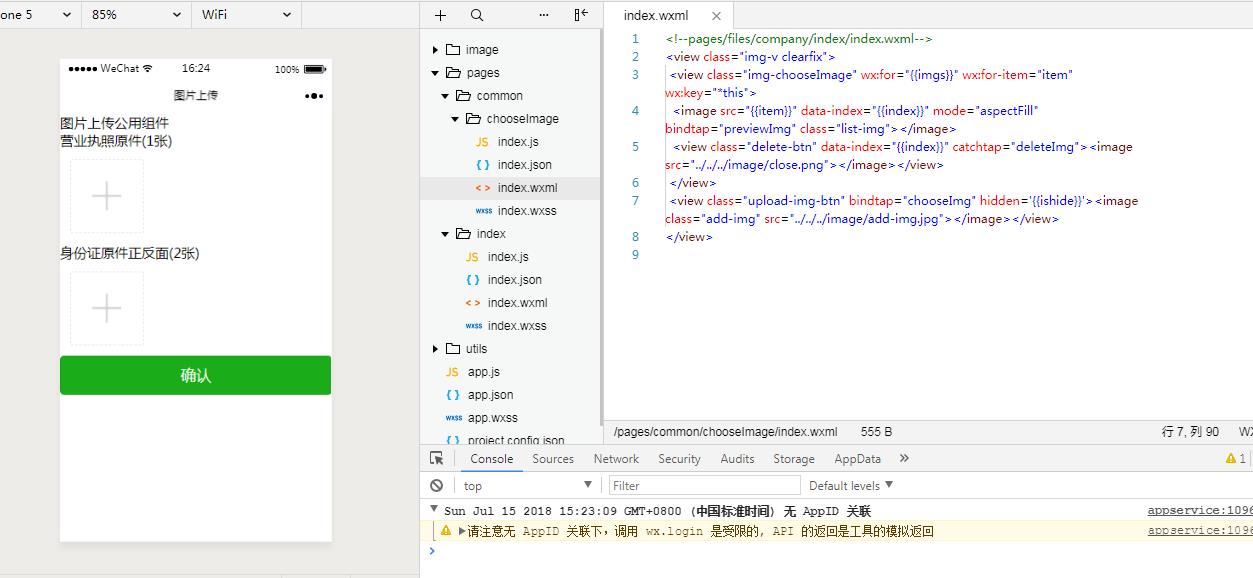
接下来开始写写上传图片的公用组件,可以自定义上传几张图片。

chooseImage文件夹里面的index.wxml和index.js,涉及图片上传,删除,预览。
<view class="img-v clearfix">
 <view class="img-chooseImage" wx:for="{{imgs}}" wx:for-item="item" wx:key="*this">
  <image src="{{item}}" data-index="{{index}}" mode="aspectFill" bindtap="previewImg" class="list-img"></image>
  <view class="delete-btn" data-index="{{index}}" catchtap="deleteImg"><image  src="../../../image/close.png"></image></view>
 </view>
 <view class="upload-img-btn" bindtap="chooseImg" hidden=\'{{ishide}}\'><image class="add-img" src="../../../image/add-img.jpg"></image></view>
</view>
Component({
  options: {
    multipleSlots: true // 在组件定义时的选项中启用多slot支持
  },
  properties: {
    count: String   //父子传参
  },
  /**
   * 页面的初始数据
   */
  data: {
    imgs: [],
    count:1,
    ishide:false
  },
  // 上传图片
  methods: {
    chooseImg: function (e) {
      var that = this;
      var imgs = this.data.imgs;
      if (imgs.length >= 9) {
        this.setData({
          lenMore: 1
        });
        setTimeout(function () {
          that.setData({
            lenMore: 0
          });
        }, 2500);
        return false;
      }
      wx.chooseImage({
        sizeType: [\'original\', \'compressed\'], // 可以指定是原图还是压缩图,默认二者都有
        sourceType: [\'album\', \'camera\'], // 可以指定来源是相册还是相机,默认二者都有
        success: function (res) {
          // 返回选定照片的本地文件路径列表,tempFilePath可以作为img标签的src属性显示图片
          var tempFilePaths = res.tempFilePaths;
          var imgs = that.data.imgs;
          // console.log(tempFilePaths + \'----\');
          console.log(that.data.count);
          for (var i = 0; i < tempFilePaths.length; i++) {
            if (imgs.length > that.data.count-1) {
              that.setData({
                imgs: imgs
              });
              return false;
            } else {
              imgs.push(tempFilePaths[i]);
              if (imgs.length > that.data.count-1){
                that.setData({
                  ishide: true
                });
              }
            }
          }
          // console.log(imgs);
          that.setData({
            imgs: imgs
          });
          that.triggerEvent("chooseImg");//触发回调
        }
      });
    },
    // 删除图片
    deleteImg: function  (e) {
      var imgs = this.data.imgs;
      var index = e.currentTarget.dataset.index;
      imgs.splice(index, 1);
      this.setData({
        imgs: imgs
      });
      if (imgs.length < this.data.count) {
        // console.log(imgs.length);
        this.setData({
          ishide: false
        });
      }
      this.triggerEvent("deleteImg");//触发回调
    },
    // 预览图片
    previewImg: function  (e) {
      //获取当前图片的下标
      var index = e.currentTarget.dataset.index;
      //所有图片
      var imgs = this.data.imgs;
      wx.previewImage({
        //当前显示图片
        current: imgs[index],
        //所有图片
        urls: imgs
      })
    }
  }
})
index文件夹的index.json和index.wxml和index.js
{
  "navigationBarTitleText": "图片上传",
  "usingComponents": {
    "pop": "../common/chooseImage/index",
    "popnum": "../common/chooseImage/index"
  }
}
 <view class="perfect-title">图片上传公用组件</view>
  <view class="pop-box">
    <view class="upload-title">营业执照原件(1张)</view>
      <view style="margin:30rpx;">
        <pop id="pop" bind:chooseImg="chooseImg" bind:deleteImg="deleteImg" bind:previewImg="previewImg" count="{{count}}"></pop>
      </view>
  </view>
  <view class="pop-box">
    <view class="upload-title">身份证原件正反面(2张)</view>
      <view style="margin:30rpx;">
        <popnum id="popnum" bind:chooseImg="chooseImgnum" bind:deleteImg="deleteImgnum" bind:previewImg="previewImg" count="{{countnum}}"></popnum>
      </view>
  </view>
  <view class="btn-area" id="buttonContainer2">
    <button type="primary" bindtap="submitBtn">确认</button>
  </view>
Page({

  /**
   * 页面的初始数据
   */
  data: {
   imgs:[],
   imgsnum: [],
   count:1,
   countnum:2
  },
  /**
   * 生命周期函数--监听页面加载
   */
  onLoad: function (options) {
    //获得pop组件
    this.pop = this.selectComponent("#pop");
    this.popnum = this.selectComponent("#popnum");
  },
  chooseImg: function (e) {
    // console.log(this.pop.data.imgs);
    this.setData({
      imgs: this.pop.data.imgs
    })
  },
  deleteImg: function (e) {
    // console.log(this.pop.data.imgs);
    this.setData({
      imgs: this.pop.data.imgs
    })
  },
  chooseImgnum: function (e) {
    // console.log(this.pop.data.imgs);
    this.setData({
      imgsnum: this.popnum.data.imgs
    })
  },
  deleteImgnum: function (e) {
    // console.log(this.pop.data.imgs);
    this.setData({
      imgsnum: this.popnum.data.imgs
    })
  },
  submitBtn: function(){
    console.log(this.data.imgs);
    console.log(this.data.imgsnum);
  },

  /**
   * 生命周期函数--监听页面初次渲染完成
   */
  onReady: function () {

  }
})
以上是关于微信小程序(15)--上传图片公用组件的主要内容,如果未能解决你的问题,请参考以下文章