Linux 入门
Posted 拼命姑娘fh
tags:
篇首语:本文由小常识网(cha138.com)小编为大家整理,主要介绍了Linux 入门相关的知识,希望对你有一定的参考价值。
摘要:牢记用户(root,普通)登录区别,权限,学会用快捷键进入终端,知道终端的分类,以及查看当前终端,会用ssh远程连接。熟练掌握显示、修改提示符格式,会查看命令的类型,会用hash缓存,使用命令别名,命令执行的顺序。牢记一些简单命令,如echo,history,date,cal.关机,重启,查看用户登录信息的命令。解压screen包,会创建,加入,退出会话。用tab键补齐命令,掌握命令行历史,可以用于安全系统,发送远程集中式管理。熟练使用一些常用的快捷键。
1 用户登录
root用户:一个特殊的管理帐户 ,对系统损害几乎有无限的能力 除非必要,不要登录为 root
普通( 非特权 )用户 :权限有限 ,造成损害的能力比较有限。
用户登录信息查看命令: whoami
[root@localhost ~]# whoami
root
显示当前登录有效用户 who am i:
[root@localhost ~]# who am i 显示户名,终端号,时间,IP地址
root     pts/0        2019-03-20 06:27 (172.18.250.74)
显示当前的登录会话 who:
[root@localhost ~]# who
fhj      :0           2019-03-20 06:25 (:0)
root     tty3         2019-03-20 06:26
root     pts/0        2019-03-20 06:27 (172.18.250.74)
系统当前所有的登录会话 w: 系统当前所有的登录会话及所做的操作
[root@localhost ~]# w
  06:32:05 up 8 min,  3 users,  load average: 0.04, 0.55, 0.45
USER     TTY      FROM             LOGIN@   IDLE   JCPU   PCPU WHAT
fhj      :0       :0               06:25   ?xdm?  46.92s  0.42s /usr/libexe
root     tty3                      06:26    5:17   0.17s  0.17s -bash
root     pts/0    172.18.250.74    06:27    5.00s  0.15s  0.05s w
2 终端(用户信息输入以及处理结果直接显示的设备)
虚拟终端:tty可有n个,
进入终端:快捷键Ctrl+Alt+F[2-6] ,有的键盘冲突,可用Ctrl+Alt+Fn+[2-6]
查看当前的终端设备:
[root@localhost ~]# tty
            /dev/tty4
伪终端:pty, SSH远程连接
 [root@localhost ~]# tty
          /dev/pts/1
3 重启 : reboot 关机:halt poweroff
shutdown -r: reboot
-h: halt
-c:cancel
TIME:无指定,默认相当于 +1
now: 立刻,相当于+0
+m: 相对时间表示法,几分钟之后;例如 +3
hh:mm: 绝对时间表示,指明具体时间
[root@localhost ~]# shutdown -h 17:00
Shutdown scheduled for Sat 2018-07-14 17:00:00 CST, use \'shutdown -c\' to cancel.
[root@localhost ~]#
Broadcast message from root@localhost.localdomain (Sat 2018-07-14 16:59:02 CST):
The system is going down for power-off at Sat 2018-07-14 17:00:00 CST!
ctrl+c取消
当其他伪终端接收广播信息时,只能用shutdown -c取消
4 查看IP地址
[root@localhost ~]# ifconfig
  ens33: flags=4163<UP,BROADCAST,RUNNING,MULTICAST>  mtu 1500
               inet 172.18.250.118  netmask 255.255.0.0  broadcast 172.18.255.255   //桥接模式
ens34: flags=4163<UP,BROADCAST,RUNNING,MULTICAST>  mtu 1500
              ether 00:0c:29:d1:b9:fb  txqueuelen 1000  (Ethernet)                              //仅主机模式
ifup ens34可以将00:0c:29:d1:b9:fb显示为192.168.40.13
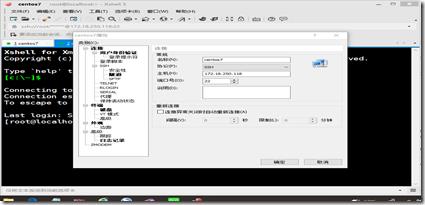
两个虚拟机之间进行连接 用ssh +对方的IP地址192.168.40.127,linux下有自带的客户端,服务端,windows下没有ssh,只能用第三方软件Xshell,连接虚拟机时输入其地址,密码等
隧道模式开启xmanager,方便以后打开gedit文本编辑
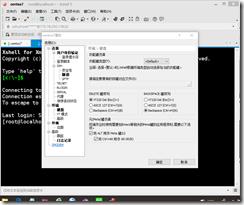
选中ALT作为Meta键,方便以后ALT键使用
5 Shell
Shell 是Linux系统的用户界面,提供了用户与内核进行交互操作 的一种接口。它接收用户输入的命令并把它送入内核去执行
显示当前使用的shell
[root@centos7 ~]# echo $SHELL
     /bin/bash
显示当前系统使用的所有shell
[root@centos7 ~]# cat /etc/shells
     /bin/sh
     /bin/bash
     /sbin/nologin
     /bin/dash
     /bin/tcsh
     /bin/csh
6 命令提示符
[root@localhost ~]# # 管理员 $ 普通用户
显示提示符格式 [root@localhost ~]#echo $PS1
修改提示符格式 PS1="[\\u@\\h \\W]\\\\$ "
7 执行命令
type查看命令是内部还是外部
[root@localhost ~]# type cd
cd is a shell builtin
[root@localhost ~]# type ifconfig
ifconfig is /usr/sbin/ifconfig
内部命令:help 只能显示shell内部的命令帮助信息。而对于外部命令的帮助信息只能使用man或者info命令查看。
[root@localhost ~]# help cd
    cd: cd [-L|[-P [-e]]] [dir]
     Change the shell working directory.

     Change the current directory to DIR.  The default DIR is the value of the
     HOME shell variable.

     The variable CDPATH defines the search path for the directory containing
     DIR.  Alternative directory names in CDPATH are separated by a colon (:).
     A null directory name is the same as the current directory.  If DIR begins
     with a slash (/), then CDPATH is not used.

     If the directory is not found, and the shell option `cdable_vars\' is set,
     the word is assumed to be  a variable name.  If that variable has a value,
     its value is used for DIR.

     Options:
         -L    force symbolic links to be followed
         -P    use the physical directory structure without following symbolic
         links
         -e    if the -P option is supplied, and the current working directory
         cannot be determined successfully, exit with a non-zero status

     The default is to follow symbolic links, as if `-L\' were specified.

     Exit Status:
     Returns 0 if the directory is changed, and if $PWD is set successfully when
     -P is used; non-zero otherwise.
pwd 内部命令
外部命令去PATH找
[root@localhost ~]# echo $PATH
/usr/local/sbin:/usr/local/bin:/usr/sbin:/usr/bin:/root/bin
/usr/local/sbin/pwd  (ifconfig)
/bin/pwd
外部命令:查看路径:which -a |--skip-alias ;
enable 显示及激活内部命令
[root@localhost ~]# enable
enable .
enable :
enable [
enable alias
enable bg
enable bind
enable break
enable builtin
enable caller
enable cd
enable command
enable compgen
enable complete
enable compopt
enable continue
enable declare
enable dirs
enable disown
enable echo
enable enable
enable eval
enable exec
enable exit
enable export
enable false
enable fc
enable fg
enable getopts
enable hash
enable help
enable history
enable jobs
enable kill
enable let
enable local
enable logout
enable mapfile
enable popd
enable printf
enable pushd
enable pwd
enable read
enable readarray
enable readonly
enable return
enable set
enable shift
enable shopt
enable source
enable suspend
enable test
enable times
enable trap
enable true
enable type
enable typeset
enable ulimit
enable umask
enable unalias
enable unset
enable wait
enable |wc -l 显示所有已激活的内部命令的数量
 [root@localhost ~]# enable |wc -l
 61
enable command 激活所指定的内部命令
enable  –n   显示所有被禁用的内部命令
[root@localhost ~]# enable -n
enable -n alias
enable -n |wc -l 显示所有已禁用的内部命令的数量
[root@localhost ~]# enable -n |wc -l
 1
enable -n command 禁用所指定的内部命令
[root@localhost ~]# enable -n alias
[root@localhost ~]# enable
enable .
enable :
enable [
enable bg
enable bind
enable break
enable builtin
enable caller
enable cd
enable command
enable compgen
enable complete
enable compopt
enable continue
enable declare
enable dirs
enable disown
enable echo
enable enable
enable eval
enable exec
enable exit
enable export
enable false
enable fc
enable fg
enable getopts
enable hash
enable help
enable history
enable jobs
enable kill
enable let
enable local
enable logout
enable mapfile
enable popd
enable printf
enable pushd
enable pwd
enable read
enable readarray
enable readonly
enable return
enable set
enable shift
enable shopt
enable source
enable suspend
enable test
enable times
enable trap
enable true
enable type
enable typeset
enable ulimit
enable umask
enable unalias
enable unset
enable wait
8 Hash缓存表 (将外部命令的路径缓存,可大 大提高命令的调用速率 )
hash常见用法: hash 将外部命令的路径缓存
hash –l 显示hash缓存,可作为输入使用
[root@localhost ~]# hash -l
                                    builtin hash -p /usr/bin/who who
                                    builtin hash -p /usr/bin/whoami whoami
                                    builtin hash -p /usr/bin/ls ls
                                    builtin hash -p /usr/bin/w w
hash –t name 打印缓存中name的路径
 [root@localhost ~]# hash -t who
  /usr/bin/who
hash –d name 删除指定命令的hash缓存
 [root@localhost ~]# hash
 hits    command
  1    /usr/bin/who
  1    /usr/bin/whoami
  2    /usr/bin/ls
  1    /usr/bin/w
 [root@localhost ~]# hash -d w
 [root@localhost ~]# hash
 hits    command
  1    /usr/bin/who
  1    /usr/bin/whoami
  2    /usr/bin/ls
hash –r 删除所有的hash缓存
[root@localhost ~]# hash -r
[root@localhost ~]# hash
 hash: hash table empty
9 命令别名
命令执行的顺序
alias > 内部 > hash > path
alias 别名
查看所有别名:
[root@localhost ~]# alias
alias cp=\'cp -i\'
alias egrep=\'egrep --color=auto\'
alias fgrep=\'fgrep --color=auto\'
alias grep=\'grep --color=auto\'
alias l.=\'ls -d .* --color=auto\'
alias ll=\'ls -l --color=auto\'
alias ls=\'ls --color=auto\'
alias mv=\'mv -i\'
alias rm=\'rm -i\'
alias which=\'alias | /usr/bin/which --tty-only --read-alias --show-dot --show-tilde\'
unalias 取消别名
[root@localhost ~]# alias hm=\'help me\'
[root@localhost ~]# alias
alias cp=\'cp -i\'
alias egrep=\'egrep --color=auto\'
alias fgrep=\'fgrep --color=auto\'
alias grep=\'grep --color=auto\'
alias hm=\'help me\'
alias l.=\'ls -d .* --color=auto\'
alias ll=\'ls -l --color=auto\'
alias ls=\'ls --color=auto\'
alias mv=\'mv -i\'
alias rm=\'rm -i\'
alias which=\'alias | /usr/bin/which --tty-only --read-alias --show-dot --show-tilde\'
[root@localhost ~]# unalias hm
[root@localhost ~]# alias
alias cp=\'cp -i\'
alias egrep=\'egrep --color=auto\'
alias fgrep=\'fgrep --color=auto\'
alias grep=\'grep --color=auto\'
alias l.=\'ls -d .* --color=auto\'
alias ll=\'ls -l --color=auto\'
alias ls=\'ls --color=auto\'
alias mv=\'mv -i\'
alias rm=\'rm -i\'
alias which=\'alias | /usr/bin/which --tty-only --read-alias --show-dot --show-tilde
unalias -a 取消所有别名
[root@localhost ~]# unalias -a
[root@localhost ~]# alias
[root@localhost ~]#
如果想让别名永久有效,要定义在配置文件中 ,仅对当前用户:~/.bashrc
对所有用户有效:/etc/bashrc
如果别名同原命令同名,要执行原命令,可使用 “\\COMMAND” 或者 ’COMMAND’ 或者/PATH/COMMAND:外部命令
取消和结束命令执行:Ctrl+c,Ctrl+d
以上是关于Linux 入门的主要内容,如果未能解决你的问题,请参考以下文章

![[K5N{`P_DDM]BGM08[A8O{W [K5N{`P_DDM]BGM08[A8O{W](https://image.cha138.com/20210512/73dee59c8eb04ac6a250af815aac7bb6.jpg)
