uniapp实现APP中内嵌H5应用
Posted ㄏ、Forgetˊ
tags:
篇首语:本文由小常识网(cha138.com)小编为大家整理,主要介绍了uniapp实现APP中内嵌H5应用相关的知识,希望对你有一定的参考价值。
现如今,各大APP平台都有属于自己的小程序体系,各种各样的应用都可直接内嵌在APP中实现一站式体验。使用uniapp开发的APP如何实现这样的功能呢?答案就是内嵌web-view
注意事项
-
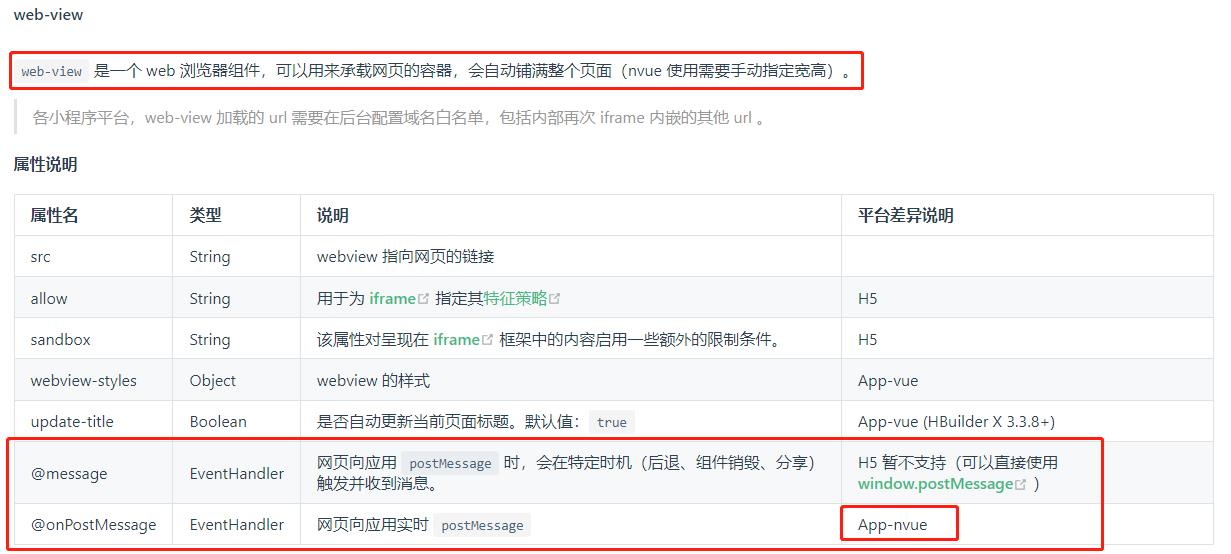
APP中有vue页面及nvue页面,两种页面均可内嵌web-view,但两种页面的表现不一:vue页面会自动铺满整个页面,接收web-view页面通信使用的是
@message;nvue页面则需要指定页面宽高,接收web-view页面通信使用的是@onPostMessage

-
由APP通知web-view页面,无论是vue页面还是nvue页面,只有
evalJS方法,但调用的姿势不一致
vue页面调用:
<template>
	<web-view :src="url" @message="message"></web-view>
</template>
<script>
export default
	xxx,
	onLoad()
		this.currentWebview = this.$mp.page.$getAppWebview();
		this.currentWebview.children()[0].evalJS('xxx');


</script>
nvue页面调用:
<template>
	<web-view ref="webview" :src="url" @message="message"></web-view>
</template>
<script>
export default
	xxx,
	onReady()
		this.currentWebview = this.$refs.webview;
		this.currentWebview.evalJS('xxx');


</script>
- nvue页面中使用的web-view页面是无法调用plus API的,vue页面是可以控制外部web-view页面是否可用plus API,其他事项具体参考web-view | uni-app官网
实现细节
博主使用的是vue页面的web-view组件,因为页面需要铺满屏幕且需要plus API支持,但实现的过程中还是会遇到大大小小的问题,下边举两个具体实现中遇到的问题及解决方案
- 顶部导航栏的表现不一:因内嵌web-view应用需要全屏显示,标题栏也交由内嵌应用自定义,故在pages.json中定义页面的时候,须将页面的
titleNView设置为false。但即便如此,其表现仍然不一致,表现为android端的页面起始位置是手机屏幕的最顶部(含状态栏在内),ios端则是从状态栏之下开始渲染页面,为了抹平差异,可使用webview的setStyle统一
APP端设置:
export default
	xxx,
	onReady()
		this.currentWebview = this.$mp.page.$getAppWebview();
		// 提前计算好屏幕比率(screenRatio),底部安全距离(safeAreaInsetsBtm),区分平台(platform)
		let  screenRatio, safeAreaInsetsBtm, platform  = this.$store.state;
		// 由于iOS端会自动定位top到状态栏底下,故这里需要判断手机系统
		// 因调节Android端的top值能看出头部变化,故转换思路调ios端的top值
		let top = 0;
		if (platform === 'ios')
			let info = uni.getSystemInfoSync();
			top = -info.statusBarHeight;

		let bottom = safeAreaInsetsBtm / screenRatio;
		this.currentWebview.children()[0].setStyle( top, bottom: parseInt(bottom) );
统一两端的top至手机屏幕最顶部,bottom至手机屏幕安全距离之上
内嵌应用中设置:
// 内嵌应用中,配置一个全局变量管理顶部样式,比如可在vuex的action中写个setPage方法
const actions =
	setPage(context)
		let statusbarHeight = plus.navigator.getStatusbarHeight();
		let pageStyle =  paddingTop: `calc(0.2rem + $statusbarHeightpx)` ;
		context.commit('pageStyle', pageStyle);

;
APP中调用:
export default
	onReady()
		this.currentWebview = this.$mp.page.$getAppWebview();
		this.currentWebview.children()[0].evalJS("showTip('提示测试')");
内嵌应用的index.html中,引用下载到本地的mitt.umd.js:
<!DOCTYPE html>
<html lang="en">
	<head>
		<meta charset="utf-8" />
		<meta http-equiv="X-UA-Compatible" content="IE=edge" />
		<meta name="renderer" content="webkit" />
		<meta name="viewport" content="width=device-width, user-scalable=no, initial-scale=1.0, maximum-scale=1.0, minimum-scale=1.0" />
		<!-- uni 的 SDK,必须引用。 -->
		<script src="<%= BASE_URL %>libs/uni-app/uni.app.webview.1.5.2.js"></script>
		<!--html页面与vue页面通讯js-->
		<script src="<%= BASE_URL %>libs/mitt/mitt.umd.js"></script>
		<title>xxx</title>
	</head>

	<body>
		<noscript>
			<strong>当前浏览器版本太低,请升级浏览器或使用其他浏览器</strong>
		</noscript>
		<div id="app"></div>
		<!-- built files will be auto injected -->
		<script>
			window.bus = window.mitt();
			const showTip = (tip) =>
				window.bus.emit('showTip', tip);
			;
		</script>
	</body>
</html>
内嵌应用vue页面中:
export default
	activated()
		// 挂载
		window.bus.on('showTip', (tip) =>
			alert(tip);
		);

	deactivated()
		// 离开时记得销毁
		window.bus.off('showTip');
总结
在实现的过程中,其实不单单只有这些内容,具体的实现还是需要各位真枪实弹编码踩坑,才能知道原来这里面还有这么细节的东西。只能感慨跨端确实不容易啊,继续加油吧,Keep learning…
以上是关于uniapp实现APP中内嵌H5应用的主要内容,如果未能解决你的问题,请参考以下文章