ubuntu配置静态ip安装使用supervisor
Posted 倪馒头
tags:
篇首语:本文由小常识网(cha138.com)小编为大家整理,主要介绍了ubuntu配置静态ip安装使用supervisor相关的知识,希望对你有一定的参考价值。
一、配置静态ip
1、查看网卡名称
使用ifconfig查看,若查看不看,使用ifconfig -a
2、配置静态ip
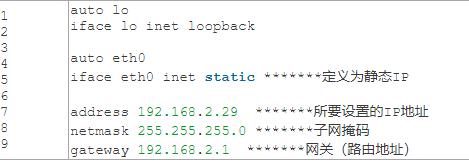
打开:vi /etc/network/interfaces,里面内容默认为自动获取ip

修改为
3、设置dns
1)打开:vi /etc/resolv.conf,添加内容为:
nameserver 114.114.114.114
nameserver 8.8.8.8
2)上述配置的dns在重启机器后会有自动修改为默认值,所以需要修改为永久性,打开vi /etc/resolvconf/resolv.conf.d/base,添加内容为:
nameserver 114.114.114.114
nameserver 8.8.8.8
4、重启网络
重启网络——执行:/etc/init.d/networking restart
(重启后若发现网络还没生效,请重启机器)执行:reboot
二、安装使用supervisor
supervisor是一款方便管理进程,在进程被意外杀死会自动进行重启的工具。
1、安装supervisor
执行:
sudo apt-get update
sudo apt-get install supervisor
2、添加需要管理配置的进程
cd到/etc/supervisor/conf.d下,
创建进程文件:vi xxx.conf
添加以下内容:
[program:xxx]
command=/opt/java/jdk1.8.0_212/jre/bin/java -jar xxx.jar
autostart=true
autorestart=true
startretries=3
directory=/xx/xx
3、启动加载进程
启动:supervisord
加载:supervisorctl reload
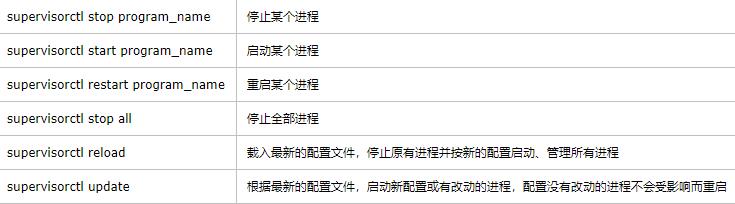
4、其他常用命令
以上是关于ubuntu配置静态ip安装使用supervisor的主要内容,如果未能解决你的问题,请参考以下文章