原生开发小程序 和 wepy mpvue 对比
Posted 苍青浪
tags:
篇首语:本文由小常识网(cha138.com)小编为大家整理,主要介绍了原生开发小程序 和 wepy mpvue 对比相关的知识,希望对你有一定的参考价值。
1.三者的开发文档以及介绍:
原生开发小程序文档:点此进入
wepy 开发文档:点此进入
mpvue 开发文档:点此进入
2.三者的简单对比:
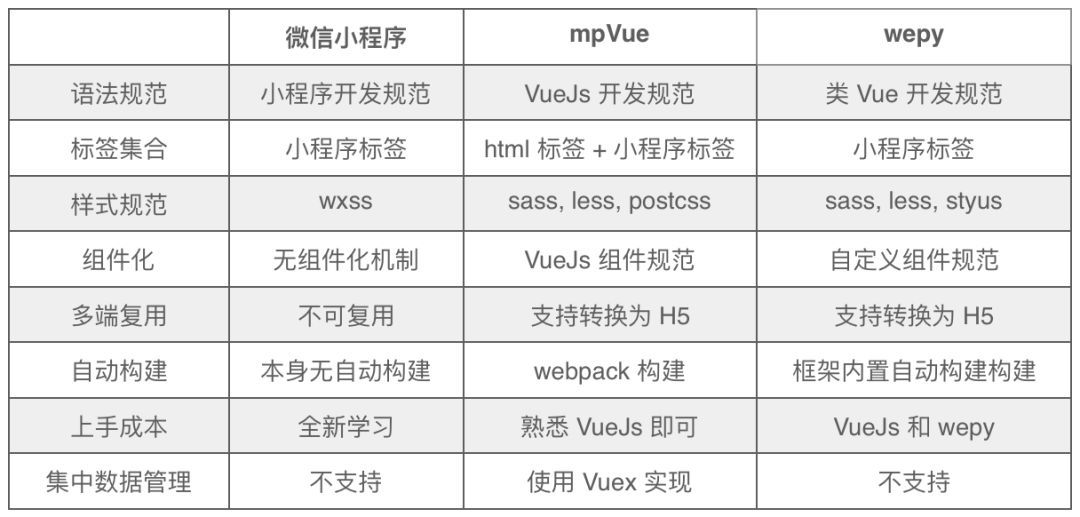
以下用一张图来简单概括三者的区别:
小程序支持的是 WXML + WXSS + JS 这样的组合,所以,wepy 和 mpvue 都是将文件构建到 dist 目录,转换为小程序支持的文件类型,然后将微信开发者工具指向 dist 目录下,进行调试开发,并且两者都提供了热更新。
3.开发中,该选择哪种开发方式:
1.开发方式上:
原生开发:
开发者需要全新学习小程序的抒写格式,目前版本模板中支持 slot,但是不支持 npm 包。原生不支持 css 预处理器,但是 vsCode 中 Easy WXLESS 插件可以将 less 文件自动转换为 wxss 文件;
wepy:
开发者需要熟悉 vue 和 wepy 两种语法,支持 slot 组件内容分发插槽,支持 npm 包,支持 css 预处理器;
mpvue:
开发者需要熟悉 vue ,目前版本(v1.0.5)不支持 slot ,支持 npm 包,支持 css 预处理器;
2.应用状态管理上:
原生开发:
没有提供原生的应用状态管理方式,但是可以将 Redux or Mobx 引入到项目中。
小程序原生提供了一种声明使用全局变量,写法为:
app.js 中配置变量
|
1
2
3
4
5
6
7
8
9
10
11
12
13
|
//App.jsApp({ onLaunch: function () { console.log(‘App Launch‘) }, onShow: function () { console.log(‘App Show‘) }, onHide: function () { console.log(‘App Hide‘) }}) |
通过全局函数 getApp() 可以获取全局的应用实例,然后调用配置常量
/pages/index/index index.js测试
|
1
2
3
4
5
6
7
|
Page({ onLoad:function(options){ var app = getApp(); // Get the app instance. console.log(app.BASE_URL); }}) |
wepy:
可以将 Redux or Mobx 引入到项目中。
mpvue:
可以直接使用 vuex 做应用状态管理
3.开发便利上:
原生开发:
不支持 computed 计算属性和 watcher 监听器;模板语法中只支持简单的 js 表达式。需要写小程序的 view 标签等;
wepy:
支持 computed 计算属性和 watcher 监听器;模板语法中只支持简单的 js 表达式。需要写小程序的 view 标签等;
computed 的写法:
|
1
2
3
4
5
|
computed = { aPlus () { return this.a + 1 }} |
watcher 监听器的写法:
// 监听器函数名必须跟需要被监听的data对象中的属性num同名, // 其参数中的newValue为属性改变后的新值,oldValue为改变前的旧值
|
1
2
3
4
5
|
watch = { num (newValue, oldValue) { console.log(`num value: ${oldValue} -> ${newValue}`) }} |
mpvue:
支持 computed 计算属性和 watcher 监听器;模板语法中只支持简单的 js 表达式。可以直接写 div 、span 等标签
computed 的写法:
|
1
2
3
4
5
6
7
8
|
computed: { computedClassStr () { return this.isActive ? ‘active‘ : ‘‘ }, computedClassObject () { return { active: this.isActive } }} |
watcher 监听器的写法:
|
1
2
3
4
5
|
watch: { num (newValue, oldValue) { console.log(`num value: ${oldValue} -> ${newValue}`) }} |
4.组件化
mpvue
详细的不支持列表:
- 暂不支持在组件引用时,在组件上定义 click 等原生事件、v-show(可用 v-if 代替)和 class style 等样式属性(例:
<card class="class-name"> </card>样式是不会生效的),因为编译到 wxml,小程序不会生成节点,建议写在内部顶级元素上。 - Slot(scoped 暂时还没做支持)
- 动态组件
- 异步组件
- inline-template
- X-Templates
- keep-alive
- transition
- class
- style
mpvue 可以支持小程序的原生组件,比如: picker,map 等,需要注意的是原生组件上的事件绑定,需要以 vue 的事件绑定语法来绑定,如 bindchange="eventName" 事件,需要写成 @change="eventName"
wepy
props 传值
props传值在WePY中属于父子组件之间传值的一种机制,包括静态传值与动态传值。静态传值和VUE类似
动态传值是指父组件向子组件传递动态数据内容,父子组件数据完全独立互不干扰。但可以通过使用.sync修饰符来达到父组件数据绑定至子组件的效果,也可以通过设置子组件props的twoWay: true来达到子组件数据绑定至父组件的效果
支持双向绑定!!而vue是一种自上而下的数据传递方式!!
wepy.component基类提供$broadcast、$emit、$invoke三个方法用于组件之间的通信和交互
|
1
2
3
4
5
6
7
8
9
10
11
12
13
14
15
16
17
|
import wepy from ‘wepy‘export default class Com extends wepy.component { components = {}; data = {}; methods = {}; // events对象中所声明的函数为用于监听组件之间的通信与交互事件的事件处理函数 events = { ‘some-event‘: (p1, p2, p3, $event) => { console.log(`${this.$name} receive ${$event.name} from ${$event.source.$name}`); } }; // Other properties} |
不同的是组件自定义的事件定义在events对象中。
$broadcast事件是由父组件发起,所有子组件都会收到此广播事件,除非事件被手动取消。
$emit
$emit与$broadcast正好相反,事件发起组件的所有祖先组件会依次接收到$emit事件。
$invoke
$invoke是一个页面或组件对另一个组件中的方法的直接调用,通过传入组件路径找到相应的组件,然后再调用其方法。
组件自定义事件处理函数
可以通过使用.user修饰符为自定义组件绑定事件,如:@customEvent.user="myFn"
其中,@表示事件修饰符,customEvent 表示事件名称,.user表示事件后缀。
目前总共有三种事件后缀:
-
.default: 绑定小程序冒泡型事件,如bindtap,.default后缀可省略不写; -
.stop: 绑定小程序捕获型事件,如catchtap; -
.user: 绑定用户自定义组件事件,通过$emit触发。注意,如果用了自定义事件,则events中对应的监听函数不会再执行。
5.参数获取
原生开发:
APP 中
 onLaunch: function(options) {
    // Do something initial when launch.
  },
  onShow: function(options) {
      // Do something when show.
},Page中onLoad: function(options) {
// Do some initialize when page load.
}mpvue
在所有 页面 的组件内可以通过 this.$root.$mp.query 进行获取onLoad 时候传递的 options。
在所有的组件内可以通过 this.$root.$mp.appOptions 进行获取小程序在 app onLaunch/onShow 时候传递的 options。
6.数据更新
原生开发,mpvue
通过this.setData({});
wepy
WePY使用脏数据检查对setData进行封装,在函数运行周期结束时执行脏数据检查,一来可以不用关心页面多次setData是否会有性能上的问题,二来可以更加简洁去修改数据实现绑定,不用重复去写setData方法。
this.title = ‘this is title‘;
需注意的是,在异步函数中更新数据的时候,必须手动调用$apply方法,才会触发脏数据检查流程的运行。如:
|
1
2
3
4
|
setTimeout(() => { this.title = ‘this is title‘; this.$apply();}, 3000); |
7.事件处理
mpvue
// 事件映射表,左侧为 WEB 事件,右侧为 小程序 对应事件
|
1
2
3
4
5
6
7
8
9
10
11
12
13
14
15
16
17
18
19
20
21
22
|
{ click: ‘tap‘, touchstart: ‘touchstart‘, touchmove: ‘touchmove‘, touchcancel: ‘touchcancel‘, touchend: ‘touchend‘, tap: ‘tap‘, longtap: ‘longtap‘, input: ‘input‘, change: ‘change‘, submit: ‘submit‘, blur: ‘blur‘, focus: ‘focus‘, reset: ‘reset‘, confirm: ‘confirm‘, columnchange: ‘columnchange‘, linechange: ‘linechange‘, error: ‘error‘, scrolltoupper: ‘scrolltoupper‘, scrolltolower: ‘scrolltolower‘, scroll: ‘scroll‘} |
在 input 和 textarea 中 change 事件会被转为 blur 事件。
8.其它
mpvue
不支持部分复杂的 javascript 渲染表达式
template 中的 {{}} 双花括号的部分,直接编码到 wxml 文件中,由于微信小程序的能力限制(数据绑定),所以无法支持复杂的 JavaScript 表达式。
不支持过滤器
不支持函数 不支持在 template 内使用 methods 中的函数。
wepy
interceptor 拦截器
可以使用WePY提供的全局拦截器对原生API的请求进行拦截。
具体方法是配置API的config、fail、success、complete回调函数。参考示例:
|
1
2
3
4
5
6
7
8
9
10
11
12
13
14
15
16
17
18
19
20
21
22
23
24
25
26
27
28
29
30
31
32
33
34
35
36
37
38
39
|
import wepy from ‘wepy‘;export default class extends wepy.app { constructor () { // this is not allowed before super() super(); // 拦截request请求 this.intercept(‘request‘, { // 发出请求时的回调函数 config (p) { // 对所有request请求中的OBJECT参数对象统一附加时间戳属性 p.timestamp = +new Date(); console.log(‘config request: ‘, p); // 必须返回OBJECT参数对象,否则无法发送请求到服务端 return p; }, // 请求成功后的回调函数 success (p) { // 可以在这里对收到的响应数据对象进行加工处理 console.log(‘request success: ‘, p); // 必须返回响应数据对象,否则后续无法对响应数据进行处理 return p; }, //请求失败后的回调函数 fail (p) { console.log(‘request fail: ‘, p); // 必须返回响应数据对象,否则后续无法对响应数据进行处理 return p; }, // 请求完成时的回调函数(请求成功或失败都会被执行) complete (p) { console.log(‘request complete: ‘, p); } }); }} |
wpy其它优化细节
1. wx.request 接收参数修改
|
1
2
3
4
5
6
7
8
9
10
11
12
13
14
15
16
17
|
// 原生代码:wx.request({ url: ‘xxx‘, success: function (data) { console.log(data); }});// WePY 使用方式, 需要开启 Promise 支持,参考开发规范章节wepy.request(‘xxxx‘).then((d) => console.log(d));// async/await 的使用方式, 需要开启 Promise 和 async/await 支持,参考 WIKIasync function request () { let d = await wepy.request(‘xxxxx‘); console.log(d);} |
2. 优化事件参数传递
|
1
2
3
4
5
6
7
8
9
10
11
12
13
14
15
16
17
18
19
20
21
|
// 原生的事件传参方式:<view data-id="{{index}}" data-title="wepy" data-other="otherparams" bindtap="tapName"> Click me! </view>Page({ tapName: function (event) { console.log(event.currentTarget.dataset.id)// output: 1 console.log(event.currentTarget.dataset.title)// output: wepy console.log(event.currentTarget.dataset.other)// output: otherparams }});// WePY 1.1.8以后的版本,只允许传string。<view @tap="tapName({{index}}, ‘wepy‘, ‘otherparams‘)"> Click me! </view>methods: { tapName (id, title, other, event) { console.log(id, title, other)// output: 1, wepy, otherparams }} |
3. 改变数据绑定方式
保留setData方法,但不建议使用setData执行绑定,修复传入undefined的bug,并且修改入参支持: this.setData(target, value) this.setData(object)
以上是关于原生开发小程序 和 wepy mpvue 对比的主要内容,如果未能解决你的问题,请参考以下文章
