Tomcat启动过程
Posted funny_coding
tags:
篇首语:本文由小常识网(cha138.com)小编为大家整理,主要介绍了Tomcat启动过程相关的知识,希望对你有一定的参考价值。
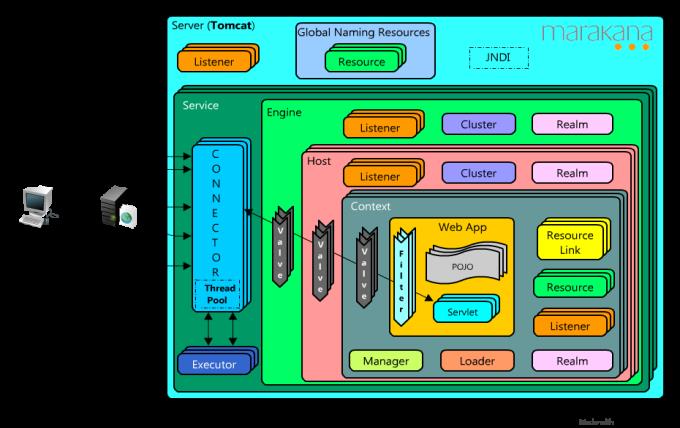
整体架构图
一. 启动阶段
BootStrap的main方法加载server.xml配置文件,封装成Server,Service,Connector,Engine等java对象
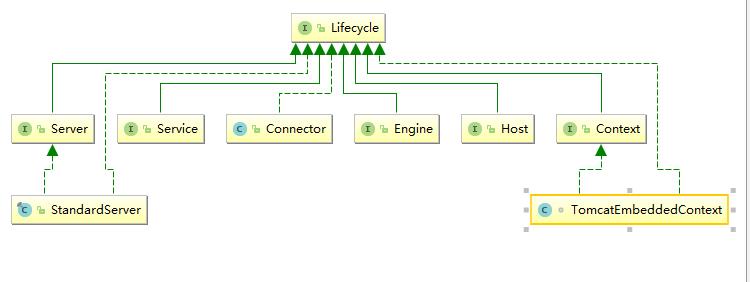
Server初始化==>Service初始化==>Connector初始化==>Engine初始化==>Host初始化==>Context初始化 WAR解压 创建Servlet
Connector初始化:绑定端口,创建BIO NIO NIO2线程池
Connector.setProtocol是在解析server.xml配置文件时绑定关系
启动Connector initInternal() ===>ProtocolHandler.init() ==> Endpoint.init()-->Endpoint.bind()
Connector作用(接收请求时):
ServerSocket(Channel)接收socket请求创建Socket, 并将Socket.InputStream中的内容封装成javax.servlet.http.HttpServletRequest的实现类, 经过多个valve filter之后传递到Container的Servlet(SpringMVC)中, servlet.doService完成之后由HttpServletResponse(持有请求时创建的socket?).outputStream回写内容到socket中
Protocol 配置在server.xml的<connector >标签的属性中, 作用:根据配置创建不同的Endpoint
tomcat8.5
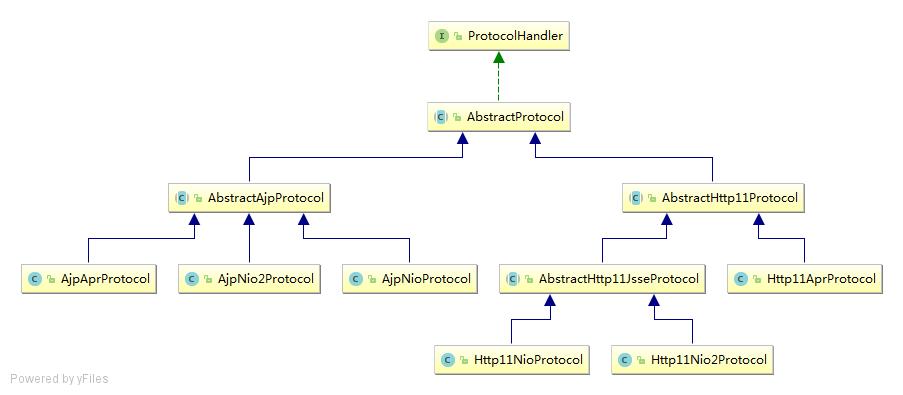
Endpoint 具体协议的实现, 完成绑定端口及创建线程池
tomcat8.5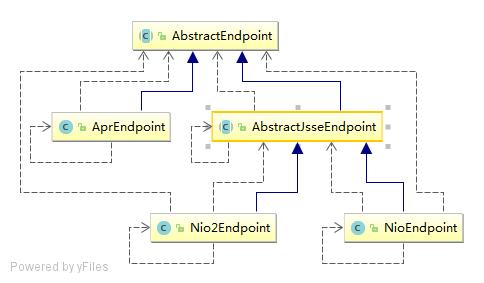
tomcat8.0 
tomcat 7.0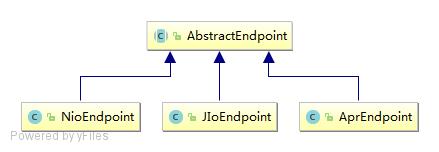
Endpoint.startInternal()
7.0默认使用JIOEndpoint, 8.0以上默认使用NIOEndpoint
//搞懂NIO NIO2===>
二、接收浏览器HTTP请求
整体流程:
NIOEndpoint ---> Http11Processor(创建Request, Response) ---> CoyoteAdapter --> Container -->
PipeLine(StandardEngineValve, StandardHostValve, StandardContextValve, StandardWrapperValve)--> Servlet.doService
2.1 Endpoint中request创建
JIOEndpoint在接收socket请求后,直接将Request交给了worker线程
NIOEndpoint.Acceptor在接收到请求后(while循环一直监听),将PollerEvent事件注册到NIOEndpoint.Poller(持有selector对象)的事件队列中,并调用selector.waitup() 只调用一次,
private void addEvent(PollerEvent event) {
            events.offer(event);
            if ( wakeupCounter.incrementAndGet() == 0 ) selector.wakeup();
}
Poller的while循环中查找到PollerEvent, 调用processKey()方法-->AbstractEndpoint#processSocket()在这里创建SocketProcessor(Runable)并提交给Executor线程池处理。
SocketProcessor --> Http11Processor.service() readsocket&buildRequest-->CoyoteAdatper.service()
2.2 CoyoteAdapter中处理Request
Servlet3.1 异步Request, 在Servlet里面设置.isAsync, coyoteAdapter invoke服务方法后直接返回,socket并没有释放
org.apache.catalina.connector.CoyoteAdapter#service
 1             if (postParseSuccess) {
 2                 //check valves if we support async
 3                 request.setAsyncSupported(
 4                         connector.getService().getContainer().getPipeline().isAsyncSupported());
 5                 // Calling the container  调用filter servlet
 6                 connector.getService().getContainer().getPipeline().getFirst().invoke(
 7                         request, response);
 8             }
 9             if (request.isAsync()) {
10                 async = true;
11                 ReadListener readListener = req.getReadListener();
12                 if (readListener != null && request.isFinished()) {
13                     // Possible the all data may have been read during service()
14                     // method so this needs to be checked here
15                     ClassLoader oldCL = null;
16                     try {
17                         oldCL = request.getContext().bind(false, null);
18                         if (req.sendAllDataReadEvent()) {
19                             req.getReadListener().onAllDataRead();
20                         }
21                     } finally {
22                         request.getContext().unbind(false, oldCL);
23                     }
24                 }
25
26                 Throwable throwable =
27                         (Throwable) request.getAttribute(RequestDispatcher.ERROR_EXCEPTION);
28
29                 // If an async request was started, is not going to end once
30                 // this container thread finishes and an error occurred, trigger
31                 // the async error process
32                 if (!request.isAsyncCompleting() && throwable != null) {
33                     request.getAsyncContextInternal().setErrorState(throwable, true);
34                 }
35             } else {
36                 request.finishRequest(); // 非异步的请求处理之后, 会释放socket
37                 response.finishResponse();
38             }
session创建时机, 在Request.getSession时根据请求中的JSESSIONID查找,如果id为null,首次创建,新的请求中就携带了JSESSIONID
Connector创建的是org.apache.catalina.connector.Request
org.apache.catalina.core.StandardWrapperValve --> 具体某个Servlet (DispatchServlet), 初始化FilterChain, 然后调用各个filter, 最后到Servlet.doService
filterChain.doFilter
    (request.getRequest(), response.getResponse());
压缩版的两个默认Servlet: DefaultServlet处理静态资源,JSPServlet创建HttpServletRequest,对connector.Request又包一层
2.3 Response的socket WRITE,CLOSE事件在NIOEndpoint中的处理
和socket OPEN_READ事件基本一致
其他参考:
Http中socket长连接短连接使用场景 http://www.cnblogs.com/0201zcr/p/4694945.html
程序中设置为长连接 1. socket.setKeepAlive(true) 2.socketChannel.setOption(StandardSocketOptions.SO_KEEPALIVE, true);
See:
http://tomcat.apache.org/tomcat-8.0-doc/architecture/requestProcess.html
http://tomcat.apache.org/tomcat-8.0-doc/config/http.html#NIO2_specific_configuration
以上是关于Tomcat启动过程的主要内容,如果未能解决你的问题,请参考以下文章
