Linux系统裁剪笔记
Posted
tags:
篇首语:本文由小常识网(cha138.com)小编为大家整理,主要介绍了Linux系统裁剪笔记相关的知识,希望对你有一定的参考价值。
1.什么裁剪?
本篇文章的主要目的是让笔者和读者更深的认识Linux系统的运作方式,大致内容就是把Linux拆开自己一个个组件来组装,然后完成一个微型的Linux系统.下面,让我们来实现吧..写的不好的地方请指教.
2.原理
大家都知道,操作系统的启动流程是(主要是Linux):POST—>Bios—>MBR—kernel-->initrd-->sbin/init,
POST,BIOS都不是我们管的,所以这里我们从MBR开始,Linux的系统引导先主要是用的grub这个软件,grub引导系统了,然后启动内核,内核调用initrd来实现最基本的操作系统,
3.实验 (所有操作均在虚拟机上实现,且定义硬盘时选IDE)
3.1.首先我们得创建一个新的磁盘,来保存我们的grub和内核等关键程序(直接在虚拟机上添加新的磁盘)
分两个区,分别是20M的sdb1主盘,和512M的sdb2主盘。
[[email protected] mnt]# fdisk -l
Disk /dev/sdb: 42.9 GB, 42949672960 bytes
255 heads, 63 sectors/track, 5221 cylinders
Units = cylinders of 16065 * 512 = 8225280 bytes
Device Boot Start End Blocks Id System
/dev/sdb1 1 3 24066 83 Linux
/dev/sdb2 4 66 506047+ 83 Linux
/dev/sdb3 67 83 136552+ 82 Linux swap / Solaris
[[email protected] mnt]# mke2fs -j /dev/sdb1
[[email protected] mnt]# mke2fs -j /dev/sdb2
[[email protected] mnt]# mount /dev/sdb1 /mnt/boot/
[[email protected] mnt]# mount /dev/sdb2 /mnt/sysroot/
[[email protected] mnt]# mount
...
/dev/sdb1 on /mnt/boot type ext3 (rw)
/dev/sdb2 on /mnt/sysroot type ext3 (rw)
[[email protected] mnt]# ls boot/ #验证挂载是否成功
lost+found
[[email protected] mnt]# ls sysroot/
lost+found
3.2.启动系统的时候识别硬盘后要有引导程序,系统通过MBR可查找到/dev/sdb中的/mnt
[[email protected] mnt]# grub-install --root-directory=/mnt /dev/sdb
Probing devices to guess BIOS drives. This may take a long time.
Installation finished. No error reported.
This is the contents of the device map /mnt/boot/grub/device.map.
Check if this is correct or not. If any of the lines is incorrect,
fix it and re-run the script `grub-install‘.
(fd0) /dev/fd0
(hd0) /dev/hda
(hd1) /dev/sda
(hd2) /dev/sdb
(hd3) /dev/sdc
[[email protected] mnt]# ls /mnt/boot/ #grub已成功生成
grub lost+found
3.3.有了引导程序就需要有我们的内核了,没有内核怎么启动啊,但是内核的启动又要依赖initrd,所以我们要建立/mnt/boot/vmlinuz,/mnt/boot/initrd.gz,/mnt/boot/grub/grub.conf
3.3.1. 复制内核文件vmlinuz
[[email protected] mnt]# cp /boot/vmlinuz-2.6.18-164.el5 /mnt/boot/vmlinuz
3.3.2. 故应该手动展开文件2:initrd
方法一:
[[email protected] mnt]# cp /boot/initrd-2.6.18-164.el5.img /root
[[email protected] mnt]# file /root/initrd-2.6.18-164.el5.img #该文件为gzip文件
/boot/initrd-2.6.18-164.el5.img: gzip compressed data, from Unix, last modified: Thu Apr 17 11:43:57 2014, max compression
[[email protected] ~]# mv initrd-2.6.18-164.el5.img initrd-2.6.18-164.el5.img.gz
[[email protected] ~]# gzip -d initrd-2.6.18-164.el5.img.gz #解压该文件
[[email protected] ~]# file initrd-2.6.18-164.el5.img
initrd-2.6.18-164.el5.img: ASCII cpio archive (SVR4 with no CRC)
[[email protected] ~]# mkdir testinit
[[email protected] testinit]# cpio -id < ../initrd-2.6.18-164.el5.img #展开文件
13832 blocks
[[email protected] testinit]# ls #查看
bin dev etc init lib proc sbin sys sysroot
[[email protected] testinit]#
方法二:
[[email protected] ~]# mkdir testiso #创建空目录
[[email protected] ~]# cd testiso
[[email protected] testiso]# ls
[[email protected] testiso]# zcat /boot/initrd-2.6.18-164.el5.img | cpio -id
13832 blocks
[[email protected] testiso]# ls
bin dev etc init lib proc sbin sys sysroot
3.3.3. 修改INIT文件中的启动分区,再打包成initrd.gz
[[email protected] testiso]# file init
init: a /bin/nash script text executable
[[email protected] testiso]# vim init
#resume /dev/VolGroup00/LogVol01 #禁用swap分区
或#resume LABEL=SWAP-sda9 #禁用swap分区
mkrootdev -t ext3 -o defaults,ro /dev/hda2 #/dev/hda1为BOOT分区
#红色部分原为:sda5 或 /dev/VolGroup00/LogVol00
#[[email protected] testiso]# mount
#/dev/sda5 on / type ext3 (rw)
[[email protected] testiso]# find . | cpio -H newc --quiet -o | gzip -9 > /mnt/boot/initrd.gz
[[email protected] boot]# ls -lh
total 7.1M
drwxr-xr-x 2 root root 1.0K Nov 21 09:02 grub
-rw-r--r-- 1 root root 2.6M Nov 21 10:13 initrd.gz #init文件中改为/dev/hda2
drwx------ 2 root root 12K Nov 21 08:54 lost+found
-rw-r--r-- 1 root root 1.9M Nov 21 09:16 vmlinuz
3.3.4. 接下来要配置grub文件,不然系统怎么找到你的硬件,故新建grub.conf文件
[[email protected] boot]# vim /mnt/boot/grub/grub.conf
default=0
timeout=5
title Test Linux 5.4 (Test)
root (hd0,0)
kernel /vmlinuz
initrd /initrd.gz
3.4. 这样一个简单的操作系统的雏形就做好了,但是OS的操作依赖于shell,所以我们得手动复制bash、bash依赖的库文件,可写程式自动复制。
[[email protected] sysroot]# mkdir -pv proc sys dev etc/rc.d lib bin sbin boot home var proc
[[email protected] sysroot]# cp /sbin/init /mnt/sysroot/sbin/
[[email protected] sysroot]# cp /bin/bash /mnt/bin/
[[email protected] sysroot]# ldd /sbin/init
libsepol.so.1 => /lib64/libsepol.so.1 (0x0000003941c00000)
libselinux.so.1 => /lib64/libselinux.so.1 (0x0000003942000000)
libc.so.6 => /lib64/libc.so.6 (0x0000003940400000)
libdl.so.2 => /lib64/libdl.so.2 (0x0000003940c00000)
/lib64/ld-linux-x86-64.so.2 (0x0000003940000000)
[[email protected] sysroot]# cp /lib64/libsepol.so.1 /mnt/sysroot/lib64/ #复制相关库文件
[[email protected] sysroot]# cp /lib64/libselinux.so.1 /mnt/sysroot/lib64/
[[email protected] sysroot]# cp /lib64/libc.so.6 /mnt/sysroot/lib64/
[[email protected] sysroot]# cp /lib64/libdl.so.2 /mnt/sysroot/lib64/
[[email protected] sysroot]# cp /lib64/ld-linux-x86-64.so.2 /mnt/sysroot/lib64/
[[email protected] sysroot]# ldd /bin/bash
libtermcap.so.2 => /lib64/libtermcap.so.2 (0x0000003943000000)
libdl.so.2 => /lib64/libdl.so.2 (0x0000003940c00000)
libc.so.6 => /lib64/libc.so.6 (0x0000003940400000)
/lib64/ld-linux-x86-64.so.2 (0x0000003940000000)
[[email protected] sysroot]# cp /lib64/libtermcap.so.2 /mnt/sysroot/
[[email protected] sysroot]# chroot /mnt/sysroot/ #切换根目录,画地为牢
bash-3.2# pwd
/
bash-3.2# cd /lib
lib/ lib64/
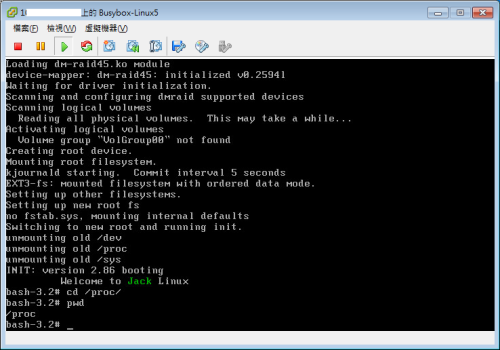
3.5. 好了!系统到这里就差不多了,不过我们还得修修,大家可以看到,我们的init=/bin/bash,这时候就会有同学问了,有没搞错,Linux系统化初始化不都是调用/sbin/init的么,你怎么调用了/bin/bash,没错,其实这里指向什么就调什么,那我们现在重新让他指向/etc/rc.d/rc.sysinit。
[[email protected] sysroot]# vim etc/inittab
[[email protected] sysroot]# cat etc/inittab
id:3:initdefault:
si::sysinit:/etc/rc.d/rc.sysinit
[[email protected] sysroot]# vim etc/rc.d/rc.sysinit
[[email protected] sysroot]# chmod +x etc/rc.d/rc.sysinit
[[email protected] sysroot]# cat etc/rc.d/rc.sysinit
#!/bin/bash
#
echo -e "\t Welcome to \033[32mJack\033[0m Linux"
/bin/bash
3.6.如下图,执行成功了
好了,整个系统安装完成了!
以上是关于Linux系统裁剪笔记的主要内容,如果未能解决你的问题,请参考以下文章
