主动分布式WEB资产扫描
Posted 渗透测试中心
tags:
篇首语:本文由小常识网(cha138.com)小编为大家整理,主要介绍了主动分布式WEB资产扫描相关的知识,希望对你有一定的参考价值。
一、 Redis的服务安装
系统环境:centos7x64 ip地址:192.168.1.11
1.设置静态IP地址
[root@localhost backlion]#vi /etc/sysconfig/network-scripts/ifcfg-*
BOOTPROTO=static #dhcp改为static(修改)
ONBOOT=yes #开机启用本配置,一般在最后一行(修改)
IPADDR=192.168.1.11 #静态IP(增加)
GATEWAY=192.168.1.1#默认网关,虚拟机安装的话,通常是2,也就是VMnet8的网关设置(增加)
NETMASK=255.255.255.0 #子网掩码(增加)
DNS1=192.168.1.1 #DNS 配置,虚拟机安装的话,DNS就网关就行,多个DNS网址的话再增加(增加)
2.设置主机名
[root@localhost network-scripts]# hostnamectl set-hostname redis-server.com
1.设置Redis的仓库地址
[root@localhost backlion]# yuminstall epel-release
3.关闭防火墙
[root@localhost ~]# cat /etc/selinux/config
# This file controls the state of SELinux on the system.
# SELINUX= can take one of these three values:
# enforcing - SELinux security policy is enforced.
# permissive - SELinux prints warnings instead of enforcing.
# disabled - No SELinux policy is loaded.
SELINUX=disabled
# SELINUXTYPE= can take one of three two values:
# targeted - Targeted processes are protected,
# minimum - Modification of targeted policy. Only selected processes are protected.
# mls - Multi Level Security protection.
SELINUXTYPE=targeted
关闭firewall:
systemctl stop firewalld.service #停止firewall
systemctl disable firewalld.service #禁止firewall开机启动
4.安装redis
[root@localhost backlion]# yum install redis
修改配置文件,监听所有的IP地址
vim /etc/redis.conf
找到下面这一行
bind 127.0.0.1
改成
bind 0.0.0.0
3.redis配置认证密码
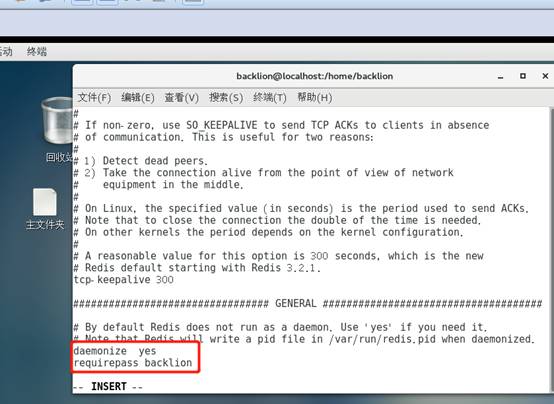
yum方式安装的redis配置文件通常在/etc/redis.conf中,添加密码以及设置daemonize yes和protected-mode no
requirepass backlion
daemonize yes
protected-mode no

4.启动redis,到此完成
[root@localhost backlion]# redis-server /etc/redis.conf
[root@localhost backlion]# service redis start
如果需要设置开机自动启动
chkconfig redis on
[root@localhost backlion]# yum install git
[root@localhost backlion]# cd /opt
[root@localhost backlion]#
git clone https://github.com/grayddq/PublicSecScan.git
二、Server部署
系统环境:ubuntux64 ip地址:192.168.1.12
1.进入到opt目录
root@backlion:~# cd /opt
2.下载扫描项目PublicSecScan
root@backlion:~# Git clone https://github.com/grayddq/PublicSecScan.git
3.进入到PublicSecScan目录
root@backlion:~# cd PublicSecScan
4.进行安装PublicSecScan
pip install -r requirements.txt
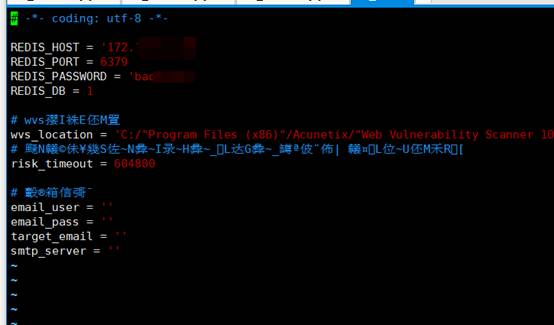
5对lib/config.py配置文件进行配置(填入Redis和Email(可选)相关信息,wvs信息可忽略
)

6. domain.txt中填入待扫描信息,可随时更新
7.执行
python PublicSecScan.py

三、Worker部署
系统环境:win7x86 ip地址:192.168.1.13
1.安装python 2.7.5
https://www.python.org/ftp/python/2.7.5/python-2.7.5.msi #这里是win7x86
2.安装AWVS10.5
链接:https://pan.baidu.com/s/16iMwWgIjZyI6CR1ROCd7mQ 密码:ia2m
3.分别安装python的模块
amqp-1.4.6, anyjson-0.3.3, billiard-3.3.0.13, celery-3.1.7,celery-4.1.1,kombu-3.0.25,
pytz-2018.4,redis-2.10.6,setuptools-39.2.0,xlwt-1.3.0,pip-10.0.1
用以下命令进行安装
Python setup.py install
其中的包我已打好,上传到百度网盘方便大家下载:
链接: https://pan.baidu.com/s/1SV-wUdzzHMtNuuA2s4fBJQ 密码: tnbw
4.对lib/config.py配置文件进行配置(填入Redis和WVS相关信息,Email信息可忽略
)
5.进入到PublicSecScan目录,然后执行命令
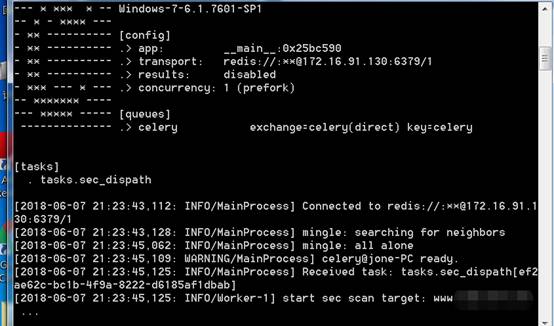
cmd代码目录执行,-c 1代表多一个WVS进程,可增加:
celery -A tasks worker -c 1 --loglevel=info –Ofair

6.在Server部署中查看扫描结果:
输出目录默认:./out/
以上是关于主动分布式WEB资产扫描的主要内容,如果未能解决你的问题,请参考以下文章