Ubuntu安装SSH + Windows上配置Putty
Posted
tags:
篇首语:本文由小常识网(cha138.com)小编为大家整理,主要介绍了Ubuntu安装SSH + Windows上配置Putty相关的知识,希望对你有一定的参考价值。
1. Ubuntu安装SSH
    命令: # sudo apt-get install openssh-server
2. 启动SSH Server
    命令: # sudo /etc/init.d/ssh start
3. 在控制端(安装putty的一侧,Windows或其他Linux OS)安装和配置putty
3.1 下载安装putty
    官方主页: http://www.putty.org/
    下载页面: http://www.chiark.greenend.org.uk/~sgtatham/putty/download.html
    # 在Windows上,直接下载二进制可执行文件比较方便
    二进制可执行文件下载链接:  http://tartarus.org/~simon/putty-snapshots/x86/putty.exe
    源码下载链接:  http://the.earth.li/~sgtatham/putty/latest/putty-src.zip
    # 在Linux上,可以下载二进制可执行文件或源码
    源码下载链接:  http://the.earth.li/~sgtatham/putty/latest/putty-0.64.tar.gz
3.2 配置putty
    # Windows上配置Putty
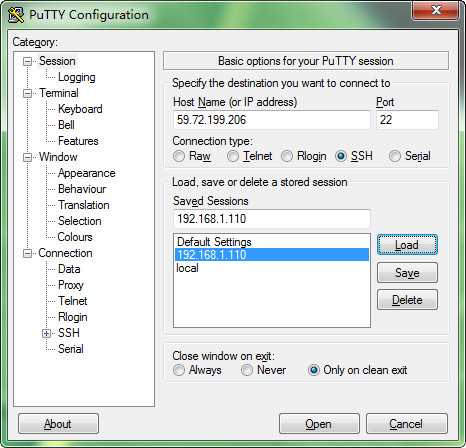
    1) 启动Putty, 在session category页上, 输入Host Name或IP Address, 以及Connection Type, 由于Ubuntu一侧的SSH Server的默认监听端口号是22,故一般只需要输入Ubunt一侧提供SSH服务的IP地址或主机名即可,端口号和连接类型分别保持"22"和"SSH"不变即可.
    2) 在Putty中, Window/Appearance中设置字体,设置一个Ubuntu一侧可接受的字体.
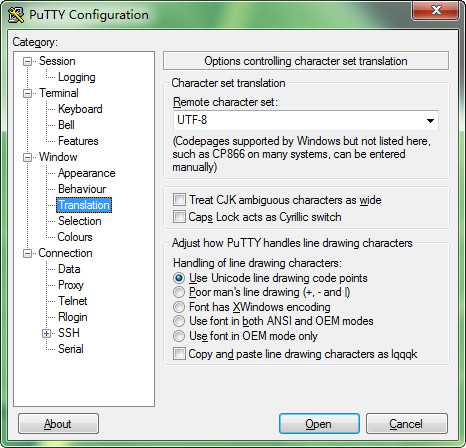
    3) 在Putty中,Window/Translation中设置编码,设置Remote Character Set为UTF-8编码集.
    4) 在Putty中, Window/Colors中设置前景色,设置为Default Foreground Color即可.
    5) 在Putty中, 回到Session Category页, 输入Session名,并保存(save).
    6) 在Putty中, 直接点Open即可进行连接.
    注意: 登录时,若无法直接用root帐号登录,可以尝试先登录一个普通用户帐号,再利用su或sudo命令切换身份.
简易配置:
1.save session ,之后再选中load,就可以对指定session设置相关内容。设置完之后再save

2.设置编码

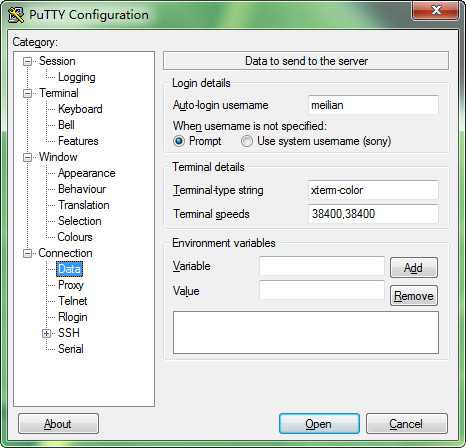
3.设置颜色和用户名

以上是关于Ubuntu安装SSH + Windows上配置Putty的主要内容,如果未能解决你的问题,请参考以下文章