Spring Security 整合 JSON Web Token(JWT)
Posted
tags:
篇首语:本文由小常识网(cha138.com)小编为大家整理,主要介绍了Spring Security 整合 JSON Web Token(JWT)相关的知识,希望对你有一定的参考价值。
参考技术A 注:参考 Spring Security 整合 JSON Web Token(JWT) 提升 REST 安全性 ,写的特别全面,本文只是学习总结基于token的鉴权机制
基于token的鉴权机制类似于http协议也是无状态的,它不需要在服务端去保留用户的认证信息或者会话信息。这就意味着基于token认证机制的应用不需要去考虑用户在哪一台服务器登录了,这就为应用的扩展提供了便利。
流程上是这样的:
1.用户使用用户名密码来请求服务器
2.服务器进行验证用户的信息
3.服务器通过验证发送给用户一个token
4.客户端存储token,并在每次请求时附送上这个token值
5.服务端验证token值,并返回数据
这个token必须要在每次请求时传递给服务端,它应该保存在请求头里, 另外,服务端要支持CORS(跨来源资源共享)策略,一般我们在服务端这么做就可以了Access-Control-Allow-Origin: *。
第一部分我们称它为头部(header),第二部分我们称其为载荷(payload, 类似于飞机上承载的物品),第三部分是签证(signature).
jwt的头部承载两部分信息:
声明类型,这里是jwt
声明加密的算法 通常直接使用 HMAC SHA256
完整的头部就像下面这样的JSON:
然后将头部进行base64加密(该加密是可以对称解密的),构成了第一部分.
载荷就是存放有效信息的地方。这个名字像是特指飞机上承载的货品,这些有效信息包含三个部分
1.标准中注册的声明
2.公共的声明
3.私有的声明
标准中注册的声明 (建议但不强制使用) :
iss : jwt签发者
sub : jwt所面向的用户
aud : 接收jwt的一方
exp : jwt的过期时间,这个过期时间必须要大于签发时间
nbf : 定义在什么时间之前,该jwt都是不可用的.
iat : jwt的签发时间
jti : jwt的唯一身份标识,主要用来作为一次性token,从而回避重放攻击。
公共的声明 :
公共的声明可以添加任何的信息,一般添加用户的相关信息或其他业务需要的必要信息.但不建议添加敏感信息,因为该部分在客户端可解密.
私有的声明 :
私有声明是提供者和消费者所共同定义的声明,一般不建议存放敏感信息,因为base64是对称解密的,意味着该部分信息可以归类为明文信息。
定义一个payload:
然后将其进行base64加密,得到Jwt的第二部分。
jwt的第三部分是一个签证信息,这个签证信息由三部分组成:
1.header (base64后的)
2.payload (base64后的)
3.secret
这个部分需要base64加密后的header和base64加密后的payload使用.连接组成的字符串,然后通过header中声明的加密方式进行加盐secret组合加密,然后就构成了jwt的第三部分。
将这三部分用.连接成一个完整的字符串,构成了最终的jwt:
注意:secret是保存在服务器端的,jwt的签发生成也是在服务器端的,secret就是用来进行jwt的签发和jwt的验证,所以,它就是你服务端的私钥,在任何场景都不应该流露出去。一旦客户端得知这个secret, 那就意味着客户端是可以自我签发jwt了。
如何应用
一般是在请求头里加入Authorization,并加上Bearer标注:
服务端会验证token,如果验证通过就会返回相应的资源。整个流程就是这样的:
jwt-diagram
总结
优点
因为json的通用性,所以JWT是可以进行跨语言支持的,像JAVA,javascript,NodeJS,php等很多语言都可以使用。
因为有了payload部分,所以JWT可以在自身存储一些其他业务逻辑所必要的非敏感信息。
便于传输,jwt的构成非常简单,字节占用很小,所以它是非常便于传输的。
它不需要在服务端保存会话信息, 所以它易于应用的扩展
安全相关
不应该在jwt的payload部分存放敏感信息,因为该部分是客户端可解密的部分。
保护好secret私钥,该私钥非常重要。
如果可以,请使用https协议
在SpringBoot中整合JWTSpring Security的步奏:
1.在项目中引入(本项目使用Gradle)
2.配置
目录结构如下:
WebSecurityConfig文件:
Spring Security整合JWT实现权限认证和授权
1jwt相关
- JWT是JSON Web Token的缩写,即JSON Web令牌,是一种自包含令牌。 是为了在网络应用环境间传递声明而执行的一种基于JSON的开放标准。
- JWT的声明一般被用来在身份提供者和服务提供者间传递被认证的用户身份信息,以便于从资源服务器获取资源。比如用在用户登录上。
- JWT最重要的作用就是对 token信息的防伪作用。
- 一个JWT由三个部分组成:JWT头、有效载荷、签名哈希最后由这三者组合进行base64url编码得到JWT
1.引入jwt依赖
<dependency>
      <groupId>io.jsonwebtoken</groupId>
      <artifactId>jjwt</artifactId>
       <version>0.7.0</version>
 </dependency>
2.jwt相关配置
public class JwtHelper

    //token过期时间
    private static long tokenExpiration = 365 * 24 * 60 * 60 * 1000;
    //加密秘钥
    private static String tokenSignKey = "123456";

    //根据用户id和用户名称生成token字符串
    public static String createToken(String userId, String username)
        String token = Jwts.builder()
                .setSubject("AUTH-USER")
                .setExpiration(new Date(System.currentTimeMillis() + tokenExpiration))
                .claim("userId", userId)
                .claim("username", username)
                .signWith(SignatureAlgorithm.HS512, tokenSignKey)
                .compressWith(CompressionCodecs.GZIP)
                .compact();
        return token;


    //从token字符串获取userid
    public static String getUserId(String token)
        try
            if (StringUtils.isEmpty(token)) return null;

            Jws<Claims> claimsJws = Jwts.parser().setSigningKey(tokenSignKey).parseClaimsJws(token);
            Claims claims = claimsJws.getBody();
            String userId = (String) claims.get("userId");
            return userId;
         catch (Exception e)
            e.printStackTrace();
            return null;


    //从token字符串获取username
    public static String getUsername(String token)
        try
            if (StringUtils.isEmpty(token)) return "";

            Jws<Claims> claimsJws = Jwts.parser().setSigningKey(tokenSignKey).parseClaimsJws(token);
            Claims claims = claimsJws.getBody();
            return (String) claims.get("username");
         catch (Exception e)
            e.printStackTrace();
            return null;
通过jwt可以生成token,可以token解析到用户的信息等等。
2.Spring Security
Spring 是非常流行和成功的 Java 应用开发框架,Spring Security 正是 Spring 家族中的成员。Spring Security 基于 Spring 框架,提供了一套 Web 应用安全性的完整解决方案。
正如你可能知道的关于安全方面的两个核心功能是“认证”和“授权”,一般来说,Web 应用的安全性包括用户认证(Authentication)和用户授权(Authorization)两个部分,这两点也是 SpringSecurity 重要核心功能。
(1)用户认证指的是:验证某个用户是否为系统中的合法主体,也就是说用户能否访问该系统。用户认证一般要求用户提供用户名和密码,系统通过校验用户名和密码来完成认证过程。
通俗点说就是系统认为用户是否能登录
(2)用户授权指的是验证某个用户是否有权限执行某个操作。在一个系统中,不同用户所具有的权限是不同的。比如对一个文件来说,有的用户只能进行读取,而有的用户可以进行修改。一般来说,系统会为不同的用户分配不同的角色,而每个角色则对应一系列的权限。
通俗点讲就是系统判断用户是否有权限去做某些事情。
SpringSecurity 特点:
- 和 Spring 无缝整合。
- 全面的权限控制。
- 专门为 Web 开发而设计。
- 旧版本不能脱离 Web 环境使用。
- 新版本对整个框架进行了分层抽取,分成了核心模块和 Web 模块。单独引入核心模块就可以脱离 Web 环境。
- 重量级。
Shiro 特点:
Apache 旗下的轻量级权限控制框架。
- 轻量级。Shiro 主张的理念是把复杂的事情变简单。针对对性能有更高要求
- 的互联网应用有更好表现。
- 通用性。
- 好处:不局限于 Web 环境,可以脱离 Web 环境使用。
- 缺陷:在 Web 环境下一些特定的需求需要手动编写代码定制。
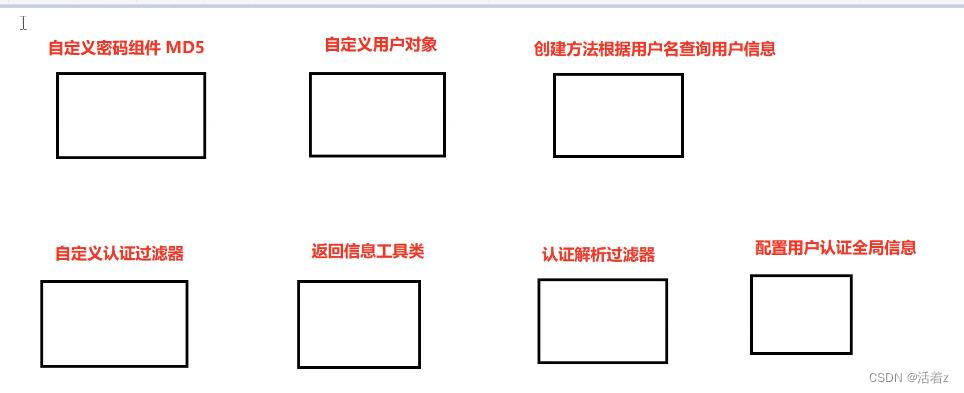
其实Spring Security可以根据以下图流程进行开发

- 创建自定义密码组件
- 创建自定义用户对象
- 创建方法查询用户信息
- 创建自定义认证过滤器
- 创建返回信息工具类
- 创建认证解析过滤器
- 创建配置用户认证全局信息
1.引入依赖
 <dependency>
            <groupId>org.springframework.boot</groupId>
            <artifactId>spring-boot-starter-security</artifactId>
        </dependency>
2. 创建自定义密码组件
@Component
public class CustomMD5Password implements PasswordEncoder
    @Override
    public String encode(CharSequence charSequence)
        return MD5.encrypt(charSequence.toString());


    @Override
    public boolean matches(CharSequence charSequence, String s)
        return s.equals(MD5.encrypt(charSequence.toString()));
登录会来到这进行密码校对判断
3.创建自定义用户对象
/**
 * 自定义用户类
 */
public class CustomUser extends User


    /**
     * 我们自己的用户实体对象,要调取用户信息时直接获取这个实体对象
     */
    private SysUser sysUser;

    public CustomUser(SysUser sysUser, Collection<? extends GrantedAuthority> authorities)
        super(sysUser.getUsername(), sysUser.getPassword(), authorities);
        this.sysUser = sysUser;


    public SysUser getSysUser()
        return sysUser;


    public void setSysUser(SysUser sysUser)
        this.sysUser = sysUser;
实际开发中我们的用户属性各种各样,这些默认属性可能是满足不了,所以我们一般会自己实现该接口,然后设置好我们实际的用户实体对象。实现此接口要重写很多方法比较麻烦,我们可以继承Spring Security提供的org.springframework.security.core.userdetails.User类,该类实现了UserDetails接口帮我们省去了重写方法的工作
4.创建方法查询用户信息
@Component
public class UserDetailServiceImpl implements UserDetailsService
    @Autowired
    private SysUserService sysUserService;

    @Autowired
    private SysMenuService sysMenuService;

    @Override
    public UserDetails loadUserByUsername(String username) throws UsernameNotFoundException
        SysUser sysUser = sysUserService.getUserInfoByUserName(username);
        if (sysUser == null)
            throw new UsernameNotFoundException("用户不存在");

        if (sysUser.getStatus().intValue() == 0)
            throw new RuntimeException("用户被禁用了");

        //根据用户id查询权限数据
        List<String> userPermsList = sysMenuService.getUserButtonList(sysUser.getId());
        //转换为security要求的格式
        List<SimpleGrantedAuthority> authorities=new ArrayList<>();
        for (String s : userPermsList)
            SimpleGrantedAuthority simpleGrantedAuthority = new SimpleGrantedAuthority(s.trim());
            authorities.add(simpleGrantedAuthority);

        CustomUser customUser = new CustomUser(sysUser, authorities);
        return customUser;
5.创建自定义认证过滤器
public class TokenLoginFilter extends UsernamePasswordAuthenticationFilter

    private RedisTemplate redisTemplate;

    private LoginLogService loginLogService;

    public TokenLoginFilter(AuthenticationManager authenticationManager, RedisTemplate redisTemplate, LoginLogService loginLogService)
        this.setAuthenticationManager(authenticationManager);
        this.setPostOnly(false);

        //指定登录接口及提交方式,可以指定任意路径
        this.setRequiresAuthenticationRequestMatcher(new AntPathRequestMatcher("/admin/system/index/login", "POST"));
        this.redisTemplate = redisTemplate;
        this.loginLogService = loginLogService;


    //获取用户名和密码,认证
    @Override
    public Authentication attemptAuthentication(HttpServletRequest request,
                                                HttpServletResponse response) throws AuthenticationException
        try
            LoginVo loginVo = new ObjectMapper().readValue(request.getInputStream(), LoginVo.class);
            Authentication authentication = new UsernamePasswordAuthenticationToken(loginVo.getUsername(), loginVo.getPassword());
            return this.getAuthenticationManager().authenticate(authentication);
         catch (IOException e)
            e.printStackTrace();

        return null;


    //认证成功就会调用此方法
    @Override
    protected void successfulAuthentication(HttpServletRequest request,
                                            HttpServletResponse response,
                                            FilterChain chain,
                                            Authentication authResult) throws IOException, ServletException
        //获取认证对象
        CustomUser customUser = (CustomUser) authResult.getPrincipal();

        //保存权限数据
        redisTemplate.opsForValue().set(customUser.getUsername(),
                JSON.toJSONString(customUser.getAuthorities()));

        //记录登录日志
        loginLogService.recordLoginLog(customUser.getUsername(), 0,
                IpUtil.getIpAddress(request), "登录成功");

        //生成token
        String token = JwtHelper.createToken((customUser.getSysUser().getId()).toString(), customUser.getSysUser().getUsername());
        Map<String, Object> map = new HashMap<>();
        map.put("token", token);
        ResponseUtil.out(response, Result.ok(map));


    //认证失败
    @Override
    protected void unsuccessfulAuthentication(HttpServletRequest request,
                                              HttpServletResponse response,
                                              AuthenticationException failed) throws IOException, ServletException
        if (failed.getCause() instanceof RuntimeException)
            ResponseUtil.out(response, Result.build(null, 204, failed.getMessage()));
         else
            ResponseUtil.out(response, Result.build(null, ResultCodeEnum.LOGIN_MOBLE_ERROR));
6.创建返回信息工具类
public static void out(HttpServletResponse response, Result r)
        ObjectMapper mapper = new ObjectMapper();
        response.setStatus(HttpStatus.OK.value());
        response.setContentType(MediaType.APPLICATION_JSON_UTF8_VALUE);
        try
            mapper.writeValue(response.getWriter(), r);
         catch (IOException e)
            e.printStackTrace();
7.创建认证解析过滤器
因为用户登录状态在token中存储在客户端,所以每次请求接口请求头携带token, 后台通过自定义token过滤器拦截解析token完成认证并填充用户信息实体。
public class TokenAuthenticationFilter extends OncePerRequestFilter
    private RedisTemplate redisTemplate;

    public TokenAuthenticationFilter(RedisTemplate redisTemplate)
        this.redisTemplate = redisTemplate;


    @Override
    protected void doFilterInternal(HttpServletRequest request, HttpServletResponse response, FilterChain chain)
            throws IOException, ServletException
        logger.info("uri:" + request.getRequestURI());
        //如果是登录接口,直接放行
        if ("/admin/system/index/login".equals(request.getRequestURI()))
            chain.doFilter(request, response);
            return;


//        if ("/prod-api/admin/system/index/login".equals(request.getRequestURI()))
//            chain.doFilter(request, response);
//            return;
//

        UsernamePasswordAuthenticationToken authentication = getAuthentication(request);
        if (null != authentication)
            SecurityContextHolder.getContext().setAuthentication(authentication);
            chain.doFilter(request, response);
         else
            ResponseUtil.out(response, Result.build(null, ResultCodeEnum.PERMISSION));


    private UsernamePasswordAuthenticationToken getAuthentication(HttpServletRequest request)
        // token置于header里
        String token = request.getHeader("token");
        logger.info("token:" + token);
        if (!StringUtils.isEmpty(token))
            String username = JwtHelper.getUsername(token);
            logger.info("username:" + username);
            if (!StringUtils.isEmpty(username))
                String authoritiesString =
                        (String) redisTemplate.opsForValue().get(username);
                List<Map> mapList = JSON.parseArray(authoritiesString, Map.class);
                List<SimpleGrantedAuthority> authorities = new ArrayList<>();
                for (Map map : mapList)
                    authorities.add(new SimpleGrantedAuthority((String) map.get("authority")));

                return new UsernamePasswordAuthenticationToken(username, null, authorities);


        return null;
8.创建配置用户认证全局信息
@Configuration
@EnableWebSecurity //开启springSecurity默认行为
@EnableGlobalMethodSecurity(prePostEnabled = true)//开启注解功能,默认禁用注解
public class WebSecurityConfig extends WebSecurityConfigurerAdapter
    @Autowired
    private UserDetailsService userDetailsService;

    @Autowired
    private CustomMD5Password customMd5PasswordEncoder;

    @Autowired
    private RedisTemplate redisTemplate;

    @Autowired
    private LoginLogService loginLogService;

    @Bean
    @Override
    protected AuthenticationManager authenticationManager() throws Exception
        return super.authenticationManager();


    @Override
    protected void configure(HttpSecurity http) throws Exception
        // 这是配置的关键,决定哪些接口开启防护,哪些接口绕过防护
        http
                //关闭csrf
                .csrf().disable()
                // 开启跨域以便前端调用接口
                .cors().and()
                .authorizeRequests()
                // 指定某些接口不需要通过验证即可访问。登陆接口肯定是不需要认证的
                .antMatchers("/admin/system/index/login").permitAll()
                // 这里意思是其它所有接口需要认证才能访问
                .anyRequest().authenticated()
                .and()
                //TokenAuthenticationFilter放到UsernamePasswordAuthenticationFilter的前面,
                // 这样做就是为了除了登录的时候去查询数据库外,其他时候都用token进行认证。
                .addFilterBefore(new TokenAuthenticationFilter(redisTemplate), UsernamePasswordAuthenticationFilter.class)
                .addFilter(new TokenLoginFilter(authenticationManager(),redisTemplate,loginLogService));

        //禁用session
        http.sessionManagement().sessionCreationPolicy(SessionCreationPolicy.STATELESS);


    @Override
    protected void configure(AuthenticationManagerBuilder auth) throws Exception
        // 指定UserDetailService和加密器
        auth.userDetailsService(userDetailsService).passwordEncoder(customMd5PasswordEncoder);


    /**
     * 配置哪些请求不拦截
     * 排除swagger相关请求
     *
     * @param web
     * @throws Exception
     */
    @Override
    public void configure(WebSecurity web) throws Exception
        web.ignoring().antMatchers("/favicon.ico", "/swagger-resources/**", "/webjars/**", "/v2/**", "/swagger-ui.html/**", "/doc.html");
3.用户授权
在SpringSecurity中,会使用默认的FilterSecurityInterceptor来进行权限校验。在FilterSecurityInterceptor中会从SecurityContextHolder获取其中的Authentication,然后获取其中的权限信息。判断当前用户是否拥有访问当前资源所需的权限。
1.操作步骤
1.前面登录时执行loadUserByUsername方法时,return new CustomUser(sysUser, Collections.emptyList());后面的空数据对接就是返回给Spring Security的权限数据。
在TokenAuthenticationFilter中登录时我们把权限数据保存到redis中(用户名为key,权限数据为value即可),这样通过token获取用户名即可拿到权限数据,这样就可构成出完整Authentication对象。
2.Spring Security默认是禁用注解的,要想开启注解,需要在继承WebSecurityConfigurerAdapter的类上加@EnableGlobalMethodSecurity注解,来判断用户对某个控制层的方法是否具有访问权限
通过@PreAuthorize标签控制controller层接口权限
 @PreAuthorize("hasAnyAuthority('bnt.sysRole.list')")
    @ApiOperation("条件分页查询")
    @GetMapping("/page/limit")
    public Result findPageQueryRole(@PathVariable("page") Long page,
                                    @PathVariable("limit") Long limit,
                                    SysRoleQueryVo vo)

        //创建page对象
        Page<SysRole> pageParam = new Page<>(page, limit);

        //调用service方法
        IPage<SysRole> iPage = sysRoleService.selectPage(pageParam, vo);
        return Result.ok(iPage);
这样就可以操作是否具有该权限如果没有该权限会报异常(AccessDeniedException ),注解里的参数对应数据库里的值。
3.自定义异常返回
@ExceptionHandler(AccessDeniedException.class)
@ResponseBody
public Result error(AccessDeniedException e) throws AccessDeniedException
    return Result.build(null, ResultCodeEnum.PERMISSION);
AccessDeniedException需要引入依赖,Spring Security对应的异常
<dependency>
    <groupId>org.springframework.boot</groupId>
    <artifactId>spring-boot-starter-security</artifactId>
    <scope>provided</scope>
</dependency>
4.测试
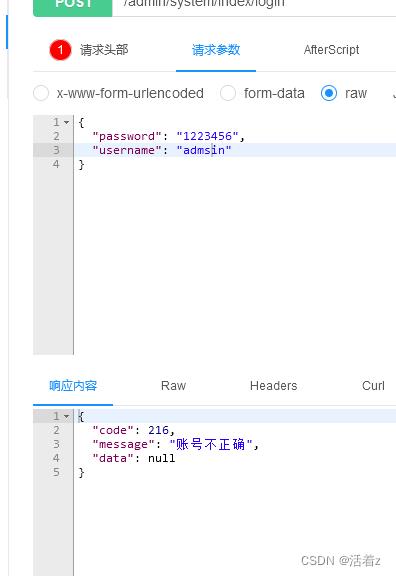
1.账号不正确

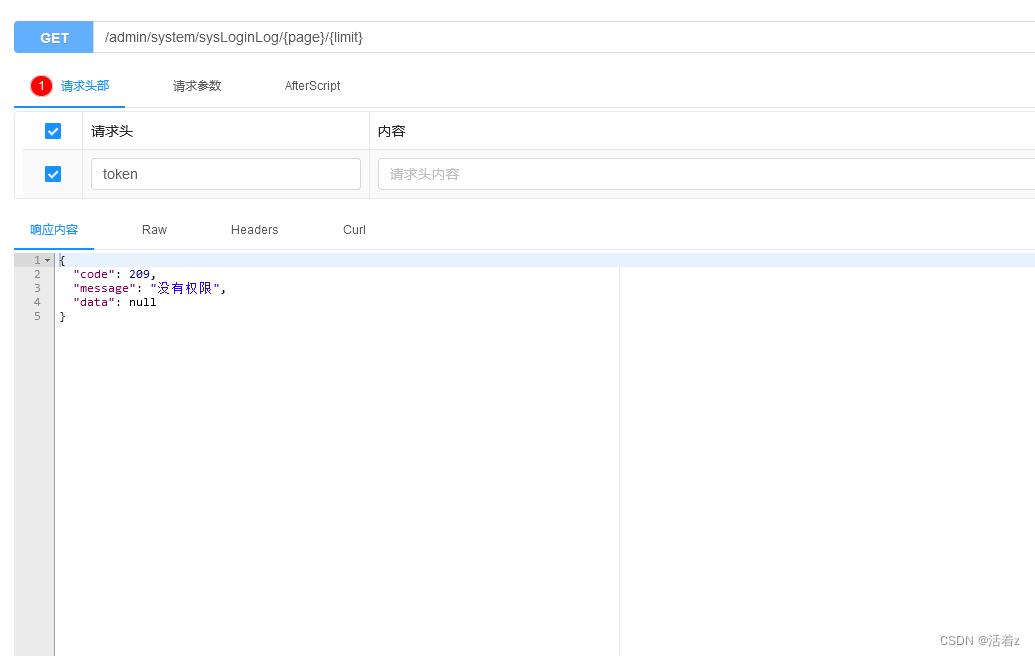
2.没有token值

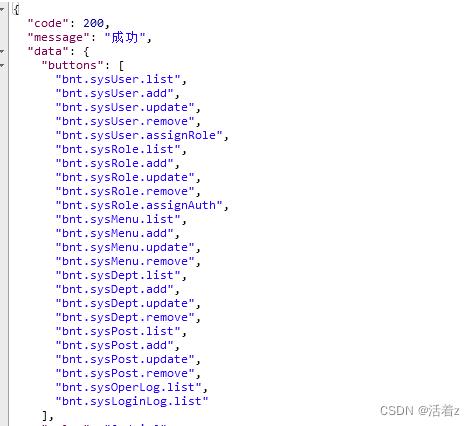
3.有token正确返回数据

5.工具类
1.树形展示工具类
 /**
     * 构建树形结构
     * 步骤:
     * 1.获取所有菜单集合
     * 2.找到菜单根节点,顶层数据==>parent==0 【对应的id==1】
     * 3.拿着id==1的值,对比菜单所有数据 谁的parentid==1 数据封装到id==1里面
     *
     * @param list
     * @return
     */
    public static List<SysMenu> buildTree(List<SysMenu> list)
        //创建一个集合封装数据
        List<SysMenu> trees = new ArrayList<>();
        //遍历所有菜单集合
        for (SysMenu sysMenu : list)
            //找到递归路口 parentId=0
            if (sysMenu.getParentId().longValue() == 0)
                trees.add(findChildren(sysMenu, list));


        return trees;


    /**
     * 从根节点进行递归查询,查询子节点
     * 判断根节点id=子节点parentId 是否相同,如果相同是子节点
     *
     * @param sysMenu
     * @param treeNodes
     * @return
     */
    private static SysMenu findChildren(SysMenu sysMenu, List<SysMenu> treeNodes)
        //数据初始化
        sysMenu.setChildren(new ArrayList<>());
        //遍历递归查找
        for (SysMenu it : treeNodes)
            //获取当前菜单id
            Long cid = sysMenu.getId();
            //获取所有菜单的parentId
            Long parentId = it.getParentId();
            //比对
            if (cid == parentId)
                if (sysMenu.getChildren() == null)
                    sysMenu.setChildren(new ArrayList<>());

                sysMenu.getChildren().add(findChildren(it, treeNodes));


        return sysMenu;
2.获取ip地址工具类
public class IpUtil

    public static String getIpAddress(HttpServletRequest request)
        String ipAddress = null;
        try
            ipAddress = request.getHeader("x-forwarded-for");
            if (ipAddress == null || ipAddress.length() == 0 || "unknown".equalsIgnoreCase(ipAddress))
                ipAddress = request.getHeader("Proxy-Client-IP");

            if (ipAddress == null || ipAddress.length() == 0 || "unknown".equalsIgnoreCase(ipAddress))
                ipAddress = request.getHeader("WL-Proxy-Client-IP");

            if (ipAddress == null || ipAddress.length() == 0 || "unknown".equalsIgnoreCase(ipAddress))
                ipAddress = request.getRemoteAddr();
                if (ipAddress.equals("127.0.0.1"))
                    // 根据网卡取本机配置的IP
                    InetAddress inet = null;
                    try
                        inet = InetAddress.getLocalHost();
                     catch (UnknownHostException e)
                        e.printStackTrace();

                    ipAddress = inet.getHostAddress();


            // 对于通过多个代理的情况,第一个IP为客户端真实IP,多个IP按照','分割
            if (ipAddress != null && ipAddress.length() > 15)  // "***.***.***.***".length()
                // = 15
                if (ipAddress.indexOf(",") > 0)
                    ipAddress = ipAddress.substring(0, ipAddress.indexOf(","));


         catch (Exception e)
            ipAddress="";

        // ipAddress = this.getRequest().getRemoteAddr();

        return ipAddress;


    public static String getGatwayIpAddress(ServerHttpRequest request)
        HttpHeaders headers = request.getHeaders();
        String ip = headers.getFirst("x-forwarded-for");
        if (ip != null && ip.length() != 0 && !"unknown".equalsIgnoreCase(ip))
            // 多次反向代理后会有多个ip值,第一个ip才是真实ip
            if (ip.indexOf(",") != -1)
                ip = ip.split(",")[0];


        if (ip == null || ip.length() == 0 || "unknown".equalsIgnoreCase(ip))
            ip = headers.getFirst("Proxy-Client-IP");

        if (ip == null || ip.length() == 0 || "unknown".equalsIgnoreCase(ip))
            ip = headers.getFirst("WL-Proxy-Client-IP");

        if (ip == null || ip.length() == 0 || "unknown".equalsIgnoreCase(ip))
            ip = headers.getFirst("HTTP_CLIENT_IP");

        if (ip == null || ip.length() == 0 || "unknown".equalsIgnoreCase(ip))
            ip = headers.getFirst("HTTP_X_FORWARDED_FOR");

        if (ip == null || ip.length() == 0 || "unknown".equalsIgnoreCase(ip))
            ip = headers.getFirst("X-Real-IP");

        if (ip == null || ip.length() == 0 || "unknown".equalsIgnoreCase(ip))
            ip = request.getRemoteAddress().getAddress().getHostAddress();

        return ip;
以上是关于Spring Security 整合 JSON Web Token(JWT)的主要内容,如果未能解决你的问题,请参考以下文章