TOMCAT8源码分析——处理请求分析(下)
Posted ppjj
tags:
篇首语:本文由小常识网(cha138.com)小编为大家整理,主要介绍了TOMCAT8源码分析——处理请求分析(下)相关的知识,希望对你有一定的参考价值。
前言
本文继续讲解TOMCAT的请求原理分析,建议朋友们阅读本文时首先阅读过《TOMCAT源码分析——请求原理分析(上)》和《TOMCAT源码分析——请求原理分析(中)》。在《TOMCAT源码分析——请求原理分析(中)》一文我简单讲到了Pipeline,但并未完全展开,本文将从Pipeline开始讲解请求原理的剩余内容。
管道
在Tomcat中管道Pipeline是一个接口,定义了使得一组阀门Valve按照顺序执行的规范,Pipeline中定义的接口如下:
- getBasic:获取管道的基础阀门;
- setBasic:设置管道的基础阀门;
- addValve:添加阀门;
- getValves:获取阀门集合;
- removeValve:移除阀门;
- getFirst:获取第一个阀门;
- isAsyncSupported:当管道中的所有阀门都支持异步时返回ture,否则返回false;
- getContainer:获取管道相关联的容器,比如StandardEngine;
- setContainer:设置管道相关联的容器。
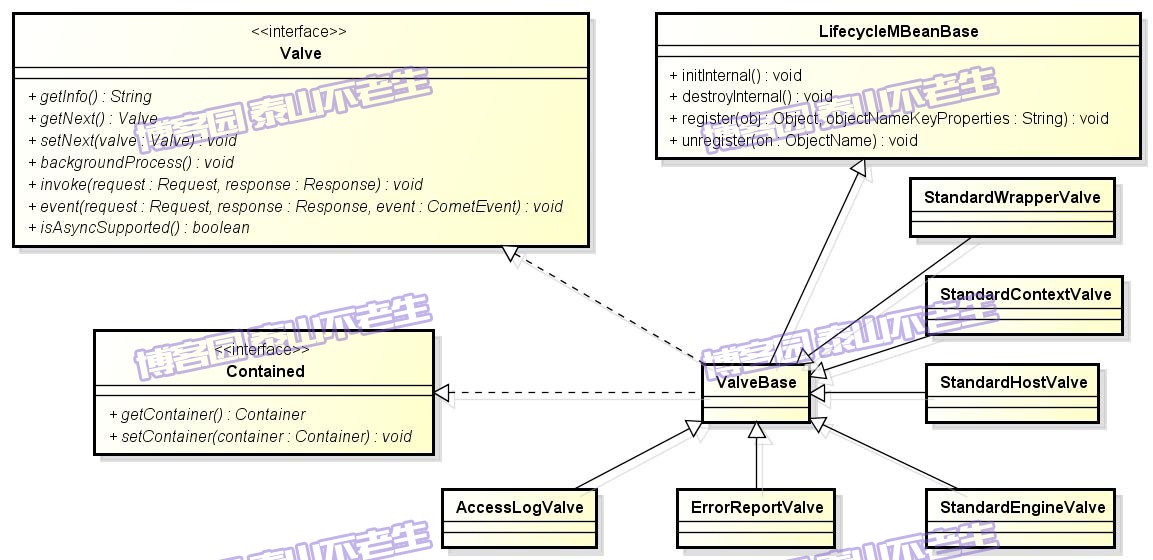
Engine、Host、Context及Wrapper等容器都定义了自身的Pipeline,每个Pipeline都包含一到多个Valve。Valve定义了各个阀门的接口规范,其类继承体系如图1所示。

图1 Valve的类继承体系

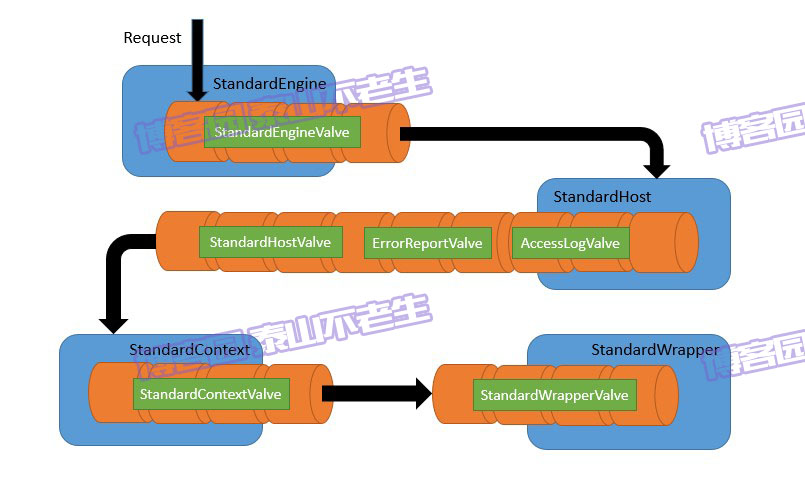
tomcat管道示意图
这里对图1中的主要部分(LifecycleMBeanBase及Contained接口在《TOMCAT源码分析——生命周期管理》一文详细阐述)进行介绍:
- Valve:定义了管道中阀门的接口规范,getNext和setNext分别用于获取或者设置当前阀门的下游阀门,invoke方法用来应用当前阀门的操作。
- ValveBase:Valve接口的基本实现,ValveBase与Valve的具体实现采用抽象模板模式将管道中的阀门串联起来。
- StandardEngineValve:StandardEngine中的唯一阀门,主要用于从request中选择其host映射的Host容器StandardHost。
- AccessLogValve:StandardHost中的第一个阀门,主要用于管道执行结束之后记录日志信息。
- ErrorReportValve:StandardHost中紧跟AccessLogValve的阀门,主要用于管道执行结束后,从request对象中获取异常信息,并封装到response中以便将问题展现给访问者。
- StandardHostValve:StandardHost中最后的阀门,主要用于从request中选择其context映射的Context容器StandardContext以及访问request中的Session以更新会话的最后访问时间。
- StandardContextValve:StandardContext中的唯一阀门,主要作用是禁止任何对WEB-INF或META-INF目录下资源的重定向访问,对应用程序热部署功能的实现,从request中获得StandardWrapper。
- StandardWrapperValve:StandardWrapper中的唯一阀门,主要作用包括调用StandardWrapper的loadServlet方法生成Servlet实例和调用ApplicationFilterFactory生成Filter链。
有了以上对Tomcat的管道设计的讲述,我们下面详细剖析其实现。
在《TOMCAT源码分析——请求原理分析(中)》一文中讲到执行管道的代码如代码清单1所示。
代码清单1
connector.getService().getContainer().getPipeline().getFirst().invoke(request, response);
代码清单1中的getContainer方法获取到的实际是StandardService中的StandardEngine容器,根据《TOMCAT源码分析——生命周期管理》一文的内容,我们知道StandardEngine继承自ContainerBase,所以这里的getPipeline方法实际是ContainerBase实现的,代码如下:
/**
     * Return the Pipeline object that manages the Valves associated with
     * this Container.
     */
    @Override
    public Pipeline getPipeline() {

        return (this.pipeline);

    }
pipeline在ContainerBase实例化时生成,代码如下:
/**
     * The Pipeline object with which this Container is associated.
     */
    protected final Pipeline pipeline = new StandardPipeline(this);
代码清单1随后调用了StandardPipeline的getFirst方法(见代码清单3)用来获取管道中的第一个Valve ,由于Tomcat并没有为StandardEngine的StandardPipeline设置first,因此将返回StandardPipeline的basic。
代码清单3
    public Valve getFirst() {
        if (first != null) {
            return first;
        }

        return basic;
    }
代码清单3中的basic的类型是StandardEngineValve,那么它是何时添加到StandardEngine的StandardPipeline中的呢?还记得《TOMCAT源码分析——SERVER.XML文件的加载与解析》一文在介绍过的ObjectCreateRule?在执行ObjectCreateRule的begin方法时,会反射调用StandardEngine的构造器生成StandardEngine的实例,StandardEngine的构造器中就会给其StandardPipeline设置basic为StandardEngineValve,见代码清单4。
代码清单4
    /**
     * Create a new StandardEngine component with the default basic Valve.
     */
    public StandardEngine() {

        super();
        pipeline.setBasic(new StandardEngineValve());
        /* Set the jmvRoute using the system property jvmRoute */
        try {
            setJvmRoute(System.getProperty("jvmRoute"));
        } catch(Exception ex) {
        }
        // By default, the engine will hold the reloading thread
        backgroundProcessorDelay = 10;

    }
代码清单1中最后调用了StandardEngineValve的invoke方法(见代码清单5)正式将请求交给管道处理。根据《TOMCAT源码分析——请求原理分析(中)》一文对CoyoteAdapter.postParseRequest方法的介绍,request已经被映射到相对应的Context容器(比如/manager)。所以此处调用request的getHost方法,实质是从request属性的mappingData对象中的属性host得到的(见代码清单6)。然后调用Host容器的Pipeline的getFirst方法获得AbstractAccessLogValve。AbstractAccessLogValve的invoke方法(见代码清单7),从中可以看出调用了getNext方法获取Host容器的Pipeline的下一个ErrorReportValve,并调用其invoke方法,最后ErrorReportValve调用getNext方法获取Host容器的Pipeline的下一个StandardHostValve。
代码清单5
    @Override
    public final void invoke(Request request, Response response)
        throws IOException, ServletException {

        // Select the Host to be used for this Request
        Host host = request.getHost();
        if (host == null) {
            response.sendError
                (HttpServletResponse.SC_BAD_REQUEST,
                 sm.getString("standardEngine.noHost",
                              request.getServerName()));
            return;
        }
        if (request.isAsyncSupported()) {
            request.setAsyncSupported(host.getPipeline().isAsyncSupported());
        }

        // Ask this Host to process this request
        host.getPipeline().getFirst().invoke(request, response);

    }
代码清单6
/**
     * @return the Host within which this Request is being processed.
     */
    public Host getHost() {
        return mappingData.host;
    }
其中mappingData在初始化的时候时没有值的,代码如下Request.java:
/**
* Mapping data.
*/
protected final MappingData mappingData = new MappingData();
只有用户请求的时候,调用CoyoteAdapter的service方法,该方法里面调用postParseRequest方法,该方法解析请求url,最后把host属性赋值给mappingData,代码如下Mapper.java
private final void internalMap(CharChunk host, CharChunk uri,
            String version, MappingData mappingData) throws IOException {

        if (mappingData.host != null) {
            // The legacy code (dating down at least to Tomcat 4.1) just
            // skipped all mapping work in this case. That behaviour has a risk
            // of returning an inconsistent result.
            // I do not see a valid use case for it.
            throw new AssertionError();
        }

        uri.setLimit(-1);

        // Virtual host mapping
        MappedHost[] hosts = this.hosts;
        MappedHost mappedHost = exactFindIgnoreCase(hosts, host);
        if (mappedHost == null) {
            // Note: Internally, the Mapper does not use the leading * on a
            //       wildcard host. This is to allow this shortcut.
            int firstDot = host.indexOf(\'.\');
            if (firstDot > -1) {
                int offset = host.getOffset();
                try {
                    host.setOffset(firstDot + offset);
                    mappedHost = exactFindIgnoreCase(hosts, host);
                } finally {
                    // Make absolutely sure this gets reset
                    host.setOffset(offset);
                }
            }
            if (mappedHost == null) {
                mappedHost = defaultHost;
                if (mappedHost == null) {
                    return;
                }
            }
        }
        mappingData.host = mappedHost.object;

        // Context mapping
        ContextList contextList = mappedHost.contextList;
        MappedContext[] contexts = contextList.contexts;
        int pos = find(contexts, uri);
        if (pos == -1) {
            return;
        }
代码清单7
    @Override
    public void invoke(Request request, Response response) throws IOException,
            ServletException {
        final String t1Name = AccessLogValve.class.getName()+".t1";
        if (getState().isAvailable() && getEnabled()) {
            // Pass this request on to the next valve in our pipeline
            long t1 = System.currentTimeMillis();
            boolean asyncdispatch = request.isAsyncDispatching();
            if (!asyncdispatch) {
                request.setAttribute(t1Name, new Long(t1));
            }

            getNext().invoke(request, response);

            //we\'re not done with the request
            if (request.isAsyncDispatching()) {
                return;
            } else if (asyncdispatch && request.getAttribute(t1Name)!=null) {
                t1 = ((Long)request.getAttribute(t1Name)).longValue();
            }

            long t2 = System.currentTimeMillis();
            long time = t2 - t1;

            log(request,response, time);
        } else
            getNext().invoke(request, response);
    }
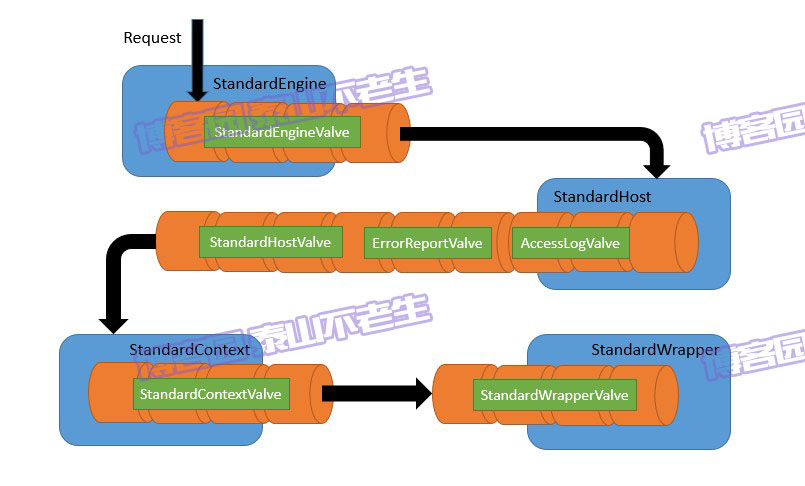
根据以上分析,我们看到StandardEngine容器的Pipeline中只有一个Valve(StandardEngineValve),而StandardHost容器中有三个Valve(分别是AccessLogValve、ErrorReportValve和StandardHostValve),此外StandardContext容器中有一个Valve(StandardContextValve),StandardWrapper中也只有一个Valve(StandardWrapperValve)。这些阀门Valve通过invoke方法彼此串联起来,最终构成的执行顺序十分类似于一个管道,最终形成的管道正如图2一样,这也许是Pipeline名字的由来。

图2 Tomcat管道示意图
本文以StandardEngineValve和AccessLogValve为例讲了Valve的实现,以及Pipeline是如何串联起来的,我们最后看看StandardWrapperValve的实现,其它Valve的实现不再赘述。
FILTER与职责链模式
根据对管道和阀门的分析, 我们知道要分析StandardWrapperValve,只需直接阅读其invoke方法即可,见代码清单8所示。
代码清单8
    @Override
    public final void invoke(Request request, Response response)
        throws IOException, ServletException {

        // Initialize local variables we may need
        boolean unavailable = false;
        Throwable throwable = null;
        // This should be a Request attribute...
        long t1=System.currentTimeMillis();
        requestCount++;
        StandardWrapper wrapper = (StandardWrapper) getContainer();
        Servlet servlet = null;
        Context context = (Context) wrapper.getParent();

        // 省略校验及次要代码

        // Allocate a servlet instance to process this request
        try {
            if (!unavailable) {
                servlet = wrapper.allocate();
            }
        } catch (UnavailableException e) {
            // 省略异常处理代码
        } catch (ServletException e) {
            // 省略异常处理代码
        } catch (Throwable e) {
            // 省略异常处理代码
        }

        // Identify if the request is Comet related now that the servlet has been allocated
        boolean comet = false;
        if (servlet instanceof CometProcessor
                && request.getAttribute("org.apache.tomcat.comet.support") == Boolean.TRUE) {
            comet = true;
            request.setComet(true);
        }

        // Acknowledge the request
        try {
            response.sendAcknowledgement();
        } catch (IOException e) {
            // 省略异常处理代码
        } catch (Throwable e) {
            // 省略异常处理代码
        }
        MessageBytes requestPathMB = request.getRequestPathMB();
        DispatcherType dispatcherType = DispatcherType.REQUEST;
        if (request.getDispatcherType()==DispatcherType.ASYNC) dispatcherType = DispatcherType.ASYNC;
        request.setAttribute
            (ApplicationFilterFactory.DISPATCHER_TYPE_ATTR,
             dispatcherType);
        request.setAttribute
            (ApplicationFilterFactory.DISPATCHER_REQUEST_PATH_ATTR,
             requestPathMB);
        // Create the filter chain for this request
        ApplicationFilterFactory factory =
            ApplicationFilterFactory.getInstance();
        ApplicationFilterChain filterChain =
            factory.createFilterChain(request, wrapper, servlet);

        // Reset comet flag value after creating the filter chain
        request.setComet(false);

        // Call the filter chain for this request
        // NOTE: This also calls the servlet\'s service() method
        try {
            String jspFile = wrapper.getJspFile();
            if (jspFile != null)
                request.setAttribute(Globals.JSP_FILE_ATTR, jspFile);
            else
                request.removeAttribute(Globals.JSP_FILE_ATTR);
            if ((servlet != null) && (filterChain != null)) {
                // Swallow output if needed
                if (context.getSwallowOutput()) {
                    try {
                        SystemLogHandler.startCapture();
                        if (request.isAsyncDispatching()) {
                            //TODO SERVLET3 - async
                            ((AsyncContextImpl)request.getAsyncContext()).doInternalDispatch();
                        } else if (comet) {
                            filterChain.doFilterEvent(request.getEvent());
                            request.setComet(true);
                        } else {
                            filterChain.doFilter(request.getRequest(),
                                    response.getResponse());
                        }
                    } finally {
                        String log = SystemLogHandler.stopCapture();
                        if (log != null && log.length() > 0) {
                            context.getLogger().info(log);
                        }
                    }
                } else {
                    if (request.isAsyncDispatching()) {
                        //TODO SERVLET3 - async
                        ((AsyncContextImpl)request.getAsyncContext()).doInternalDispatch();
                    } else if (comet) {
                        request.setComet(true);
                        filterChain.doFilterEvent(request.getEvent());
                    } else {
                        filterChain.doFilter
                            (request.getRequest(), response.getResponse());
                    }
                }

            }
            request.removeAttribute(Globals.JSP_FILE_ATTR);
        } catch (ClientAbortException e) {
            // 省略异常处理代码
        } catch (IOException e) {
            // 省略异常处理代码
        } catch (UnavailableException e) {
            // 省略异常处理代码
        } catch (ServletException e) {
            // 省略异常处理代码
        } catch (Throwable e) {
            // 省略异常处理代码
        }

        // Release the filter chain (if any) for this request
        if (filterChain != null) {
            if (request.isComet()) {
                // If this is a Comet request, then the same chain will be used for the
                // processing of all subsequent events.
                filterChain.reuse();
            } else {
                filterChain.release();
            }
        }

        // Deallocate the allocated servlet instance
        try {
            if (servlet != null) {
                wrapper.deallocate(servlet);
            }
        } catch (Throwable e) {
            // 省略异常处理代码
            }
        }

        // If this servlet has been marked permanently unavailable,
        // unload it and release this instance
        try {
            if ((servlet != null) &&
                (wrapper.getAvailable() == Long.MAX_VALUE)) {
                wrapper.unload();
            }
        } catch (Throwable e) {
            // 省略异常处理代码
        }
        long t2=System.currentTimeMillis();

        long time=t2-t1;
        processingTime += time;
        if( time > maxTime) maxTime=time;
        if( time < minTime) minTime=time;

    }
通过阅读代码清单8,我们知道StandardWrapperValve的invoke方法的执行步骤如下:
- 调用StandardWrapper的allocate方法分配org.apache.catalina.servlets.DefaultServlet的实例处理访问包括*.html、*.htm、*.gif、*.jpg、*.jpeg等资源的request,分配org.apache.jasper.servlet.JspServlet的实例处理访问*.jpg页面的request。简单提下这些Servlet实例是在StandardContext启动的时候调用StandardWrapper的load方法用反射生成的,有关StandardContext启动的内容可以参考《TOMCAT源码分析——生命周期管理》一文。
- 确认当前request是否是Comet的,由于默认的DefaultServlet并未实现CometProcessor接口,所以不会作为Comet的请求处理。顺便简单提下,Comet 指的是一种 Web 应用程序的架构。在这种架构中,客户端程序(通常是浏览器)不需要显式的向服务器端发出请求,服务器端会在其数据发生变化的时候主动的将数据异步的发送给客户端,从而使得客户端能够及时的更新用户界面以反映服务器端数据的变化。
- 向客户端发送确认。
- 给request对象设置请求类型和请求路径属性。
- 获取ApplicationFilterFactory(单例模式实现),并调用其createFilterChain方法创建ApplicationFilterChain。
- 调用ApplicationFilterChain的doFilter方法,执行ApplicationFilterChain中维护的Filter职责链。
- 调用ApplicationFilterChain的release方法清空对Servlet、Filter的引用。
- 调用StandardWrapper的deallocate方法释放为其分配的Servlet。
注意:如果接收请求的Servlet实现了SingleThreadModel接口,那么singleThreadModel属性为true,则Tomcat的StandardWrapper中只有一个Servlet实例,否则会创建一个Servlet实例池。
创建Filter职责链用到createFilterChain方法,其实现见代码清单9。
代码清单9
/**
     * Construct a FilterChain implementation that will wrap the execution of
     * the specified servlet instance.
     *
     * @param request The servlet request we are processing
     * @param wrapper The wrapper managing the servlet instance
     * @param servlet The servlet instance to be wrapped
     *
     * @return The configured FilterChain instance or null if none is to be
     *         executed.
     */
    public static ApplicationFilterChain createFilterChain(ServletRequest request,
            Wrapper wrapper, Servlet servlet) {

        // If there is no servlet to execute, return null
        if (servlet == null)
            return null;

        // Create and initialize a filter chain object
        ApplicationFilterChain filterChain = null;
        if (request instanceof Request) {
            Request req = (Request) request;
            if (Globals.IS_SECURITY_ENABLED) {
                // Security: Do not recycle
                filterChain = new ApplicationFilterChain();
            } else {
                filterChain = (ApplicationFilterChain) req.getFilterChain();
                if (filterChain == null) {
                    filterChain = new ApplicationFilterChain();
                    req.setFilterChain(filterChain);
                }
            }
        } else {
            // Request dispatcher in use
            filterChain = new ApplicationFilterChain();
        }

        filterChain.setServlet(servlet);
        filterChain.setServletSupportsAsync(wrapper.isAsyncSupported());

        // Acquire the filter mappings for this Context
        StandardContext context = (StandardContext) wrapper.getParent();
        FilterMap filterMaps[] = context.findFilterMaps();

        // If there are no filter mappings, we are done
        if ((filterMaps == null) || (filterMaps.length == 0))
            return (filterChain);

        // Acquire the information we will need to match filter mappings
        DispatcherType dispatcher =
                (DispatcherType) request.getAttribute(Globals.DISPATCHER_TYPE_ATTR);

        String requestPath = null;
        Object attribute = request.getAttribute(Globals.DISPATCHER_REQUEST_PATH_ATTR);
        if (attribute != null){
            requestPath = attribute.toString();
        }

        String servletName = wrapper.getName();

        // Add the relevant path-mapped filters to this filter chain
        for (int i = 0; i < filterMaps.length; i++) {
            if (!matchDispatcher(filterMaps[i] ,dispatcher)) {
                continue;
            }
            if (!matchFiltersURL(filterMaps[i], requestPath))
                continue;
            ApplicationFilterConfig filterConfig = (ApplicationFilterConfig)
                context.findFilterConfig(filterMaps[i].getFilterName());
            if (filterConfig == null) {
                // FIXME - log configuration problem
                continue;
            }
            filterChain.addFilter(filterConfig);
        }

        // Add filters that match on servlet name second
        for (int i = 0; i < filterMaps.length; i++) {
            if (!matchDispatcher(filterMaps[i] ,dispatcher)) {
                continue;
            }
            if (!matchFiltersServlet(filterMaps[i], servletName))
                continue;
            ApplicationFilterConfig filterConfig = (ApplicationFilterConfig)
                context.findFilterConfig(filterMaps[i].getFilterName());
            if (filterConfig == null) {
                // FIXME - log configuration problem
                continue;
            }
            filterChain.addFilter(filterConfig);
        }

        // Return the completed filter chain
        return filterChain;
    }
根据代码清单9,我们整理下整个创建Filter职责链的过程:
- 从request中获取请求的类型(Tomcat目前提供的请求类型有REQUEST、FORWARD、INCLUDE、ASYNC及ERROR五种)与路径;
- 创建ApplicationFilterChain并设置给当前request;
- 给ApplicationFilterChain设置Servlet,即DefaultServlet;
- 从StandardContext中获取当前Context的filterMaps;
- 如果filterMaps为空,则说明当前Context没有配置Filter,否则会将filterMaps中的Filter全部添加到ApplicationFilterChain中的Filter职责链中。
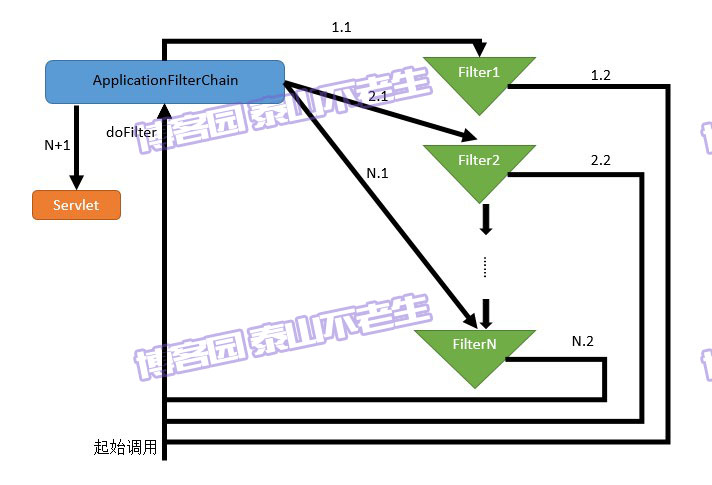
调用ApplicationFilterChain的doFilter方法,执行ApplicationFilterChain中维护的Filter职责链。Filter职责链是对职责链模式的经典应用,我们先通过图3来介绍其执行流程。

图3 Tomcat的Filter职责链执行流程
这里对图3的执行过程进行介绍:
- StandardWrapperValve的invoke方法在创建完ApplicationFilterChain后,第一次调用ApplicationFilterChain的doFilter方法;
- 如果ApplicationFilterChain自身维护的Filter数组中还有没有执行的Filter,则取出此Filter并执行Filter的doFilter方法(即第3步),否则执行Servlet的service方法处理请求(即第4步);
- 每个Filter首先执行自身的过滤功能,最后在执行结束前会回调ApplicationFilterChain的doFilter方法,此时会将执行流程交给第2步;
- Servlet的service实际会调用自身的doGet、doHead、doPost、doPut、doDelete等方法。
第2步对应了图3中M.N这个标记的M部分,第3步则对应N的部分。
本文最后从源码实现级别分析Filter职责链的执行过程,首先来看ApplicationFilterChain的doFilter方法,见代码清单10。
代码清单10
@Override
    public void doFilter(ServletRequest request, ServletResponse response)
        throws IOException, ServletException {

        if( Globals.IS_SECURITY_ENABLED ) {
            final ServletRequest req = request;
            final ServletResponse res = response;
            try {
                java.security.AccessController.doPrivileged(
                    new java.security.PrivilegedExceptionAction<Void>() {
                        @Override
                        public Void run()
                            throws ServletException, IOException {
                            internalDoFilter(req,res);
                            return null;
                        }
                    }
                );
            } catch( PrivilegedActionException pe) {
                Exception e = pe.getException();
                if (e instanceof ServletException)
                    throw (ServletException) e;
                else if (e instanceof IOException)
                    throw (IOException) e;
                else if (e instanceof RuntimeException)
                    throw (RuntimeException) e;
                else
                    throw new ServletException(e.getMessage(), e);
            }
        } else {
            internalDoFilter(request,response);
        }
    }
从代码清单10看到ApplicationFilterChain的doFilter方法主要调用了internalDoFilter方法(见代码清单11)。
代码清单11
private void internalDoFilter(ServletRequest request,
                                  ServletResponse response)
        throws IOException, ServletException {

        // Call the next filter if there is one
        if (pos < n) {
            ApplicationFilterConfig filterConfig = filters[pos++];
            try {
                Filter filter = filterConfig.getFilter();

                if (request.isAsyncSupported() && "false".equalsIgnoreCase(
                        filterConfig.getFilterDef().getAsyncSupported())) {
                    request.setAttribute(Globals.ASYNC_SUPPORTED_ATTR, Boolean.FALSE);
                }
                if( Globals.IS_SECURITY_ENABLED ) {
                    final ServletRequest req = request;
                    final ServletResponse res = response;
                    Principal principal =
                        ((HttpServletRequest) req).getUserPrincipal();

                    Object[] args = new Object[]{req, res, this};
                    SecurityUtil.doAsPrivilege ("doFilter", filter, classType, args, principal);
                } else {
                    filter.doFilter(request, response, this);
                }
            } catch (IOException | ServletException | RuntimeException e) {
                throw e;
            } catch (Throwable e) {
                e = ExceptionUtils.unwrapInvocationTargetException(e);
                ExceptionUtils.handleThrowable(e);
                throw new ServletException(sm.getString("filterChain.filter"), e);
            }
            return;
        }

        // We fell off the end of the chain -- call the servlet instance
        try {
            if (ApplicationDispatcher.WRAP_SAME_OBJECT) {
                lastServicedRequest.set(request);
                lastServicedResponse.set(response);
            }

            if (request.isAsyncSupported() && !servletSupportsAsync) {
                request.setAttribute(Globals.ASYNC_SUPPORTED_ATTR,
                        Boolean.FALSE);
            }
            // Use potentially wrapped request from this point
            if ((request instanceof HttpServletRequest) &&
                    (response instanceof HttpServletResponse) &&
                    Globals.IS_SECURITY_ENABLED ) {
                final ServletRequest req = request;
                final ServletResponse res = response;
                Principal principal =
                    ((HttpServletRequest) req).getUserPrincipal();
                Object[] args = new Object[]{req, res};
                SecurityUtil.doAsPrivilege("service",
                                           servlet,
                                           classTypeUsedInService,
                                           args,
                                           principal);
            } else {
                servlet.service(request, response);
            }
        } catch (IOException | ServletException | RuntimeException e) {
            throw e;
        } catch (Throwable e) {
            e = ExceptionUtils.unwrapInvocationTargetException(e);
            ExceptionUtils.handleThrowable(e);
            throw new ServletException(sm.getString("filterChain.servlet"), e);
        } finally {
            if (ApplicationDispatcher.WRAP_SAME_OBJECT) {
                lastServicedRequest.set(null);
                lastServicedResponse.set(null);
            }
        }
    }
执行SERVLET
从代码清单11,我们可以看到ApplicationFilterChain最后会执行Servlet的service方法,此service方法实际是所有Servlet的父类HttpServlet实现的,见代码清单12。
代码清单12
    @Override
    public void service(ServletRequest req, ServletResponse res)
        throws ServletException, IOException {

        HttpServletRequest  request;
        HttpServletResponse response;

        try {
            request = (HttpServletRequest) req;
            response = (HttpServletResponse) res;
        } catch (ClassCastException e) {
            throw new ServletException("non-HTTP request or response");
        }
        service(request, response);
    }
}
代码清单12中的service方法调用重载的service方法,后者通过判断HttpServletRequest对象的HTTP Method,调用不同的方法,如GET、DELETE、POST等,见代码清单13。
代码清单13
    protected void service(HttpServletRequest req, HttpServletResponse resp)
        throws ServletException, IOException {

        String method = req.getMethod();

        if (method.equals(METHOD_GET)) {
            long lastModified = getLastModified(req);
            if (lastModified == -1) {
                // servlet doesn\'t support if-modified-since, no reason
                // to go through further expensive logic
                doGet(req, resp);
            } else {
                long ifModifiedSince = req.getDateHeader(HEADER_IFMODSINCE);
                if (ifModifiedSince < (lastModified / 1000 * 1000)) {
                    // If the servlet mod time is later, call doGet()
                    // Round down to the nearest second for a proper compare
                    // A ifModifiedSince of -1 will always be less
                    maybeSetLastModified(resp, lastModified);
                    doGet(req, resp);
                } else {
                    resp.setStatus(HttpServletResponse.SC_NOT_MODIFIED);
                }
            }

        } else if (method.equals(METHOD_HEAD)) {
            long lastModified = getLastModified(req);
            maybeSetLastModified(resp, lastModified);
            doHead(req, resp);

        } else if (method.equals(METHOD_POST)) {
            doPost(req, resp);

        } else if (method.equals(METHOD_PUT)) {
            doPut(req, resp);

        } else if (method.equals(METHOD_DELETE)) {
            doDelete(req, resp);

        } else if (method.equals(METHOD_OPTIONS)) {
            doOptions(req,resp);

        } else if (method.equals(METHOD_TRACE)) {
            doTrace(req,resp);

        } else {
            //
            // Note that this means NO servlet supports whatever
            // method was requested, anywhere on this server.
            //

            String errMsg = lStrings.getString("http.method_not_implemented");
            Object[] errArgs = new Object[1];
            errArgs[0] = method;
            errMsg = MessageFormat.format(errMsg, errArgs);

            resp.sendError(HttpServletResponse.SC_NOT_IMPLEMENTED, errMsg);
        }
    }
以doGet方法为例,见代码清单14。
代码清单14
    protected void doGet(HttpServletRequest req, HttpServletResponse resp)
        throws ServletException, IOException
    {
        String protocol = req.getProtocol();
        String msg = lStrings.getString("http.method_get_not_supported");
        if (protocol.endsWith("1.1")) {
            resp.sendError(HttpServletResponse.SC_METHOD_NOT_ALLOWED, msg);
        } else {
            resp.sendError(HttpServletResponse.SC_BAD_REQUEST, msg);
        }
    }
不对啊!为什么doGet方法的实现只是返回了400和405错误呢?因为这是抽象类HttpServlet的默认实现,用户必须实现自身的Servlet或者使用默认的DefaultServlet。
至此,Tomcat有关请求流程的主要内容已经讲解完毕。欢迎大家提出宝贵意见!
如需转载,请标明本文作者及出处——作者:jiaan.gja,本文原创首发:博客园,原文链接:http://www.cnblogs.com/jiaan-geng/p/4898871.html
以上是关于TOMCAT8源码分析——处理请求分析(下)的主要内容,如果未能解决你的问题,请参考以下文章
