第一步:定义模板
①:新建一个template文件夹用来管理项目中所有的模板(本文案例定义文件夹名为:temp);
②、新建一个wxml文件来定义模板(本文案例定义文件夹名为:temp.wxml);
③、使用name属性,作为模板的名字。然后在<template name=‘模板名称‘>代码片段<template/>内定义代码片段。
 1 <!--pages/temp/temp.wxml-->
 2 <template name=‘list‘>
 3
 4     <view class=‘expertStyle‘>
 5
 6         <image class=‘expertPhoto‘ src=‘{{img}}‘></image>
 7
 8         <view class=‘expertInfo‘>
 9             <view class=‘infoTop‘>
10               <view class=‘topName‘>{{name}}</view>
11               <view class=‘topType‘ wx:for="{{expertTitle}}" wx:key="*this">{{item.title}}</view>
12             </view>
13
14           <view class=‘infoMiddle‘>{{info}}</view><
15           <view class=‘infoBottom‘>所在科室: {{keshi}} </view>
16           <view class=‘infoBottom‘>坐诊时间: {{time}} </view>
17         </view>
18     </view>
19
20     <view class="class_item class_item_end">
21       {{title}}
22     </view>
23
24 </template>
25
26
27 <template name=‘small-title‘>
28   <view class=‘tips-info‘>
29     <image class=‘tip-pic‘ src=‘../../../../../../images/red.png‘></image>
30     <view class=‘tip-word‘>{{title}}</view>
31     <view class=‘more‘><navigator url=‘{{url}}‘>更多 ></navigator></view>
32   </view>
33 </template>
注意:一个.wxml文件中可以定义多个模板,但是需要通过name来区分(此处定义了list和small-title两个模板);
另外.wxss文件照常写再temp.wxss中即可。之后可直接引用。
第二步:使用模板
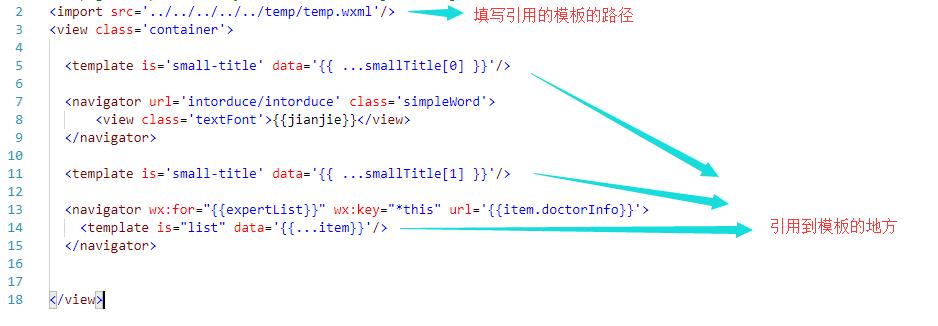
注意:data 是要模板渲染的数据,data="{{...item}}" 写法是ES6的写法,item是wx:for当前项,... 是展开运算符,在模板中不需要再{{item.courseName}} 而是直接{{courseName}} 。
wxss页面只需直接引用模板里写好的样式即可,js文件此处不予讲述,毕竟模板相同,但每个页面的数据不同,故此处不引用。
@import "../../../../../temp/temp.wxss"
此处附上本文案例所引用的js数据的大体结构
 1 data: {
 2   jianjie: "文本信息",
 3     expertList: [
 4       {
 5         "doctorInfo": "url地址", "img": "图片地址", "name": "文本", "keshi": "文本", "time": "文本", "info": "文本", "expertTitle": [
 6           { "title": "文本1" },
 7           { "title": "文本2" },
 8           { "title": "文本3" }
 9         ]
10       },
11       {
12         "doctorInfo": "url地址", "img": "图片地址", "name": "文本", "keshi": "文本", "time": "文本", "info": "文本", "expertTitle": [
13           { "title": "文本1" },
14           { "title": "文本2" },
15           { "title": "文本3" }
16         ]
17       },
18       {
19         "doctorInfo": "url地址", "img": "图片地址", "name": "文本", "keshi": "文本", "time": "文本", "info": "文本", "expertTitle": [
20           { "title": "文本1" },
21           { "title": "文本2" },
22           { "title": "文本3" }
23         ]
24       },
25     ],
26       smallTitle: [
27         { "title": ‘文本‘, "url": ‘url地址‘ },
28         { "title": ‘文本‘, "url": ‘url地址‘ }
29       ],
30   },
此处js数据中在expertList数组中嵌套了第二个数组expertTitle,“..."展开符只能展开一层,故expertTitle中的子属性title用item.title来引用。
<view class=‘topType‘ wx:for="{{expertTitle}}" wx:key="*this">{{item.title}}</view>
另一处区别的是
<template is=‘small-title‘ data=‘{{ ...smallTitle[0] }}‘/>
此处引用模板给予数组下标来应用对应信息。
<navigator wx:for="{{expertList}}" wx:key="*this" url=‘{{item.doctorInfo}}‘>
    <template is="list" data=‘{{...item}}‘/>
</navigator>
此处item是wx:for当前项,故无需给予下标。
以上为笔者全部内容,若有不对之处,欢迎指正。
版权声明:本文为博主原创文章,欢迎转载和发表评论,转载请注明出处:http://www.cnblogs.com/leijue/p/8638442.html