微信小程序简洁登录页面(附源码)
Posted code袁
tags:
篇首语:本文由小常识网(cha138.com)小编为大家整理,主要介绍了微信小程序简洁登录页面(附源码)相关的知识,希望对你有一定的参考价值。
微信小程序简洁登录页面(附源码)
文章目录
1. 群聊(开源项目以及技术交流)

2.看效果

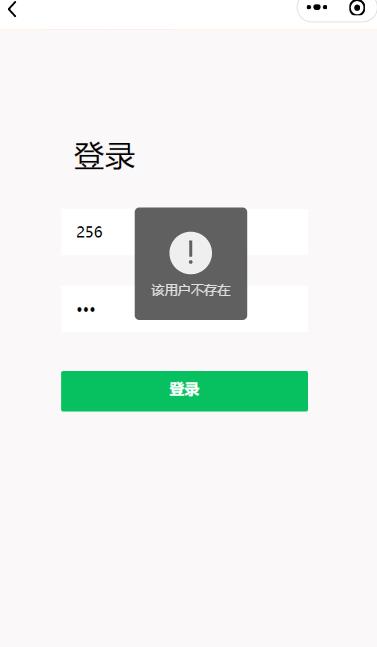
3.用户不存在

4.上代码
4.1login.wxml
<view class="v1" style="height:clientHeight?clientHeight+'px':'auto'">

 <!-- v2父容器  子view使用绝对布局 -->
   <view class="v2">
     <view class="dltext" style="width: 232rpx; height: 92rpx; display: block; box-sizing: border-box; left: 0rpx; top: -2rpx">登录</view>

     <!-- 手机号 -->
     <view class="phoneCs">
       <!-- <image src="/images/zhang.png" class="ph"></image> -->
       <input placeholder="请输入账号" type="number" bindinput="content" />
     </view>
     <!-- 密码 -->
     <view class=passwordCs">
       <!-- <image src="/images/mi.png" class="ps"></image> -->
       <input placeholder="请输入密码" type="password" bindinput="password" />
     </view>
     <!-- 登录按钮 -->
     <view class="denglu">
       <button class="btn-dl" type="primary" bindtap="goadmin">登录</button>
     </view>
   </view>
 </view>
4.2login.css
/* pages/login/login.wxss *//* 最大的父元素 */
.v1
  display: block;
  position:absolute;
  width: 100%;
  background-color: rgb(250, 248, 248);

/* 白色区域 */
.v1 .v2
  position: relative;
  margin-top: 150rpx;
  left: 100rpx;
  width: 545rpx;
  height: 600rpx;
  background-color: rgb(250, 248, 248);
  border-radius: 50rpx;

/* 白色区域内的登录文本 */
.v1 .v2 .dltext
  margin-top: 50rpx;
  position: absolute;
  margin-left:50rpx;
  width: 150rpx;
  height: 100rpx;
  font-size: 60rpx;
  font-family: Helvetica;
  color: #000000;
  line-height: 100rpx;
  letter-spacing: 2rpx;

/* 手机图片+输入框+下划线的父容器view */
.v1 .v2 .phoneCs
  margin-top: 200rpx;
  margin-left: 25rpx;
  position: absolute;
  display: flex;
  width:480rpx ;
  height: 90rpx ;
  background-color: white;


/* 手机图标 */
.v1 .v2 .phoneCs .ph
  margin-top: 5rpx;
  margin-left: 30rpx;
  width: 55rpx;
  height: 55rpx;

/* 手机号输入框 */
.v1 .v2 .phoneCs input
  width: 400rpx;
  font-size: 30rpx ;
  margin-top: 25rpx;
  margin-left: 30rpx;

/* 密码图标+输入框+小眼睛图标+下划线父容器view */
.v1 .v2 .passwordCs
  margin-top: 350rpx;
  margin-left: 25rpx;
  position: absolute;
  display: flex;
  width:480rpx ;
  height: 90rpx ;
  background-color: white;


/* 密码图标 */
.v1 .v2 .passwordCs .ps
  margin-top: 5rpx;
  margin-left: 30rpx;
  width: 55rpx;
  height: 55rpx;

/* 眼睛 图标*/
.v1 .v2 .passwordCs .eye
  margin-top: 5rpx;
  margin-left: 65rpx;
  width: 55rpx;
  height: 55rpx;

/* 密码输入框 */
.v1 .v2 .passwordCs input
  width: 400rpx;
  font-size: 30rpx ;
  margin-top: 25rpx;
  margin-left: 30rpx;

/* 登录按钮容器view */
.v1 .v2 .denglu
  width: 480rpx;
  height: 80rpx;
  position: absolute;
  margin-top:515rpx;
  margin-left:25rpx;


/* 登录按钮 */
.v1 .v2 .denglu button
  padding: 0rpx;
  line-height: 70rpx;
  font-size: 30rpx;
  width: 100%;
  height: 100%;
  border-radius: 5rpx;
4.3login.js
//index.js
//获取应用实例
const app = getApp()
 let username=''
 let password=''
Page(
  data:
    username: '',
    password: '',
    clientHeight:''
  ,
  onLoad()
    var that=this
    wx.getSystemInfo(
      success: function (res)
        console.log(res.windowHeight)
          that.setData(
              clientHeight:res.windowHeight
        );

    )
  ,
  //协议
  goxieyi()
   wx.navigateTo(
     url: '/pages/oppoint/oppoint',
   )
  ,
  //获取输入款内容
  content(e)
    username=e.detail.value
  ,
  password(e)
    password=e.detail.value
  ,
  //登录事件
  goadmin()
    let flag = false  //表示账户是否存在,false为初始值
    if(username=='')

      wx.showToast(
        icon:'none',
        title: '账号不能为空',
      )
    else if(password=='')
      wx.showToast(
        icon:'none',
        title: '密码不能为空',
      )
    else
      wx.cloud.database().collection('adminShop')
      .get(
        success:(res)=>
          console.log(res.data)
          let admin=res.data
          for (let i = 0; i < admin.length; i++)   //遍历数据库对象集合
            if (username === admin[i].username)  //账户已存在
              flag=true;
              if (password !== admin[i].password)   //判断密码正确与否
                wx.showToast(  //显示密码错误信息
                  title: '密码错误!!',
                  icon: 'error',
                  duration: 2500
                );
               break;
               else
                wx.showToast(  //显示登录成功信息
                  title: '登陆成功!!',
                  icon: 'success',
                  duration: 2500
                )
                flag=true;
                wx.setStorageSync('admin', password)
               wx.navigateTo(
                 url: '/pages/admin/admin',
               )
                break;


          ;
          if(flag==false)//遍历完数据后发现没有该账户

            wx.showToast(
              title: '该用户不存在',
              icon: 'error',
              duration: 2500
            )


      )

  ,
)
5.总结
小程序的页面的简洁可以给用户带来很好的体验。
当用户在输入信息后逻辑层通过for循环来遍历数据库的中数据。
好了,今天的分享就到这里了。点个赞吧

微信小程序 授权登录详解(附完整源码)
一、前言
由于微信官方修改了 getUserInfo 接口,所以现在无法实现一进入微信小程序就弹出授权窗口,只能通过 button 去触发。
官方连接:https://developers.weixin.qq.com/community/develop/doc/0000a26e1aca6012e896a517556c01
二、实现思路
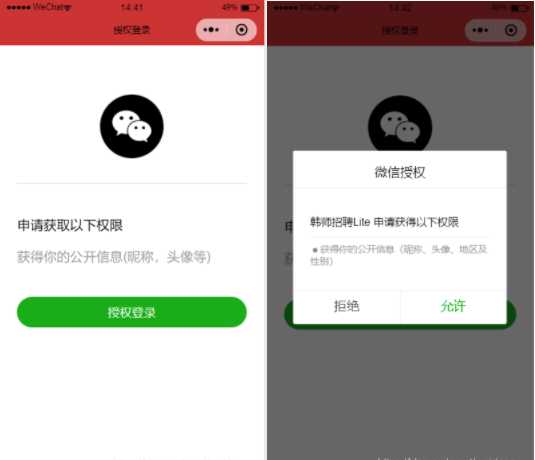
自己写一个微信授权登录页面让用户实现点击的功能,也就是实现了通过 button 组件去触发 getUserInof 接口。在用户进入微信小程序的时候,判断用户是否授权了,如果没有授权的话就显示授权页面,让用户去执行授权的操作。如果已经授权了,则直接跳过这个页面,进入首页。
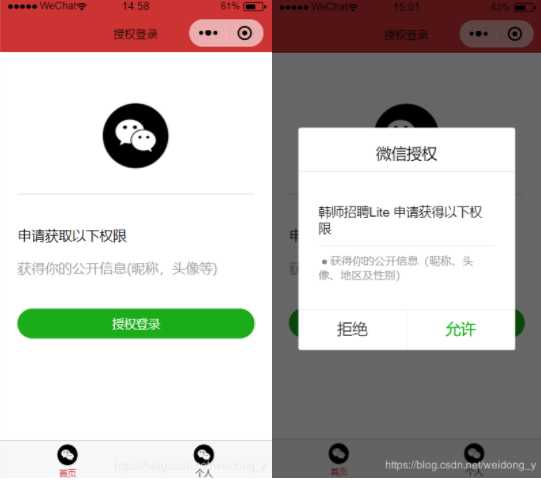
三、界面简介
1.不带 tabBar


四、源码
1.index.wxml
<view wx:if="{{isHide}}">
 <view wx:if="{{canIUse}}" >
  <view class=‘header‘>
   <image src=‘/images/wx_login.png‘></image>
  </view>

  <view class=‘content‘>
   <view>申请获取以下权限</view>
   <text>获得你的公开信息(昵称,头像等)</text>
  </view>

  <button class=‘bottom‘ type=‘primary‘ open-type="getUserInfo" lang="zh_CN" bindgetuserinfo="bindGetUserInfo">
   授权登录
  </button>
 </view>
 <view wx:else>请升级微信版本</view>
</view>

<view wx:else>
 <view>我的首页内容</view>
</view>
2.index.wcss
.header {
 margin: 90rpx 0 90rpx 50rpx;
 border-bottom: 1px solid #ccc;
 text-align: center;
 width: 650rpx;
 height: 300rpx;
 line-height: 450rpx;
}

.header image {
 width: 200rpx;
 height: 200rpx;
}

.content {
 margin-left: 50rpx;
 margin-bottom: 90rpx;
}

.content text {
 display: block;
 color: #9d9d9d;
 margin-top: 40rpx;
}

.bottom {
 border-radius: 80rpx;
 margin: 70rpx 50rpx;
 font-size: 35rpx;
}
3.index.js
Page({
 data: {
  //判断小程序的API,回调,参数,组件等是否在当前版本可用。
  canIUse: wx.canIUse(‘button.open-type.getUserInfo‘),
  isHide: false
 },

 onLoad: function() {
  var that = this;
  // 查看是否授权
  wx.getSetting({
   success: function(res) {
    if (res.authSetting[‘scope.userInfo‘]) {
     wx.getUserInfo({
      success: function(res) {
       // 用户已经授权过,不需要显示授权页面,所以不需要改变 isHide 的值
       // 根据自己的需求有其他操作再补充
       // 我这里实现的是在用户授权成功后,调用微信的 wx.login 接口,从而获取code
       wx.login({
        success: res => {
         // 获取到用户的 code 之后:res.code
         console.log("用户的code:" + res.code);
         // 可以传给后台,再经过解析获取用户的 openid
         // 或者可以直接使用微信的提供的接口直接获取 openid ,方法如下:
         // wx.request({
         //  // 自行补上自己的 APPID 和 SECRET
         //  url: ‘https://api.weixin.qq.com/sns/jscode2session?appid=自己的APPID&secret=自己的SECRET&js_code=‘ + res.code + ‘&grant_type=authorization_code‘,
         //  success: res => {
         //   // 获取到用户的 openid
         //   console.log("用户的openid:" + res.data.openid);
         //  }
         // });
        }
       });
      }
     });
    } else {
     // 用户没有授权
     // 改变 isHide 的值,显示授权页面
     that.setData({
      isHide: true
     });
    }
   }
  });
 },

 bindGetUserInfo: function(e) {
  if (e.detail.userInfo) {
   //用户按了允许授权按钮
   var that = this;
   // 获取到用户的信息了,打印到控制台上看下
   console.log("用户的信息如下:");
   console.log(e.detail.userInfo);
   //授权成功后,通过改变 isHide 的值,让实现页面显示出来,把授权页面隐藏起来
   that.setData({
    isHide: false
   });
  } else {
   //用户按了拒绝按钮
   wx.showModal({
    title: ‘警告‘,
    content: ‘您点击了拒绝授权,将无法进入小程序,请授权之后再进入!!!‘,
    showCancel: false,
    confirmText: ‘返回授权‘,
    success: function(res) {
     // 用户没有授权成功,不需要改变 isHide 的值
     if (res.confirm) {
      console.log(‘用户点击了“返回授权”‘);
     }
    }
   });
  }
 }
})
关于 TabBar 的处理,只需要把上面写好的页面设置到 app.json 里面即可。
4.github 下载
https://github.com/yyzheng1729/loginDemo
五、同类文章推荐
以上就是本文的全部内容,希望对大家的学习有所帮助,也希望大家多多支持脚本之家。
您可能感兴趣的文章:
转自:https://www.jb51.net/article/168314.html
以上是关于微信小程序简洁登录页面(附源码)的主要内容,如果未能解决你的问题,请参考以下文章