如何在linux上面安装mariadb总结
Posted
tags:
篇首语:本文由小常识网(cha138.com)小编为大家整理,主要介绍了如何在linux上面安装mariadb总结相关的知识,希望对你有一定的参考价值。
一 安装1.需要下载 perl-DBI-1.521-1.EL5.rfx.x86_64.rpm 安装包,
mariaDB MariaDB-5.5.29-rhel5-x86_64-common.rpm
MariaDB-5.5.29-rhel5-x86_64-server.rpm
MariaDB-5.5.29-rhel5-x86_64-client.rpm
2.然后再http://yum.mariadb.org/ 找到 RPM-GPG-KEY-MariaDB 这个PGP文件,
把文件放入到/etc/pki/rpm-gpg 目录下,执行 导入key 的命令 rpm --import /etc/pki/rpm-gpg/RPM*
3.安装perl-DBI-1.521-1.EL5.rfx.x86_64.rpm 包, rpm -ivh perl-DBI-1.521-1.EL5.rfx.x86_64.rpm
4.安装MariaDB 包 ,rpm -ivh MariaDB-*,安装完成
二,使用
1.启动mysql:
[root@localhost mysql]# service mysql start
Starting MySQL....... [ OK ]
2.进入mysql # mysql -u root -p
[root@localhost rpms]# mysql
MariaDB [(none)]> show databases;
+--------------------+
| Database |
+--------------------+
| information_schema |
| mysql |
| performance_schema |
| test |
+--------------------+
4 rows in set (5.75 sec) 参考技术A
1、下载MariaDB(mariadb-5.5.31.tar.gz)
[root@zabbix_server opt]# wget http://www.cmake.org/files/v2.8/cmake-2.8.5.tar.gz2、安装MariaDB
[root@zabbix_server opt]# tar xzvf mariadb-5.5.31.tar.gz[root@zabbix_server cmake-2.8.5]# cd cmake-2.8.5
[root@zabbix_server cmake-2.8.5]# ./bootstrap
[root@zabbix_server cmake-2.8.5]# make
[root@zabbix_server cmake-2.8.5]# make install
3、安装MariaDB所需软件包
yum install libaio-devel -ycmake . -DCMAKE_INSTALL_PREFIX=/usr/local/mariamysql
-DWITH_INNOBASE_STORAGE_ENGINE=1 -DWITH_FEDERATED_STORAGE_ENGINE=1
-DENABLED_LOCAL_INFILE=1 -DEXTRA_CHARSETS=all -DDEFAULT_CHARSET=utf8
-DDEFAULT_COLLATION=utf8_general_ci -DWITH_DEBUG=0
-DBUILD_CONFIG=mysql_release -DFEATURE_SET=community
-DWITH_EMBEDDED_SERVER=OFF
cp support-files/my-innodb-heavy-4G.cnf /etc/my.cnf
/usr/local/mariamysql/scripts/mysql_install_db
--basedir=/usr/local/mariamysql/ --datadir=/usr/local/mariamysql/data/
--user=mysql
/usr/local/mariamysql/bin/mysqld_safe --user=mysql &
4、查看mariadb是否安装成功
root 9010 17846 0 16:08 pts/0 00:00:00 /bin/sh /usr/local/mariamysql/bin/mysqld_safe --user=mysql
mysql 9459 9010 0 16:08 pts/0 00:00:01 /usr/local/mariamysql/bin/mysqld --basedir=/usr/local/mariamysql --datadir=/data/database --plugin-dir=/usr/local/mariamysql/lib/plugin --user=mysql --log-error=/data/database/zabbix_server.err --open-files-limit=40960 --pid-file=zabbix_server.pid --socket=/data/database/mysql.sock --port=3306
root 10391 17846 0 16:16 pts/0 00:00:00 grep mysql
[root@zabbix_server mariadb-5.5.31]# mysql
Welcome to the MySQL monitor. Commands end with ; or \\g.
Your MySQL connection id is 41
Server version: 5.5.31-MariaDB-log MariaDB Server
Copyright (c) 2000, 2010, Oracle and/or its affiliates. All rights reserved.
This software comes with ABSOLUTELY NO WARRANTY. This is free software,
and you are welcome to modify and redistribute it under the GPL v2 license
Type 'help;' or '\\h' for help. Type '\\c' to clear the current input statement.
root@zabbix ((none)) > show databases;
+--------------------+
| Database |
+--------------------+
| information_schema |
| mysql |
| zabbix |
+--------------------+
3 rows in set (0.00 sec)
root@zabbix ((none)) >
Linux系统之LAMP实现
 首先说一下实现过程吧,要想图形化展示日志,我们可以利用rsyslog的前端展示工具loganalyzer来展示。用这个工具它是基于LAMP架构来实现的,在这之前我们先把apache的访问日志交给rsyslog,rsyslog再把对应的日志写到数据库里,然后通过日志展示工具loganalyzer去数据库把日志对出来,然后展示出来。
1、部署分离的LAMP,部署到二台服务器上,php加载xcache模块
首先准备LAMP环境,准备两台Linux主机,一台是192.168.0.10 ,这台上面主要跑apache httpd ,mariadb数据库,另外一台是192.168.0.30 ,这台上面跑php-fpm;
1)在192.168.0.10这台主机上安装httpd和mariadb ,这个安装可以yum安装,也可以编译安装。我这里就yum安装来演示
[root@test-centos7-node1 ~]# ip a s ens33
2: ens33: <BROADCAST,MULTICAST,UP,LOWER_UP> mtu 1500 qdisc pfifo_fast state UP qlen 1000
    link/ether 00:0c:29:f2:82:0c brd ff:ff:ff:ff:ff:ff
    inet 192.168.0.10/24 brd 192.168.0.255 scope global ens33
       valid_lft forever preferred_lft forever
    inet6 fe80::20c:29ff:fef2:820c/64 scope link
       valid_lft forever preferred_lft forever
[root@test-centos7-node1 ~]# yum install -y httpd mariadb-server
Loaded plugins: fastestmirror
my_base                                                            | 3.6 kB  00:00:00
Loading mirror speeds from cached hostfile
epel/x86_64/primary_db                                             | 6.9 MB  00:00:00
Resolving Dependencies
--> Running transaction check
---> Package httpd.x86_64 0:2.4.6-67.el7.centos will be installed
--> Processing Dependency: httpd-tools = 2.4.6-67.el7.centos for package: httpd-2.4.6-67.el7.centos.x86_64
--> Processing Dependency: /etc/mime.types for package: httpd-2.4.6-67.el7.centos.x86_64
--> Processing Dependency: libaprutil-1.so.0()(64bit) for package: httpd-2.4.6-67.el7.centos.x86_64
--> Processing Dependency: libapr-1.so.0()(64bit) for package: httpd-2.4.6-67.el7.centos.x86_64
---> Package mariadb-server.x86_64 1:5.5.56-2.el7 will be installed
--> Processing Dependency: mariadb(x86-64) = 1:5.5.56-2.el7 for package: 1:mariadb-server-5.5.56-2.el7.x86_64
--> Processing Dependency: perl-DBI for package: 1:mariadb-server-5.5.56-2.el7.x86_64
--> Processing Dependency: perl-DBD-MySQL for package: 1:mariadb-server-5.5.56-2.el7.x86_64
--> Processing Dependency: perl(Data::Dumper) for package: 1:mariadb-server-5.5.56-2.el7.x86_64
--> Processing Dependency: perl(DBI) for package: 1:mariadb-server-5.5.56-2.el7.x86_64
--> Processing Dependency: libaio.so.1(LIBAIO_0.4)(64bit) for package: 1:mariadb-server-5.5.56-2.el7.x86_64
--> Processing Dependency: libaio.so.1(LIBAIO_0.1)(64bit) for package: 1:mariadb-server-5.5.56-2.el7.x86_64
--> Processing Dependency: libaio.so.1()(64bit) for package: 1:mariadb-server-5.5.56-2.el7.x86_64
--> Running transaction check
---> Package apr.x86_64 0:1.4.8-3.el7 will be installed
---> Package apr-util.x86_64 0:1.5.2-6.el7 will be installed
---> Package httpd-tools.x86_64 0:2.4.6-67.el7.centos will be installed
---> Package libaio.x86_64 0:0.3.109-13.el7 will be installed
---> Package mailcap.noarch 0:2.1.41-2.el7 will be installed
---> Package mariadb.x86_64 1:5.5.56-2.el7 will be installed
---> Package perl-DBD-MySQL.x86_64 0:4.023-5.el7 will be installed
---> Package perl-DBI.x86_64 0:1.627-4.el7 will be installed
--> Processing Dependency: perl(RPC::PlServer) >= 0.2001 for package: perl-DBI-1.627-4.el7.x86_64
--> Processing Dependency: perl(RPC::PlClient) >= 0.2000 for package: perl-DBI-1.627-4.el7.x86_64
---> Package perl-Data-Dumper.x86_64 0:2.145-3.el7 will be installed
--> Running transaction check
---> Package perl-PlRPC.noarch 0:0.2020-14.el7 will be installed
--> Processing Dependency: perl(Net::Daemon) >= 0.13 for package: perl-PlRPC-0.2020-14.el7.noarch
--> Processing Dependency: perl(Net::Daemon::Test) for package: perl-PlRPC-0.2020-14.el7.noarch
--> Processing Dependency: perl(Net::Daemon::Log) for package: perl-PlRPC-0.2020-14.el7.noarch
--> Processing Dependency: perl(Compress::Zlib) for package: perl-PlRPC-0.2020-14.el7.noarch
--> Running transaction check
---> Package perl-IO-Compress.noarch 0:2.061-2.el7 will be installed
--> Processing Dependency: perl(Compress::Raw::Zlib) >= 2.061 for package: perl-IO-Compress-2.061-2.el7.noarch
--> Processing Dependency: perl(Compress::Raw::Bzip2) >= 2.061 for package: perl-IO-Compress-2.061-2.el7.noarch
---> Package perl-Net-Daemon.noarch 0:0.48-5.el7 will be installed
--> Running transaction check
---> Package perl-Compress-Raw-Bzip2.x86_64 0:2.061-3.el7 will be installed
---> Package perl-Compress-Raw-Zlib.x86_64 1:2.061-4.el7 will be installed
--> Finished Dependency Resolution

Dependencies Resolved

==========================================================================================
 Package                       Arch         Version                   Repository     Size
==========================================================================================
Installing:
 httpd                         x86_64       2.4.6-67.el7.centos       my_base       2.7 M
 mariadb-server                x86_64       1:5.5.56-2.el7            my_base        11 M
Installing for dependencies:
 apr                           x86_64       1.4.8-3.el7               my_base       103 k
 apr-util                      x86_64       1.5.2-6.el7               my_base        92 k
 httpd-tools                   x86_64       2.4.6-67.el7.centos       my_base        87 k
 libaio                        x86_64       0.3.109-13.el7            my_base        24 k
 mailcap                       noarch       2.1.41-2.el7              my_base        31 k
 mariadb                       x86_64       1:5.5.56-2.el7            my_base       8.7 M
 perl-Compress-Raw-Bzip2       x86_64       2.061-3.el7               my_base        32 k
 perl-Compress-Raw-Zlib        x86_64       1:2.061-4.el7             my_base        57 k
 perl-DBD-MySQL                x86_64       4.023-5.el7               my_base       140 k
 perl-DBI                      x86_64       1.627-4.el7               my_base       802 k
 perl-Data-Dumper              x86_64       2.145-3.el7               my_base        47 k
 perl-IO-Compress              noarch       2.061-2.el7               my_base       260 k
 perl-Net-Daemon               noarch       0.48-5.el7                my_base        51 k
 perl-PlRPC                    noarch       0.2020-14.el7             my_base        36 k

Transaction Summary
==========================================================================================
Install  2 Packages (+14 Dependent packages)

Total download size: 24 M
Installed size: 120 M
Downloading packages:
(1/16): apr-util-1.5.2-6.el7.x86_64.rpm                            |  92 kB  00:00:00
(2/16): apr-1.4.8-3.el7.x86_64.rpm                                 | 103 kB  00:00:00
(3/16): httpd-tools-2.4.6-67.el7.centos.x86_64.rpm                 |  87 kB  00:00:00
(4/16): libaio-0.3.109-13.el7.x86_64.rpm                           |  24 kB  00:00:00
(5/16): mailcap-2.1.41-2.el7.noarch.rpm                            |  31 kB  00:00:00
(6/16): httpd-2.4.6-67.el7.centos.x86_64.rpm                       | 2.7 MB  00:00:00
(7/16): mariadb-server-5.5.56-2.el7.x86_64.rpm                     |  11 MB  00:00:02
(8/16): perl-Compress-Raw-Bzip2-2.061-3.el7.x86_64.rpm             |  32 kB  00:00:00
(9/16): perl-Compress-Raw-Zlib-2.061-4.el7.x86_64.rpm              |  57 kB  00:00:00
(10/16): mariadb-5.5.56-2.el7.x86_64.rpm                           | 8.7 MB  00:00:03
(11/16): perl-DBD-MySQL-4.023-5.el7.x86_64.rpm                     | 140 kB  00:00:00
(12/16): perl-Data-Dumper-2.145-3.el7.x86_64.rpm                   |  47 kB  00:00:00
(13/16): perl-DBI-1.627-4.el7.x86_64.rpm                           | 802 kB  00:00:00
(14/16): perl-IO-Compress-2.061-2.el7.noarch.rpm                   | 260 kB  00:00:00
(15/16): perl-Net-Daemon-0.48-5.el7.noarch.rpm                     |  51 kB  00:00:00
(16/16): perl-PlRPC-0.2020-14.el7.noarch.rpm                       |  36 kB  00:00:00
------------------------------------------------------------------------------------------
Total                                                     5.2 MB/s |  24 MB  00:00:04
Running transaction check
Running transaction test
Transaction test succeeded
Running transaction
  Installing : apr-1.4.8-3.el7.x86_64                                                1/16
  Installing : apr-util-1.5.2-6.el7.x86_64                                           2/16
  Installing : perl-Data-Dumper-2.145-3.el7.x86_64                                   3/16
  Installing : httpd-tools-2.4.6-67.el7.centos.x86_64                                4/16
  Installing : 1:mariadb-5.5.56-2.el7.x86_64                                         5/16
  Installing : libaio-0.3.109-13.el7.x86_64                                          6/16
  Installing : perl-Compress-Raw-Bzip2-2.061-3.el7.x86_64                            7/16
  Installing : 1:perl-Compress-Raw-Zlib-2.061-4.el7.x86_64                           8/16
  Installing : perl-IO-Compress-2.061-2.el7.noarch                                   9/16
  Installing : mailcap-2.1.41-2.el7.noarch                                          10/16
  Installing : perl-Net-Daemon-0.48-5.el7.noarch                                    11/16
  Installing : perl-PlRPC-0.2020-14.el7.noarch                                      12/16
  Installing : perl-DBI-1.627-4.el7.x86_64                                          13/16
  Installing : perl-DBD-MySQL-4.023-5.el7.x86_64                                    14/16
  Installing : 1:mariadb-server-5.5.56-2.el7.x86_64                                 15/16
  Installing : httpd-2.4.6-67.el7.centos.x86_64                                     16/16
  Verifying  : perl-DBD-MySQL-4.023-5.el7.x86_64                                     1/16
  Verifying  : perl-Net-Daemon-0.48-5.el7.noarch                                     2/16
  Verifying  : apr-1.4.8-3.el7.x86_64                                                3/16
  Verifying  : perl-Data-Dumper-2.145-3.el7.x86_64                                   4/16
  Verifying  : httpd-2.4.6-67.el7.centos.x86_64                                      5/16
  Verifying  : mailcap-2.1.41-2.el7.noarch                                           6/16
  Verifying  : httpd-tools-2.4.6-67.el7.centos.x86_64                                7/16
  Verifying  : apr-util-1.5.2-6.el7.x86_64                                           8/16
  Verifying  : 1:perl-Compress-Raw-Zlib-2.061-4.el7.x86_64                           9/16
  Verifying  : perl-PlRPC-0.2020-14.el7.noarch                                      10/16
  Verifying  : perl-Compress-Raw-Bzip2-2.061-3.el7.x86_64                           11/16
  Verifying  : 1:mariadb-server-5.5.56-2.el7.x86_64                                 12/16
  Verifying  : libaio-0.3.109-13.el7.x86_64                                         13/16
  Verifying  : perl-DBI-1.627-4.el7.x86_64                                          14/16
  Verifying  : perl-IO-Compress-2.061-2.el7.noarch                                  15/16
  Verifying  : 1:mariadb-5.5.56-2.el7.x86_64                                        16/16

Installed:
  httpd.x86_64 0:2.4.6-67.el7.centos         mariadb-server.x86_64 1:5.5.56-2.el7

Dependency Installed:
  apr.x86_64 0:1.4.8-3.el7
  apr-util.x86_64 0:1.5.2-6.el7
  httpd-tools.x86_64 0:2.4.6-67.el7.centos
  libaio.x86_64 0:0.3.109-13.el7
  mailcap.noarch 0:2.1.41-2.el7
  mariadb.x86_64 1:5.5.56-2.el7
  perl-Compress-Raw-Bzip2.x86_64 0:2.061-3.el7
  perl-Compress-Raw-Zlib.x86_64 1:2.061-4.el7
  perl-DBD-MySQL.x86_64 0:4.023-5.el7
  perl-DBI.x86_64 0:1.627-4.el7
  perl-Data-Dumper.x86_64 0:2.145-3.el7
  perl-IO-Compress.noarch 0:2.061-2.el7
  perl-Net-Daemon.noarch 0:0.48-5.el7
  perl-PlRPC.noarch 0:0.2020-14.el7

Complete!
[root@test-centos7-node1 ~]#
2)启动httpd和mariadb
[root@test-centos7-node1 ~]# systemctl start httpd mariadb
[root@test-centos7-node1 ~]# ss -ntl
State      Recv-Q Send-Q Local Address:Port               Peer Address:Port
LISTEN     0      128               *:22                            *:*
LISTEN     0      100       127.0.0.1:25                            *:*
LISTEN     0      50                *:3306                          *:*
LISTEN     0      128              :::80                           :::*
LISTEN     0      128              :::22                           :::*
LISTEN     0      100             ::1:25                           :::*
[root@test-centos7-node1 ~]#
3)测试httpd和mariadb是否可以正常使用
[root@test-centos7-node1 ~]# echo "this is test page" > /var/www/html/index.html
[root@test-centos7-node1 ~]# curl -I http://192.168.0.10/index.html
HTTP/1.1 200 OK
Date: Mon, 27 Jan 2020 11:51:44 GMT
Server: Apache/2.4.6 (CentOS)
Last-Modified: Mon, 27 Jan 2020 11:51:23 GMT
ETag: "12-59d1db9fd910a"
Accept-Ranges: bytes
Content-Length: 18
Content-Type: text/html; charset=UTF-8

[root@test-centos7-node1 ~]# mysql
Welcome to the MariaDB monitor.  Commands end with ; or \\g.
Your MariaDB connection id is 2
Server version: 5.5.56-MariaDB MariaDB Server

Copyright (c) 2000, 2017, Oracle, MariaDB Corporation Ab and others.

Type \'help;\' or \'\\h\' for help. Type \'\\c\' to clear the current input statement.

MariaDB [(none)]> show databases;
+--------------------+
| Database           |
+--------------------+
| information_schema |
| mysql              |
| performance_schema |
| test               |
+--------------------+
4 rows in set (0.00 sec)

MariaDB [(none)]> \\q
Bye
[root@test-centos7-node1 ~]#
提示:可以看到httdp和mariadb是可以正常访问的。接下来在192.168.0.30机器上安装php-fpm
[root@test-centos7-node3 ~]# ip a s ens33
2: ens33: <BROADCAST,MULTICAST,UP,LOWER_UP> mtu 1500 qdisc pfifo_fast state UP qlen 1000
    link/ether 00:0c:29:4a:bd:74 brd ff:ff:ff:ff:ff:ff
    inet 192.168.0.30/24 brd 192.168.0.255 scope global ens33
       valid_lft forever preferred_lft forever
    inet6 fe80::20c:29ff:fe4a:bd74/64 scope link
       valid_lft forever preferred_lft forever
[root@test-centos7-node3 ~]# yum install -y php-fpm
Loaded plugins: fastestmirror
base                                                               | 3.6 kB  00:00:00
epel                                                               | 5.3 kB  00:00:00
extras                                                             | 2.9 kB  00:00:00
updates                                                            | 2.9 kB  00:00:00
(1/4): epel/x86_64/updateinfo                                      | 1.0 MB  00:00:00
(2/4): extras/7/x86_64/primary_db                                  | 159 kB  00:00:00
(3/4): updates/7/x86_64/primary_db                                 | 6.7 MB  00:00:01
(4/4): epel/x86_64/primary_db                                      | 6.9 MB  00:00:02
Loading mirror speeds from cached hostfile
 * base: mirrors.163.com
 * extras: mirrors.163.com
 * updates: mirrors.aliyun.com
Resolving Dependencies
--> Running transaction check
---> Package php-fpm.x86_64 0:5.4.16-46.1.el7_7 will be installed
--> Processing Dependency: php-common(x86-64) = 5.4.16-46.1.el7_7 for package: php-fpm-5.4.16-46.1.el7_7.x86_64
--> Running transaction check
---> Package php-common.x86_64 0:5.4.16-46.1.el7_7 will be installed
--> Processing Dependency: libzip.so.2()(64bit) for package: php-common-5.4.16-46.1.el7_7.x86_64
--> Running transaction check
---> Package libzip.x86_64 0:0.10.1-8.el7 will be installed
--> Finished Dependency Resolution

Dependencies Resolved

==========================================================================================
 Package             Arch            Version                       Repository        Size
==========================================================================================
Installing:
 php-fpm             x86_64          5.4.16-46.1.el7_7             updates          1.4 M
Installing for dependencies:
 libzip              x86_64          0.10.1-8.el7                  base              48 k
 php-common          x86_64          5.4.16-46.1.el7_7             updates          565 k

Transaction Summary
==========================================================================================
Install  1 Package (+2 Dependent packages)

Total download size: 2.0 M
Installed size: 8.4 M
Downloading packages:
(1/3): libzip-0.10.1-8.el7.x86_64.rpm                              |  48 kB  00:00:00
(2/3): php-common-5.4.16-46.1.el7_7.x86_64.rpm                     | 565 kB  00:00:00
(3/3): php-fpm-5.4.16-46.1.el7_7.x86_64.rpm                        | 1.4 MB  00:00:00
------------------------------------------------------------------------------------------
Total                                                     3.1 MB/s | 2.0 MB  00:00:00
Running transaction check
Running transaction test
Transaction test succeeded
Running transaction
  Installing : libzip-0.10.1-8.el7.x86_64                                             1/3
  Installing : php-common-5.4.16-46.1.el7_7.x86_64                                    2/3
  Installing : php-fpm-5.4.16-46.1.el7_7.x86_64                                       3/3
  Verifying  : php-common-5.4.16-46.1.el7_7.x86_64                                    1/3
  Verifying  : libzip-0.10.1-8.el7.x86_64                                             2/3
  Verifying  : php-fpm-5.4.16-46.1.el7_7.x86_64                                       3/3

Installed:
  php-fpm.x86_64 0:5.4.16-46.1.el7_7

Dependency Installed:
  libzip.x86_64 0:0.10.1-8.el7            php-common.x86_64 0:5.4.16-46.1.el7_7

Complete!
[root@test-centos7-node3 ~]#
4)配置php-fpm工作在192.168.0.30的9000端口
[root@test-centos7-node3 ~]# rpm -ql php-fpm
/etc/logrotate.d/php-fpm
/etc/php-fpm.conf
/etc/php-fpm.d
/etc/php-fpm.d/www.conf
/etc/sysconfig/php-fpm
/run/php-fpm
/usr/lib/systemd/system/php-fpm.service
/usr/lib/tmpfiles.d/php-fpm.conf
/usr/sbin/php-fpm
/usr/share/doc/php-fpm-5.4.16
/usr/share/doc/php-fpm-5.4.16/fpm_LICENSE
/usr/share/doc/php-fpm-5.4.16/php-fpm.conf.default
/usr/share/fpm
/usr/share/fpm/status.html
/usr/share/man/man8/php-fpm.8.gz
/var/log/php-fpm
[root@test-centos7-node3 ~]# grep -i "listen" /etc/php-fpm.d/www.conf
;   \'ip.add.re.ss:port\'    - to listen on a TCP socket to a specific address on
;   \'port\'                 - to listen on a TCP socket to all addresses on a
;   \'/path/to/unix/socket\' - to listen on a unix socket.
#listen = 127.0.0.1:9000
listen = 192.168.0.30:9000
; Set listen(2) backlog. A value of \'-1\' means unlimited.
;listen.backlog = -1
; PHP FCGI (5.2.2+). Makes sense only with a tcp listening socket. Each address
#listen.allowed_clients = 127.0.0.1
;listen.owner = nobody
;listen.group = nobody
;listen.mode = 0666
[root@test-centos7-node3 ~]#
5)启动php-fpm
[root@test-centos7-node3 ~]# systemctl start php-fpm
[root@test-centos7-node3 ~]# ss -ntl
State      Recv-Q Send-Q Local Address:Port               Peer Address:Port
LISTEN     0      128               *:22                            *:*
LISTEN     0      100       127.0.0.1:25                            *:*
LISTEN     0      128    192.168.0.30:9000                          *:*
LISTEN     0      128              :::22                           :::*
LISTEN     0      100             ::1:25                           :::*
[root@test-centos7-node3 ~]#
提示:可以看到php-fpm启动起来了,并且监听在192.168.0.30的9000端口上,接下来我们配置httpd,请求.php结尾的资源都交给192.168.0.30:9000执行
6)配置httpd的请求.php的资源能够连接至192.168.0.30:9000
[root@test-centos7-node1 ~]# httpd -M |grep fcgi
AH00558: httpd: Could not reliably determine the server\'s fully qualified domain name, using fe80::20c:29ff:fef2:820c. Set the \'ServerName\' directive globally to suppress this message
 proxy_fcgi_module (shared)
[root@test-centos7-node1 ~]# cat /etc/httpd/conf.d/fcgi.conf
DirectoryIndex index.php
ProxyRequests Off
ProxyPassMatch ^/(.*\\.php)$ fcgi://192.168.0.30:9000/var/www/html/$1
[root@test-centos7-node1 ~]#
提示:如果没有加载proxy_fcgi_module需要先加载此模块,然后才能够代理fcgi协议
7)在192.168.0.30上新建一个php测试页面,然后访问192.168.0.10/teset.php,如果能够将测试页面解析出来,说明httpd和php-fpm是连接正常的
[root@test-centos7-node3 ~]# ip a s ens33
2: ens33: <BROADCAST,MULTICAST,UP,LOWER_UP> mtu 1500 qdisc pfifo_fast state UP qlen 1000
    link/ether 00:0c:29:4a:bd:74 brd ff:ff:ff:ff:ff:ff
    inet 192.168.0.30/24 brd 192.168.0.255 scope global ens33
       valid_lft forever preferred_lft forever
    inet6 fe80::20c:29ff:fe4a:bd74/64 scope link
       valid_lft forever preferred_lft forever
[root@test-centos7-node3 ~]# ll /var/www/html
ls: cannot access /var/www/html: No such file or directory
[root@test-centos7-node3 ~]# mkdir /var/www/html -p
[root@test-centos7-node3 ~]# cat > /var/www/html/test.php
<?php
phpinfo();
?>
^C
[root@test-centos7-node3 ~]# cat /var/www/html/test.php
<?php
phpinfo();
?>
[root@test-centos7-node3 ~]#
8)重新启动httpd,然后访问192.168.10/test.php
[root@test-centos7-node1 ~]# systemctl restart httpd
[root@test-centos7-node1 ~]# curl -I http://192.168.0.10/test.php
HTTP/1.1 200 OK
Date: Mon, 27 Jan 2020 12:54:56 GMT
Server: Apache/2.4.6 (CentOS)
X-Powered-By: PHP/5.4.16
Content-Type: text/html; charset=UTF-8

[root@test-centos7-node1 ~]#
提示:到此LAP环境已经搭建好了,但是php-fpm是不支持xcode的,接下来我们来安装xcache模块
9)安装xcache模块
[root@test-centos7-node3 ~]# yum install -y php-xcache
Loaded plugins: fastestmirror
Loading mirror speeds from cached hostfile
 * base: mirrors.163.com
 * extras: mirrors.163.com
 * updates: mirrors.aliyun.com
Resolving Dependencies
--> Running transaction check
---> Package php-xcache.x86_64 0:3.1.1-1.el7 will be installed
--> Finished Dependency Resolution

Dependencies Resolved

==========================================================================================
 Package                Arch               Version                 Repository        Size
==========================================================================================
Installing:
 php-xcache             x86_64             3.1.1-1.el7             epel              72 k

Transaction Summary
==========================================================================================
Install  1 Package

Total download size: 72 k
Installed size: 187 k
Downloading packages:
php-xcache-3.1.1-1.el7.x86_64.rpm                                  |  72 kB  00:00:00
Running transaction check
Running transaction test
Transaction test succeeded
Running transaction
  Installing : php-xcache-3.1.1-1.el7.x86_64                                          1/1
  Verifying  : php-xcache-3.1.1-1.el7.x86_64                                          1/1

Installed:
  php-xcache.x86_64 0:3.1.1-1.el7

Complete!
[root@test-centos7-node3 ~]#
提示:当然xcache这个模块我们可以编译安装。
10)重启php-fpm,然后访问测试页,看看是不是支持xcache
[root@test-centos7-node3 ~]# systemctl restart php-fpm
[root@test-centos7-node3 ~]#
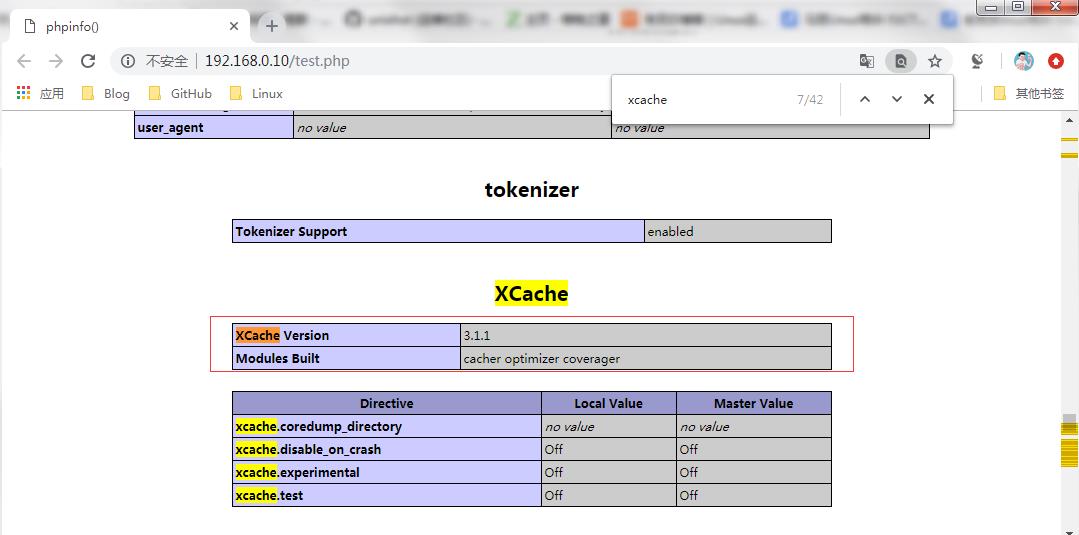
提示:通过访问测试页面,我们看到了php-fpm支持了xcache,到此php部分就搭建完毕了,接下来我们要来利用php连接数据库
11)安装php-mysql 此包用于php连接mysql数据库
[root@test-centos7-node3 ~]# yum install -y php-mysql
Loaded plugins: fastestmirror
Loading mirror speeds from cached hostfile
 * base: mirrors.163.com
 * extras: mirrors.163.com
 * updates: mirrors.aliyun.com
Resolving Dependencies
--> Running transaction check
---> Package php-mysql.x86_64 0:5.4.16-46.1.el7_7 will be installed
--> Processing Dependency: php-pdo(x86-64) = 5.4.16-46.1.el7_7 for package: php-mysql-5.4.16-46.1.el7_7.x86_64
--> Running transaction check
---> Package php-pdo.x86_64 0:5.4.16-46.1.el7_7 will be installed
--> Finished Dependency Resolution

Dependencies Resolved

==========================================================================================
 Package             Arch             Version                     Repository         Size
==========================================================================================
Installing:
 php-mysql           x86_64           5.4.16-46.1.el7_7           updates           101 k
Installing for dependencies:
 php-pdo             x86_64           5.4.16-46.1.el7_7           updates            99 k

Transaction Summary
==========================================================================================
Install  1 Package (+1 Dependent package)

Total download size: 201 k
Installed size: 424 k
Downloading packages:
(1/2): php-mysql-5.4.16-46.1.el7_7.x86_64.rpm                      | 101 kB  00:00:00
(2/2): php-pdo-5.4.16-46.1.el7_7.x86_64.rpm                        |  99 kB  00:00:00
------------------------------------------------------------------------------------------
Total                                                     513 kB/s | 201 kB  00:00:00
Running transaction check
Running transaction test
Transaction test succeeded
Running transaction
  Installing : php-pdo-5.4.16-46.1.el7_7.x86_64                                       1/2
  Installing : php-mysql-5.4.16-46.1.el7_7.x86_64                                     2/2
  Verifying  : php-mysql-5.4.16-46.1.el7_7.x86_64                                     1/2
  Verifying  : php-pdo-5.4.16-46.1.el7_7.x86_64                                       2/2

Installed:
  php-mysql.x86_64 0:5.4.16-46.1.el7_7

Dependency Installed:
  php-pdo.x86_64 0:5.4.16-46.1.el7_7

Complete!
[root@test-centos7-node3 ~]#
12)在192.168.0.10的mariadb数据库里添加一个帐号,用于php测试连接数据库用
[root@test-centos7-node1 ~]# mysql
Welcome to the MariaDB monitor.  Commands end with ; or \\g.
Your MariaDB connection id is 4
Server version: 5.5.56-MariaDB MariaDB Server

Copyright (c) 2000, 2017, Oracle, MariaDB Corporation Ab and others.

Type \'help;\' or \'\\h\' for help. Type \'\\c\' to clear the current input statement.

MariaDB [(none)]> grant all on *.* to \'php_test\'@\'192.168.0.%\' identified by \'admin\';
Query OK, 0 rows affected (0.00 sec)

MariaDB [(none)]> flush privileges;
Query OK, 0 rows affected (0.00 sec)

MariaDB [(none)]> \\q
Bye
[root@test-centos7-node1 ~]#
13)在php-fpm服务器上添加一个测试页,用于测试php-fpm是否能够连接数据库
[root@test-centos7-node3 html]# pwd
/var/www/html
[root@test-centos7-node3 html]# ll
total 8
-rw-r--r-- 1 root root 159 Feb 14 07:21 test_conn_mysql.php
-rw-r--r-- 1 root root  20 Feb 14 06:40 test.php
[root@test-centos7-node3 html]# cat test_conn_mysql.php
<?php
$mysqli=new mysqli("192.168.0.10","php_test","admin");
if(mysqli_connect_errno()){
echo "Failure";
$mysqli=null;
exit;
}
echo "OK\\n";
$mysqli->close();
?>
[root@test-centos7-node3 html]#
14)重启php-fpm,然后再访问http://192.168.0.10/test_conn_mysql.php
[root@test-centos7-node3 html]# curl http://192.168.0.10/test_conn_mysql.php
OK
[root@test-centos7-node3 html]#
提示:可以看到我们访问测试连接数据库的脚本文件能够正常连接到数据库,到此LAMP的环境就搭建完毕了。
2、部署wordpress论坛,并实现正常访问登录论坛。
1)下载wordpress源码包,然后把源码放到我们刚才搭建的LAMP环境中。
[root@test-centos7-node1 ~]# ip a s ens33
2: ens33: <BROADCAST,MULTICAST,UP,LOWER_UP> mtu 1500 qdisc pfifo_fast state UP qlen 1000
    link/ether 00:0c:29:f2:82:0c brd ff:ff:ff:ff:ff:ff
    inet 192.168.0.10/24 brd 192.168.0.255 scope global ens33
       valid_lft forever preferred_lft forever
    inet6 fe80::20c:29ff:fef2:820c/64 scope link
       valid_lft forever preferred_lft forever
[root@test-centos7-node1 ~]# cd /var/www/html/
[root@test-centos7-node1 html]# ls
[root@test-centos7-node1 html]# rz
rz waiting to receive.
 zmodem trl+C ȡ

  100%    7989 KB 7989 KB/s 00:00:01       0 Errorstar.gz...
Transferring wordpress-4.5.1-zh_CN.tar.gz...

[root@test-centos7-node1 html]# ls
wordpress-4.5.1-zh_CN.tar.gz
[root@test-centos7-node1 html]# tar xf wordpress-4.5.1-zh_CN.tar.gz
[root@test-centos7-node1 html]#
提示:在192.168.0.10上放一份源码的原因是httpd的静态页面是不会往后面的php-fpm服务器转的,所以我们放程序源码除了httpd上要放一份外,php-fpm服务器上也要放一份
[root@test-centos7-node3 ~]# ip a s ens33
2: ens33: <BROADCAST,MULTICAST,UP,LOWER_UP> mtu 1500 qdisc pfifo_fast state UP qlen 1000
    link/ether 00:0c:29:4a:bd:74 brd ff:ff:ff:ff:ff:ff
    inet 192.168.0.30/24 brd 192.168.0.255 scope global ens33
       valid_lft forever preferred_lft forever
    inet6 fe80::20c:29ff:fe4a:bd74/64 scope link
       valid_lft forever preferred_lft forever
[root@test-centos7-node3 ~]# cd /var/www/html/
[root@test-centos7-node3 html]# ls
pdo.php  test_conn_mysql.php  test.php
[root@test-centos7-node3 html]# rm -rf *
[root@test-centos7-node3 html]# ls
[root@test-centos7-node3 html]# rz
rz waiting to receive.
 zmodem trl+C ȡ

  100%    7989 KB 7989 KB/s 00:00:01       0 Errorstar.gz...

[root@test-centos7-node3 html]# tar xf wordpress-4.5.1-zh_CN.tar.gz
[root@test-centos7-node3 html]# ls
wordpress  wordpress-4.5.1-zh_CN.tar.gz
[root@test-centos7-node3 html]#
提示:放好源码文件后,我们要在数据库里创建一个库来存放wordpress程序的数据
2)在数据库里创建一个数据库用于存放wordpress的各种数据
[root@test-centos7-node1 html]# mysql
Welcome to the MariaDB monitor.  Commands end with ; or \\g.
Your MariaDB connection id is 36
Server version: 5.5.56-MariaDB MariaDB Server

Copyright (c) 2000, 2017, Oracle, MariaDB Corporation Ab and others.

Type \'help;\' or \'\\h\' for help. Type \'\\c\' to clear the current input statement.

MariaDB [(none)]> show databases;
+--------------------+
| Database           |
+--------------------+
| information_schema |
| mysql              |
| performance_schema |
| test               |
+--------------------+
4 rows in set (0.00 sec)

MariaDB [(none)]> create database wordpress;
Query OK, 1 row affected (0.00 sec)

MariaDB [(none)]> grant all on  wordpress.* to wordpress@\'192.168.0.%\' identified by \'admin\';
Query OK, 0 rows affected (0.00 sec)

MariaDB [(none)]> flush privileges;
Query OK, 0 rows affected (0.01 sec)

MariaDB [(none)]> \\q
Bye
[root@test-centos7-node1 html]#
提示:为了安全,我们在数据库里专门创建了一个用户用于wordpress程序连接数据库用
接下来我们就可以通过浏览器来安装wordpress

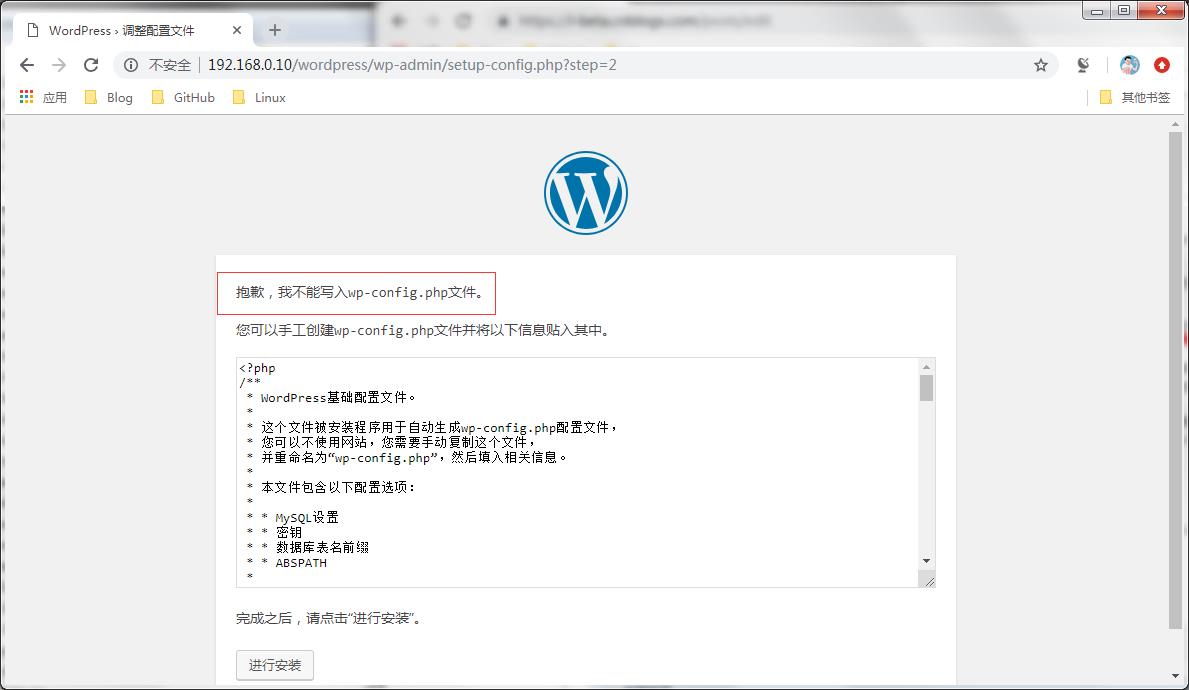
提示:它提示不能写入wp-config.php,我们需要对httpd运行的用户来进行授权,让其对wordpress目录有写操作即可
[root@test-centos7-node3 html]# setfacl -R -m u:apache:rwx wordpress
[root@test-centos7-node3 html]# getfacl wordpress
# file: wordpress
# owner: nobody
# group: 65534
user::rwx
user:apache:rwx
group::r-x
mask::rwx
other::r-x

[root@test-centos7-node3 html]#
提示:我们授权其实在php-fpm上面授权即可。授权后我们就可以刷新刚才的安装页面,进行安装

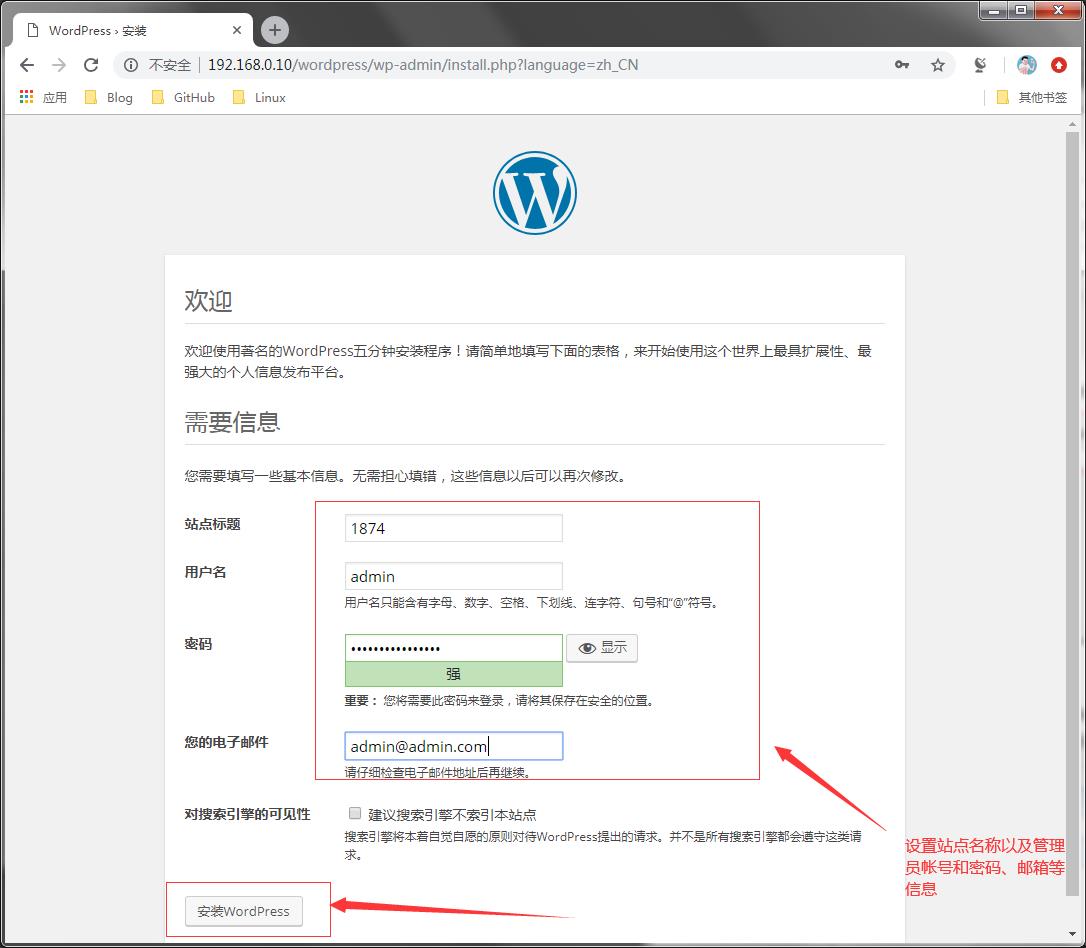
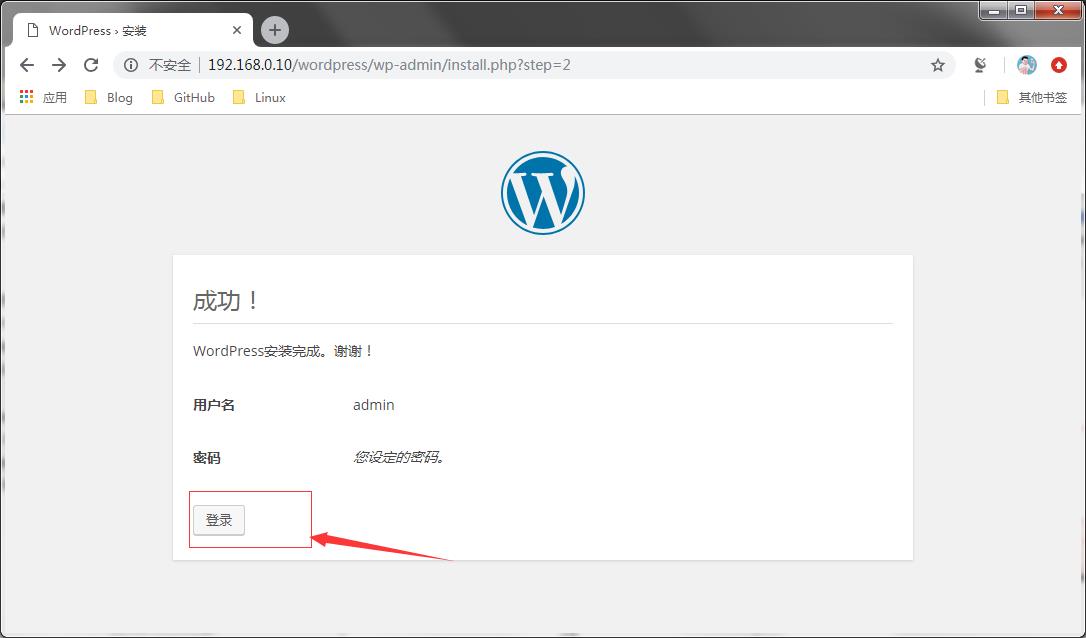

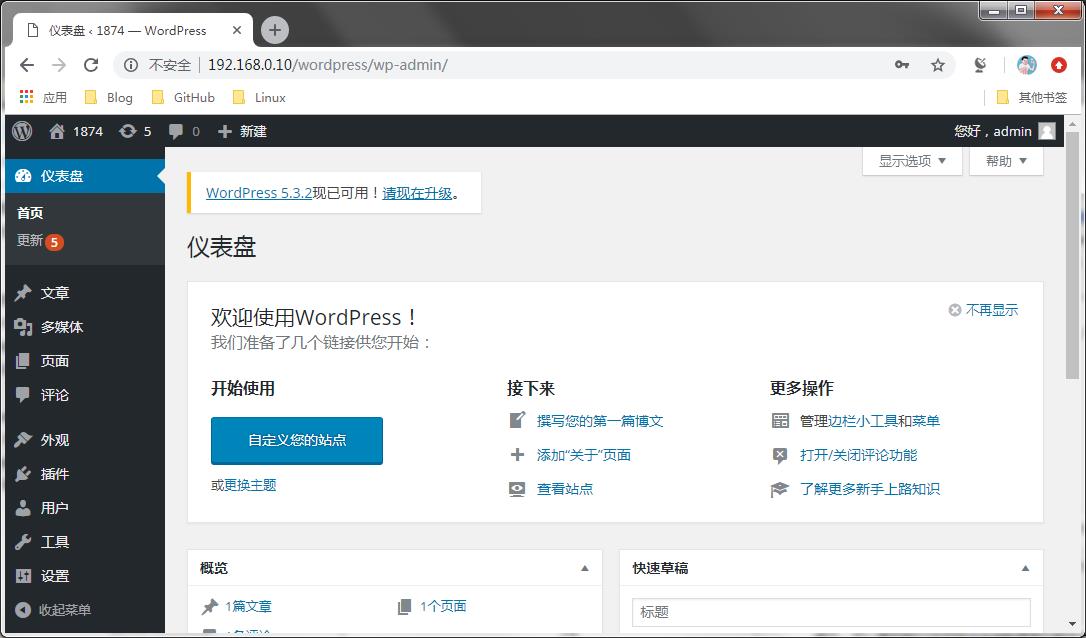
到此wordpress就搭建完毕了,后续就可以通过以上界面管理wordpress
3、收集apache访问日志,并实现图形化展示。
首先说一下实现过程吧,要想图形化展示日志,我们可以利用rsyslog的前端展示工具loganalyzer来展示。用这个工具它是基于LAMP架构来实现的,在这之前我们先把apache的访问日志交给rsyslog,rsyslog再把对应的日志写到数据库里,然后通过日志展示工具loganalyzer去数据库把日志对出来,然后展示出来。
1)配置httpd的日志,把错误日志传给syslog:local1,把访问日志通过管道传给logger,然后logger再把它传给 local2
[root@test-centos7-node1 ~]# grep -E "^Error" /etc/httpd/conf/httpd.conf
ErrorLog syslog:local1
[root@test-centos7-node1 ~]# grep -E "^[[:space:]]*CustomLog" /etc/httpd/conf/httpd.conf
    CustomLog "|/usr/bin/logger -p local2.info" combined
[root@test-centos7-node1 ~]#
提示:以上配置就是把httpd的访问日志传给local1 ,把访问日志传给local2,local1和local2是rsyslog的自定义日志设施
2)安装rsyslog-mysql,这个包主要是用于rsyslog连接数据库的一个模块,除此以外还有一个创建数据库和表的SQL脚本,用此脚本可以创建存放日志的库和表
[root@test-centos7-node1 ~]# yum install -y rsyslog-mysql
Loaded plugins: fastestmirror
Loading mirror speeds from cached hostfile
Resolving Dependencies
--> Running transaction check
---> Package rsyslog-mysql.x86_64 0:8.24.0-12.el7 will be installed
--> Finished Dependency Resolution

Dependencies Resolved

==================================================================================================================================
 Package                           Arch                       Version                           Repository                   Size
==================================================================================================================================
Installing:
 rsyslog-mysql                     x86_64                     8.24.0-12.el7                     my_base                      35 k

Transaction Summary
==================================================================================================================================
Install  1 Package

Total download size: 35 k
Installed size: 20 k
Downloading packages:
rsyslog-mysql-8.24.0-12.el7.x86_64.rpm                                                                     |  35 kB  00:00:00
Running transaction check
Running transaction test
Transaction test succeeded
Running transaction
  Installing : rsyslog-mysql-8.24.0-12.el7.x86_64                                                                             1/1
  Verifying  : rsyslog-mysql-8.24.0-12.el7.x86_64                                                                             1/1

Installed:
  rsyslog-mysql.x86_64 0:8.24.0-12.el7

Complete!
[root@test-centos7-node1 ~]# rpm -ql rsyslog-mysql
/usr/lib64/rsyslog/ommysql.so
/usr/share/doc/rsyslog-8.24.0/mysql-createDB.sql
[root@test-centos7-node1 ~]#
3)导入数据库和表,然后在其数据库里创建一个用于rsyslog连接数据库的专有账号
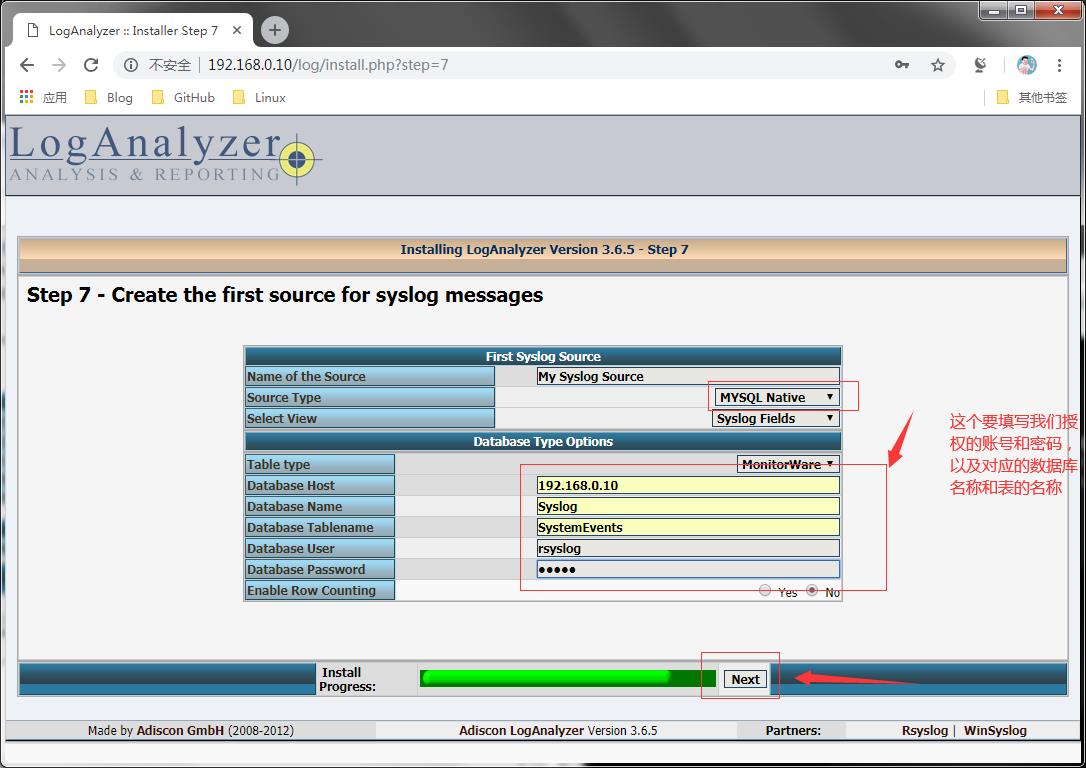
[root@test-centos7-node1 ~]# rpm -ql rsyslog-mysql
/usr/lib64/rsyslog/ommysql.so
/usr/share/doc/rsyslog-8.24.0/mysql-createDB.sql
[root@test-centos7-node1 ~]# mysql < /usr/share/doc/rsyslog-8.24.0/mysql-createDB.sql
[root@test-centos7-node1 ~]# mysql
Welcome to the MariaDB monitor.  Commands end with ; or \\g.
Your MariaDB connection id is 60
Server version: 5.5.56-MariaDB MariaDB Server

Copyright (c) 2000, 2017, Oracle, MariaDB Corporation Ab and others.

Type \'help;\' or \'\\h\' for help. Type \'\\c\' to clear the current input statement.

MariaDB [(none)]> show databases;
+--------------------+
| Database           |
+--------------------+
| information_schema |
| Syslog             |
| mysql              |
| performance_schema |
| test               |
| wordpress          |
+--------------------+
6 rows in set (0.00 sec)

MariaDB [(none)]> use Syslog
Reading table information for completion of table and column names
You can turn off this feature to get a quicker startup with -A

Database changed
MariaDB [Syslog]> show tables;
+------------------------+
| Tables_in_Syslog       |
+------------------------+
| SystemEvents           |
| SystemEventsProperties |
+------------------------+
2 rows in set (0.00 sec)

MariaDB [Syslog]> grant all on Syslog.* to rsyslog@\'192.168.0.%\' identified by \'admin\';
Query OK, 0 rows affected (0.00 sec)

MariaDB [Syslog]> flush privileges;
Query OK, 0 rows affected (0.00 sec)

MariaDB [Syslog]> \\q
Bye
[root@test-centos7-node1 ~]#
4)配置rsyslog加载ommysql模块将local1、local2收集的日志存入数据库中
[root@test-centos7-node1 ~]# grep "ommysql" /etc/rsyslog.conf
$ModLoad ommysql
local1.*                                                :ommysql:192.168.0.10,Syslog,rsyslog,admin
local2.*                                                :ommysql:192.168.0.10,Syslog,rsyslog,admin
[root@test-centos7-node1 ~]#
5)重启rsyslog和httpd后访问httpd服务,然后在其数据库里查看对应的表里是否存有日志
[root@test-centos7-node1 ~]# systemctl restart rsyslog httpd
[root@test-centos7-node1 ~]# curl -I http://192.168.0.10/wordpress
HTTP/1.1 301 Moved Permanently
Date: Mon, 27 Jan 2020 17:08:30 GMT
Server: Apache/2.4.6 (CentOS)
Location: http://192.168.0.10/wordpress/
Content-Type: text/html; charset=iso-8859-1

[root@test-centos7-node1 ~]# mysql
Welcome to the MariaDB monitor.  Commands end with ; or \\g.
Your MariaDB connection id is 12
Server version: 5.5.56-MariaDB MariaDB Server

Copyright (c) 2000, 2017, Oracle, MariaDB Corporation Ab and others.

Type \'help;\' or \'\\h\' for help. Type \'\\c\' to clear the current input statement.

MariaDB [(none)]> show databases;
+--------------------+
| Database           |
+--------------------+
| information_schema |
| Syslog             |
| mysql              |
| performance_schema |
| test               |
| wordpress          |
+--------------------+
6 rows in set (0.00 sec)

MariaDB [(none)]> use Syslog
Reading table information for completion of table and column names
You can turn off this feature to get a quicker startup with -A

Database changed
MariaDB [Syslog]> show tables;
+------------------------+
| Tables_in_Syslog       |
+------------------------+
| SystemEvents           |
| SystemEventsProperties |
+------------------------+
2 rows in set (0.00 sec)

MariaDB [Syslog]> select * from SystemEvents;
+----+------------+---------------------+---------------------+----------+----------+--------------------+--------------------------------------------------------------------------------------------------+------------+------------+-------------+-----------+---------------+---------+-----------------+--------------+-----------+----------+----------+------------+-----------+--------------+-----------------+----------+
| ID | CustomerID | ReceivedAt          | DeviceReportedTime  | Facility | Priority | FromHost           | Message                                                                                          | NTSeverity | Importance | EventSource | EventUser | EventCategory | EventID | EventBinaryData | MaxAvailable | CurrUsage | MinUsage | MaxUsage | InfoUnitID | SysLogTag | EventLogType | GenericFileName | SystemID |
+----+------------+---------------------+---------------------+----------+----------+--------------------+--------------------------------------------------------------------------------------------------+------------+------------+-------------+-----------+---------------+---------+-----------------+--------------+-----------+----------+----------+------------+-----------+--------------+-----------------+----------+
|  1 |       NULL | 2020-01-27 12:08:30 | 2020-01-27 12:08:30 |       18 |        6 | test-centos7-node1 | 192.168.0.10 - - [27/Jan/2020:12:08:30 -0500] "HEAD /wordpress HTTP/1.1" 301 - "-" "curl/7.29.0" |       NULL |       NULL | NULL        | NULL      |          NULL |    NULL | NULL            |         NULL |      NULL |     NULL |     NULL |          1 | logger:   | NULL         | NULL            |     NULL |
+----+------------+---------------------+---------------------+----------+----------+--------------------+--------------------------------------------------------------------------------------------------+------------+------------+-------------+-----------+---------------+---------+-----------------+--------------+-----------+----------+----------+------------+-----------+--------------+-----------------+----------+
1 row in set (0.00 sec)

MariaDB [Syslog]>
提示:可以看到数据库里已经有我们刚才的访问日志了。到此收集日志记录到数据库的过程就实现了,接下来我们把前端展示工具搭建好就可以把数据库里的日志展示出来
6)上传loganalyzer到/var/ww/html/下,并解压(注意在httpd服务器上放一份的同时php-fpm服务器上也放一份)
[root@test-centos7-node1 html]# ls
wordpress
[root@test-centos7-node1 html]# rz
rz waiting to receive.
 zmodem trl+C ȡ

  100%    1022 KB 1022 KB/s 00:00:01       0 Errorsgz...

[root@test-centos7-node1 html]# tar xf loganalyzer-3.6.5.tar.gz
[root@test-centos7-node1 html]# ls
loganalyzer-3.6.5  loganalyzer-3.6.5.tar.gz  wordpress
[root@test-centos7-node1 html]# cd loganalyzer-3.6.5
[root@test-centos7-node1 loganalyzer-3.6.5]# ls
ChangeLog  contrib  COPYING  doc  INSTALL  src
[root@test-centos7-node1 loganalyzer-3.6.5]# cp -a src ../log
[root@test-centos7-node1 loganalyzer-3.6.5]# cd ..
[root@test-centos7-node1 html]# ls
log  loganalyzer-3.6.5  loganalyzer-3.6.5.tar.gz  wordpress
[root@test-centos7-node1 html]# scp -r log 192.168.0.30:/var/www/html/
root@192.168.0.30\'s password:
install.php                                                                                     100%   41KB   1.0MB/s   00:00
export.php                                                                                      100%   12KB 309.3KB/s   00:00
searchhelpers.js                                                                                100% 6181     1.5MB/s   00:00
common.js                                                                                       100% 9434     2.0MB/s   00:00
reports.php                                                                                     100% 4146   110.2KB/s   00:00
details.php                                                                                     100%   16KB   2.6MB/s   00:00
defaults.css                                                                                    100% 2039   521.7KB/s   00:00
highlight.css                                                                                   100% 1032   314.3KB/s   00:00
menu.css                                                                                        100% 1194    25.9KB/s   00:00
msgparser.class.php                                                                             100% 2425    73.3KB/s   00:00
logstreamconfigmongodb.class.php                                                                100% 2573   420.8KB/s   00:00
logstreamconfig.class.php                                                                       100% 5439   904.0KB/s   00:00
msgparser.apache2common.class.php
……省略部分内容
7)用浏览器访问192.168.0.10/log安装loganalyzer
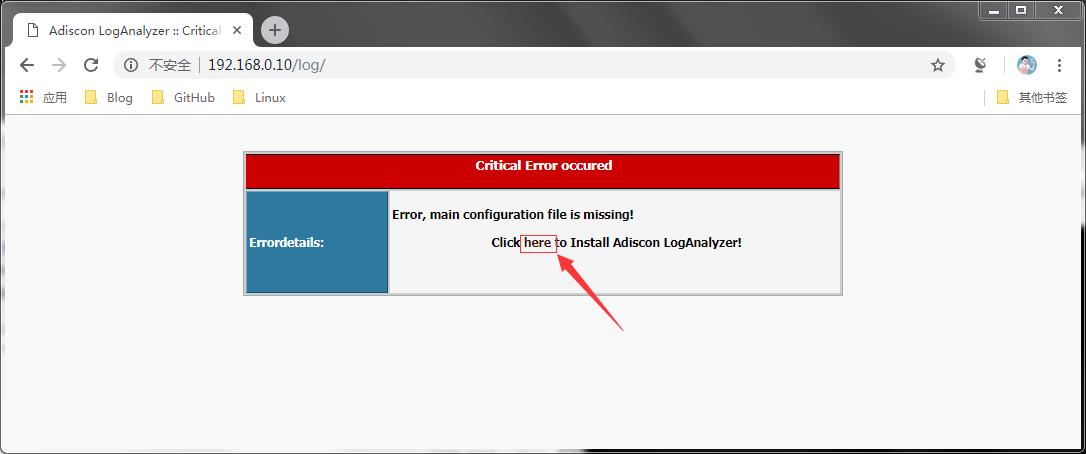
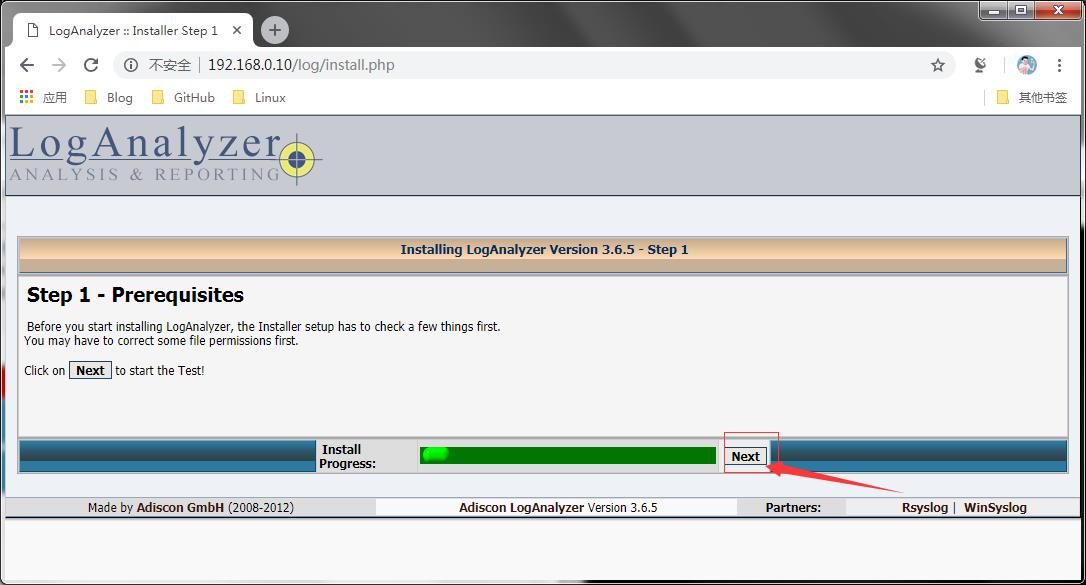

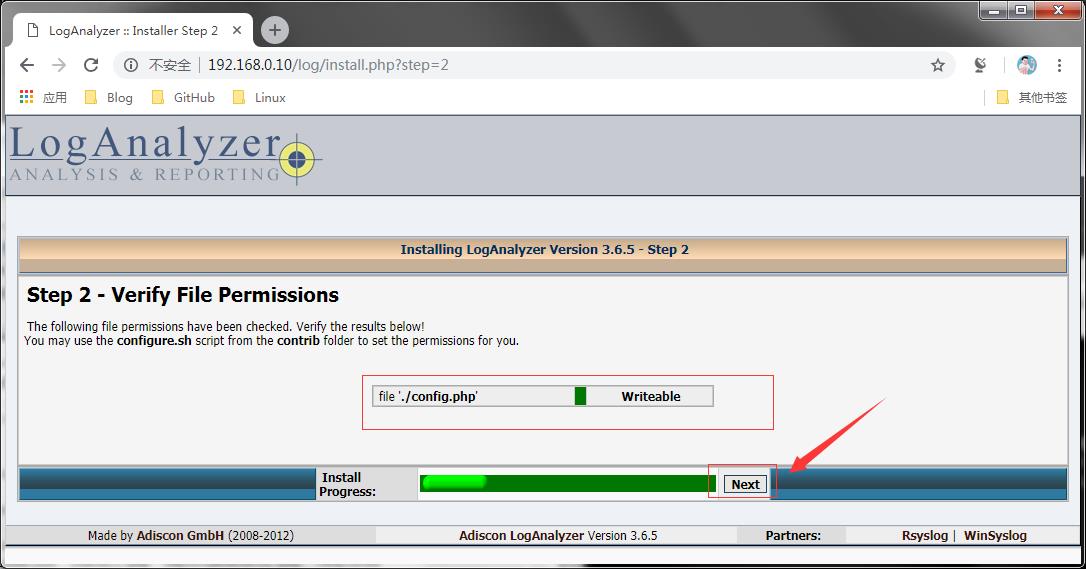
提示:上面安装界面提示我们没有config.php文件,需要我们新建一个这样的文件,并且权限得是666的权限
[root@test-centos7-node3 ~]# cd /var/www/html/
[root@test-centos7-node3 html]# ls
log  wordpress
[root@test-centos7-node3 html]# cd log/
[root@test-centos7-node3 log]# ls
admin               classes      details.php  images       js                   reports.php     themes
asktheoracle.php    convert.php  doc          include      lang                 search.php      userchange.php
BitstreamVeraFonts  cron         export.php   index.php    login.php            statistics.php
chartgenerator.php  css          favicon.ico  install.php  reportgenerator.php  templates
[root@test-centos7-node3 log]# touch config.php
[root@test-centos7-node3 log]# chmod 666 config.php
[root@test-centos7-node3 log]#
提示:把需要的文件创建好,授好权后,我们点击recheck

提示:安装完毕后,它提示我们错误500,我们知道错误500是服务器内部错误,我们需要在php-fpm上面找原因,我们先看看php-fpm的错误日志吧
[root@test-centos7-node3 log]# cd /var/log/php-fpm/
[root@test-centos7-node3 php-fpm]# ls
error.log  www-error.log
[root@test-centos7-node3 php-fpm]# tail www-error.log
[14-Feb-2020 16:00:06 UTC] PHP Notice:  Undefined index: ViewStringCharacterLimit in /var/www/html/log/install.php on line 800
[14-Feb-2020 16:00:06 UTC] PHP Notice:  Undefined index: ViewEntriesPerPage in /var/www/html/log/install.php on line 801
[14-Feb-2020 16:00:06 UTC] PHP Notice:  Undefined index: ViewEnableDetailPopups in /var/www/html/log/install.php on line 802
[14-Feb-2020 16:00:06 UTC] PHP Notice:  Undefined index: EnableIPAddressResolve in /var/www/html/log/install.php on line 803
[14-Feb-2020 16:00:06 UTC] PHP Notice:  Undefined index: UserDBEnabled in /var/www/html/log/install.php on line 904
[14-Feb-2020 16:00:06 UTC] PHP Warning:  Unknown: open(/var/lib/php/session/sess_b7f7ckbngimv44nhs20dpl7807, O_RDWR) failed: No such file or directory (2) in Unknown on line 0
[14-Feb-2020 16:00:06 UTC] PHP Warning:  Unknown: Failed to write session data (files). Please verify that the current setting of session.save_path is correct (/var/lib/php/session) in Unknown on line 0
[14-Feb-2020 16:00:48 UTC] PHP Parse error:  syntax error, unexpected \';\' in /var/www/html/log/config.php on line 86
[14-Feb-2020 16:00:48 UTC] PHP Warning:  Unknown: open(/var/lib/php/session/sess_b7f7ckbngimv44nhs20dpl7807, O_RDWR) failed: No such file or directory (2) in Unknown on line 0
[14-Feb-2020 16:00:48 UTC] PHP Warning:  Unknown: Failed to write session data (files). Please verify that the current setting of session.save_path is correct (/var/lib/php/session) in Unknown on line 0
[root@test-centos7-node3 php-fpm]#
说明:php-fpm错误日志提示我们说/var/www/html/log/config.php的第86行语法错误
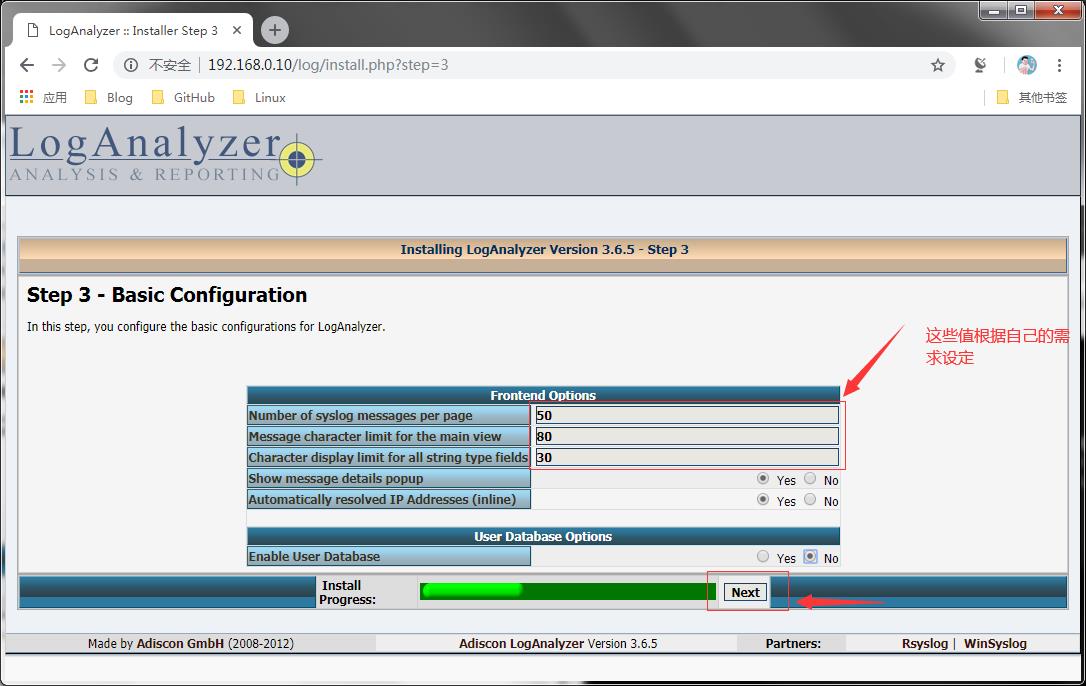
提示:前三个值是我们设置安装loganalyzer的第三步,它这里没有写进来,我们需要手动填一下即可
提示:修改好后,我们在用浏览器访问下192.168.0.10/log看看问题解决没有
提示:还是告诉我们错误500,我们再来看看php-fpm的错误日志,看看它提示我们那里错了

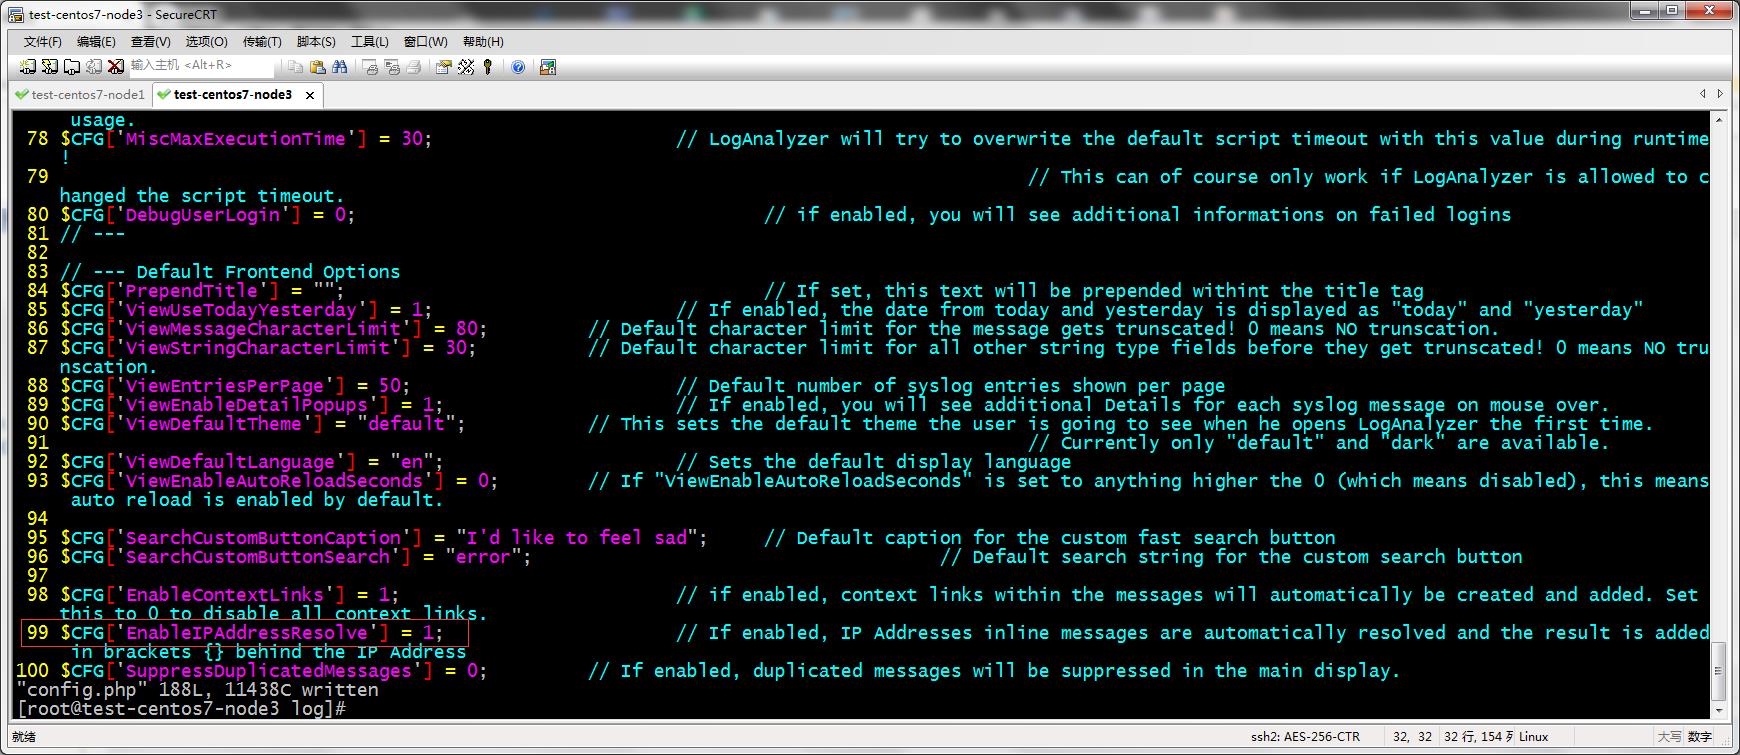
提示:它又告诉我们99行有错误,我们去看看呢
提示:这个错误和上面一样,没有给值,我们可以从后面的解释看看,这个表示什么;它说如果启用,将自动解析IP地址内联消息,并将结果添加到IP后面的括号{}中;那说明这选项要么启动,要么关闭,那我们就填一个1启用嘛
提示:我们改完配置文件后,保存在用浏览器访问192.168.0.10/log看看现在是否可以访问了

提示:可以看到是可以访问了,我们看到我们访问httpd的日志都有记录,并显示在我们搭建的loganalyzer上面
我们点击statistics可能没有图标展示,这是因为我们的服务器上没有安装php-gd这个包,安装好了,重启php-fpm后,在刷新就有了
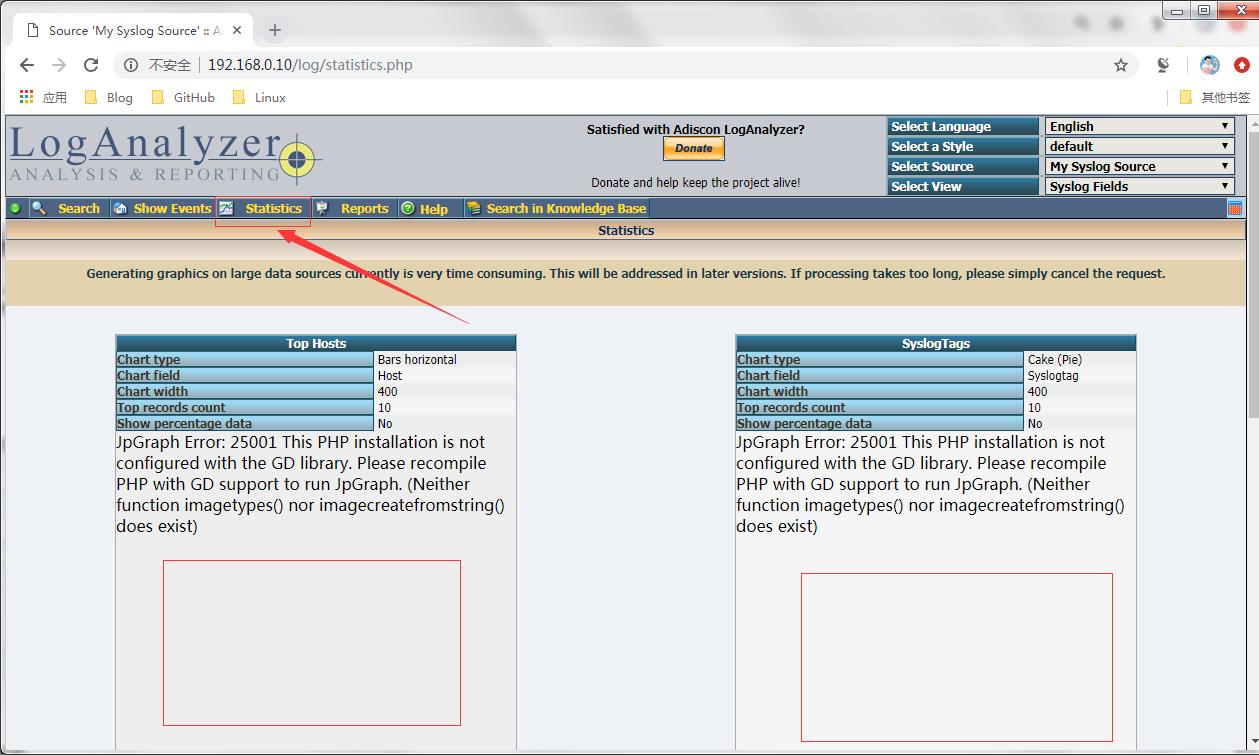
[root@test-centos7-node3 log]# yum install php-gd -y
[root@test-centos7-node3 log]# systemctl restart php-fpm
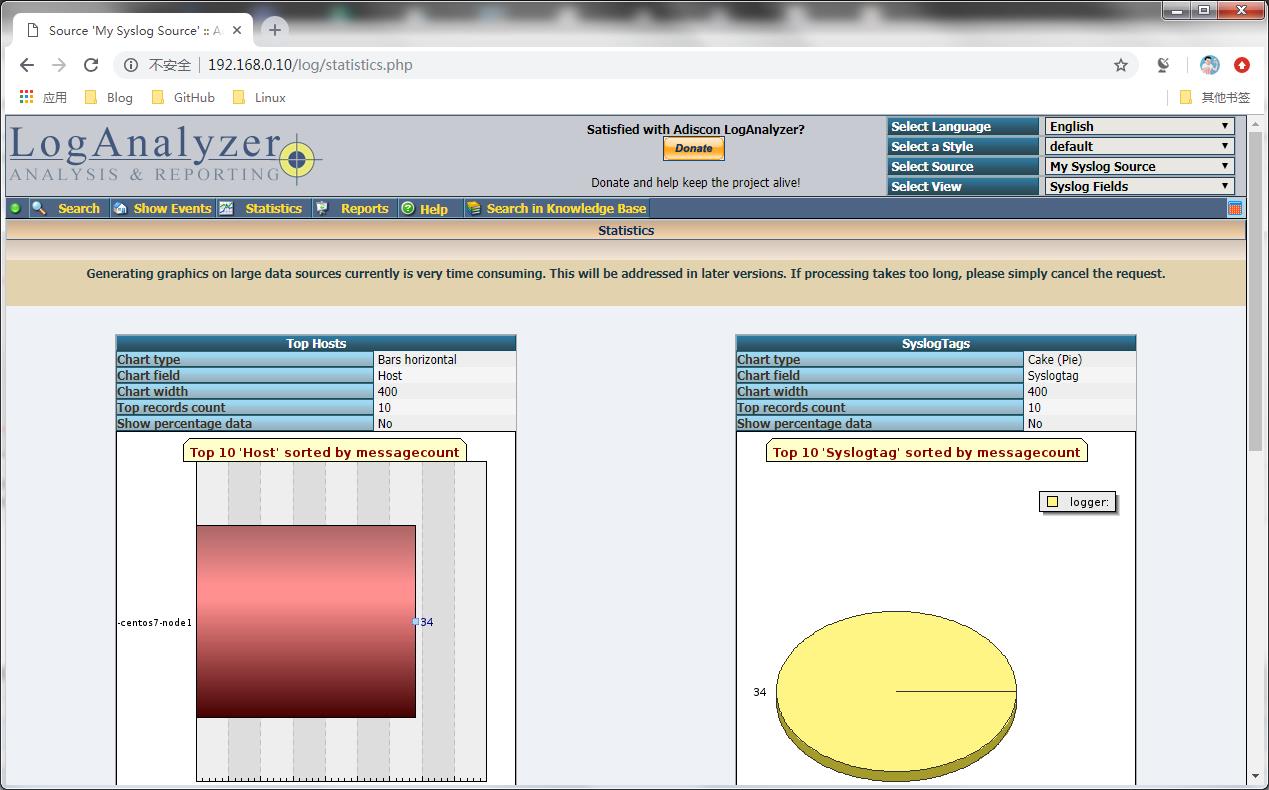
提示:我们才搭建好数据量很少,所以看到画的图也不是很好。我们可以把其他主机的日志也接入到数据库中,当数据量比较大时,我们看统计图就可以看到那个主机的日志占比等等信息。如下

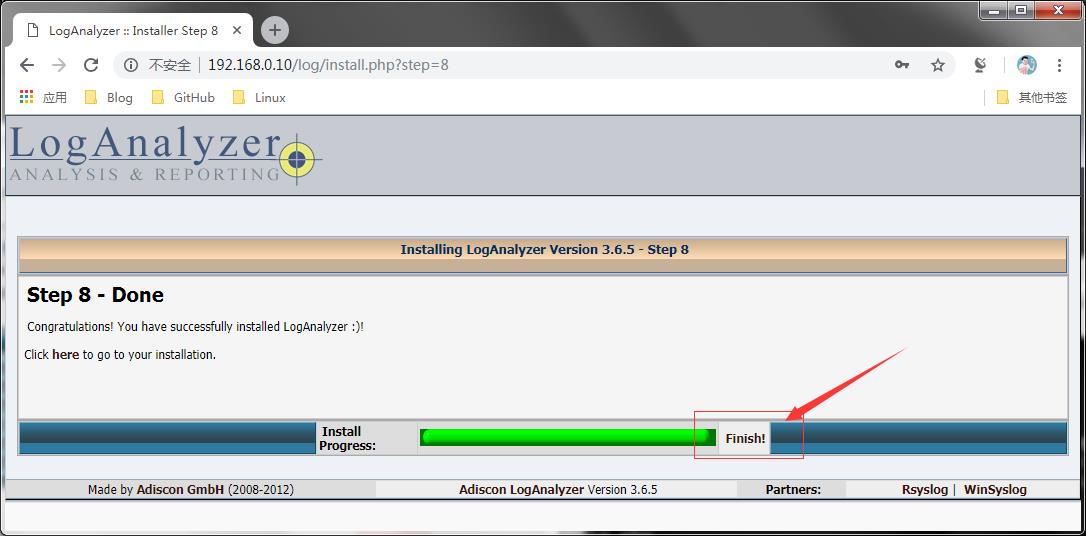
到此我们就把httpd的访问日志用rsyslog给收集到数据库中,然后通过loganalyzer 给图形化展示出来了。
以上是关于如何在linux上面安装mariadb总结的主要内容,如果未能解决你的问题,请参考以下文章