JetpackLiveData 架构组件 ( LiveData 简介 | LiveData 使用方法 | ViewModel + LiveData 示例 )
Posted 韩曙亮
tags:
篇首语:本文由小常识网(cha138.com)小编为大家整理,主要介绍了JetpackLiveData 架构组件 ( LiveData 简介 | LiveData 使用方法 | ViewModel + LiveData 示例 )相关的知识,希望对你有一定的参考价值。
文章目录
一、LiveData 简介
在 视图 View 与 数据模型 Model 通过 ViewModel 架构组件 进行绑定后 , 可以立即 将 ViewModel 中的数据设置到 UI 界面中 ,
运行过程中 , 在 UI 界面中 , 可以 修改 ViewModel 中的值 , 并 将新的值设置在 视图 View 中 ;
但是 , 如果 数据是在 ViewModel 中发生的改变 , 那么如何 通知 UI 来进行 视图 View 的更新 操作呢 ?
这里引入 LiveData 架构组件 , 在 ViewModel 中 , 可以 通过 LiveData 将数据修改的信息发送给 视图 View , 通知 UI 界面进行修改 ;

场景举例 : 在 ViewModel 中申请 HTTP 服务器数据 , 请求发送后 , 不知道什么时候才能获得响应 , 如果 过一段时间服务器才反馈响应数据 , 此时只能 通过 LiveData 将 ViewModel 的数据修改通知给 视图 View ;
二、LiveData 使用方法
首先 , 在 ViewModel 视图模型 中定义 LiveData 数据 , 如 MutableLiveData<T> ,
class MyViewModel: ViewModel
    var second: MutableLiveData<Int> = MutableLiveData<Int>()

    constructor()
        second.value = 0
在该类中提供了 postValue 和 setValue 两个函数 ,
- 在 UI 主线程 中调用
setValue函数 , - 在 非 UI 线程的子线程 中调用
postValue函数 更新数据 ;
public class MutableLiveData<T> extends LiveData<T>
    @Override
    public void postValue(T value)
    @Override
    public void setValue(T value)
然后 , 在 Activity 组件中 , 调用 LiveData#observe 函数 , 添加数据变化监听器 androidx.lifecycle.Observer<T> , 一旦 LiveData 数据发生了改变 , 就会 回调 Observer 监听器中的 onChanged 函数 ;
// 设置 LiveData 监听
myViewModel.second.observe(this, object : androidx.lifecycle.Observer<Int>
    override fun onChanged(t: Int?)
        // 将 ViewModel 中的数据设置到 视图 View 组件中
        textView.setText("$myViewModel.second.value")

)
三、ViewModel + LiveData 简单示例
设置一个定时器 , 定时更新数据 , 在 ViewModel 中数据发生了改变 , 需要 主动通知 视图 View 进行修改 ;
使用 传统的开发方式 , 可以使用 线程通信 , Handler 或者 广播 等形式 , 在子线程中通知主线程更新 UI ;
使用 LiveData 后 , 将数据定义在 LiveData 中 , 然后在 Activity 中 为 LiveData 添加 Observer 监听器 , 当 LiveData 数据发生改变时 , 会自动回调该监听器的 onChange 方法 ;
1、ViewModel + LiveData 代码
自定义 ViewModel 子类继承 ViewModel , 在 ViewModel 中 , 定义 LiveData 类型的数据 , 此处选择使用 MutableLiveData<Int> 数据类型 , 维护一个 Int 类型的数据 , 当该 Int 值发生改变时 , 会触发 LiveData 设置的 Observer 监听器 ;
package kim.hsl.livedatademo

import androidx.lifecycle.MutableLiveData
import androidx.lifecycle.ViewModel

class MyViewModel: ViewModel
    var second: MutableLiveData<Int> = MutableLiveData<Int>()

    constructor()
        second.value = 0
2、Activity 组件代码
在 Activity 系统组件中 , 绑定 ViewModel , 从 ViewModel 中获取 LiveData 显示到 UI 界面中 , 并为该 LiveData 设置 Observer 监听器 , 监听 LiveData 的数据变化 ;
启动 Timer 定时器 , 修改 ViewModel 中的 LiveData 数据 , 在 LiveData 数据发生改变时 , 会自动回调 Observer 监听器的 onChanged 函数 ;
package kim.hsl.livedatademo

import androidx.appcompat.app.AppCompatActivity
import android.os.Bundle
import android.widget.TextView
import androidx.lifecycle.ViewModelProvider
import java.util.*

class MainActivity : AppCompatActivity()

    lateinit var textView: TextView
    lateinit var myViewModel: MyViewModel

    override fun onCreate(savedInstanceState: Bundle?)
        super.onCreate(savedInstanceState)
        setContentView(R.layout.activity_main)

        // 获取 视图 View 组件
        textView = findViewById(R.id.textView)

        // 获取 ViewModel
        myViewModel = ViewModelProvider(this,
            ViewModelProvider.AndroidViewModelFactory(application))
            .get(MyViewModel::class.java)

        // 将 ViewModel 中的数据设置到 视图 View 组件中
        textView.setText("$myViewModel.second.value")

        // 设置 LiveData 监听
        myViewModel.second.observe(this, object : androidx.lifecycle.Observer<Int>
            override fun onChanged(t: Int?)
                // 将 ViewModel 中的数据设置到 视图 View 组件中
                textView.setText("$myViewModel.second.value")

        )

        // 启动定时器, 将 ViewModel 中的数据自增
        startTimer()


    fun startTimer()
        Timer().schedule(object : TimerTask()
            override fun run()
                // 获取 ViewModel 中的数据
                var second: Int? = myViewModel.second.value

                // 将 ViewModel 中的数据自增 1
                myViewModel.second.postValue(second?.plus(1))

        , 1000, 1000)
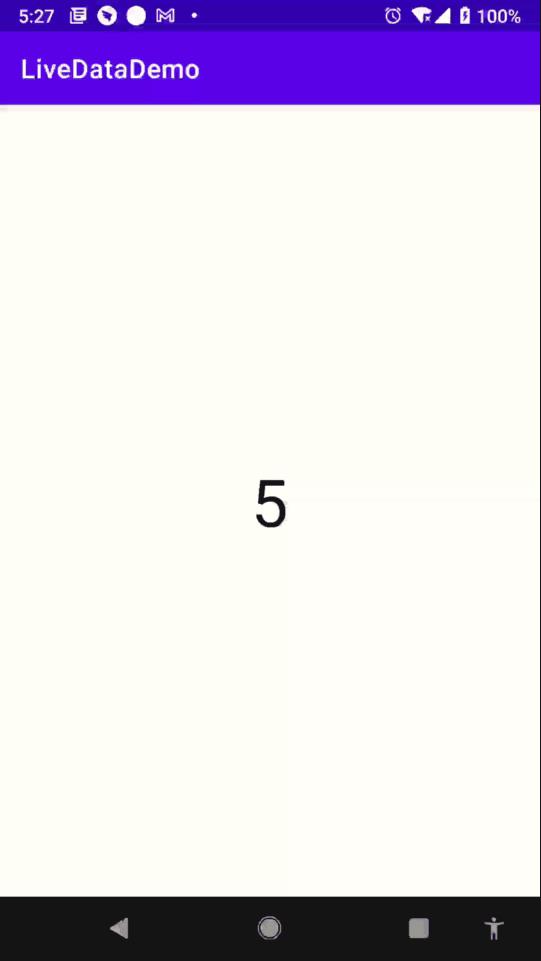
3、运行效果展示
应用启动后 , 在界面中启动定时器 , 对 ViewModel 中的 LiveData 数据进行累加 , LiveData 设置了 Observer 监听 , 数据改变时回调 Observer#onChanged 函数更新 UI 显示 ;
执行时切换屏幕方向 , 不影响数据累加显示 ;
四、ViewModel + LiveData + Fragment 通信示例
在 Activity 系统组件中 设置两个 Fragment , 两个 Fragment 之间通过 ViewModel + LiveData 进行通信 ;
在其中一个 Fragment 中设置 SeekBar 拖动条 , 将数值设置到另外一个 Fragment 中的 TextView 中显示 ;
1、ViewModel + LiveData 代码
自定义 ViewModel 子类继承 ViewModel , 在 ViewModel 中 , 定义 LiveData 类型的数据 , 此处选择使用 MutableLiveData<Int> 数据类型 , 维护一个 Int 类型的数据 , 当该 Int 值发生改变时 , 会触发 LiveData 设置的 Observer 监听器 ;
package kim.hsl.livedatademo

import androidx.lifecycle.MutableLiveData
import androidx.lifecycle.ViewModel

class MyViewModel: ViewModel
    var progress: MutableLiveData<Int> = MutableLiveData<Int>()

    constructor()
        progress.value = 0
2、Activity 组件代码
在该 Activity 组件中 , 维护了两个 Fragment , 两个 Fragment 之间借助 ViewModel + LiveData 进行通信 ;
Activity 代码
package kim.hsl.livedatademo

import android.os.Bundle
import androidx.appcompat.app.AppCompatActivity

class MainActivity : AppCompatActivity()
    override fun onCreate(savedInstanceState: Bundle?)
        super.onCreate(savedInstanceState)
        setContentView(R.layout.activity_main)
布局文件
在 Activity 中设置了两个 Fragment , 它们之间借助 ViewModel + LiveData 进行通信 ;
<?xml version="1.0" encoding="utf-8"?>
<androidx.constraintlayout.widget.ConstraintLayout xmlns:android="http://schemas.android.com/apk/res/android"
    xmlns:app="http://schemas.android.com/apk/res-auto"
    xmlns:tools="http://schemas.android.com/tools"
    android:layout_width="match_parent"
    android:layout_height="match_parent"
    tools:context=".MainActivity">

    <androidx.constraintlayout.widget.Guideline
        android:id="@+id/guideline"
        android:layout_width="wrap_content"
        android:layout_height="wrap_content"
        android:orientation="horizontal"
        app:layout_constraintGuide_percent="0.5" />

    <androidx.fragment.app.FragmentContainerView
        android:id="@+id/fragmentContainerView1"
        android:name="kim.hsl.livedatademo.Fragment1"
        android:layout_width="0dp"
        android:layout_height="0dp"
        app:layout_constraintBottom_toTopOf="@+id/guideline"
        app:layout_constraintEnd_toEndOf="parent"
        app:layout_constraintStart_toStartOf="parent"
        app:layout_constraintTop_toTopOf="parent" />

    <androidx.fragment.app.FragmentContainerView
        android:id="@+id/fragmentContainerView2"
        android:name="kim.hsl.livedatademo.Fragment2"
        android:layout_width="0dp"
        android:layout_height="0dp"
        app:layout_constraintBottom_toBottomOf="parent"
        app:layout_constraintEnd_toEndOf="parent"
        app:layout_constraintStart_toStartOf="parent"
        app:layout_constraintTop_toTopOf="@+id/guideline" />

</androidx.constraintlayout.widget.ConstraintLayout>
3、Fragment 代码
在该 Activity 组件中 , 维护了两个 Fragment , 两个 Fragment 之间借助 ViewModel + LiveData 进行通信 ;
第一个 Fragment 代码
先将 ViewModel 中的 LiveData 数据中的 进度值设置给 SeekBar ,
目的是为了在屏幕旋转时 , 可随时恢复数据 ;
在 SeekBar 的拖动数据中 , 修改 ViewModel 中的 LiveData 数据 ,
当数据修改时 , 对应的 Fragment2 中的 TextView 会刷新显示新的数据 ;
package kim.hsl.livedatademo

import android.os.Bundle
import android.view.LayoutInflater
import android.view.View
import android.view.ViewGroup
import android.widget.SeekBar
import android.widget.SeekBar.OnSeekBarChangeListener
import androidx.fragment.app.Fragment
import androidx.lifecycle.ViewModelProvider

class Fragment1: Fragment()
    override fun onCreateView(
        inflater: LayoutInflater,
        container: ViewGroup?,
        savedInstanceState: Bundle?
    ): View?
        // 设置布局
        val root: View = inflater.inflate(R.layout.fragment1, container, false)

        // 获取拖动条
        var seekBar: SeekBar = root.findViewById(R.id.seekBar)

        // 获取 ViewModel
        var viewModel: MyViewModel = ViewModelProvider(requireActivity(),
            ViewModelProvider.AndroidViewModelFactory(requireActivity().application))
            .get(MyViewModel::class.java)

        seekBar.progress = viewModel.progress.value!!

        // 设置进度条拖动事件
        seekBar.setOnSeekBarChangeListener(object : OnSeekBarChangeListener
            override fun onProgressChanged(seekBar: SeekBar, progress: Int, fromUser: Boolean)
                viewModel.progress.value = progress


            override fun onStartTrackingTouch(seekBar: SeekBar)


            override fun onStopTrackingTouch(seekBar: SeekBar)


        )

        return root
第一个 Fragment 布局文件
Fragment1 中维护了一个 SeekBar 拖动条组件 ;
<?xml version="1.0" encoding="utf-8"?>
<androidx.constraintlayout.widget.ConstraintLayout
    xmlns:android="http://schemas.android.com/apk/res/android"
    xmlns:app="http://schemas.android.com/apk/res-auto"
    xmlns:tools="http://schemas.android.com/tools"
    android:layout_width="match_parent"
    android:layout_height="match_parent"
    tools:context=".MainActivity">

    <SeekBar
        android:id="@+id/seekBar"
        android:layout_width="0dp"
        android:layout_height="wrap_content"
        android:max="100"
        android:min="0"
        app:layout_constraintBottom_toBottomOf="parent"
        app:layout_constraintEnd_toEndOf="parent"
        app:layout_constraintStart_toStartOf="parent"
        app:layout_constraintTop_toTopOf="parent" />

</androidx.constraintlayout.widget.ConstraintLayout>
第二个 Fragment 代码
在 Fragment2 中 , 只放了一个 TextView 组件 , 该组件显示的是 ViewModel 中的 LiveData 数据 , 当该 LiveData 数据发生改变时 , 对应 TextView 显示也随之更新 ;
package kim.hsl.livedatademo

import android.os.Bundle
import android.view.LayoutInflater
import android.view.View
import android.view.ViewGroup
import android.widget.TextView
import androidx.fragment.app.Fragment
import androidx.lifecycle.ViewModelProvider

class Fragment2: Fragment()
    override fun onCreateView(
        inflater: LayoutInflater,
        container: ViewGroup?,
        savedInstanceState: Bundle?
    ): View?
        // 设置布局
        val root: View = inflater.inflate(R.layout.fragment2, container, false)

        // 获取文本组件
        val textView: TextView = root.findViewById(R.id.textView)

        // 获取 ViewModel
        var viewModel: MyViewModel = ViewModelProvider(requireActivity(),
            ViewModelProvider.AndroidViewModelFactory(requireActivity().application))
            .get(MyViewModel::class.java)

        // 设置文本显示内容
        textView.setText("$viewModel.progress.value")

        // 设置 LiveData 监听
        viewModel.progress.observe(requireActivity(), object : androidx.lifecycle.Observer<Int>
            override fun onChanged(t: Int)
                textView.setText("$viewModel.progress.value")

        )

        return root
第二个 Fragment 布局文件
Fragment2 中维护了 TextView 组件 ;
<?xml version="1.0" encoding="utf-8"?>
<androidx.constraintlayout.widget.ConstraintLayout
    xmlns:android="http://schemas.android.com/apk/res/android"
    xmlns:app="http://schemas.android.com/apk/res-auto"
    xmlns:tools="http://schemas.android.com/tools"
    android:layout_width="match_parent"
    android:layout_height="match_parent"
    tools:context=".MainActivity">

    <TextView
        android:id="@+id/textView"
        android:layout_width="wrap_content"
        android:layout_height="wrap_content"
        android:text="0"
        android:textSize="50sp"
        android:textColor="@color/black"
        app:layout_constraintBottom_toBottomOf="parent"
        app:layout_constraintEnd_toEndOf="parent"
        app:layout_constraintStart_toStartOf="parent"
        app:layout_constraintTop_toTopOf="parent" />

</androidx.constraintlayout.widget.ConstraintLayout>
4、运行效果展示
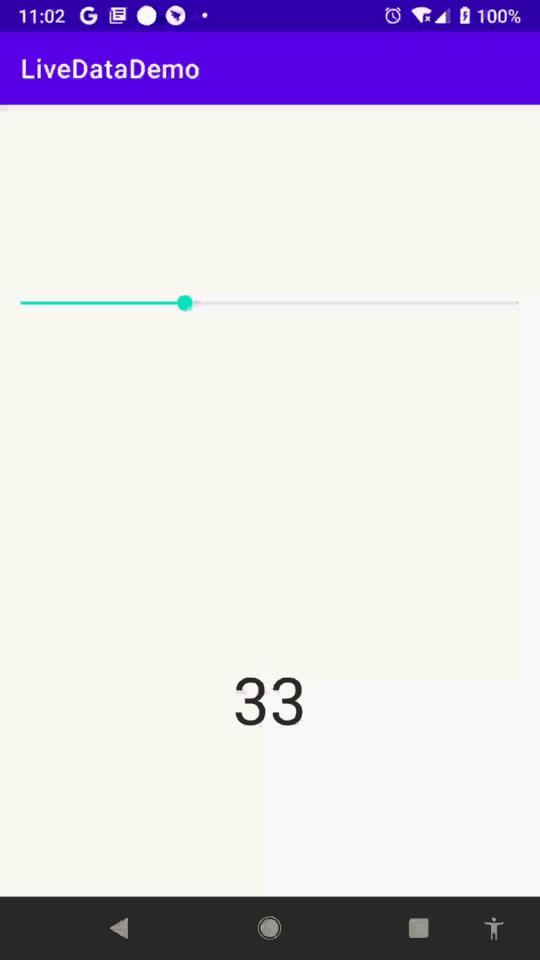
拖动 Fragment1 中的进度条 , 将进度条的进度 在 Fragment2 中的 TextView 中显示 , 并且横竖屏切换时 , 数据没有丢失 ;
博客代码 :
Android JetpackLiveData 组件原理剖析
Jetpack 源码分析系列:
- Android Jetpack(一)Lifecycle 组件原理剖析
- Android Jetpack(二)ViewModel 组件原理剖析
- Android Jetpack(三)LiveData 组件原理剖析
本文主要内容:
- LiveData 简介
- LiveData 案例
- LiveData 原理分析
- Retrofit 整合 LiveData
LiveData 简介
前面我们介绍了 Jetpack 中的 Lifecycle 和 ViewModel 组件,今天我们来看下 Jetpack 中的 LiveData 组件的使用及原理分析。
根据官方文档对 LiveData 的介绍,LiveData 主要由如下几个特点:
- LiveData 是一个数据的持有者,是一个可以被观察的类(Observable)。
- LiveData 能够感知 Activity、Fragment、Service 组件的生命周期,能够保证在组件在活跃(active)的状态下被更新
LiveData 能够感知组件的生命周期,那么它肯定依赖 Lifecycle 这个组件的,关于 Lifecycle 组件已经在前面分析过了:《Android Jetpack(一) Lifecycle 组件原理剖析》。
一般 LiveData 放在 ViewModel 中使用,关于 ViewModel 组件也在前面分析过了:《Android Jetpack(二)ViewModel 组件原理剖析》。
理解 Lifecycle 是理解 LiveData 工作原理的的前提。
下面我们通过一个简单的案例来认识下 LiveData,然后借助这个案例对 LiveData 的工作机制做一个分析。
LiveData 案例
Demo 的效果还是和介绍 ViewModel 的时候一样的:
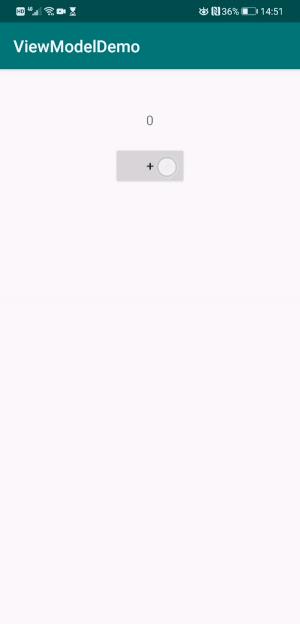
只不过实现的方式有一些细微的差别,完整的代码如下所示:
LiveDataDemoActivity.kt
class LiveDataDemoActivity : BaseActivity()

    private lateinit var myViewModel: LiveDataViewModel

    override fun onCreate(savedInstanceState: Bundle?)
        super.onCreate(savedInstanceState)
        setContentView(R.layout.activity_viewmodel_demo_layout)

        myViewModel = ViewModelProvider(this).get(LiveDataViewModel::class.java)

        myViewModel.liveData.observe(this, Observer<Int>
            text_number.text = "$it"
        )

        btn_plus.setOnClickListener
            myViewModel.plus(1)
LiveDataViewModel.kt
class LiveDataViewModel : ViewModel()

    val liveData: MutableLiveData<Int> by lazy
        MutableLiveData<Int>().apply
            value = 0


    fun plus(num: Int)
        liveData.value = liveData.value?.plus(num)
上面的实现方式和介绍 ViewModel 时的案例区别在于,数据不直接放在 ViewModel 中,而是放在 LiveData 中,然后 ViewModel 持有这个 LiveData
在界面中调用 liveData.observer 来监听数据的变化,就这么简单,不需要在生命周期方法中做任何特殊处理,LiveData 只会在组件被激活的状态下(start、resume)通知 Observer。
下面我们就来分析下 LiveData 的工作原理。
LiveData 原理分析
看完上面的效果图和对应的实现代码,读者可能有些疑问,例如在 configuration changes 的时候界面上为什么能够展示上次的数据,我们并没有在 onCreate 方法中直接为控件设置数据,而是在 liveData.observe 方法的回调中为控件设置数据的。那说明应该是在某个生命周期触发了这个 observer 回调的,由此可见有两种方式来触发 observer 回调:一个是在生命周期方法触发的时候自动触发;一个是手动调用 liveData.setValue 方式触发。
在上面的案例中我们在 ViewModel 中持有了 LiveData,那么在 configuration changes 界面重建的时候获取到的 ViewModel 对象是同一个,这个已经在前面介绍了过了,在这里就不赘述了。既然 ViewModel 是同一个,那么里面的 LiveData 对象也是同一个。
然后我们来看下上面调用的 livedata.observer 方法:
public abstract class LiveData<T>

    // 省略其他代码...

    @MainThread
    public void observe(@NonNull LifecycleOwner owner, @NonNull Observer<? super T> observer)
        assertMainThread("observe");
        if (owner.getLifecycle().getCurrentState() == DESTROYED)
            // ignore
            return;

        // 将 owner 和 observer 组装成新的对象 LifecycleBoundObserver
        LifecycleBoundObserver wrapper = new LifecycleBoundObserver(owner, observer);

        ObserverWrapper existing = mObservers.putIfAbsent(observer, wrapper);

        // 如果容器中已经存在,并且和 owner 绑定过,则抛出异常
        if (existing != null && !existing.isAttachedTo(owner))
            throw new IllegalArgumentException("Cannot add the same observer"
                    + " with different lifecycles");

        if (existing != null)
            return;

        owner.getLifecycle().addObserver(wrapper);
上面最关键的一行代码为:
owner.getLifecycle().addObserver(wrapper);
这段代码很熟悉,这不就是我们介绍 Lifecycle 源码的时候介绍的吗,在这里我就不赘述了,不了解了 Lifecycle 的可以查看之前的文章。
简而言之就是将观察者放进容器中,然后在生命周期触发的时候调用里面的 observer 回调。
那么就上面的案例中的 observer :
来说不就会被调用很多次(onCreate,onStart,onResume)吗?事实上只会在 onStart 的时候调用一次:
myViewModel.liveData.observe(this, Observer<Int>
    text_number.text = "$it"
)
从上面的 observe 方法源码中我们知道,该方法会将 owner 和 observer 组装成新的对象 LifecycleBoundObserver,然后放进容器中。
我们来看下 LifecycleBoundObserver:
class LifecycleBoundObserver extends ObserverWrapper implements LifecycleEventObserver
    @NonNull
    final LifecycleOwner mOwner;

    LifecycleBoundObserver(@NonNull LifecycleOwner owner, Observer<? super T> observer)
        super(observer);
        mOwner = owner;


    @Override
    boolean shouldBeActive()
        return mOwner.getLifecycle().getCurrentState().isAtLeast(STARTED);


    @Override
    public void onStateChanged(@NonNull LifecycleOwner source,
            @NonNull Lifecycle.Event event)
        // 如果当前的状态为 DESTROYED ,则从容器中移除 observer
        if (mOwner.getLifecycle().getCurrentState() == DESTROYED)
            removeObserver(mObserver);
            return;

        // 当前状态为 START 才会通知 observer
        activeStateChanged(shouldBeActive());


    @Override
    boolean isAttachedTo(LifecycleOwner owner)
        return mOwner == owner;


    @Override
    void detachObserver()
        mOwner.getLifecycle().removeObserver(this);
LifecycleBoundObserver 继承自 ObserverWrapper:
private abstract class ObserverWrapper
    final Observer<? super T> mObserver;
    boolean mActive;
    int mLastVersion = START_VERSION;

    ObserverWrapper(Observer<? super T> observer)
        mObserver = observer;


    abstract boolean shouldBeActive();

    boolean isAttachedTo(LifecycleOwner owner)
        return false;


    void detachObserver()


    void activeStateChanged(boolean newActive)
        // 如果当前的状态和 newActive 一样则跳过
        // 都是 false 或者都是 true
        // 例如在 onCreate(都是false)、onResume(都是true)都会跳过
        if (newActive == mActive)
            return;

        // immediately set active state, so we'd never dispatch anything to inactive
        // owner
        mActive = newActive;
        boolean wasInactive = LiveData.this.mActiveCount == 0;
        LiveData.this.mActiveCount += mActive ? 1 : -1;
        if (wasInactive && mActive)
            onActive();

        if (LiveData.this.mActiveCount == 0 && !mActive)
            onInactive();

        if (mActive)
            // 真正的通知 observer
            dispatchingValue(this);
上面的代码有两个重要的方法:shouldBeActive、activeStateChanged
尽然是依赖 Lifecycle 组件,那么当触发生命周期的时候,肯定会触发里面的 Observer,LiveData 为了避免 Observer 被通知多次,通过 shouldBeActive 方法来判断是否应该被通知。所以在 START 状态会被通知,那么 RESUME 是不是也会通知呢,它也是 active 状态,其实不会,应该 LiveData 里面会有变量记录当前的是否为激活状态,如果该变量和 shouldBeActive 放回的值一样则 return:
void activeStateChanged(boolean newActive)
    // 如果当前的状态和 newActive 一样则跳过
    // 都是 false 或者都是 true
    // 例如在 onCreate(都是false)、onResume(都是true)都会跳过
    if (newActive == mActive)
        return;


    // 省略其他代码
因为在 START 状态的时候已经将 mActive 变量设置为 true 了,当 RESUME 的时候 newActive 也是 true ,所以直接 return。
了解完了 Observer 的触发时机,我们看下最终的触发 Observer 回调的方法:
void dispatchingValue(@Nullable ObserverWrapper initiator)
    // 如果当前正在分发数据,则 return
    if (mDispatchingValue)
        mDispatchInvalidated = true;
        return;

    mDispatchingValue = true;
    do
        mDispatchInvalidated = false;
        // 如果 initiator 不为空,则考虑通知 observer
        if (initiator != null)
            considerNotify(initiator);
            initiator = null;
         else
            // 如果 initiator 为空,则遍历整个 observer 集合
            for (Iterator<Map.Entry<Observer<? super T>, ObserverWrapper>> iterator =
                    mObservers.iteratorWithAdditions(); iterator.hasNext(); )
                considerNotify(iterator.next().getValue());
                if (mDispatchInvalidated)
                    break;


     while (mDispatchInvalidated);
    mDispatchingValue = false;


private void considerNotify(ObserverWrapper observer)
    // 如果为未激活状态
    if (!observer.mActive)
        return;

    // Check latest state b4 dispatch. Maybe it changed state but we didn't get the event yet.
    //
    // we still first check observer.active to keep it as the entrance for events. So even if
    // the observer moved to an active state, if we've not received that event, we better not
    // notify for a more predictable notification order.
    if (!observer.shouldBeActive())
        observer.activeStateChanged(false);
        return;

    if (observer.mLastVersion >= mVersion)
        return;

    observer.mLastVersion = mVersion;

    // 将 LiveData 持有的数据回传给 observer
    observer.mObserver.onChanged((T) mData);
至此,我们就将 LiveData 组件的原理介绍完毕了,其实也挺简单的,当然我们是基于理解了 Lifecycle 和 ViewModel 的前提之下的。希望对你有帮助。
Retrofit 整合 LiveData
上面的案例我们只是简单的把数据写死在 LiveData 中,并没有从本地或者服务器获取数据。在实际的开发中一般是 LiveData 操作 Repository。
在这里我们使用 Retrofit 来作为网络请求库。Retrofit 官方没有推出整合 LiveData 的依赖,需要我们自定义 CallAdapter:
class LiveDataCallAdapterFactory : CallAdapter.Factory()

    override fun get(returnType: Type, annotations: Array<out Annotation>?, retrofit: Retrofit?): CallAdapter<*, *>?


        if (getRawType(returnType) != LiveData::class.java)
            return null


        check(returnType is ParameterizedType)
             "LiveData must have generic type (e.g., LiveData<ResponseBody>)"


        val type = getParameterUpperBound(0, returnType)

        return LiveDataCallAdapter<Any>(type)


    class LiveDataCallAdapter<R>(private var type: Type) : CallAdapter<R, LiveData<R>>
        override fun adapt(call: Call<R>): LiveData<R>
            return object : LiveData<R>()

                val flag = AtomicBoolean(false)

                override fun onActive()
                    super.onActive()
                    if (flag.compareAndSet(false, true))
                        call.enqueue(object : Callback<R>
                            override fun onFailure(call: Call<R>?, t: Throwable?)
                                t?.printStackTrace()
                                postValue(null)


                            override fun onResponse(call: Call<R>?, response: Response<R>?)
                                postValue(response?.body())

                        )


        override fun responseType(): Type
            return type
然后在 ViewModel 中使用:
class GithubViewModel : ViewModel()

    private val retrofit: Retrofit = Retrofit.Builder()
            .baseUrl("https://api.github.com")
            // 添加自定义的 CallAdapterFactory
            .addCallAdapterFactory(LiveDataCallAdapterFactory())
            .addConverterFactory(GsonConverterFactory.create())
            .build()


    private var githubService: Github = retrofit.create(Github::class.java)

    fun getContributors(owner: String?, repo: String?): LiveData<List<Contributor?>?>?
        return githubService.contributors(owner, repo)
最后在 Activity 中监听 ViewModel 数据的变化:
class RetrofitLiveDataDemoActivity : BaseActivity()
private val myViewModel: GithubViewModel by viewModels
GithubViewModelFactory()
override fun onCreate(savedInstanceState: Bundle?)
super.onCreate(savedInstanceState)
setContentView(R.layout.activity_retrofit_livedata_layout)
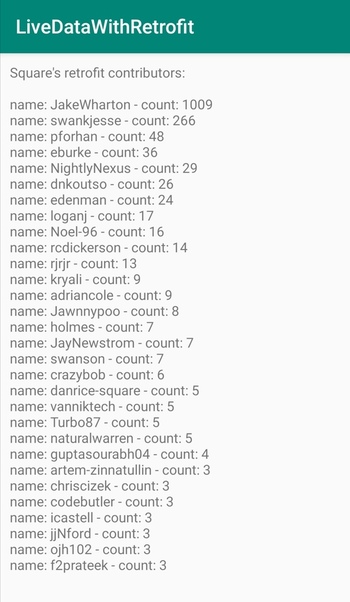
text_log.text = "Square's retrofit contributors:\\n"
myViewModel.getContributors("square", "retrofit")?.observe(this, Observer
it?.forEach contributor: Contributor? ->
text_log.append("\\nname: $contributor?.login - count: $contributor?.contributions")
)
程序运行如下图所示:
小结
本文详细为大家介绍了 Jetpack LiveData 组件使用及原理分析,最后通过自定义 CallAdapter 整合了 Retrofit 和 ViewModel。
另外本文涉及到的代码都在我的 AndroidAll GitHub 仓库中。该仓库除了 Jetpack,还有 Android 程序员需要掌握的技术栈,如:程序架构、设计模式、性能优化、数据结构算法、Kotlin、Flutter、NDK,以及常用开源框架 Router、RxJava、Glide、LeakCanary、Dagger2、Retrofit、OkHttp、ButterKnife、Router 的原理分析 等,持续更新,欢迎 star。
以上是关于JetpackLiveData 架构组件 ( LiveData 简介 | LiveData 使用方法 | ViewModel + LiveData 示例 )的主要内容,如果未能解决你的问题,请参考以下文章