centos上nginx的安装
Posted leskang
tags:
篇首语:本文由小常识网(cha138.com)小编为大家整理,主要介绍了centos上nginx的安装相关的知识,希望对你有一定的参考价值。
安装步骤:
1、下载nginx,执行:wget http://nginx.org/download/nginx-1.10.2.tar.gz
2、解压,执行:tar vxzf nginx-1.10.2.tar.gz
3、安装,切换到nginx解压目录下,执行:./configure --prefix=/usr/local/nginx
遇到问题:
执行时报错:
checking for C compiler ... not found
./configure: error: C compiler cc is not found
原因:缺少编译环境
解决:
安装gcc,执行:yum install gcc
4、继续执行:./configure --prefix=/usr/local/nginx
遇到问题:
./configure: error: the HTTP rewrite module requires the PCRE library.
You can either disable the module by using --without-http_rewrite_module
option, or install the PCRE library into the system, or build the PCRE library
statically from the source with nginx by using --with-pcre=<path> option.
原因:缺少rewrite模块,需要安装PCRE library(即正则表达式)
解决:
安装pcre library,执行:yum install pcre
安装完成后再安装pcre-devel(开发使用包):yum install pcre-devel
5、安装完成后再次执行./configure --prefix=/usr/local/nginx
6、安装,执行:make && make install
7、切换到/usr/local下发现有nginx目录,安装完成
8、继续切换到/usr/local/nginx下查看有目录为:
9、启动nginx,执行:./sbin/nginx
遇到问题:
启动过程中可能出现:nginx: [emerg] bind() to 0.0.0.0:80 failed (98: Address already in use)
原因:80端口被占用
解决:
执行:netstat -antp(或netstat -tunlp) 查看占用端口的程序,如:

杀掉进程即可,执行:kill -9 2985 //2985是进程号
10、再次启动,执行:./sbin/nginx 启动成功没有任何提示
访问:
安装成功后可通过虚拟机ip直接访问主机,正常情况会出现nginx欢迎页面,但是发现无法访问,windows下ping主机ip可以ping通,但是执行:telnet ip 端口 无法访问,说明可能是linux防火墙的问题
注:telnet打开方法:控制面板--->程序和功能--->打开或关闭windows功能--->勾选Telnet服务器及Telnet客户端两个选项,点击确定--->在windows窗口下执行telnet尝试即可
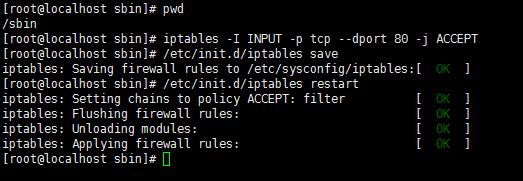
然后依次执行以下操作允许80端口的访问:
1、 /sbin/iptables -I INPUT -p tcp --dport 80 -j ACCEPT
2、/etc/init.d/iptables save
3、 /etc/init.d/iptables restart
操作具体反映如下:

至此,再次访问主机ip地址即可出现nginx欢迎页了,主机已可访问虚拟机的nginx服务。
以上是关于centos上nginx的安装的主要内容,如果未能解决你的问题,请参考以下文章