Java 网络编程之NIO
Posted 百事yyds
tags:
篇首语:本文由小常识网(cha138.com)小编为大家整理,主要介绍了Java 网络编程之NIO相关的知识,希望对你有一定的参考价值。
同步 VS 异步
同步
同步编程是指当程序执行某个操作时,它必须等待该操作完成才能继续执行下一个操作。这意味着程序在执行网络请求时必须等待网络请求完成才能继续执行下一步操作,因此同步编程通常会导致程序的性能降低。在网络编程中,同步编程通常用于处理较慢的网络请求,例如文件读写操作。
异步
异步编程是指将一个操作 (如网络请求) 放置在线程中,但并不阻塞该线程,而是在操作完成或者出现异常时再通知线程。这意味着线程可以在执行其他任务的同时处理网络请求,从而提高了程序的效率。在异步编程中,线程池可以帮助管理多个异步操作,从而避免线程的频繁创建和销毁。
阻塞
阻塞编程是指在处理网络请求时,如果网络请求无法完成,程序将无法继续执行其他操作,而是被迫等待网络请求完成。这意味着程序在执行网络请求时必须等待网络请求完成才能继续执行下一步操作,因此阻塞编程通常也会导致程序的性能降低。在网络编程中,阻塞编程通常用于处理固定的、快速的网络请求,例如 HTTP 请求。
非阻塞
非阻塞编程是指在处理网络请求时,等待网络请求完成之后再继续执行下一个操作,而不是在处理网络请求时阻塞线程。这可以提高程序的响应速度,但需要更多的内存和资源来支持长时间运行的网络请求。在非阻塞编程中,可以使用 poll、epoll 等事件驱动模型来管理网络请求。
异步 VS 非阻塞
异步编程和非阻塞编程的区别主要在于它们的执行方式。异步编程是将操作放置在线程中,但并不阻塞线程,而是在操作完成或者出现异常时再通知线程。非阻塞编程则是等待网络请求完成之后再继续执行下一个操作。因此,异步编程更加灵活,可以在处理网络请求的同时执行其他任务,而非阻塞编程则需要更多内存和资源来支持长时间运行的网络请求。
同步 VS 阻塞
同步和阻塞的区别主要在于它们的执行方式。同步编程必须等待操作完成才能继续执行下一个操作,而阻塞编程则是被迫等待操作完成才能继续执行下一个操作。因此,同步编程通常适用于处理较慢的网络请求,而阻塞编程通常适用于处理固定的、快速的网络请求。
举例说明(个人理解【如有错误请指出联系笔者感激不尽!!!!】)
比如我们把客人去饭店吃饭的事情举例
【网络请求】 客人(最多) 【处理请求】服务员(中)【读写操作】 厨师(最少)
同步阻塞:
m个客人来到饭店,n个服务员对应n个客人,(m-n)客人等待【阻塞】服务员处理完自己负责的客人,当服务员把客人点的菜单交给厨师时,此时服务员不能离开,而且客人也不能干自己事情【同步】,等待厨师做完饭,服务员上完菜,这时客人可以做自己事情,服务员接着服务剩下的客人。
同步非阻塞:
m个客人来到饭店,n个服务员对应n个客人,但是此时服务员把客人点的菜单交给厨师的做菜队列中,接着服务剩下的(m-n)客人【非阻塞】。而且此时客人也不能干自己事情【同步】,等待厨师做完饭,通知服务员上完菜,这时客人可以做自己事情,服务员接着服务剩下的客人。
异步阻塞:
m个客人来到饭店,n个服务员对应n个客人,(m-n)客人等待【阻塞】服务员处理完自己负责的客人,当服务员把客人点的菜单交给厨师时,此时服务员不能离开,但是客人可以离开饭店做自己事情【异步】,等待厨师做完饭,服务员上完菜,服务员通知客人可以吃饭,服务员接着服务剩下的客人。
异步非阻塞(AIO):
m个客人来到饭店,n个服务员对应n个客人,但是此时服务员把客人点的菜单交给厨师的做菜队列中,接着服务剩下的(m-n)客人【非阻塞】。点完菜的客人可以离开饭店做自己事情【异步】等待厨师做完饭,通知服务员上菜,服务员通知客人可以吃饭。
NIO的核心组成部分
Channel
可以翻译成“通道”。Channel和IO中的Stream(流)是差不多一个等级的。只不过Stream是单向的,譬如: InputStream, OutputStream.而Channel是双向的,既可以用来进行读操作,又可以用来进行写操作。
FileChannel、DatagramChannel、 SocketChannel 和 ServerSocketChannel IO UDP TCPBuffer
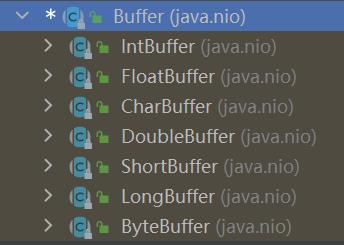
ByteBuffer, CharBuffer, DoubleBuffer, FloatBuffer, IntBuffer, LongBuffer, ShortBuffer,(对应) byte, char, double, float , int, long, shortSelector
Selector 运行单线程处理多个 Channel,如果你的应用打开了多个通道,但每个连接 的流量都很低,使用 Selector 就会很方便。例如在一个聊天服务器中。要使用 Selector, 得向 Selector 注册 Channel,然后调用它的 select()方法。这个方法会一直 阻塞到某个注册的通道有事件就绪。一旦这个方法返回,线程就可以处理这些事件, 事件的例子有如新的连接进来、数据接收等。
FileChannel
基本的读写操作
   public void readFile() throws Exception
        RandomAccessFile file = new RandomAccessFile("D:\\\\code\\\\JVMCODE\\\\a.txt", "r");
        FileChannel channel = file.getChannel();
        ByteBuffer buf = ByteBuffer.allocate(10);
        buf.clear();//相当于清空缓存
        int len = 0;//记录读入
        while((len = channel.read(buf)) != -1)
              buf.flip();//读写指针指到缓存头部
              while(buf.hasRemaining())
                  System.out.println((char) buf.get());

            System.out.println("进入下一个读操作");
              buf.clear();

        channel.close();
        file.close();


    @Test
    public void writeFile() throws Exception
        RandomAccessFile file = new RandomAccessFile("D:\\\\code\\\\JVMCODE\\\\a.txt", "rw");
        FileChannel channel = file.getChannel();
        ByteBuffer buf = ByteBuffer.allocate(40);
        buf.clear();//相当于清空缓存
        buf.put("你好世界".getBytes());
        buf.flip();//读写指针指到缓存头部
        while (buf.hasRemaining())
            channel.write(buf);
            System.out.println("进行下一次的写操作");

        channel.close();
        file.close();
FileChannel的常用方法
| 方法 | 描述 |
| int read(ByteBuffer dst) | 从Channel中读取数据到ByteBuffer |
| int read(ByteBufer[] dsts) | 将Channel中的数据“分散”到ByteBuffer[] |
| int write(ByteBuffer src) | 将ByteBuffer 中的数据写入Channel |
| long write(ByteBuffer[] srcs) | 将ByteBuffer[] 中的数据“聚集”到Channel |
| long position() | 返回此通道的文件位置 |
| FileChannel position(long p) | 设置此通道的文件位置 |
| long size() | 返回此通道的文件的当前大小 |
| FileChannel truncate(long s) | 将此通道的文件截取为给定大小 |
| void force(boolean metaData) | 强制将所有对此通道的文件更新写入到存储设备中 |
| transferTo(初始位,长度,目的通道) | 将数据从 FileChannel 传输到其他的 channel 中 |
| transferFrom(原通道,初始位,长度) | 将FileChannel数据从源通道传输到 FileChannel 中 |
SocketChannel
1 ) SocketChannel 就是 NIO 对于非阻塞 socket 操作的支持的组件,其在 socket 上 封装了一层,主要是支持了非阻塞的读写。同时改进了传统的单向流 API, , Channel 同时支持读写。 2)socket 通道类主要分为 DatagramChannel、SocketChannel 和 ServerSocketChannel,它们在被实例化时都会创建一个对等 socket 对象。要把一个 socket 通道置于非阻塞模式,我们要依靠所有 socket 通道类的公有超级类: SelectableChannel。就绪选择(readiness selection)是一种可以用来查询通道的 机制,该查询可以判断通道是否准备好执行一个目标操作,如读或写。非阻塞 I/O 和 可选择性是紧密相连的,那也正是管理阻塞模式的 API 代码要在 SelectableChannel 超级类中定义的原因。 3)设置或重新设置一个通道的阻塞模式是很简单的,只要调用 configureBlocking( ) 方法即可,传递参数值为 true 则设为阻塞模式,参数值为 false 值设为非阻塞模式。可以通过调用 isBlocking( )方法来判断某个 socket 通道当前处哪种模式。SocketChannel
Java NIO 中的 SocketChannel 是一个连接到 TCP 网络套接字的通道。 SocketChannel 是一种面向流连接 sockets 套接字的可选择通道。从这里可以看出: SocketChannel 是用来连接 Socket 套接字 SocketChannel 主要用途用来处理网络 I/O 的通道 SocketChannel 是基于 TCP 连接传输 SocketChannel 实现了可选择通道,可以被多路复用的 1)对于已经存在的 socket 不能创建 SocketChannel 2)SocketChannel 中提供的 open 接口创建的 Channel 并没有进行网络级联,需要使 用 connect 接口连接到指定地址 3)未进行连接的 SocketChannle 执行 I/O 操作时,会抛出 NotYetConnectedException 4)SocketChannel 支持两种 I/O 模式:阻塞式和非阻塞式 5)SocketChannel 支持异步关闭。如果 SocketChannel 在一个线程上 read 阻塞,另 一个线程对该 SocketChannel 调用 shutdownInput,则读阻塞的线程将返回-1 表示没有 读取任何数据;如果 SocketChannel 在一个线程上 write 阻塞,另一个线程对该 SocketChannel 调用 shutdownWrite,则写阻塞的线程将抛出 AsynchronousCloseException 6)SocketChannel 支持设定参数 SO_SNDBUF 套接字发送缓冲区大小 SO_RCVBUF 套接字接收缓冲区大小 SO_KEEPALIVE 保活连接 O_REUSEADDR 复用地址 SO_LINGER 有数据传输时延缓关闭 Channel (只有在非阻塞模式下有用) TCP_NODELAY 禁用 Nagle 算法使用的步骤
【1】 创建SocketChannel
 public void createSocketChannel() throws Exception
        //方式一:使用SocketChannel的静态方法open(套接字)【推荐使用】
        SocketChannel.open(new InetSocketAddress("www.baidu.com",80));
        //方式二:使用功connect
        SocketChannel socketChannel = SocketChannel.open();
        socketChannel.connect(new InetSocketAddress("www.baidu.com",80));
【2】连接检验
  public void isConnect() throws Exception
        SocketChannel socketChannel = SocketChannel.open(new InetSocketAddress("www.baidu.com",80));
        System.out.println(socketChannel.isOpen());//测试是否为open状态
        System.out.println(socketChannel.isConnected());//测试是否为已经被连接
        System.out.println(socketChannel.isConnectionPending());//测试是正在被连接
        System.out.println(socketChannel.finishConnect());//是否已经完成连接
【3】读写模式(是否为阻塞或者非阻塞)
  @Test
    public void isBlocking() throws Exception
        SocketChannel socketChannel = SocketChannel.open(new InetSocketAddress("www.baidu.com",80));
        System.out.println(socketChannel.isBlocking());
        socketChannel.configureBlocking(false);//设置非阻塞
        System.out.println(socketChannel.isBlocking());
【4】读写
阻塞读写
@Test
    public void read1() throws Exception
        SocketChannel socketChannel = SocketChannel.open(new InetSocketAddress("www.baidu.com",80));
        ByteBuffer buf = ByteBuffer.allocate(1024);
        socketChannel.read(buf);//线程被阻塞因为百度不为发给你消息
        socketChannel.close();
        System.out.println("read over");//不会打印
非阻塞读写
@Test
    public void read2() throws Exception
        SocketChannel socketChannel = SocketChannel.open(new InetSocketAddress("www.baidu.com",80));
        ByteBuffer buf = ByteBuffer.allocate(1024);
        socketChannel.configureBlocking(false);//设置非阻塞
        socketChannel.read(buf);
        socketChannel.close();
        System.out.println("read over");//会打印
【5】设置参数
 @Test
    public void set() throws Exception
        SocketChannel socketChannel = SocketChannel.open(new InetSocketAddress("www.baidu.com",80));
        socketChannel.setOption(StandardSocketOptions.TCP_NODELAY,Boolean.TRUE);
        System.out.println(socketChannel.getOption(StandardSocketOptions.TCP_NODELAY));
ServerSocketChannel
ServerSocketChannel 是一个基于通道的 socket 监听器。它同我们所熟悉的 java.net.ServerSocket 执行相同的任务,不过它增加了通道语义,因此能够在非阻塞 模式下运行。 由于 ServerSocketChannel 没有 bind()方法,因此有必要取出对等的 socket 并使用 它来绑定到一个端口以开始监听连接。我们也是使用对等 ServerSocket 的 API 来根 据需要设置其他的 socket 选项。 同 java.net.ServerSocket 一样,ServerSocketChannel 也有 accept( )方法。 ServerSocketChannel 的 accept()方法会返回 SocketChannel 类型对象, SocketChannel 可以在非阻塞模式下运行。非阻塞的accpet()方法
@Test
    public void notBlockAccept() throws Exception
        ByteBuffer buf = ByteBuffer.allocate(48);
        buf.clear();
        buf.put("hello".getBytes());
        ServerSocketChannel ssc = ServerSocketChannel.open();
        ssc.socket().bind(new InetSocketAddress(1234));
        ssc.configureBlocking(false);
        while (true)
            System.out.println("等待连接!");
            SocketChannel accept = ssc.accept();
            if(accept == null)
                System.out.println("null connect");
                Thread.sleep(1000);
            else
                System.out.println("建立连接:"+accept.getRemoteAddress());
                buf.rewind();
                /*
                 Buffer.rewind() 方法用于将字符缓冲区恢复到最初的状态,
                 即缓冲区中的数据没有被读取或写入。
                 */
                accept.write(buf);//获取hello值
                accept.close();
【1】打开ServerSocketChannel
 @Test
    public void open() throws Exception
        ServerSocketChannel ssc = ServerSocketChannel.open();
【2】监听新的链接
通过 ServerSocketChannel.accept() 方法监听新进的连接。当 accept()方法返回时 候,它返回一个包含新进来的连接的 SocketChannel。因此, accept()方法会一直阻塞 到有新连接到达。 @Test
public void accept() throws Exception
ServerSocketChannel ssc = ServerSocketChannel.open();
ssc.socket().bind(new InetSocketAddress(1222));
while (true)
System.out.println("等待连接");
SocketChannel accept = ssc.accept();
只会执行一次因为这是阻塞的
DatagramChannel
每 一个 DatagramChannel 对象也有一个关联的 DatagramSocket 对象。正如 SocketChannel 模拟连接导向的流协议(如 TCP/IP),DatagramChannel 则模拟包 导向的无连接协议(如 UDP/IP)。DatagramChannel 是无连接的,每个数据报 (datagram)都是一个自包含的实体,拥有它自己的目的地址及不依赖其他数据报的 数据负载。与面向流的的 socket 不同, DatagramChannel 可以发送单独的数据报给 不同的目的地址 。同样,DatagramChannel 对象 也可以接收来自任意地址的数据包 。 每个到达的数据报都含有关于它来自何处的信息(源地址) 【1】打开DatagramChannel @Test
public void open() throws Exception
DatagramChannel server = DatagramChannel.open();
server.socket().bind(new InetSocketAddress(1243));
【2】链接
UDP 不存在真正意义上的连接,这里的连接是向特定服务地址用 read 和 write 接收 发送数据包。client.connect(new InetSocketAddress("127.0.0.1",10086));
int readSize= client.read(sendBuffer);
server.write(sendBuffer);【3】接收数据 recevice()接收UDP包
    @Test
    public void reviceUDP() throws Exception
        DatagramChannel server = DatagramChannel.open();
        server.socket().bind(new InetSocketAddress(1243));
        server.configureBlocking(false);
        ByteBuffer receviceBuffer = ByteBuffer.allocate(34);
        receviceBuffer.clear();
        SocketAddress receive = server.receive(receviceBuffer);
        System.out.println(receive);
       // SocketAddress 可以获得发包的 ip、端口等信息,用 toString 查看,格式如下
【4】发送数据 send()发送UDP包
@Test
    public void sendUDP() throws Exception
        DatagramChannel server = DatagramChannel.open();
        ByteBuffer buf = ByteBuffer.wrap("hello".getBytes());
        server.send(buf, new InetSocketAddress("127.0.0.1", 1003));
综合案列
 /**
     * 收包端
     */
    @Test
    public void receive() throws Exception
        DatagramChannel receiveChannel= DatagramChannel.open();
        InetSocketAddress receiveAddress= new InetSocketAddress(9999);
        receiveChannel.bind(receiveAddress);
        ByteBuffer receiveBuffer= ByteBuffer.allocate(512);
        while (true)
            receiveBuffer.clear();
            SocketAddress sendAddress= receiveChannel.receive(receiveBuffer);
            receiveBuffer.flip();
            System.out.print(sendAddress.toString() + " ");
            System.out.println(Charset.forName("UTF-8").decode(receiveBuffer));


    /**
     * 只接收和发送 9999 的数据包
     */
    @Test
    public void testConect1() throws Exception
        DatagramChannel connChannel= DatagramChannel.open();
        connChannel.bind(new InetSocketAddress(9998));
        connChannel.connect(new InetSocketAddress("127.0.0.1",9999));
        connChannel.write(ByteBuffer.wrap("发包".getBytes("UTF-8")));
        ByteBuffer readBuffer= ByteBuffer.allocate(512);
        while (true)
            try
                readBuffer.clear();
                connChannel.read(readBuffer);
                readBuffer.flip();
                System.out.println(Charset.forName("UTF-8").decode(readBuffer));
            catch(Exception e)
java之NIO编程
NIO介绍
前面介绍了BIO为阻塞IO,其阻塞表现在两个方面:服务端等待客户端连接时的阻塞以及连接后没有发生数据传输时的阻塞。NIO是非阻塞IO,那么NIO是如何非阻塞的呢?带着这个疑问,开始研究NIO。
NIO有三大组件:Selector 选择器、Channel 管道、buffer 缓冲区。
Channel:
首先理解Channel管道。管道是应用程序与操作系统之间交互事件和传递内容的渠道。管道是应用程序与操作系统直接交互的渠道,应用程序可以从管道中读取操作系统中接收到的数据,也可以向操作系统发送数据。
操作系统接收和发送网络数据,都是在操作系统内开辟了一块儿空间,来缓存接收到的数据或要发送的数据,然后进行网络数据发送。那么Channel就可以理解为Java NIO定义了一个新概念,来接收操作系统内缓存的数据给应用程序,或发送应用程序的数据到操作系统内存中。
Channel需要与具体事件绑定,如读、写、请求连接、接受连接等事件。每个Channel只负责处理一种事件。
在BIO中,我们也没有直接和操作系统打交道呀,也是通过socket来发送数据到操作系统和接收操作系统的数据呀,那为什么要重新定义个Channel概念出来呢?这个在Selector选择器中说明。
Buffer缓冲区:
Channel不直接和应用程序打交道,中间通过Buffer缓冲区来沟通,即应用程序发送数据到Buffer缓冲区,Channel从缓冲区那数据。同时Channel把接收到的数据发给Buffer,应用程序从Buffer中拿数据。这样做的本质还是应用程序无需关注Channel,只需要操作Buffer来发送或获取数据即可。
Selector选择器:
Selector是实现非阻塞的核心。上述Channel需要注册到Selector上,一个Selector可以注册多个Channel,这些Channel里,有负责读操作的,也有负责写操作的等等,当读操作发生阻塞时,Selector切换到写操作的Channel上,当写操作阻塞时,Selector切换到读操作的Channel上,这样就避免了阻塞。如下图所示:

可以看到,在BIO中,一个线程对应一个socket,一个socket对应一个客户端连接。读写都在这个socket上进行,所以会发生阻塞。而在NIO中,一个线程对应一个Selector,一个Selector对应多个Channel,而一个Channel对应一个网络事件。相当于是将网络事件进行了拆分,以此实现了非阻塞效果。
流程图如下所示:

Java NIO相关类介绍
SelectionKey类
每个Channel向Selector注册时,都会创建一个SelectionKey对象,通过SelectionKey对象向Selector注册,且SelectionKey中维护了Channel的事件。Java NIO定义了四种事件,如下图所示:
| 操作类型 | 就绪条件及说明 |
|---|---|
| OP_READ | 当操作系统读缓冲区有数据可读时就绪。并非时刻都有数据可读,所以一般需要注册该操作,仅当有就绪时才发起读操作,有的放矢,避免浪费 CPU。 |
| OP_WRITE | 当操作系统写缓冲区有空闲空间时就绪。一般情况下写缓冲区都有空闲空间,小块数据直接写入即可,没必要注册该操作类型,否则该条件不断就绪浪费 CPU;但如果是写密集型的任务,比如文件下载等,缓冲区很可能满,注册该操作类型就很有必要,同时注意写完后取消注册。 |
| OP_CONNECT | 当 SocketChannel.connect()请求连接成功后就绪。该操作只给客户端使用。 |
| OP_ACCEPT | 当接收到一个客户端连接请求时就绪。该操作只给服务器使用。 |
ServerSocketChannel与SocketChannel
服务端定义Channel使用ServerSocketChannel类,客户端定义Channel使用SocketChannel类。ServerSocketChannel类使用accept()方法返回SocketChannel对象,类似于BIO中的ServerSocket类。
ServerSocketChannel 和 SocketChannel 可以注册自己感兴趣的操作类型,当对应操作类型的就绪条件满足时 OS 会通知 channel,下表描述各种 Channel 允许注册的操作类型,Y 表
示允许注册,N 表示不允许注册。

服务器启动 ServerSocketChannel,关注 OP_ACCEPT 事件,
客户端启动 SocketChannel,连接服务器,关注 OP_CONNECT 事件,
服务器接受连接,启动一个服务器的 SocketChannel,这个 SocketChannel 可以关注
OP_READ、OP_WRITE 事件,一般连接建立后会直接关注 OP_READ 事件,
客户端这边的客户端 SocketChannel 发现连接建立后,可以关注 OP_READ、OP_WRITE
事件,一般是需要客户端需要发送数据了才关注 OP_READ 事件,
连接建立后客户端与服务器端开始相互发送消息(读写),根据实际情况来关注OP_READ、
OP_WRITE 事件。
Buffer类
应用程序发送数据和接收数据,都通过Buffer操作,因此,Buffer是和程序员打交道最多的类。缓冲区本质上是一块可以写入数据,然后可以从中读取数据的内存( 其实就是数组)。
这块内存被包装成 NIO Buffer 对象,并提供了一组方法,用来方便的访问该块内存。
下面看Buffer类几个重要的成员属性:
//作为一个内存块,Buffer 有一个固定的大小值,也叫“capacity”.你只能往里写 capacity个 byte、long,char 等类型。一旦 Buffer 满了,需要将其清空(通过读数据或者清除数据)才能继续写数据往里写数据
 private int capacity;
private int position = 0;
当你写数据到 Buffer 中时,position 表示当前能写的位置。初始的 position 值为 0.当一
个 byte、long 等数据写到 Buffer 后, position 会向前移动到下一个可插入数据的 Buffer 单
元。position 最大可为 capacity – 1.
当读取数据时,也是从某个特定位置读。当将 Buffer 从写模式切换到读模式,position
会被重置为 0. 当从 Buffer 的 position 处读取数据时,position 向前移动到下一个可读的位置。
private int limit;
在写模式下,Buffer 的 limit 表示你最多能往 Buffer 里写多少数据。 写模式下,limit 等
于 Buffer 的 capacity.
当切换 Buffer 到读模式时, limit 表示你最多能读到多少数据。因此,当切换 Buffer 到
读模式时,limit 会被设置成写模式下的 position 值。换句话说,你能读到之前写入的所有数
据(limit 被设置成已写数据的数量,这个值在写模式下就是 position).
由上述描述可知,Buffer分为读模式和写模式。ByteBuffer子类有如下几种:

Buffer分配:
Buffer分配使用allocate()方法进行分配,可以在jvm堆上申请堆上内存,也可以在操作系统上申请直接内存。
示例如下:
//申请一个capacity为48的字节Buffer
ByteBuffer buf = ByteBuffer.allocate(48);
//分配一个可存储 1024 个字符的 CharBuffer
CharBuffer buf = CharBuffer.allocate(1024);
//将字节数组包装成ByteBuffer
ByteBuffer wrap(byte [] array);
//将字节数组一部分包装成ByteBuffer
ByteBuffer wrap(byte [] array, int offset, int length)
直接内存:
HeapByteBuffer 与 DirectByteBuffer,在原理上,前者可以看出分配的 buffer 是在 heap区域的,其实真正 flush 到远程的时候会先拷贝到直接内存,再做下一步操作;在 NIO 的框架下,很多框架会采用 DirectByteBuffer 来操作,这样分配的内存不再是在 java heap 上,经过性能测试,可以得到非常快速的网络交互,在大量的网络交互下,一般速度会比HeapByteBuffer 要快速好几倍。
NIO 可以使用 Native 函数库直接分配堆外内存,然后通过一个存储在 Java 堆里面的
DirectByteBuffer 对象作为这块内存的引用进行操作。这样能在一些场景中显著提高性能,
因为避免了在 Java 堆和 Native 堆中来回复制数据。
直接内存申请空间耗费更高的性能,当频繁申请到一定量时尤为明显。直接内存 IO 读写的性能要优于普通的堆内存,在多次读写操作的情况下差异明显。
Buffer写操作API:
写数据到 Buffer 有两种方式:
- 读取 Channel 写到 Buffer
int bytesRead = inChannel.read(buf); //read into buffer
- 通过 Buffer 的 put()方法写到 Buffer 里
buf.put(127);
put 方法有很多版本,允许你以不同的方式把数据写入到 Buffer 中。例如, 写到一个
指定的位置,或者把一个字节数组写入到 Buffer。在比如:
put(byte b) 相对写,向 position 的位置写入一个 byte,并将 postion+1,为下次读写
作准备。
读写模式切换:
flip()方法: flip 方法将 Buffer 从写模式切换到读模式。调用 flip()方法会将 position 设回 0,并将 limit设置成之前 position 的值。
换句话说,position 现在用于标记读的位置,limit 表示之前写进了多少个 byte、char 等
—— 现在能读取多少个 byte、char 等。
Buffer读操作API:
从 Buffer 中读取数据有两种方式:
- 从 Buffer 读取数据写入到 Channel;
- 使用 get()方法从 Buffer 中读取数据。
int bytesWritten = inChannel.write(buf);
byte aByte = buf.get();
使用 Buffer 读写数据常见步骤:
- 写入数据到 Buffer
- 调用 flip()方法
- 从 Buffer 中读取数据
- 调用 clear()方法或者 compact()方法,准备下一次的写入
当向 buffer 写入数据时,buffer 会记录下写了多少数据。一旦要读取数据,需要通过 flip()
方法将 Buffer 从写模式切换到读模式。在读模式下,可以读取之前写入到 buffer 的所有数据。
一旦读完了所有的数据,就需要清空缓冲区,让它可以再次被写入。有两种方式能清空
缓冲区:调用 clear()或 compact()方法。clear()方法会清空整个缓冲区。compact()方法只会清
除已经读过的数据。
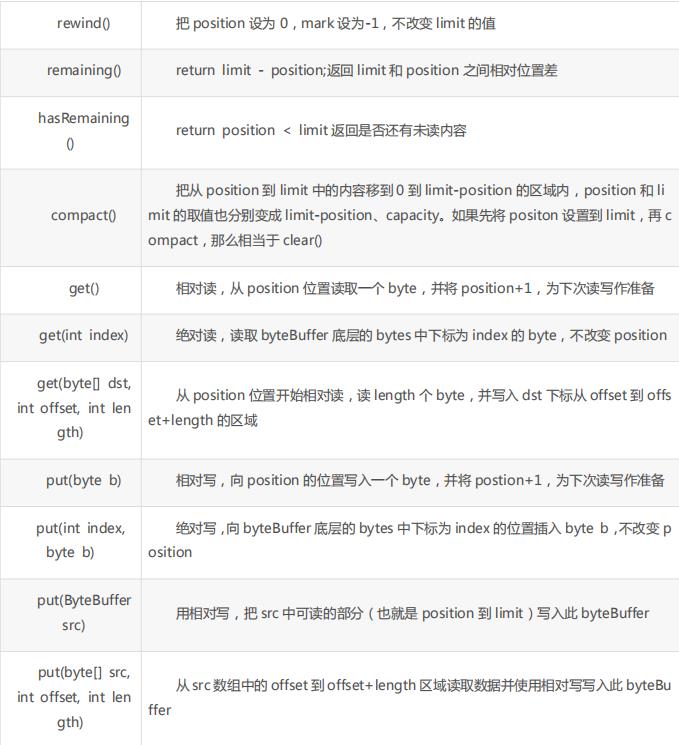
Buffer常用方法汇总:
put(int index, byte b):
绝对写,向 byteBuffer 底层的 bytes 中下标为 index 的位置插入byte b,不改变 position 的值。
get(int index):
于绝对读,读取 byteBuffer 底层的 bytes 中下标为 index 的 byte,不改变 position。
rewind():
Buffer.rewind()将 position 设回 0,所以你可以重读 Buffer 中的所有数据。limit 保持不变,仍然表示能从 Buffer 中读取多少个元素(byte、char 等)。
clear()与 compact():
一旦读完Buffer中的数据,需要让Buffer准备好再次被写入。可以通过clear()或compact()方法来完成。
如果调用的是 clear()方法,position 将被设回 0,limit 被设置成 capacity 的值。换句话Buffer被清空了。Buffer 中的数据并未清除,只是这些标记告诉我们可以从哪里开始往Buffer 里写数据。
如果 Buffer 中有一些未读的数据,调用 clear()方法,数据将“被遗忘”,意味着不再有任何标记会告诉你哪些数据被读过,哪些还没有。
如果 Buffer 中仍有未读的数据,且后续还需要这些数据,但是此时想要先先写些数据,那么使用 compact()方法。
compact()方法将所有未读的数据拷贝到 Buffer 起始处。然后将 position 设到最后一个未读元素正后面。limit 属性依然像 clear()方法一样,设置成 capacity。现在 Buffer 准备好写数据了,但是不会覆盖未读的数据。
mark()与 reset():
通过调用 Buffer.mark()方法,可以标记 Buffer 中的一个特定 position。之后可以通过调用 Buffer.reset()方法恢复到这个 position。
equals()与 compareTo():
equals()方法满足以下条件,表示两个Buffer相等:
- 有相同的类型(byte、char、int 等)。
- Buffer 中剩余的 byte、char 等的个数相等。
- Buffer 中所有剩余的 byte、char 等都相同。
equals 只是比较 Buffer 的一部分,不是每一个在它里面的元素都比较。实际
上,它只比较 Buffer 中的剩余元素。
compareTo()方法比较两个 Buffer 的剩余元素(byte、char 等), 如果满足下列条件,则认为一个 Buffer“小于”另一个 Buffer:
- 第一个不相等的元素小于另一个 Buffer 中对应的元素 。
- 所有元素都相等,但第一个 Buffer 比另一个先耗尽(第一个 Buffer 的元素个数比另一
个少)。
Buffer方法总结


Buffer代码示例
分配堆上内存、直接内存:
public class AllocateBuffer
    public static void main(String[] args)

        OperatingSystemMXBean osmxb = (OperatingSystemMXBean)
                ManagementFactory.getOperatingSystemMXBean();


        System.out.println("----------Test allocate--------");
        System.out.println("before allocate:"
                + osmxb.getFreePhysicalMemorySize());

        /*堆上分配*/
        ByteBuffer buffer = ByteBuffer.allocate(200000);
        System.out.println("buffer = " + buffer);
        System.out.println("after allocate:"
                + osmxb.getFreePhysicalMemorySize());

        /* 这部分用的直接内存*/
        ByteBuffer directBuffer = ByteBuffer.allocateDirect(200000);
        System.out.println("directBuffer = " + directBuffer);
        System.out.println("after direct allocate:"
                + osmxb.getFreePhysicalMemorySize());

        System.out.println("----------Test wrap--------");
        byte[] bytes = new byte[32];
        buffer = ByteBuffer.wrap(bytes);
        System.out.println(buffer);

        buffer = ByteBuffer.wrap(bytes, 10, 10);
        System.out.println(buffer);
Buffer常用方法示例:
public class BufferMethod
    public static void main(String[] args)

        System.out.println("------Test get and put-------------");
        ByteBuffer buffer = ByteBuffer.allocate(32);
        buffer.put((byte) 'a')//0
                .put((byte) 'b')//1
                .put((byte) 'c')//2
                .put((byte) 'd')//3
                .put((byte) 'e')//4
                .put((byte) 'f');//5
        System.out.println("before flip()" + buffer);
        /* 转换为读取模式*/
        buffer.flip();
        System.out.println("before get():" + buffer);
        System.out.println((char)buffer.get());
        System.out.println("after get():" + buffer);

        /* position移动两位*/
        byte[] dst = new byte[10];
        buffer.get(dst, 0, 2);
        System.out.println("after get(dst, 0, 2):" + buffer);
        System.out.println("dst:" + new String(dst));

        /*绝对读写*/
        System.out.println("--------Test 绝对读写-------");
        ByteBuffer bb = ByteBuffer.allocate(32);
        System.out.println("before put(byte):" + bb);
        System.out.println("after put(byte):" + bb.put((byte) 'z'));
        /* put(2,(byte) 'c')不改变position的位置*/
        bb.put(2, (byte) 'c');
        System.out.println("after put(2,(byte) 'c'):" + bb);
        System.out.println(new String(bb.array()));

        /* get(index)不影响position的值*/
        System.out.println((char) buffer.get(2));
        System.out.println("after get(index):" + buffer);

        System.out.println("--------Test Clear And Compact--------");
        ByteBuffer buffer2 = ByteBuffer.allocate(32);
        buffer2.put((byte) 'x');
        System.out.println("before clear:" + buffer2);
        buffer2.clear();
        System.out.println("after clear:" + buffer2);
        System.out.println(new String(buffer2.array()));
        /*放入4个字节,position移动到下个可写入的位置,也就是4*/
        buffer2.put("abcd".getBytes());
        System.out.println("before compact:" + buffer2);
        buffer2.flip();//将position设回0,并将limit设置成之前position的值*/
        System.out.println("after flip:" + buffer2);
        /*compact()方法将所有未读的数据拷贝到Buffer起始处。*/
        /* 然后将position设到最后一个未读元素正后面。*/
        System.out.println("还有数据未读,个数:" + buffer2.remaining());
        buffer2.compact();
        System.out.println("after compact:" + buffer2);
        System.out.println(new String(buffer2.array()));

        System.out.println("--------Test rewind--------");
        buffer.clear();
        buffer.position(10);/*移动position到10*/
        buffer.limit(15);/*限定最大可写入的位置为15*/
        System.out.println("before rewind:" + buffer);
        buffer.rewind();/*将position设回0*/
        System.out.println("before rewind:" + buffer);

        System.out.println("--------Test mark AND reset----------");
        buffer = ByteBuffer.allocate(20);
        System.out.println("buffer = " + buffer);
        buffer.clear();
        buffer.position(5);/*移动position到5*/
        buffer.mark();/*记录当前position的位置*/
        buffer.position(10);/*移动position到10*/
        System.out.println("before reset:" + buffer);
        buffer.reset();/*复位position到记录的地址*/
        System.out.println("after reset:" + buffer);
NIO编程
下面通过代码示例,体验NIO实现过程。首先,编写服务端代码:
public class NioServerHandleWriteable implements Runnable
    private Selector selector;
    private ServerSocketChannel serverChannel;
    private volatile boolean started;
    /**
     * 构造方法
     * @param port 指定要监听的端口号
     */
    public NioServerHandleWriteable(int port)
        try
            //创建选择器
            selector = Selector.open();
            //打开监听通道
            serverChannel = ServerSocketChannel.open();
            //如果为 true,则此通道将被置于阻塞模式;
            // 如果为 false,则此通道将被置于非阻塞模式
            serverChannel.configureBlocking(false);//开启非阻塞模式
            //绑定端口 backlog设为1024
            serverChannel.socket()
                    .bind(new InetSocketAddress(port),1024);
            //监听客户端连接请求
            serverChannel.register(selector, SelectionKey.OP_ACCEPT);
            //标记服务器已开启
            started = true;
            System.out.println("服务器已启动,端口号:" + port);
        catch(IOException e)
            e.printStackTrace();
            System.exit(1);


    @Override
    public void run()
        //循环遍历selector
        while(started)
            try
                //阻塞,只有当至少一个注册的事件发生的时候才会继续.
				selector.select();
                Set<SelectionKey> keys = selector.selectedKeys();
                Iterator<SelectionKey> it = keys.iterator();
                SelectionKey key = null;
                while(it.hasNext())
                    key = it.next();
                    it.remove();
                    try
                        handleInput(key);
                    catch(Exception e)
                        if(key != null)
                            key.cancel();
                            if(key.channel() != null)
                                key.channel().close();


            catch(Throwable t)
                t.printStackTrace();


        //selector关闭后会自动释放里面管理的资源
        if(selector != null)
            try
                selector.close();
            catch (Exception e)
                e.printStackTrace();


    private void handleInput(SelectionKey key) throws IOException
        System.out.println("当前通道的事件:"+ key.interestOps());
        if(key.isValid())
            //处理新接入的请求消息
            if(key.isAcceptable())
                //获得关心当前事件的channel
                ServerSocketChannel ssc = (以上是关于Java 网络编程之NIO的主要内容,如果未能解决你的问题,请参考以下文章