使用Powershell实现数据库自动化运维
Posted
tags:
篇首语:本文由小常识网(cha138.com)小编为大家整理,主要介绍了使用Powershell实现数据库自动化运维相关的知识,希望对你有一定的参考价值。
使用Powershell实现数据库自动化运维
目前市场上针对SQLServer的图书,好的原创图书屈指可数,翻译的图书较多,但只限于专门针对SQL Server数据库本身的开发、管理和商业智能。
而针对PowerShell的图书,可以说大多为MSDN里的学习笔记,主要针对Windows操作系统的管理。
微软在大的布局和技术动向来看,力推云平台。而平台化的基础是自动化、高可用。那么细化到最基础的技术着眼点,微软正在大力开发其所有服务器端产品对 PowerShell的支持。针对SQL Server来说,运用好PowerShell这项技能来将管理任务自动化,才能实现进一步的平台化,它是云平台的基石。
国外大力推广的DEVOPS、开发型运维,不仅仅让数据库管理员或系统管理员局限于手工来操作繁杂的日常工作,这样风险极大。学习PowerShell来提升脚本开发能力,让日常工作化繁为简,是大势所趋。
我翻译了一本微软MVP的《PowerShell V3 -- SQL Server 2012数据库自动化运维权威指南》,这本书涉及的知识点非常全面、实用性很强。对SQL Server DBA来说,是提高数据库管理技能的利器。
下面我通过两个实例来讲解下,使用PowerShell如何实现对SQL Server和MongoDB的自动化运维的。
一、 恢复SQL Server数据库到一个时间点
在本方案中,我们将使用不同备份文件恢复到一个时间点。
准备
在本方案中,我们将使用AdventureWorks2008R2数据库。你也可以选择你的开发环境中的你更喜欢的数据库。
AdventureWorks2008R2数据库有一个包含一个单独数据库文件的文件组。我们将使用来自以下三种不同的备份类型的三个不同备份文件,来基于时间点恢复数据库到另一个SQL Server实例:
完整备份
差异备份
事务日志备份
我们可以使用PowerShell,像在之前的方案描述的,在AdventureWorks2008R2数据库上创建这三种类型的备份。如果你对T-SQL相当熟悉,你也可以使用T-SQL备份命令。
为了帮助我们验证是否基于时间点的恢复的结果是我们期待的,在做任何类型的备份之前,创建一个时间戳标识的表。相应的,创建一个表,并在备份前插入一个时间戳标识的记录到表中。
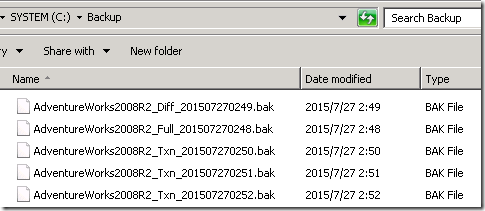
将这些备份放在C:\Backup\目录。
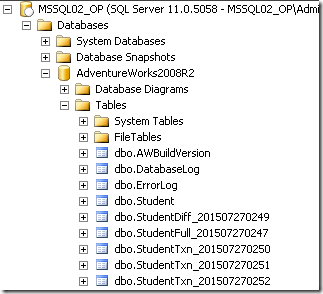
你可以使用下面的脚本来创建你的文件,6464 - Ch06 - 10 - Restore a database to a point in time - Prep.ps1,它包含在本书的可下载文件中。当脚本执行完整后,你应该在AdventureWorks2008R2数据库中有时间戳标识的Student表,以一分钟的间隔创建,类似于下面的截屏:
(译者注:可以从https://www.packtpub.com/books/content/support/10233下载该书代码。)
对于我们的方案,我们将恢复AdventureWorks2008R2数据库到另一个实例,KERRIGAN\SQL01,到2015-07-27 02:51:59。意味着,在基于时间点的恢复完成后,我们将只有四个时间戳标识的Student表在KERRIGAN\SQL01在恢复的数据库上:
StudentFull_201507270247
StudentDiff_201507270249
StudentTxn_201507270250
StudentTxn_201507270251
如何做…
为了使用完整、差异和一些事务日志文件恢复到一个时间点,遵循如下步骤:
1. 通过“Start | Accessories | Windows PowerShell | Windows PowerShell ISE”打开PowerShell控制台。
2. 导入SQLPS模块:
#import SQL Server module
Import-Module SQLPS -DisableNameChecking
3. 添加如下脚本并运行:
$instanceName = "KERRIGAN\SQL01"
$server = New-Object -TypeName Microsoft.SqlServer.Management.Smo.Server -ArgumentList $instanceName
#backupfilefolder
$backupfilefolder = "C:\Backup\"
#look for the last full backupfile
#you can be more specific and specify filename
$fullBackupFile =
Get-ChildItem $backupfilefolder -Filter "*Full*" |
Sort -Property LastWriteTime -Descending |
Select -Last 1
#read the filelist info within the backup file
#so that we know which other files we need to restore
$smoRestore = New-Object Microsoft.SqlServer.Management.Smo.Restore
$smoRestore.Devices.AddDevice($fullBackupFile.FullName, [Microsoft.SqlServer.Management.Smo.DeviceType]::File)
$filelist = $smoRestore.ReadFileList($server)
#read headers of the full backup file,
#because we are restoring to a default instance, we will
#need to specify we want to move the files
#to the default data directory of our KERRIGAN\SQL01 instance
$relocateFileList = @()
$relocatePath = "C:\Program Files\Microsoft SQL Server\MSSQL11.SQL01\MSSQL\DATA"
#we are putting this in an array in case we have
#multiple data and logfiles associated with the database
foreach($file in $fileList)
{
#restore to different instance
#replace default directory path for both
$relocateFile = Join-Path $relocatePath (Split-Path $file.PhysicalName -Leaf)
$relocateFileList += New-Object Microsoft.SqlServer.Management.Smo.RelocateFile($file.LogicalName, $relocateFile)
}
#let‘s timestamp our restored databasename
#this is strictly for testing our recipe
$timestamp = Get-Date -Format yyyyMMddHHmmss
$restoredDBName = "AWRestored_$($timestamp)"
#====================================================
#restore the full backup to the new instance name
#====================================================
#note we have a NoRecovery option, because we have
#additional files to restore
Restore-SqlDatabase `
-ReplaceDatabase `
-ServerInstance $instanceName `
-Database $restoredDBName `
-BackupFile $fullBackupFile.FullName `
-RelocateFile $relocateFileList `
-NoRecovery
#====================================================
#restore last differential
#note the database is still in Restoring State
#====================================================
#using PowerShell V2 Where syntax
$diffBackupFile =
Get-ChildItem $backupfilefolder -Filter "*Diff*" |
Where {$_.LastWriteTime -ge $fullBackupFile.LastWriteTime} |
Sort -Property LastWriteTime -Descending |
Select -Last 1
Restore-SqlDatabase `
-ReplaceDatabase `
-ServerInstance $instanceName `
-Database $restoreddbname `
-BackupFile $diffBackupFile.FullName `
-NoRecovery
#====================================================
#restore all transaction log backups from last
#differential up to 2015-07-27 02:51:59
#====================================================
#identify the last txn log backup file we need to restore
#we need this so we can specify point in time
$lastTxnFileName = "AdventureWorks2008R2_Txn_201507270251"
$lastTxnBackupFile =
Get-ChildItem $backupfilefolder -Filter "*$lastTxnFileName*"
#restore all transaction log backups after the
#last differential, except the last transaction
#backup that requires the point-in-time restore
foreach ($txnBackup in Get-ChildItem $backupfilefolder -Filter
"*Txn*" |
Where {$_.LastWriteTime -ge $diffBackupFile.LastWriteTime -and
$_.LastWriteTime -lt $lastTxnBackupFile.LastWriteTime} |
Sort -Property LastWriteTime)
{
Restore-SqlDatabase `
-ReplaceDatabase `
-ServerInstance $instanceName `
-Database $restoreddbname `
-BackupFile $txnBackup.FullName `
-NoRecovery
}
#restore last txn backup file to point in time
#restore only up to 2015-07-27 02:51:59
#this time we are going to restore using with recovery
Restore-SqlDatabase `
-ReplaceDatabase `
-ServerInstance $instanceName `
-Database $restoreddbname `
-BackupFile $lastTxnBackupFile.FullName `
-ToPointInTime "2015-07-27 02:51:59"
如何实现…
在本方案中,我们使用Restore-SqlDatabase cmdlet,与Backup-SqlDatabase相对的cmdlet在SQL Server 2012中被介绍。
让我们从高层概览下如何实施时间点恢复,然后我们可以细化,并解释包含在本方案中的片段:
1. 收集你的备份文件。
识别包含你想恢复的时间点的最后事务日志备份文件。
2. 恢复最后的好的完整备份使用NORECOVERY。
3. 恢复最后的在完整备份后的差异备份使用NORECOVERY。
4. 恢复在差异备份后的事务日志备份:
使用NORECOVERY恢复,直到包含你想恢复的时间点的日志文件备份。你需要恢复最后的日志文件备份到一个时间点,也就是说,你需要指定需要恢复的时间。最后,使用WITH RECOVERY恢复数据库,使得数据库可访问并以备使用。
或者,你可以使用NORECOVERY恢复所有的事务日志备份文件,在包含你想恢复到的时间点的日志备份前。接下来,使用WITH RECOVERY恢复最后的日志备份到一个时间点,那就是说,你需要指定恢复到何时。
步骤1 – 收集你的备份文件
你需要收集你的备份文件。它们不必位于相同的目录或驱动设备,但这样理想些,这样可以简化你的恢复脚本,你将有一个统一的目录或驱动设备去参照。你也需要这些文件的读许可权限。
在我们的方案,我们简化了这个步骤。我们收集了完整,差异和事务日志备份文件,存储它们到C:\Backup\目录,易于访问。如果你的备份文件位于不同的位置,你只需要适当的调整你脚本的参照目录。
一旦有了这些备份文件,假设你遵循着文件命名规范,你可以过滤你目录中的所有完整备份。在我们的示例中,我们使用命名规范databasename_type_timestamp.bak。对于这个方案,我们通过在文件名中指定关键字或匹配模式来抽取完整备份文件。我们使用Get-ChildItem过滤最新的完整备份文件:
#look for the last full backupfile
#you can be more specific and specify filename
$fullBackupFile =
Get-ChildItem $backupfilefolder -Filter "*Full*" |
Sort -Property LastWriteTime -Descending |
Select -Last 1
一旦你有了完整备份的句柄,你可以读取存储在备份文件中的文件列表。你可以使用SMO Restore对象的ReadFileList方法。读取文件列表可以帮助你通过抽取你需要恢复的数据和日志文件的文件名来实现自动化。
#read the filelist info within the backup file
#so that we know which other files we need to restore
$smoRestore = New-Object Microsoft.SqlServer.Management.Smo.Restore
$smoRestore.Devices.AddDevice($fullBackupFile.FullName, [Microsoft.
SqlServer.Management.Smo.DeviceType]::File)
$filelist = $smoRestore.ReadFileList($server)
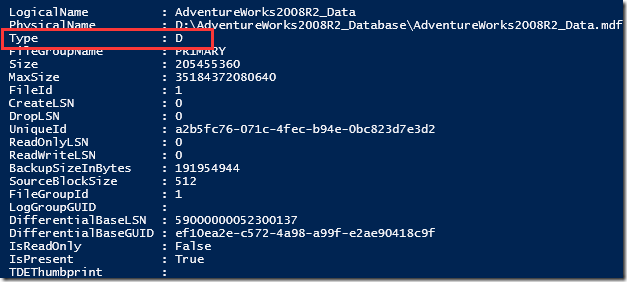
当读取文件列表时,你可以抽取的一个属性是存储的文件的类型:
不同的类型为:
L代表日志文件
D代表数据文件
F代表全文目录
步骤2 – 使用NORECOVERY恢复最后的好的完整备份
在恢复操作的第一步是恢复最后的已知好的完整备份。这提供了你一个基线,基于此你可以恢复额外的文件。NORECOVERY选项非常重要,它保持(或不回滚)未提交的事务,并允许额外的文件被恢复。我们将会使用NORECOVERY选项在我们真个恢复过程中。
因为完整备份总是第一个需要恢复的文件,所有的准备工作需要就绪,此时移动文件也开始。
对于我们的方案,我们想去恢复数据库,从源默认实例KERRIGAN到另一个实例KERRIGAN\SQL01。因此,我们需要移动我们的文件,从存储我们备份文件的路径,到我们想去使用的新路径。在这个例子中,我们只想从默认实例的默认数据目录,移动到命名实例KERRIGAN\SQL01的数据目录。我们从文件列表的原始数据和日志文件获取完整的路径,使用我们想去恢复到的新位置来替代完整路径。在下面片段中的高亮代码显示了如何修改位置:
$relocateFileList = @()
$relocatePath = "C:\Program Files\Microsoft SQL Server\MSSQL11.SQL01\
MSSQL\DATA"
#we are putting this in an array in case we have
#multiple data and logfiles associated with the database
foreach($file in $fileList)
{
#restore to different instance
#replace default directory path for both
$relocateFile = Join-Path $relocatePath (Split-Path $file.
PhysicalName -Leaf)
$relocateFileList += New-Object Microsoft.SqlServer.Management.
Smo.RelocateFile($file.LogicalName, $relocateFile)
}
注意,我们的数组包含了Microsoft.SqlServer.Management.Smo.RelocateFile对象,将包含我们数据库文件的逻辑和(重定位的)物理文件名。
$relocateFileList += New-Object Microsoft.SqlServer.Management.Smo.
RelocateFile($file.LogicalName, $relocateFile)
为了恢复我们的数据库,我们只使用Backup-SqlDatabase cmdlet。这里有一对很重要的选项,像RelocateFile和NoRecovery。
#restore the full backup to the new instance name
#note we have a NoRecovery option, because we have
#additional files to restore
Restore-SqlDatabase `
-ReplaceDatabase `
-ServerInstance $instanceName `
-Database $restoredDBName `
-BackupFile $fullBackupFile.FullName `
-RelocateFile $relocateFileList `
-NoRecovery
步骤3 – 在完整备份恢复完后,使用NORECOVERY恢复最后的好的差异备份
一旦完整备份恢复,你可以添加最后的好的差异备份跟随着完整备份。他并不是一个集成的过程,因为在这点上我们已经恢复了基础数据库并重定位了我们的文件。我们需要使用NORECOVERY恢复差异备份,阻止未提交的事务被回滚:
#using PowerShell V2 Where syntax
$diffBackupFile =
Get-ChildItem $backupfilefolder -Filter "*Diff*" |
Where {$_.LastWriteTime -ge $fullBackupFile.LastWriteTime} |
Sort -Property LastWriteTime -Descending |
Select -Last 1
Restore-SqlDatabase `
-ReplaceDatabase `
-ServerInstance $instanceName `
-Database $restoreddbname `
-BackupFile $diffBackupFile.FullName `
-NoRecovery
注意,在你的环境中,你可能有,也可能没有一个差异备份文件。如果没有,不用担心,它不会影响到你的可恢复性,只要所有的事务日志文件可用于恢复。
步骤4 – 在恢复差异备份后恢复事务日志
在我们恢复了差异备份文件,我们开始恢复我们的事务日志备份文件。这些事务日志备份文件应该是跟随着你的差异备份。你可能需要,或不需要跟随着差异备份的日志文件的完整集合。如果你需要恢复直到数据库故障点,你将需要恢复所有的事务日志备份包括尾日志备份。如果不是,你只需要知道你想恢复的事件点的备份文件。
对于我们的方案,我们识别出我们想去恢复的最后日志备份文件。这很重要,因为我们需要知道如何使用PointInTime参数,当我们使用这个特定的事务日志备份文件时。
#identify the last txn log backup file we need to restore
#we need this so we can specify point in time
$lastTxnFileName = "AdventureWorks2008R2_Txn_201507270252"
$lastTxnBackupFile =
Get-ChildItem $backupfilefolder -Filter "*$lastTxnFileName*"
对于所有其他的事务日志备份文件,我们遍历所有的备份目录,恢复所有的在最后差异备份后的,在我们想去恢复的最后事务日志备份文件之前的所有.txn文件。我们也需要通过WriteTime参数来排序这些文件,以便于我们依次恢复它们到数据库。注意,我们需要使用NORECOVERY恢复所有的这些文件。
foreach ($txnBackup in Get-ChildItem $backupfilefolder -Filter "*Txn*"
|
Where {$_.LastWriteTime -ge $diffBackupFile.LastWriteTime -and
$_.LastWriteTime -lt $lastTxnBackupFile.LastWriteTime} |
Sort -Property LastWriteTime)
{
Restore-SqlDatabase `
-ReplaceDatabase `
-ServerInstance $instanceName `
-Database $restoreddbname `
-BackupFile $txnBackup.FullName `
-NoRecovery
}
一旦所有的这些文件恢复后,然后我们准备恢复最后的事务日志文件。一旦这个文件恢复,数据库需要可访问,所有的未提交事务需要被回滚。
有两个方法去实现。第一个方法,我们在这个方案中使用的,是去使用ToPointInTime参数恢复最后的文件,并且不使用NoRecovery参数。
Restore-SqlDatabase `
-ReplaceDatabase `
-ServerInstance $instanceName `
-Database $restoreddbname `
-BackupFile $lastTxnBackupFile.FullName `
-ToPointInTime "2015-07-27 02:51:59"
另一个方法是恢复最后的事务日志文件,也使用NoRecovery,但是在最后添加另一个命令,使用WITH RECOVERY恢复该数据库。实际上,一直以来使用NORECOVERY恢复所有需要的事务日志备份文件更为安全。它更安全,是因为当我们突然使用WITH RECOVERY恢复一个文件,纠正它的唯一方法是重做整个恢复过程。这可能对于小型数据库没多大关系,但是对于大型数据库可能非常消耗时间。
一旦我们确认所有需要的文件已经被恢复,我们就可以使用WITH RECOVERY来恢复数据库。在我们的方案中,一个方法是使用T-SQL语句,并传递该语句到Invoke-Sqlcmd:
#get the database out of Restoring state
#make the database accessible
$sql = "RESTORE DATABASE $restoreddbname WITH RECOVERY"
Invoke-Sqlcmd -ServerInstance $instanceName -Query $sql
RESTORE DATABASE命名使得我们的数据库从一个正在恢复中的状态,到可访问和以备使用状态。RESTORE命名回滚了所有未完成的事务,并让数据库以备使用。
二、 使用PowerShell调用MTools分析MongoDB性能并发送邮件
在MongoDB日常运维中,经常需要查看连接数的趋势图、慢查询、Overflow语句、连接来源。任何数据库的DBA都应该对数据库情况进行定期的巡检,以清楚了解数据库的运行情况,健康状况,隐患等等。MTools工具应运而生,它带给DBA极大地帮助。
Mtools简介
Mtools是由MongoDB Inc 官方工程师所写,设计之初是为了方便自己的工作,但是随着MongoDB用户的增加,越来越多的朋友也开始使用Mtools,也越来越感受到Mtools带来的便捷。
Github地址如下:
Mtools主要有以下组件:
mlogfilter
mloginfo
mplotqueries
mlogvis
mlaunch
mgenerate
首先,我们来简单介绍下 mlogfilter,mloginfo和mplotqueries。
mlogfileter我们可以简单理解为日志的过滤器,参数如下:
mlogfilter [-h] [--version] logfile [logfile ...]
[--verbose] [--shorten [LENGTH]]
[--human] [--exclude] [--json]
[--timestamp-format {ctime-pre2.4, ctime, iso8601-utc, iso8601-local}]
[--markers MARKERS [MARKERS ...]] [--timezone N [N ...]]
[--namespace NS] [--operation OP] [--thread THREAD]
[--slow [SLOW]] [--fast [FAST]] [--scan]
[--word WORD [WORD ...]]
[--from FROM [FROM ...]] [--to TO [TO ...]]
示例:
通过mlogfilter查询日志中某个表的slow log(超过100ms的)
mlogfilter --namespace xxx.xx --slow 100 mongod.log-20160611
mloginfo可以过滤总结出slow query的情况,以及为日志中各类最常常出现情况进行统计,参数如下:
mloginfo [-h] [--version] logfile
[--verbose]
[--queries] [--restarts] [--distinct] [--connections] [--rsstate]
示例:
通过mloginfo统计日志中connections的来源情况
mloginfo mongod.log-20160611 --connections
mplotqueries相对复杂一些,功能是可以根据需求画图,以便更直观的找出问题或者隐患所在,参数如下:
mplotqueries [-h] [--version] logfile [logfile ...]
[--group GROUP]
[--logscale]
[--type {nscanned/n,rsstate,connchurn,durline,histogram,range,scatter,event} ]
[--overlay [ {add,list,reset} ]]
[additional plot type parameters]
示例:
通过mplotqueries对连接情况进行分析,时间块单位1800(30min)
mplotqueries mongod.log-20160611 --type connchurn --bucketsize 1800 --output-file 01-9.png
解决方案
笔者将在Windows上安装MTools工具来分析mongod.log日志,然后通过Powershell发送邮件。
1. 将Windows备份机目录挂载到MongoDB本地目录下,将LogRotate切换后的最新一个日志拷贝到备份目录。
2. 在Windows服务器上安装Mtools。
参考博文:《在64位Windows Server 2008 R2上安装mtools》
3. 编写PowerShell脚本,通过Mtools分析日志文件,并发送邮件。
Github源码地址:https://github.com/UltraSQL/MongoDBDailyReport.git
使用方法:
a) 将DBA模块放到相应的Modules\DBA目录下。
b) 在配置文件中加载模块:Import-Module DBA -Force。
本文出自 “SQL Server Deep Dive” 博客,请务必保留此出处http://ultrasql.blog.51cto.com/9591438/1870221
以上是关于使用Powershell实现数据库自动化运维的主要内容,如果未能解决你的问题,请参考以下文章


