CycleGAN的pytorch代码实现(代码详细注释)
Posted attacking tiger
tags:
篇首语:本文由小常识网(cha138.com)小编为大家整理,主要介绍了CycleGAN的pytorch代码实现(代码详细注释)相关的知识,希望对你有一定的参考价值。
CycleGAN代码
参考代码
参考代码链接:https://github.com/Lornatang/CycleGAN-PyTorch
数据集百度云:https://pan.baidu.com/s/1UryUwsCoyqG_xhH7VJXdLw?pwd=hqkb
CycleGAN原理
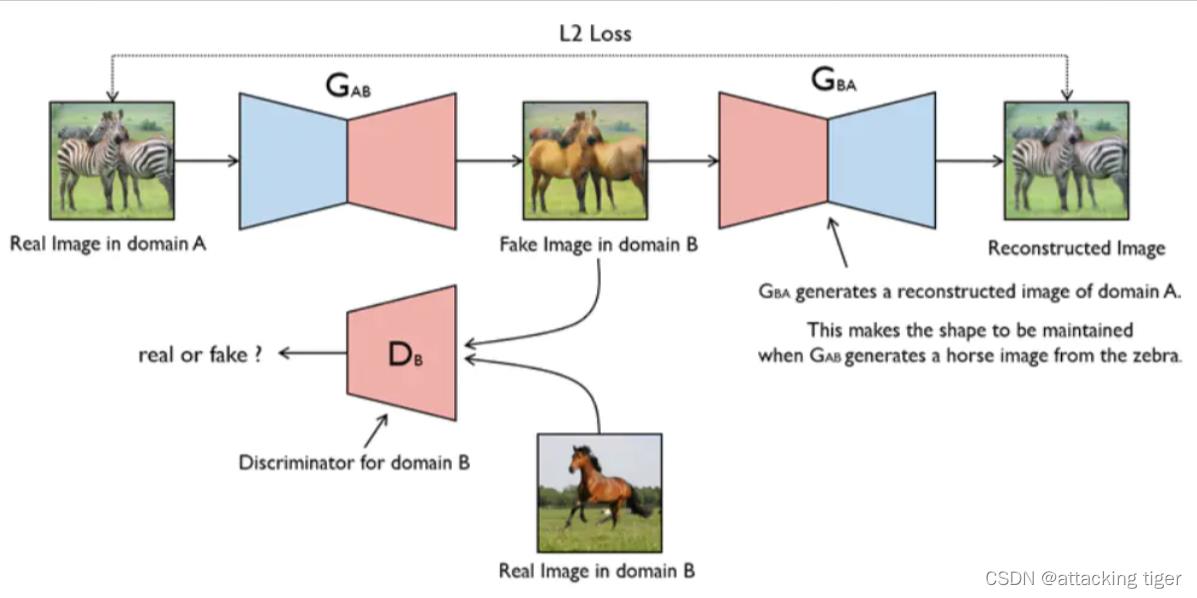
cycleGAN是一种由Generative Adversarial Networks发展而来的一种无监督机器学习,是在pix2pix的基础上发展起来的,主要应用于非配对图片的图像生成和转换,可以实现风格的转换,比如把照片转换为油画风格,或者把照片的橘子转换为苹果、马与斑马之间的转换等。因为不需要成对的数据集就能够转换,所以在数据准备上会简单很多,十分具有应用前景。
CycleGAN本质上是两个镜像对称的GAN,构成了一个环形网络。两个GAN共享两个生成器,并各自带一个判别器,即共有两个判别器和两个生成器。一个单向GAN两个loss,两个即共四个loss。
代码介绍
models
主要就是设置一个初始化参数的函数,在开始训练时调用。
构建了生成器和判别器网络。
生成器中的残差块除了减弱梯度消失外,还可以理解为这是一种自适应深度,也就是网络可以自己调节层数的深浅,至少可以退化为输入,不会变得更糟糕。可以使网络变得更深,更加的平滑,使深度神经网络的训练成为了可能。
import torch.nn as nn
import torch.nn.functional as F
import torch

## 定义参数初始化函数
def weights_init_normal(m):
    classname = m.__class__.__name__                        ## m作为一个形参,原则上可以传递很多的内容, 为了实现多实参传递,每一个moudle要给出自己的name. 所以这句话就是返回m的名字.
    if classname.find("Conv") != -1:                        ## find():实现查找classname中是否含有Conv字符,没有返回-1;有返回0.
        torch.nn.init.normal_(m.weight.data, 0.0, 0.02)     ## m.weight.data表示需要初始化的权重。nn.init.normal_():表示随机初始化采用正态分布,均值为0,标准差为0.02.
        if hasattr(m, "bias") and m.bias is not None:       ## hasattr():用于判断m是否包含对应的属性bias, 以及bias属性是否不为空.
            torch.nn.init.constant_(m.bias.data, 0.0)       ## nn.init.constant_():表示将偏差定义为常量0.
    elif classname.find("BatchNorm2d") != -1:               ## find():实现查找classname中是否含有BatchNorm2d字符,没有返回-1;有返回0.
        torch.nn.init.normal_(m.weight.data, 1.0, 0.02)     ## m.weight.data表示需要初始化的权重. nn.init.normal_():表示随机初始化采用正态分布,均值为0,标准差为0.02.
        torch.nn.init.constant_(m.bias.data, 0.0)           ## nn.init.constant_():表示将偏差定义为常量0.


##############################
##  残差块儿ResidualBlock
##############################
class ResidualBlock(nn.Module):
    def __init__(self, in_features):
        super(ResidualBlock, self).__init__()

        self.block = nn.Sequential(                     ## block = [pad + conv + norm + relu + pad + conv + norm]
            nn.ReflectionPad2d(1),                      ## ReflectionPad2d():利用输入边界的反射来填充输入张量
            nn.Conv2d(in_features, in_features, 3),     ## 卷积
            nn.InstanceNorm2d(in_features),             ## InstanceNorm2d():在图像像素上对HW做归一化,用在风格化迁移
            nn.ReLU(inplace=True),                      ## 非线性激活
            nn.ReflectionPad2d(1),                      ## ReflectionPad2d():利用输入边界的反射来填充输入张量
            nn.Conv2d(in_features, in_features, 3),     ## 卷积
            nn.InstanceNorm2d(in_features),             ## InstanceNorm2d():在图像像素上对HW做归一化,用在风格化迁移
        )

    def forward(self, x):                               ## 输入为 一张图像
        return x + self.block(x)                        ## 输出为 图像加上网络的残差输出


##############################
##  生成器网络GeneratorResNet
##############################
class GeneratorResNet(nn.Module):
    def __init__(self, input_shape, num_residual_blocks):   ## (input_shape = (3, 256, 256), num_residual_blocks = 9)
        super(GeneratorResNet, self).__init__()

        channels = input_shape[0]                           ## 输入通道数channels = 3

        ## 初始化网络结构
        out_features = 64                                   ## 输出特征数out_features = 64
        model = [                                           ## model = [Pad + Conv + Norm + ReLU]
            nn.ReflectionPad2d(channels),                   ## ReflectionPad2d(3):利用输入边界的反射来填充输入张量
            nn.Conv2d(channels, out_features, 7),           ## Conv2d(3, 64, 7)
            nn.InstanceNorm2d(out_features),                ## InstanceNorm2d(64):在图像像素上对HW做归一化,用在风格化迁移
            nn.ReLU(inplace=True),                          ## 非线性激活
        ]
        in_features = out_features                          ## in_features = 64

        ## 下采样,循环2次
        for _ in range(2):
            out_features *= 2                                                   ## out_features = 128 -> 256
            model += [                                                          ## (Conv + Norm + ReLU) * 2
                nn.Conv2d(in_features, out_features, 3, stride=2, padding=1),
                nn.InstanceNorm2d(out_features),
                nn.ReLU(inplace=True),
            ]
            in_features = out_features                                          ## in_features = 256

        # 残差块儿,循环9次
        for _ in range(num_residual_blocks):
            model += [ResidualBlock(out_features)]                              ## model += [pad + conv + norm + relu + pad + conv + norm]

        # 上采样两次
        for _ in range(2):
            out_features //= 2                                                  ## out_features = 128 -> 64
            model += [                                                          ## model += [Upsample + conv + norm + relu]
                nn.Upsample(scale_factor=2),
                nn.Conv2d(in_features, out_features, 3, stride=1, padding=1),
                nn.InstanceNorm2d(out_features),
                nn.ReLU(inplace=True),
            ]
            in_features = out_features                                          ## out_features = 64

        ## 网络输出层                                                            ## model += [pad + conv + tanh]
        model += [nn.ReflectionPad2d(channels), nn.Conv2d(out_features, channels, 7), nn.Tanh()]    ## 将(3)的数据每一个都映射到[-1, 1]之间

        self.model = nn.Sequential(*model)

    def forward(self, x):           ## 输入(1, 3, 256, 256)
        return self.model(x)        ## 输出(1, 3, 256, 256)


##############################
#        Discriminator
##############################
class Discriminator(nn.Module):
    def __init__(self, input_shape):
        super(Discriminator, self).__init__()

        channels, height, width = input_shape                                       ## input_shape:(3, 256, 256)

        # Calculate output shape of image discriminator (PatchGAN)
        self.output_shape = (1, height // 2 ** 4, width // 2 ** 4)                  ## output_shape = (1, 16, 16)

        def discriminator_block(in_filters, out_filters, normalize=True):           ## 鉴别器块儿
            """Returns downsampling layers of each discriminator block"""
            layers = [nn.Conv2d(in_filters, out_filters, 4, stride=2, padding=1)]   ## layer += [conv + norm + relu]
            if normalize:                                                           ## 每次卷积尺寸会缩小一半,共卷积了4次
                layers.append(nn.InstanceNorm2d(out_filters))
            layers.append(nn.LeakyReLU(0.2, inplace=True))
            return layers

        self.model = nn.Sequential(
            *discriminator_block(channels, 64, normalize=False),        ## layer += [conv(3, 64) + relu]
            *discriminator_block(64, 128),                              ## layer += [conv(64, 128) + norm + relu]
            *discriminator_block(128, 256),                             ## layer += [conv(128, 256) + norm + relu]
            *discriminator_block(256, 512),                             ## layer += [conv(256, 512) + norm + relu]
            nn.ZeroPad2d((1, 0, 1, 0)),                                 ## layer += [pad]
            nn.Conv2d(512, 1, 4, padding=1)                             ## layer += [conv(512, 1)]
        )

    def forward(self, img):             ## 输入(1, 3, 256, 256)
        return self.model(img)          ## 输出(1, 1, 16, 16)


# ## test
# img_shape = (3, 256, 256)
# n_residual_blocks = 9
# G_AB = GeneratorResNet(img_shape, n_residual_blocks)
# D_A = Discriminator(img_shape)
# img = torch.rand((1, 3, 256, 256))
# fake = G_AB(img)
# print(fake.shape)

# fake_D = D_A(img)
# print(fake_D.shape)
datasets
其中的root代表着存放的文件夹,命名格式如:./datasets/facades
调用train_data_loader()函数即可,得到的是字典格式的数据,可以通过data[‘A’],和data[‘B’]操作将不同类型的图片取出来。
import glob
import random
import os
from torch.utils.data import Dataset
from PIL import Image
import torchvision.transforms as transforms

## 如果输入的数据集是灰度图像,将图片转化为rgb图像(本次采用的facades不需要这个)
def to_rgb(image):
    rgb_image = Image.new("RGB", image.size)
    rgb_image.paste(image)
    return rgb_image


## 构建数据集
class ImageDataset(Dataset):
    def __init__(self, root, transforms_=None, unaligned=False, mode="train"):          ## (root = "./datasets/facades", unaligned=True:非对其数据)
        self.transform = transforms.Compose(transforms_)                                ## transform变为tensor数据
        self.unaligned = unaligned

        self.files_A = sorted(glob.glob(os.path.join(root, "%sA" % mode) + "/*.*"))     ## "./datasets/facades/trainA/*.*"
        self.files_B = sorted(glob.glob(os.path.join(root, "%sB" % mode) + "/*.*"))     ## "./datasets/facades/trainB/*.*"

    def __getitem__(self, index):
        image_A = Image.open(self.files_A[index % len(self.files_A)])                   ## 在A中取一张照片

        if self.unaligned:                                                              ## 如果采用非配对数据,在B中随机取一张
            image_B = Image.open(self.files_B[random.randint(0, len(self.files_B) - 1)])
        else:
            image_B = Image.open(self.files_B[index % len(self.files_B)])

        # 如果是灰度图,把灰度图转换为RGB图
        if image_A.mode != "RGB":
            image_A = to_rgb(image_A)
        if image_B.mode != "RGB":
            image_B = to_rgb(image_B)

        # 把RGB图像转换为tensor图, 方便计算,返回字典数据
        item_A = self.transform(image_A)
        item_B = self.transform(image_B)
        return "A": item_A, "B": item_B

    ## 获取A,B数据的长度
    def __len__(self):
        return max(len(self.files_A), len(self.files_B))
utils
这个模块设计了一个缓冲区,和学习率更新的函数
在更新discriminators的时候,用的是之前生成的图片,而不是最新的图片,所以设立图片缓冲区,可以存放50张之前生成的图片。
学习率初始为0.0003,总的epoch为50,在0-30的时候,学习率为0.0003,在30-50的时候,学习率逐渐线性减小为0,所以需要进行学习率的更新。
需要的变量有:总的训练epoch,当前的epoch,和开始进行衰减的epoch,即可实现lr的线性变化。
import random
import time
import datetime
import sys
from torch.autograd import Variable
import torch
import numpy as np
from torchvision.utils import save_image

## 先前生成的样本的缓冲区
class ReplayBuffer:
    def __init__(self, max_size=50):
        assert max_size > 0, "Empty buffer or trying to create a black hole. Be careful."
        self.max_size = max_size
        self.data = []

    def push_and_pop(self, data):                       ## 放入一张图像,再从buffer里取一张出来
        to_return = []                                  ## 确保数据的随机性,判断真假图片的鉴别器识别率
        for element in data.data:
            element = torch.unsqueeze(element, 0)
            if len(self.data) < self.max_size:          ## 最多放入50张,没满就一直添加
                self.data.append(element)
                to_return.append(element)
            else:
                if random.uniform(0, 1) > 0.5:          ## 满了就1/2的概率从buffer里取,或者就用当前的输入图片
                    i = random.randint(0, self.max_size - 1)
                    to_return.append(self.data[i].clone())
                    self.data[i] = element
                else:
                    to_return.append(element)
        return Variable(torch.cat(to_return))


## 设置学习率为初始学习率乘以给定lr_lambda函数的值
class LambdaLR:
    def __init__(self, n_epochs, offset, decay_start_epoch):                                                ## (n_epochs = 50, offset = epoch, decay_start_epoch = 30)
        assert (n_epochs - decay_start_epoch) > 0, "Decay must start before the training session ends!"     ## 断言,要让n_epochs > decay_start_epoch 才可以
        self.n_epochs = n_epochs
        self.offset = offset
        self.decay_start_epoch = decay_start_epoch

    def step(self, epoch):                                              ## return    1-max(0, epoch - 30) / (50 - 30)
        return 1.0 - max(0, epoch + self.offset - self.decay_start_epoch) / (self.n_epochs - self.decay_start_epoch)
cycle_gan
这个是训练的函数,开始训练。
先配置下超参数,优化器,数据集,损失函数,然后开始训练
训练过程中打印日志,每100次保存测试集测试结果图片
训练完成后保存模型
import argparse
import os
from tkinter import Image
import numpy as np
import math
import itertools
import datetime
import time
import torchvision.transforms as transforms
from torchvision.utils import save_image, make_grid
from torch.utils.data import DataLoader
from torchvision import datasets
from torch.autograd import Variable
from models import *
from dataset import *
from utils import *
import torch.nn as nn
import torch.nn.functional as F
import torch
from PIL import Image
## 超参数配置
parser = argparse.ArgumentParser()
parser.add_argument("--epoch", type=int, default=0, help="epoch to start training from")
parser.add_argument("--n_epochs", type=int, default=5, help="number of epochs of training")
parser.add_argument("--dataset_name", type=str, default="facades", help="name of the dataset")## ../input/facades-dataset
parser.add_argument("--batch_size", type=int, default=1, help="size of the batches")
parser.add_argument("--lr", type=float, default=0.0003, help="adam: learning rate")
parser.add_argument("--b1", type=float, default=0.5, help="adam: decay of first order momentum of gradient")
parser.add_argument("--b2", type=float, default=0.999, help="adam: decay of first order momentum of gradient")
parser.add_argument("--decay_epoch", type=int, default=3, help="epoch from which to start lr decay")
parser.add_argument("--n_cpu", type=int, default=2, help="number of cpu threads to use during batch generation")
parser.add_argument("--img_height", type=int, default=256, help="size of image height")
parser.add_argument("--img_width", type=int, default=256, help="size of image width")
parser.add_argument("--channels", type=int, default=3, help="number of image channels")
parser.add_argument("--sample_interval", type=int, default=100, help="interval between saving generator outputs")
parser.add_argument("--checkpoint_interval", type=int, default=-1, help="interval between saving model checkpoints")
parser.add_argument("--n_residual_blocks", type=int, default=9, help="number of residual blocks in generator")
parser.add_argument("--lambda_cyc", type=float, default=10.0, help="cycle loss weight")
parser.add_argument("--lambda_id", type=float, default[Pytorch系列-75]:生成对抗网络GAN - 图像生成开源项目pytorch-CycleGAN-and-pix2pix - CycleGAN网络结构与代码实现详解
作者主页(文火冰糖的硅基工坊):文火冰糖(王文兵)的博客_文火冰糖的硅基工坊_CSDN博客
本文网址:https://blog.csdn.net/HiWangWenBing/article/details/122106440
目录
第1章 网络的定义
1.1 网络结构

- 相对于基础型的GAN网络,CycleGAN增加了一个核心的还原网络,导致相关的训练也跟着发生了相应的变化,因此还原网络是核心。
- 还原是双向的,不仅仅是真实输入图片-》Fake图片-》真实输入图片的还原。还包括真实的输出图片 -> Fake图片 -》真实的输出图片的还原。
- CycleGAN一共有4个网络:G_A2B, D_A2B, G_B2A, D_B2A, 后两个是新增的 。
1.2 代码来源
pytorch-CycleGAN-and-pix2pix\\models\\cycle_gan_model.py
1.3 网络结构代码解读
def __init__(self, opt):
"""Initialize the CycleGAN class.
Parameters:
opt (Option class)-- stores all the experiment flags; needs to be a subclass of BaseOptions
"""
BaseModel.__init__(self, opt)
# specify the training losses you want to print out. The training/test scripts will call <BaseModel.get_current_losses>
self.loss_names = ['D_A', 'G_A', 'cycle_A', 'idt_A', 'D_B', 'G_B', 'cycle_B', 'idt_B']
# specify the images you want to save/display. The training/test scripts will call <BaseModel.get_current_visuals>
# 真实输入图片 =》 生成图片 =》 真实输入图片的恢复图片,这是成组图片
visual_names_A = ['real_A', 'fake_B', 'rec_A']
# 真实的输出图片 =》 生成图片 =》 真实输出图片的恢复图片,这是成组图片
visual_names_B = ['real_B', 'fake_A', 'rec_B']
# if identity loss is used, we also visualize idt_B=G_A(B) ad idt_A=G_A(B)
if self.isTrain and self.opt.lambda_identity > 0.0:
visual_names_A.append('idt_B')
visual_names_B.append('idt_A')
# combine visualizations for A and B
self.visual_names = visual_names_A + visual_names_B
# specify the models you want to save to the disk.
if self.isTrain:
# 训练模式,定义4个网络其中G_B和D_B是新增
self.model_names = ['G_A', 'G_B', 'D_A', 'D_B']
else: # during test time, only load Gs
# 测试模式,仅仅需要生成网络,其中G_B是新增。
self.model_names = ['G_A', 'G_B']
# define networks (both Generators and discriminators)
# The naming is different from those used in the paper.
# Code (vs. paper): G_A (G), G_B (F), D_A (D_Y), D_B (D_X)
# 定义G_A和G_B网络
self.netG_A = networks.define_G(opt.input_nc, opt.output_nc, opt.ngf, opt.netG, opt.norm,
not opt.no_dropout, opt.init_type, opt.init_gain, self.gpu_ids)
self.netG_B = networks.define_G(opt.output_nc, opt.input_nc, opt.ngf, opt.netG, opt.norm,
not opt.no_dropout, opt.init_type, opt.init_gain, self.gpu_ids)
# 训练模式下,定义D_A和D_B网络。
if self.isTrain: # define discriminators
self.netD_A = networks.define_D(opt.output_nc, opt.ndf, opt.netD,
opt.n_layers_D, opt.norm, opt.init_type, opt.init_gain, self.gpu_ids)
self.netD_B = networks.define_D(opt.input_nc, opt.ndf, opt.netD,
opt.n_layers_D, opt.norm, opt.init_type, opt.init_gain, self.gpu_ids)
if self.isTrain:
# only works when input and output images have the same number of channels
if opt.lambda_identity > 0.0:
assert(opt.input_nc == opt.output_nc)
# create image buffer to store previously generated images
self.fake_A_pool = ImagePool(opt.pool_size)
# create image buffer to store previously generated images
self.fake_B_pool = ImagePool(opt.pool_size)
# define loss functions: 定义所用到的loss函数,
# 这里有三种loss,对应三种loss
# define GAN loss.MSE, MSE loss,用于计算D网络的判决结果的loss
self.criterionGAN = networks.GANLoss(opt.gan_mode).to(self.device)
# L1 Loss:图片还原程度的loss
self.criterionCycle = torch.nn.L1Loss()
# L1 Loss:图片转换后的损失度loss
self.criterionIdt = torch.nn.L1Loss()
# 定义所用到的优化器
# initialize optimizers; schedulers will be automatically created by function <BaseModel.setup>.
# 定义G网络的优化器:优化的参数包括G_A和G_B网络的参数。
self.optimizer_G = torch.optim.Adam(itertools.chain(self.netG_A.parameters(), self.netG_B.parameters()), lr=opt.lr, betas=(opt.beta1, 0.999))
# 定义D网络的优化器:优化的参数包括D_A和D_B网络的参数。
self.optimizer_D = torch.optim.Adam(itertools.chain(self.netD_A.parameters(), self.netD_B.parameters()), lr=opt.lr, betas=(opt.beta1, 0.999))
self.optimizers.append(self.optimizer_G)
self.optimizers.append(self.optimizer_D)
- train模式下需要定义G_A2B, D_A2B, G_B2A, D_B2A网络, 而在测试或预测模式下,只需要定义G_A2B和G_B2A网络。
- 只有在训练模式下,才需要定义loss和优化算法。
1.4 输入数据集处理代码解读
def set_input(self, input):
"""Unpack input data from the dataloader and perform necessary pre-processing steps.
Parameters:
input (dict): include the data itself and its metadata information.
The option 'direction' can be used to swap domain A and domain B.
"""
AtoB = self.opt.direction == 'AtoB'
self.real_A = input['A' if AtoB else 'B'].to(self.device)
self.real_B = input['B' if AtoB else 'A'].to(self.device)
self.image_paths = input['A_paths' if AtoB else 'B_paths']
- real_A: 真实的输入图片。
- real_B: 真实的标签图片 (标签不一定是分类的数值,也可以是一张图片)
1.5 前向运算
def forward(self):
"""Run forward pass; called by both functions <optimize_parameters> and <test>."""
self.fake_B = self.netG_A(self.real_A) # G_A(A)
self.rec_A = self.netG_B(self.fake_B) # G_B(G_A(A))
self.fake_A = self.netG_B(self.real_B) # G_B(B)
self.rec_B = self.netG_A(self.fake_A) # G_A(G_B(B))
- 前向运算只使用G网络,创造或生成图片。
- 这里有4种前向运算,因此没有结果返回,生成结果存放在4个成员变量中。
第2章 网络的训练
1.1 G生成网络的结构与代码解读
(1)G网络的训练架构

(2)G网络Loss代码实现
def backward_G(self):
"""Calculate the loss for generators G_A and G_B"""
lambda_idt = self.opt.lambda_identity
lambda_A = self.opt.lambda_A
lambda_B = self.opt.lambda_B
# Identity loss
if lambda_idt > 0:
# G_A should be identity if real_B is fed: ||G_A(B) - B||
self.idt_A = self.netG_A(self.real_B)
self.loss_idt_A = self.criterionIdt(self.idt_A, self.real_B) * lambda_B * lambda_idt
# G_B should be identity if real_A is fed: ||G_B(A) - A||
self.idt_B = self.netG_B(self.real_A)
self.loss_idt_B = self.criterionIdt(self.idt_B, self.real_A) * lambda_A * lambda_idt
else:
self.loss_idt_A = 0
self.loss_idt_B = 0
# GAN loss D_A(G_A(A))
self.loss_G_A = self.criterionGAN(self.netD_A(self.fake_B), True)
# GAN loss D_B(G_B(B))
self.loss_G_B = self.criterionGAN(self.netD_B(self.fake_A), True)
# Forward cycle loss || G_B(G_A(A)) - A||
self.loss_cycle_A = self.criterionCycle(self.rec_A, self.real_A) * lambda_A
# Backward cycle loss || G_A(G_B(B)) - B||
self.loss_cycle_B = self.criterionCycle(self.rec_B, self.real_B) * lambda_B
# combined loss and calculate gradients
self.loss_G = self.loss_G_A + self.loss_G_B + self.loss_cycle_A + self.loss_cycle_B + self.loss_idt_A + self.loss_idt_B
self.loss_G.backward()
疑问:上述代码中的loss_idt_A与loss_idt_B为什么是如下的公式?
if lambda_idt > 0:
# G_A should be identity if real_B is fed: ||G_A(B) - B||
self.idt_A = self.netG_A(self.real_B)
self.loss_idt_A = self.criterionIdt(self.idt_A, self.real_B) * lambda_B * lambda_idt
# 疑问:为什么real_B与real_B转换后的图片idt_A相比?
# G_B should be identity if real_A is fed: ||G_B(A) - A||
self.idt_B = self.netG_B(self.real_A)
self.loss_idt_B = self.criterionIdt(self.idt_B, self.real_A) * lambda_A * lambda_idt
# 疑问:为什么real_A与real_A转换后的图片idt_B相比?
为什么不是这样?
if lambda_idt > 0:
# G_A should be identity if real_B is fed: ||G_A(B) - B||
self.idt_A = self.netG_A(self.real_B)
self.loss_idt_A = self.criterionIdt(self.idt_A, self.real_A) * lambda_B * lambda_idt
# G_B should be identity if real_A is fed: ||G_B(A) - A||
self.idt_B = self.netG_B(self.real_A)
self.loss_idt_B = self.criterionIdt(self.idt_B, self.real_B) * lambda_A * lambda_idt
答案:内在逻辑
- G_A网络对Real_B输入尽可能的不要转换,直接生成Real_B
- G_B网络对Real_A输入尽可能的不要转换,直接还原成Real_A
1.2 D-A判决网络的结构与代码解读
(1)D-A网络的训练架构

(2)D-A网络Loss代码实现
def backward_D_A(self):
"""Calculate GAN loss for discriminator D_A"""
fake_B = self.fake_B_pool.query(self.fake_B)
self.loss_D_A = self.backward_D_basic(self.netD_A, self.real_B, fake_B)
1.3 D-A判决网络的结构与代码解读
(1)D-B网络的训练架构

(2)D-B网络Loss代码实现
def backward_D_B(self):
"""Calculate GAN loss for discriminator D_B"""
fake_A = self.fake_A_pool.query(self.fake_A)
self.loss_D_B = self.backward_D_basic(self.netD_B, self.real_A, fake_A)
1.4 网络整体的优化算法
def optimize_parameters(self):
"""Calculate losses, gradients, and update network weights; called in every training iteration"""
# forward
# compute fake images and reconstruction images.
# 前向运算:包括4个运算,不是1个运算
self.forward()
# 一起训练G_A and G_B
# Ds require no gradients when optimizing Gs
# 锁定D网络
self.set_requires_grad([self.netD_A, self.netD_B], False)
# 复位G网络的梯度
self.optimizer_G.zero_grad() # set G_A and G_B's gradients to zero
# 计算G网络的梯度
self.backward_G() # calculate gradients for G_A and G_B
# 更新G网络的梯度
self.optimizer_G.step() # update G_A and G_B's weights
# 独立训练D_A and D_B
# 使能D网络训练
self.set_requires_grad([self.netD_A, self.netD_B], True)
# set D_A and D_B's gradients to zero
# 复位D网络梯度
self.optimizer_D.zero_grad()
# 计算D_A网络梯度
self.backward_D_A() # calculate gradients for D_A
# 计算D_B网络梯度
self.backward_D_B() # calculate graidents for D_B
# 更新D_A和D_B网络梯度
self.optimizer_D.step() # update D_A and D_B's weights
- 锁定D网络,训练G_A和D_B网络,使得输出图片能够骗过D_A和D_B网络。
- 开放D网络,训练D_A和D_B网络, 能够识别出输出图片是fake图片,即生成图片。
- 重新锁定D网络,训练G_A和D_B网络,使得输出图片能够骗过D_A和D_B网络。
- 依次类推,不断对抗、优化、迭代、更新,直到D网络无法判决出G网络输出的真假,得到以假乱真的效果。
作者主页(文火冰糖的硅基工坊):文火冰糖(王文兵)的博客_文火冰糖的硅基工坊_CSDN博客
本文网址:https://blog.csdn.net/HiWangWenBing/article/details/122106440
以上是关于CycleGAN的pytorch代码实现(代码详细注释)的主要内容,如果未能解决你的问题,请参考以下文章