SpringBoot 结合RabbitMQ与Redis实现商品的并发下单SpringBoot系列12
Posted 早起的年轻人
tags:
篇首语:本文由小常识网(cha138.com)小编为大家整理,主要介绍了SpringBoot 结合RabbitMQ与Redis实现商品的并发下单SpringBoot系列12相关的知识,希望对你有一定的参考价值。
SpringCloud 大型系列课程正在制作中,欢迎大家关注与提意见。
程序员每天的CV 与 板砖,也要知其所以然,本系列课程可以帮助初学者学习 SpringBooot 项目开发 与 SpringCloud 微服务系列项目开发
1 项目准备
本文章是系列文章 ,每节文章都有对应的代码,每节的源码都是在上一节的基础上配置而来,对应的视频讲解课程正在火速录制中。
订单系统,用户下单,即要保存即时性,也要保证流畅性,同时还要防止超卖,本文章是基于 RabbitMQ 消息队列 + Redis 实现的下单,当然后续还会的秒杀系统设计 以及后续的微服务以及熔断控制等等
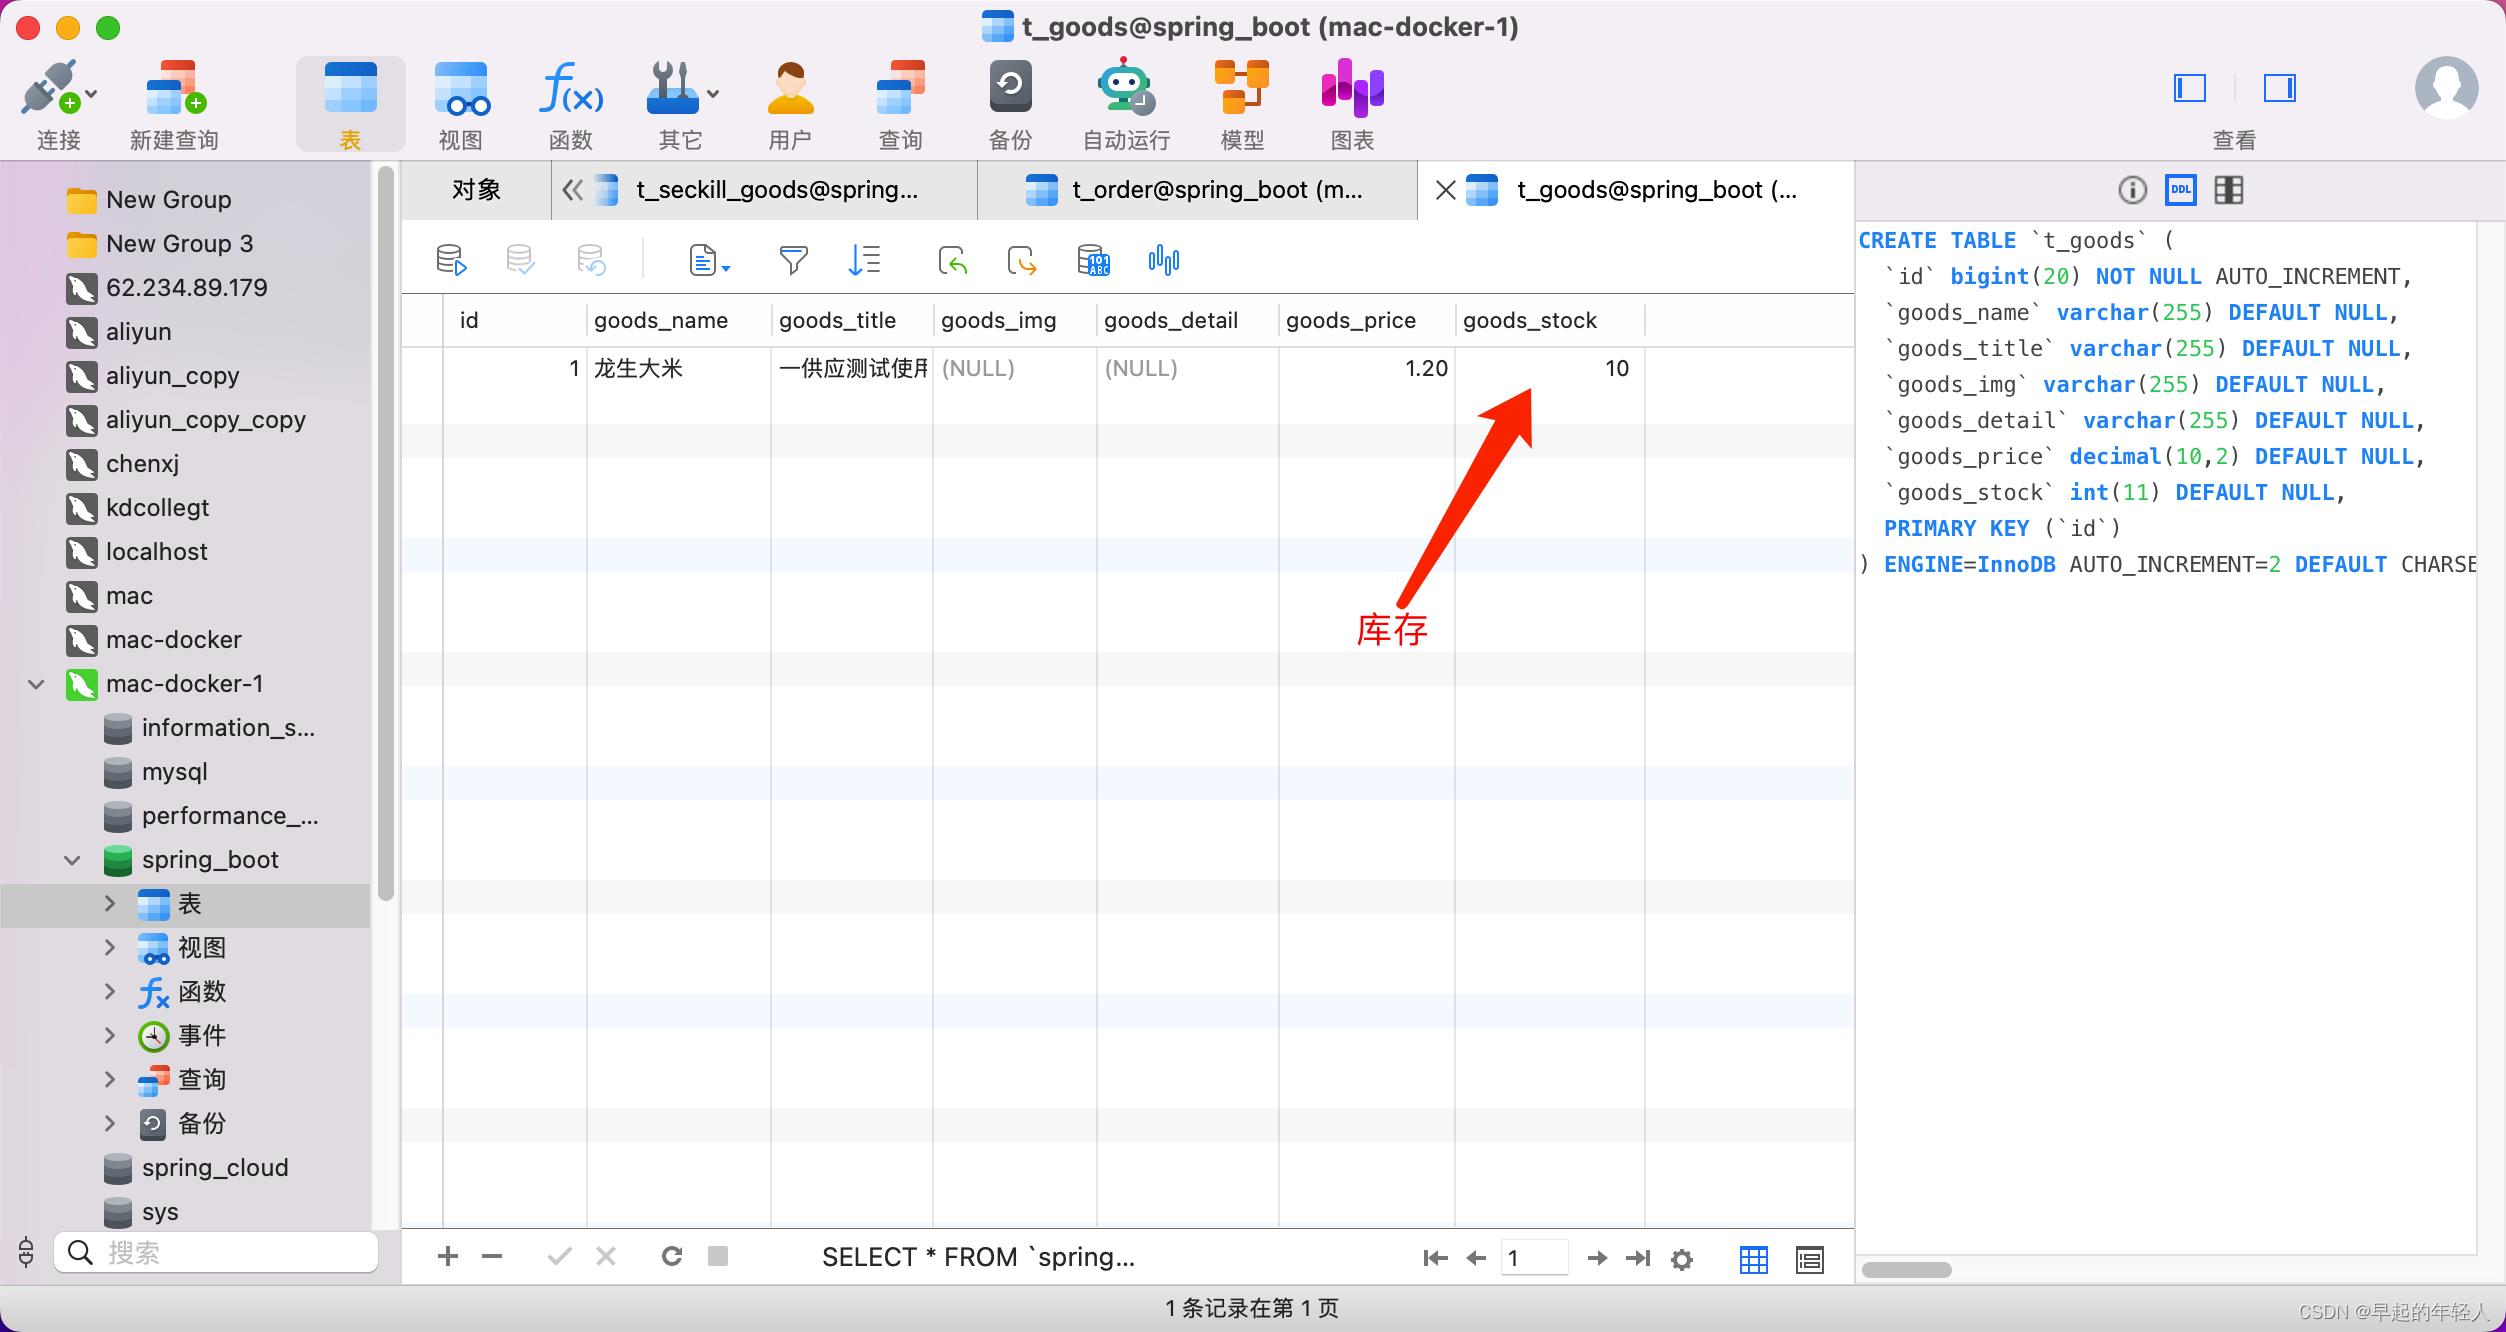
如这里 我的商品 库存有 10 个
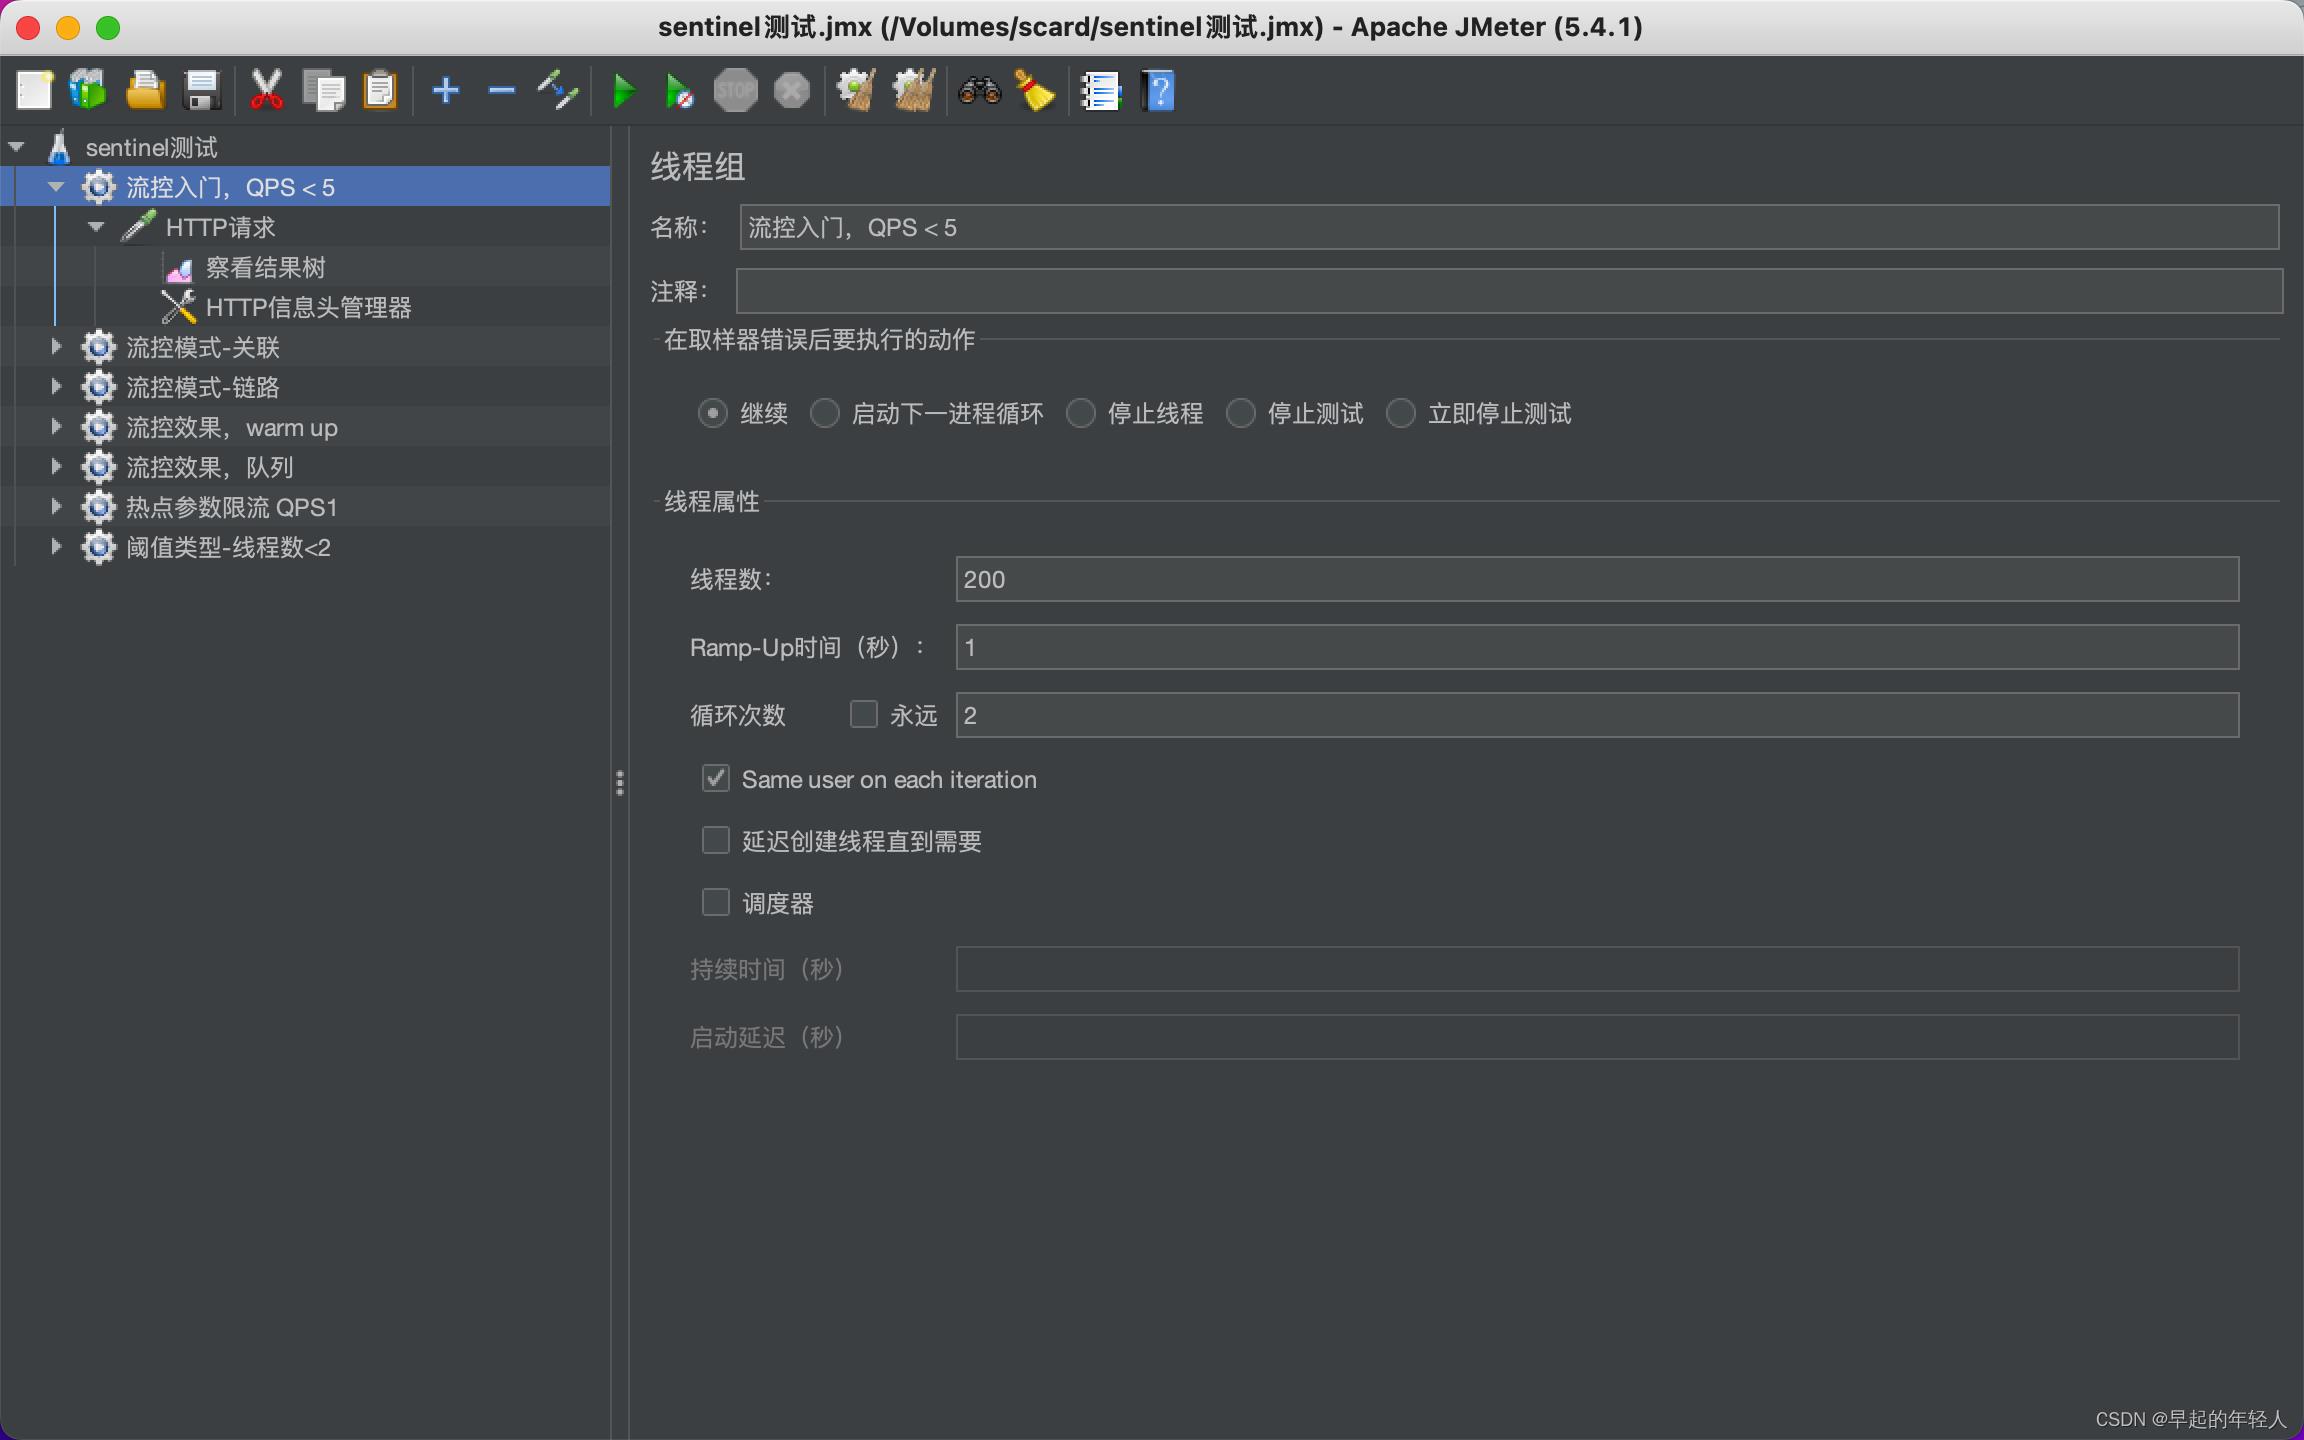
然后我使用 apache-jmeter-5.5 压测,200个用户1秒内请求完成,每个用户请求2次,也就是1秒有400次下单请求
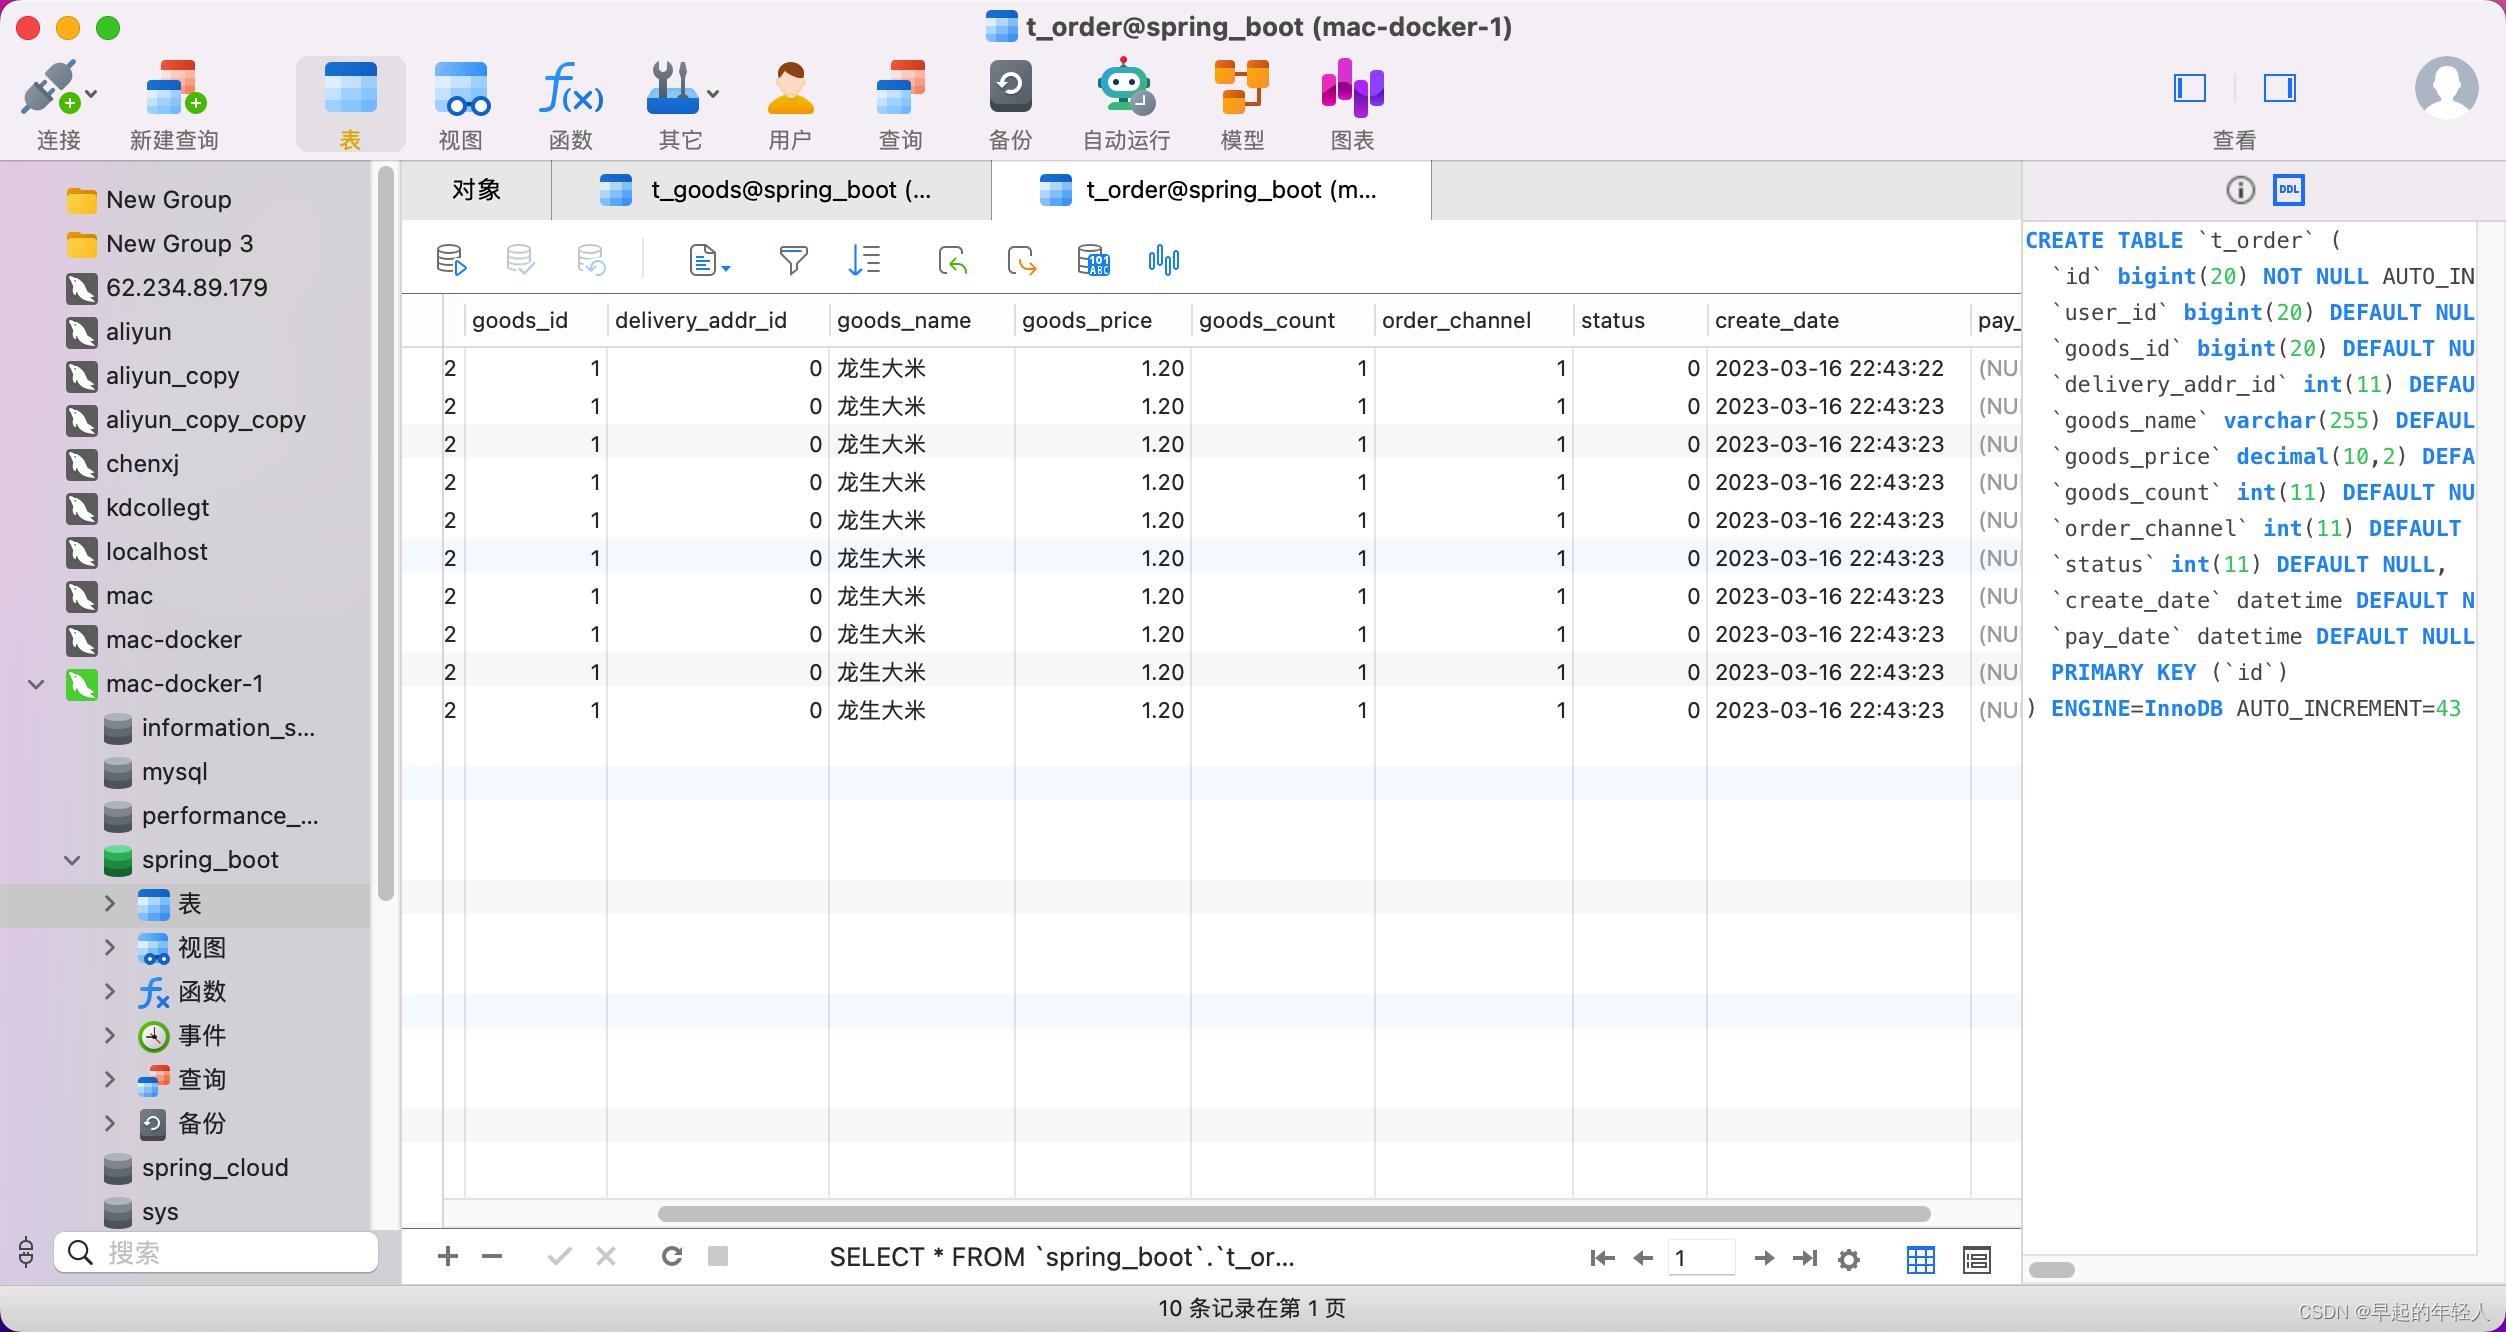
测试完成后,商品库存为0,然后订单生成10个,完美解决并发问题
这是实现的普通订单,基本实现逻辑是
1、redis 校验库存,预下单
2、消息队列减库存 生成 订单 (数据库、redis、es)
3、用户查询到订单成功,发起支付
4、支付回调 修改订单数据 (数据库、redis 、es)
1 预下单接口
@Api(tags="订单模块")
@RestController()
@RequestMapping("/orders")
@Slf4j
public class OrderController
    @Autowired
    private OrderService orderService;

    /**
     * 下单
     * @param goodsId 商品ID
     * @param userId
     * @return
     */
    @GetMapping("/create/id")
    public R createOrder(@PathVariable("id") Long goodsId,@RequestHeader Long userId)
        return orderService.createPreOrder(goodsId,userId);
    @Autowired
    private RedisTemplate redisTemplate;
    @Autowired
    private OrderMQSender mqSender;
    @Override
    public R createPreOrder(Long goodsId, Long userId)
        log.info("预下单处理 userId: goodsId: ",userId,goodsId);

        //获取redis中的商品库存 先判断商品是否有库存
        Boolean aBoolean = redisTemplate.hasKey("goodStock:" + goodsId);
        if(Boolean.FALSE.equals(aBoolean))
           return R.error("下单失败 商品库存不足");

        //获取商品库存
        int goodsStock = Integer.valueOf(redisTemplate.opsForValue().get("goodStock:" +goodsId).toString());
        if(goodsStock==0)
            return R.error("下单失败 商品库存不足");

        //发送下单消息
        SecKillMessage message = new SecKillMessage(userId, goodsId);
        mqSender.sendCommonOrderMessage(JsonUtils.toJson(message));
        return R.okData("预下单成功");
redisTemplate 的 hasKey 可以直接判断key是否存在,在这里如果商品的key不存在,则商品无库存,redis 的商品库存是在服务启动后,自动同步进入的
@Service
@Slf4j
public class OrderServiceImpl implements OrderService , InitializingBean

    @Autowired
    private RedisTemplate redisTemplate;

    @Autowired
    private GoodsService goodsService;

    /**
     * 初始化秒杀商品数量到 redis 中
     *
     * @return
     */
    @Override
    public R startSeckillInit()
        List<SeckillGoods> goods = secKillGoodsService.findAllSecKillGoods();
        if (CollectionUtils.isEmpty(goods))
            return R.error("无秒杀商品");


        goods.forEach(g ->
            log.info("初始化秒杀商品 goodsId: stock: ", g.getGoodsId(), g.getStockCount());
            redisTemplate.opsForValue().set("goodStock:" + g.getGoodsId(), g.getStockCount());
        );
        return R.ok("初始化完成");


    @Override
    public void afterPropertiesSet() throws Exception
        this.startSeckillInit();
InitializingBean 当一个类实现这个接口之后,Spring启动后,初始化Bean时,若该Bean实现InitialzingBean接口,会自动调用afterPropertiesSet()方法,完成一些用户自定义的初始化操作。
2 消息队列的定义
在这里单独定义普通下单使用的队列与交换机
import org.springframework.amqp.core.Binding;
import org.springframework.amqp.core.BindingBuilder;
import org.springframework.amqp.core.Queue;
import org.springframework.amqp.core.TopicExchange;
import org.springframework.context.annotation.Bean;
import org.springframework.context.annotation.Configuration;

@Configuration
public class OrderRabbitMQTopicConfig


    private static final String commonOrderQueue = "commonOrderQueue";
    private static final String commonExchange = "commonOrderExchange";

    @Bean
    public Queue commonOrderQueue()
        return new Queue(commonOrderQueue);

    @Bean
    public TopicExchange commonExchange()
        return new TopicExchange(commonExchange);

    @Bean
    public Binding commonOrderBinding()
        return BindingBuilder.bind(commonOrderQueue()).to(commonExchange()).with("commonOrder.#");
然后就是订单的发送者
@Service
@Slf4j
public class OrderMQSender
    @Autowired
    private RabbitTemplate rabbitTemplate;
    /**
     * 普通订单走的队列
     * @param msg
     */
    public void sendCommonOrderMessage(String msg)
        log.info("预下单发送消息:", msg);
        rabbitTemplate.convertAndSend("commonOrderExchange", "commonOrder.message", msg);
然后定义普通订单的消息接收者
@Service
@Slf4j
public class OrderMQReceiver

    @Autowired
    private OrderService orderService;

    @RabbitListener(queues = "commonOrderQueue")
    public void receiveCommonOrderMessage(String message)
        log.info("接收的秒杀订单消息:", message);
        SecKillMessage secKillMessage = JsonUtils.toObj(message, SecKillMessage.class);
        Long userId = secKillMessage.getUserId();
        Long goodsId = secKillMessage.getGoodsId();
        //普通下单
        orderService.createOrder(goodsId, userId);
普通下单里,就是减库存,生成订单的过程
    @Override
    @Transactional
    public R createOrder(Long goodsId, Long userId)

        log.info("下单处理 userId: goodsId: ",userId,goodsId);
       //查询商品详情
        Goods goods = goodsService.findGoods(goodsId);
        //商品的实际库存
        if (goods.getGoodsStock() < 1)
            // 设置该商品库存为空
            redisTemplate.opsForValue().set("goodStock:" + goods.getId(), "0");
            log.info("库存不足 下单失败");
            return R.error("商品库存不足");

        //减库存
        int currentStock = goods.getGoodsStock() -1;
        //更新数据库 库存
        goods.setGoodsStock(currentStock);
        int update = goodsService.updateGoodsStock(goods);
        if(update<=0)
            log.info("更新库存失败 下单失败");
            return R.error("商品库存不足");

        //更新redis 缓存
        redisTemplate.opsForValue().set("goodStock:" + goods.getId(), currentStock);
        // 下订单
        Order order = new Order();
        order.setUserId(userId);
        order.setGoodsId(goodsId);
        order.setDeliveryAddrId(0L);
        order.setGoodsName(goods.getGoodsName());
        order.setGoodsCount(1);
        order.setGoodsPrice(goods.getGoodsPrice());
        order.setOrderChannel(1);
        order.setStatus(0); // 订单创建中
        order.setCreateDate(new Date());
        orderMapper.insert(order);
        log.info("下单成功 userId: goodsId: orderId:",userId,goodsId,order.getId());
        //缓存普通订单
        redisTemplate.opsForValue().set("order:" +userId + ":" + goodsId, order);
        //保存数据到ES中
        //后续实现
        return R.okData(order);
本文章是系列文章 ,每节文章都有对应的代码,每节的源码都是在上一节的基础上配置而来,对应的视频讲解课程正在火速录制中。
本文章只有核心代码,全部代码请查看对应源码
项目源码在这里 :https://gitee.com/android.long/spring-boot-study/tree/master/biglead-api-10-seckill
有兴趣可以关注一下公众号:biglead
- 创建SpringBoot基础项目
- SpringBoot项目集成mybatis
- SpringBoot 集成 Druid 数据源【SpringBoot系列3】
- SpringBoot MyBatis 实现分页查询数据【SpringBoot系列4】
- SpringBoot MyBatis-Plus 集成 【SpringBoot系列5】
- SpringBoot mybatis-plus-generator 代码生成器 【SpringBoot系列6】
- SpringBoot MyBatis-Plus 分页查询 【SpringBoot系列7】
- SpringBoot 集成Redis缓存 以及实现基本的数据缓存【SpringBoot系列8】
- SpringBoot 整合 Spring Security 实现安全认证【SpringBoot系列9】
- SpringBoot Security认证 Redis缓存用户信息【SpringBoot系列10】
- SpringBoot 整合 RabbitMQ 消息队列【SpringBoot系列11】
SpringBoot整合RabbitMQ(源代码)
SpringBoot整合RabbitMQ
1. 配置类:服务器配置、创建交换器、创建队列、创建绑定关系
2. 生产者:使用路由键发送消息(使用template)
3. 消费者:监听类(监听队列) 推模式
交换器有三种分别为 direct fanout topic
- direct传递的为Key=“red”
- fanout是广播,不考虑key全部发送
- topic绑定的类型为red.* 可以接受red.任意值 小数点代码分隔符 red.82 就只能接受red.82
配置类
package com.itdfq.rabbitmq.config;


import com.itdfq.rabbitmq.reveiver.Receiver;
import org.springframework.amqp.core.*;
import org.springframework.amqp.rabbit.connection.CachingConnectionFactory;
import org.springframework.amqp.rabbit.connection.ConnectionFactory;

import org.springframework.amqp.rabbit.connection.CorrelationData;
import org.springframework.amqp.rabbit.core.RabbitAdmin;
import org.springframework.amqp.rabbit.core.RabbitTemplate;
import org.springframework.amqp.rabbit.listener.SimpleMessageListenerContainer;
import org.springframework.beans.factory.annotation.Autowired;
import org.springframework.beans.factory.annotation.Value;
import org.springframework.context.annotation.Bean;
import org.springframework.context.annotation.Configuration;


/**
 * @Author GocChin
 * @Date 2021/5/1 21:22
 * @Blog: itdfq.com
 * @QQ: 909256107
 * @Descript: 配置类
 */
@Configuration
public class RabbitConfig {
    @Value("${spring.rabbitmq.addresses}")
    private String address;
    @Value("${spring.rabbitmq.port}")
    private String port;
    @Value("${spring.rabbitmq.username}")
    private String username;
    @Value("${spring.rabbitmq.password}")
    private String password;
    @Value("${spring.rabbitmq.virtual-host}")
    private String virtualHost;

    @Autowired
    private Receiver receiver;

    //连接工厂
    @Bean
    public ConnectionFactory connectionFactory(){
        CachingConnectionFactory connectionFactory = new CachingConnectionFactory();
        connectionFactory.setAddresses(address+":"+port);
        connectionFactory.setUsername(username);
        connectionFactory.setPassword(password);
        connectionFactory.setVirtualHost(virtualHost);
        //TODO  消息发送确认--回调
        connectionFactory.setPublisherConfirms(true);
        return  connectionFactory;

    }

    //RabbitAdmin类封装对RabbitMQ的管理操作
    @Bean
    public RabbitAdmin rabbitAdmin(ConnectionFactory connectionFactory){

        return new RabbitAdmin(connectionFactory);
    }
    //使用Template
    @Bean
    public RabbitTemplate newRabbitTemplate(){
        RabbitTemplate rabbitTemplate = new RabbitTemplate(connectionFactory());
        //设置监听确认mq(交换器)接受到信息
        rabbitTemplate.setConfirmCallback(confirmCallback());
        //添加监听 失败鉴定(路由没有收到)
        rabbitTemplate.setMandatory(true);
        rabbitTemplate.setReturnCallback(returnCallback());
        return rabbitTemplate;
    }

    //声明交换器
    //Direct交换器
    @Bean
    public DirectExchange DirectExchange(){
        return new DirectExchange("DirectExchange");
    }
    //topic交换器
    @Bean
    public TopicExchange TopicExchange(){
        return new TopicExchange("TopicExchange");
    }
    //Fanout交换器
    @Bean
    public FanoutExchange FanoutExchange(){
        return new FanoutExchange("FanoutExchange");
    }
    //申明队列
    @Bean
    public Queue queue1(){
        return new Queue("queue1");
    }
    @Bean
    public Queue queue2(){
        return new Queue("queue2");
    }
    //绑定关系
    //queue1与direct绑定
    @Bean
    public Binding bindingQueue1Direct(){
        return BindingBuilder.bind(queue1())
                .to(DirectExchange())
                .with("red");
    }
    //queue2与direct绑定
    @Bean
    public Binding bindingQueue2Direct(){
        return BindingBuilder.bind(queue1())
                .to(DirectExchange())
                .with("while");
    }
    //queue1与fanout绑定
    @Bean
    public Binding bindingQueue1Fanout(){
        return BindingBuilder.bind(queue1())
                .to(FanoutExchange());

    }
    //queue2与fanout绑定
    @Bean
    public Binding bindingQueue2Fanout(){
        return BindingBuilder.bind(queue1())
                .to(FanoutExchange());
    }
    //queue1与Topic绑定
    @Bean
    public Binding bindingQueue1Topic(){
        return BindingBuilder.bind(queue1())
                .to(TopicExchange())
                .with("red.*");

    }
    //queue2与Topic绑定
    @Bean
    public Binding bindingQueue2Topic(){
        return BindingBuilder.bind(queue1())
                .to(TopicExchange())
                .with("white.82");
    }
    //****************生产者发送确认********************
    @Bean
    public RabbitTemplate.ConfirmCallback confirmCallback(){
        return new RabbitTemplate.ConfirmCallback() {
            @Override
            public void confirm(CorrelationData correlationData, boolean b, String s) {
                if (b){
                    System.out.println("发送者确认发送给mq成功");
                }else{
                    System.out.println("发送者发送失败,考虑重发"+s);
                }
            }
        };
    }
    //****************失败通知********************
    //失败才通知,成功不通知
    @Bean
    public RabbitTemplate.ReturnCallback returnCallback(){
        return new RabbitTemplate.ReturnCallback() {
            @Override
            public void returnedMessage(Message message, int i, String replayText, String exchange, String rountingKey) {
                System.out.println("无效路由信息,需要考虑另外处理");
                System.out.println("Returned replayText:"+replayText);
                System.out.println("Returned exchange:"+exchange);
                System.out.println("Returned rountingKey:"+rountingKey);
                String s = new String(message.getBody());
                System.out.println("Returned Message:"+s);
            }
        };
    }
    //****************消费者确认********************
    @Bean
    public SimpleMessageListenerContainer messageListenerContainer(){
        SimpleMessageListenerContainer container = new SimpleMessageListenerContainer(connectionFactory());
        //绑定队列
        container.setQueues(queue1());
        //手动提交
        container.setAcknowledgeMode(AcknowledgeMode.MANUAL);
        //消费者确认方法
        container.setMessageListener(receiver);
        return container;
    }
}
生产者
package com.itdfq.rabbitmq.controller;

import org.springframework.amqp.rabbit.core.RabbitTemplate;
import org.springframework.beans.factory.annotation.Autowired;
import org.springframework.web.bind.annotation.GetMapping;
import org.springframework.web.bind.annotation.RequestMapping;
import org.springframework.web.bind.annotation.RequestParam;
import org.springframework.web.bind.annotation.RestController;


/**
 * @Author GocChin
 * @Date 2021/5/1 22:04
 * @Blog: itdfq.com
 * @QQ: 909256107
 */
@RestController
@RequestMapping("/rabbit")
public class RabbitProducter {
    @Autowired
    private RabbitTemplate rabbitTemplate;
    /**
     * direct
     */
    @GetMapping("/direct")
    public String direct(@RequestParam(required = true) String Key){//mq消息的发送  true表示必须传递参数
        String sendMsg = "key("+Key+"),exchange(direct)-"+System.currentTimeMillis(); //currentTimeMillis时间戳
        System.out.println("DirectSender"+sendMsg);
        this.rabbitTemplate.convertAndSend("DirectExchange",Key,sendMsg);
        return "发送direct消息成功";

    }
    @RequestMapping("/asd")
    public String index(){
        return "jieshaole";
    }
    /**
     * topic
     */
    @GetMapping("/topic")
    public String topic(@RequestParam(required = true) String Key){//mq消息的发送  true表示必须传递参数
        String sendMsg = "key("+Key+"),exchange(topic)-"+System.currentTimeMillis();
        System.out.println("TopicSender"+sendMsg);
        this.rabbitTemplate.convertAndSend("TopicExchange",Key,sendMsg);
        return "发送topic消息成功";

    }
    /**
     * fanout
     */
    @GetMapping("/fanout")
    public String fanout(@RequestParam(required = true) String Key){//mq消息的发送  true表示必须传递参数
        String sendMsg = "key("+Key+"),exchange(fanout)-"+System.currentTimeMillis();
        System.out.println("FanoutSender"+sendMsg);
        this.rabbitTemplate.convertAndSend("FanoutExchange",Key,sendMsg);
        return "发送fanout消息成功";

    }

}
消费者
- 自动确认的消费者
package com.itdfq.rabbitmq.reveiver;

import org.springframework.amqp.rabbit.annotation.RabbitHandler;
import org.springframework.amqp.rabbit.annotation.RabbitListener;
import org.springframework.stereotype.Component;

/**
 * @Author GocChin
 * @Date 2021/5/1 22:26
 * @Blog: itdfq.com
 * @QQ: 909256107
 * @Desrcipt:监听类
 */
@Component
@RabbitListener(queues = "queue2") //监听的队列  自动确认
public class Consumer2 {

    @RabbitHandler  //根据这个注解进行执行方法
    public void process(String msg){
        System.out.println("Consumer1-Receiver:"+msg);
    }
}
- 手动确认的消费者
package com.itdfq.rabbitmq.reveiver;

import com.rabbitmq.client.Channel;
import org.springframework.amqp.core.Message;
import org.springframework.amqp.rabbit.listener.api.ChannelAwareMessageListener;
import org.springframework.stereotype.Component;

import java.io.IOException;

/**
 * @Author GocChin
 * @Date 2021/5/1 23:56
 * @Blog: itdfq.com
 * @QQ: 909256107
 * @Decript: 消费queue1
 */
@Component
public class Receiver implements ChannelAwareMessageListener {
    @Override
    public void onMessage(Message message, Channel channel) throws Exception {
        try {
            String msg=new String(message.getBody());
            System.out.println("Receiver>>>>>>>>接收到消息:"+msg);
            try {
                channel.basicAck(message.getMessageProperties().getDeliveryTag(),false);
                System.out.println("Receiver>>>>>>>>消息已消费");
            } catch (Exception e) {
                System.out.println(e.getMessage());
                channel.basicNack(message.getMessageProperties().getDeliveryTag(),false,false);
                System.out.println("Receiver>>>>>>拒绝消息,要求MQ重新发送");
                e.printStackTrace();
                throw e;
            }
        } catch (Exception e) {
            e.printStackTrace();
            System.out.println(e.getMessage());
        }

    }
- 源代码
以上是关于SpringBoot 结合RabbitMQ与Redis实现商品的并发下单SpringBoot系列12的主要内容,如果未能解决你的问题,请参考以下文章