SpringCloud框架之Config分布式配置中心
Posted 蛋饼吧
tags:
篇首语:本文由小常识网(cha138.com)小编为大家整理,主要介绍了SpringCloud框架之Config分布式配置中心相关的知识,希望对你有一定的参考价值。
本笔记内容为尚硅谷SpringCloud框架开发Config配置中心部分
目录
6.测试通过Config微服务是否可以从GitHub上获取配置内容
4.@RefreshScope业务类Controller修改
一、概述
微服务意味着要将单体应用中的业务拆分成一个个子服务,每个服务的粒度相对较小,因此系统中会出现大量的服务。由于每个服务都需要必要的配置信息才能运行,所以一套集中式的、动态的配置管理设施是必不可少的。
SpringCloud提供了ConfigServer来解决这个问题,我们每一个微服务自己带着一个application.yml,上百个配置文件的管理
1、是什么
SpringCloud Config为微服务架构中的微服务提供集中化的外部配置支持,配置服务器为各个不同微服务应用的所有环境提供了一个中心化的外部配置。
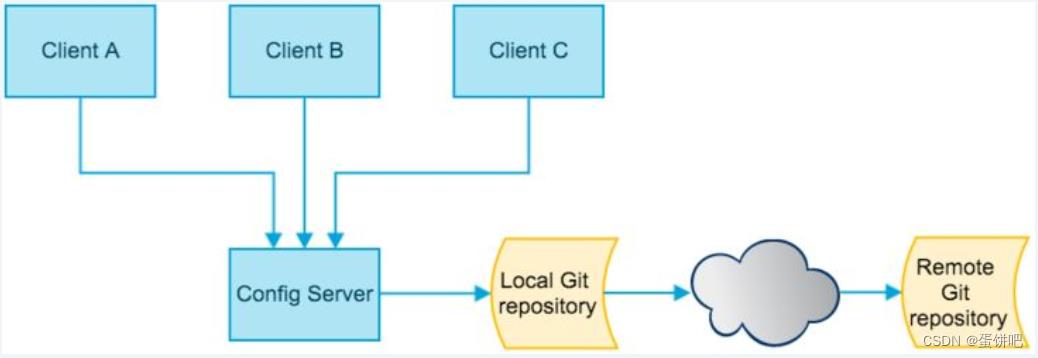
SpringCloud Config分为服务端和客户端两部分。
服务端也称为分布式配置中心,它是一个独立的微服务应用,用来连接配置服务器并为客户端提供获取配置信息,加密/解密信息等访问接口
客户端则是通过指定的配置中心来管理应用资源,以及与业务相关的配置内容,并在启动的时候从配置中心获取和加载配置信息配置服务器默认采用git来存储配置信息,这样就有助于对环境配置进行版本管理,并且可以通过git客户端工具来方便的管理和访问配置内容。
2、作用
- 集中管理配置文件。
- 不同环境不同配置,动态化的配置更新,分环境部署比如dev/test/prod/beta/release。
- 运行期间动态调整配置,不再需要在每个服务部署的机器上编写配置文件,服务会向配置中心统一拉取配置自己的信息。
- 当配置发生变动时,服务不需要重启即可感知到配置的变化并应用新的配置。
- 将配置信息以REST接口的形式暴露:post、curl访问刷新均可。
与GitHub整合配置:由于SpringCloud Config默认使用Git来存储配置文件(也有其它方式,比如支持SVN和本地文件),但最推荐的还是Git,而且使用的是http/https访问的形式(推荐码云)
二、Config服务端配置与测试
1、建仓库并克隆
这里是用GitHub作为例子(根据自己情况决定)
①用你自己的账号在GitHub上新建一个名为springcloud-config的新Repository
②由上一步获得刚新建的git地址,git@github.com:zzyybs/springcloud-config.git
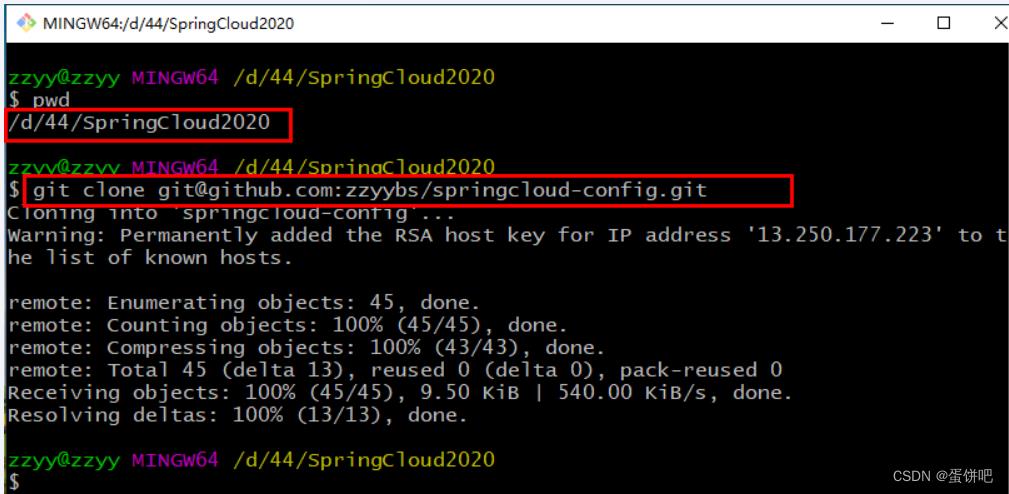
③本地硬盘目录上新建git仓库并clone
本地地址:D:\\44\\SpringCloud2020
git命令:git clone git@github.com:zzyybs/springcloud-config.git
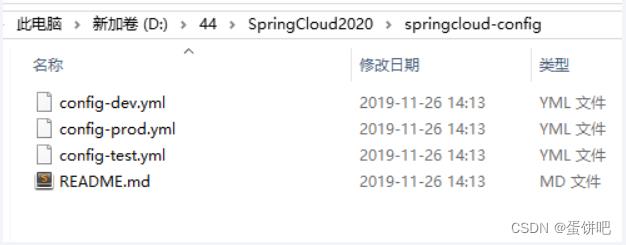
④此时在本地D盘符下D:\\44\\SpringCloud2020\\springcloud-config
表示多个环境的配置文件、保存格式必须为UTF-8
如果需要修改,此处模拟运维人员操作git和github
git add .
git commit -m "init yml"
git push origin master
2、新建项目
1.新建Module
新建Module模块cloud-config-center-3344它即为Cloud的配置中心模块cloudConfig Center
2.POM

<?xml version="1.0" encoding="UTF-8"?>
<project xmlns="http://maven.apache.org/POM/4.0.0"
         xmlns:xsi="http://www.w3.org/2001/XMLSchema-instance"
         xsi:schemaLocation="http://maven.apache.org/POM/4.0.0 http://maven.apache.org/xsd/maven-4.0.0.xsd">
    <parent>
        <artifactId>mscloud</artifactId>
        <groupId>com.atguigu.springcloud</groupId>
        <version>1.0-SNAPSHOT</version>
    </parent>
    <modelVersion>4.0.0</modelVersion>

    <artifactId>cloud-config-center-3344</artifactId>


    <dependencies>
        <dependency>
            <groupId>org.springframework.cloud</groupId>
            <artifactId>spring-cloud-config-server</artifactId>
        </dependency>
        <dependency>
            <groupId>org.springframework.cloud</groupId>
            <artifactId>spring-cloud-starter-netflix-eureka-client</artifactId>
        </dependency>
        <dependency>
            <groupId>org.springframework.boot</groupId>
            <artifactId>spring-boot-starter-web</artifactId>
        </dependency>

        <dependency>
            <groupId>org.springframework.boot</groupId>
            <artifactId>spring-boot-starter-actuator</artifactId>
        </dependency>
        <dependency>
            <groupId>org.springframework.boot</groupId>
            <artifactId>spring-boot-devtools</artifactId>
            <scope>runtime</scope>
            <optional>true</optional>
        </dependency>
        <dependency>
            <groupId>org.projectlombok</groupId>
            <artifactId>lombok</artifactId>
            <optional>true</optional>
        </dependency>
        <dependency>
            <groupId>org.springframework.boot</groupId>
            <artifactId>spring-boot-starter-test</artifactId>
            <scope>test</scope>
        </dependency>
    </dependencies>


</project>
3.YML
server:
  port: 3344

spring:
  application:
    name:  cloud-config-center #注册进Eureka服务器的微服务名
  cloud:
    config:
      server:
        git:
          uri: git@github.com:zzyybs/springcloud-config.git #GitHub上面的git仓库名字
        ####搜索目录
          search-paths:
            - springcloud-config
      ####读取分支
      label: master

#服务注册到eureka地址
eureka:
  client:
    service-url:
      defaultZone: http://localhost:7001/eureka
4.主启动类
@EnableConfigServer
ConfigCenterMain3344
package com.atguigu.springcloud;

import org.springframework.boot.SpringApplication;
import org.springframework.boot.autoconfigure.SpringBootApplication;
import org.springframework.cloud.config.server.EnableConfigServer;

@SpringBootApplication
@EnableConfigServer
public class ConfigCenterMain3344

    public static void main(String[] args)
            SpringApplication.run(ConfigCenterMain3344.class, args);
5.windows下修改hosts文件,增加映射
127.0.0.1 config-3344.com
6.测试通过Config微服务是否可以从GitHub上获取配置内容
启动微服务3344
http://config-3344.com:3344/master/config-dev.yml
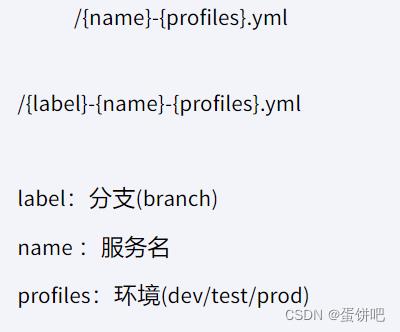
7.配置读取规则
①官网
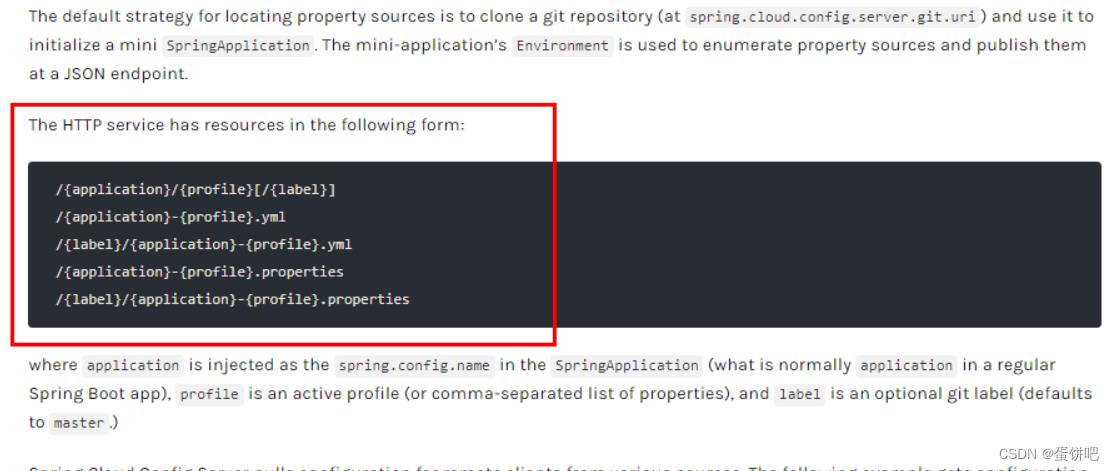
②/label/application-profile.yml
master分支
dev分支
③/application-profile.yml
④/application/profile[/label]
⑤重要配置细节总结
成功实现了用SpringCloud Config通过GitHub获取配置信息
三、Config客户端配置与测试
1、新建Module
新建cloud-config-client-3355
2、POM
<?xml version="1.0" encoding="UTF-8"?>
<project xmlns="http://maven.apache.org/POM/4.0.0"
xmlns:xsi="http://www.w3.org/2001/XMLSchema-instance"
xsi:schemaLocation="http://maven.apache.org/POM/4.0.0 http://maven.apache.org/xsd/maven-4.0.0.xsd">
<parent>
<artifactId>mscloud</artifactId>
<groupId>com.atguigu.springcloud</groupId>
<version>1.0-SNAPSHOT</version>
</parent>
<modelVersion>4.0.0</modelVersion>
<artifactId>cloud-config-client-3355</artifactId>
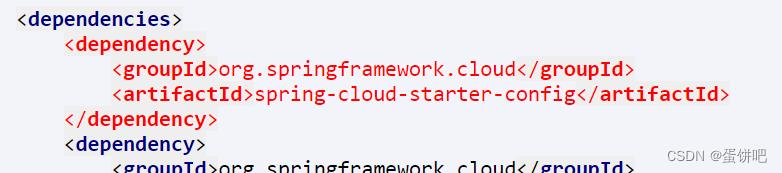
<dependencies>
<dependency>
<groupId>org.springframework.cloud</groupId>
<artifactId>spring-cloud-starter-config</artifactId>
</dependency>
<dependency>
<groupId>org.springframework.cloud</groupId>
<artifactId>spring-cloud-starter-netflix-eureka-client</artifactId>
</dependency>
<dependency>
<groupId>org.springframework.boot</groupId>
<artifactId>spring-boot-starter-web</artifactId>
</dependency>
<dependency>
<groupId>org.springframework.boot</groupId>
<artifactId>spring-boot-starter-actuator</artifactId>
</dependency>
<dependency>
<groupId>org.springframework.boot</groupId>
<artifactId>spring-boot-devtools</artifactId>
<scope>runtime</scope>
<optional>true</optional>
</dependency>
<dependency>
<groupId>org.projectlombok</groupId>
<artifactId>lombok</artifactId>
<optional>true</optional>
</dependency>
<dependency>
<groupId>org.springframework.boot</groupId>
<artifactId>spring-boot-starter-test</artifactId>
<scope>test</scope>
</dependency>
</dependencies>
</project>
3、bootstrap.yml
applicaiton.yml是用户级的资源配置项
bootstrap.yml是系统级的,优先级更加高
Spring Cloud会创建一个“Bootstrap Context”,作为Spring应用的`Application Context`的父上下文。初始化的时候,`Bootstrap Context`负责从外部源加载配置属性并解析配置。这两个上下文共享一个从外部获取的`Environment`。
`Bootstrap`属性有高优先级,默认情况下,它们不会被本地配置覆盖。 `Bootstrap context`和`Application Context`有着不同的约定,所以新增了一个`bootstrap.yml`文件,保证`Bootstrap Context`和`Application Context`配置的分离。
要将Client模块下的application.yml文件改为bootstrap.yml,这是很关键的,
因为bootstrap.yml是比application.yml先加载的。bootstrap.yml优先级高于application.yml
server:
  port: 3355

spring:
  application:
    name: config-client
  cloud:
    #Config客户端配置
    config:
      label: master #分支名称
      name: config #配置文件名称
      profile: dev #读取后缀名称   上述3个综合:master分支上config-dev.yml的配置文件被读取http://config-3344.com:3344/master/config-dev.yml
      uri: http://localhost:3344 #配置中心地址k

#服务注册到eureka地址
eureka:
  client:
    service-url:
      defaultZone: http://localhost:7001/eureka
修改config-dev.yml配置并提交到GitHub中,比如加个变量age或者版本号version
4、主启动
类ConfigClientMain3355
package com.atguigu.springcloud;

import org.springframework.boot.SpringApplication;
import org.springframework.boot.autoconfigure.SpringBootApplication;
import org.springframework.cloud.netflix.eureka.EnableEurekaClient;

@EnableEurekaClient
@SpringBootApplication
public class ConfigClientMain3355

    public static void main(String[] args)

        SpringApplication.run(ConfigClientMain3355.class,args);
5、业务类
package com.atguigu.springcloud.controller;

import org.springframework.cloud.context.config.annotation.RefreshScope;
import org.springframework.web.bind.annotation.GetMapping;
import org.springframework.web.bind.annotation.RequestMapping;
import org.springframework.web.bind.annotation.RestController;
import org.springframework.beans.factory.annotation.Value;

@RestController
public class ConfigClientController

    @Value("$config.info")
    private String configInfo;

    @GetMapping("/configInfo")
    public String getConfigInfo()


        return configInfo;
6、测试
启动Config配置中心3344微服务并自测
http://config-3344.com:3344/master/config-prod.ymlhttp://config-3344.com:3344/master/config-dev.yml
启动3355作为Client准备访问
成功实现了客户端3355访问SpringCloud Config3344通过GitHub获取配置信息
7、动态刷新问题
问题随时而来,分布式配置的动态刷新问题
Linux运维修改GitHub上的配置文件内容做调整
刷新3344,发现ConfigServer配置中心立刻响应
刷新3355,发现ConfigClient客户端没有任何响应
3355没有变化除非自己重启或者重新加载
难到每次运维修改配置文件,客户端都需要重启??噩梦
四、Config客户端之动态刷新
1、动态刷新步骤
修改3355模块
1.POM引入actuator监控
<dependency>
    <groupId>org.springframework.boot</groupId>
    <artifactId>spring-boot-starter-actuator</artifactId>
</dependency>
2.修改YML,暴露监控端口

server:
  port: 3355

spring:
  application:
    name: config-client
  cloud:
    #Config客户端配置
    config:
      label: master #分支名称
      name: config #配置文件名称
      profile: dev #读取后缀名称   上述3个综合:master分支上config-dev.yml的配置文件被读取
      uri: http://localhost:3344 #配置中心地址k

#服务注册到eureka地址
eureka:
  client:
    service-url:
      defaultZone: http://localhost:7001/eureka
# 暴露监控端点
management:
  endpoints:
    web:
      exposure:
        include: "*"
4.@RefreshScope业务类Controller修改
package com.atguigu.springcloud.controller;

import org.springframework.cloud.context.config.annotation.RefreshScope;
import org.springframework.web.bind.annotation.GetMapping;
import org.springframework.web.bind.annotation.RequestMapping;
import org.springframework.web.bind.annotation.RestController;
import org.springframework.beans.factory.annotation.Value;

@RestController
@RefreshScope
public class ConfigClientController

    @Value("$config.info")
    private String configInfo;

    @GetMapping("/configInfo")
    public String getConfigInfo()
        return configInfo;
5.此时修改github
修改了信息后访问---> 3344 ---->3355
http://localhost:3355/configInfo
发现3355没有改变
6.问题
需要运维人员发送Post请求刷新3355
#必须是POST请求
curl -X POST "http://localhost:3355/actuator/refresh"

再次访问:http://localhost:3355/configInfo
成功实现了客户端3355刷新到最新配置内容,避免了服务重启
2、思考
假如有多个微服务客户端3355/3366/3377
每个微服务都要执行一次post请求,手动刷新?
可否广播,一次通知,处处生效?
我们想大范围的自动刷新,具体见下一篇笔记SpringCloud Bus消息总线
【SpringCloud框架之Bus消息总线】_蛋饼吧的博客-CSDN博客
结束!
SpringCloud - Spring Cloud 之 Apollo Config携程阿波罗配置中心(二十一)
由于Spring Cloud自带的Config 需要配合 Bus 使用,且不能实时刷新,因此市面上出现了很多开元的配置中心
市面上开源的配置中心
Apollo(阿波罗):携程框架部门研发的分布式配置中心,能够集中化管理应用不同环境、不同集群的配置,配置修改后能够实时推送到应用端,并且具备规范的权限、流程治理等特性,适用于微服务配置管理场景;
diamond : 淘宝开源的持久配置中心,支持各种持久信息(比如各种规则,数据库配置等)的发布和订阅;(更新稍微落后一点)
XDiamond:全局配置中心,存储应用的配置项,解决配置混乱分散的问题,名字来源于淘宝的开源项目diamond,前面加上一个字母X以示区别。
Qconf: 奇虎360内部分布式配置管理工具,用来替代传统的配置文件,使得配置信息和程序代码分离,同时配置变化能够实时同步到客户端,而且保证用户高效读取配置,这使的工程师从琐碎的配置修改、代码提交、配置上线流程中解放出来,极大地简化了配置管理工作;
Disconf:百度的分布式配置管理平台,专注于各种分布式系统配置管理的通用组件和通用平台, 提供统一的配置管理服务
Apollo(GitHub - apolloconfig/apollo: Apollo is a reliable configuration management system suitable for microservice configuration management scenarios.)是一个配置中心,支持从应用、环境、集群维度去管理配置,也支持从公共,私有维度去管理配置。 满足了大部分的配置场景。
Apollo官网:Apollo
以下是 Spring Cloud Config 和 Apollo对比

一、部署Apollo运行环境
官网 Quick Start 文档:Apollo
1、环境准备
1、Java
- Apollo服务端:1.8+
- Apollo客户端:1.8+
- 如需运行在 Java 1.7 运行时环境,请使用 1.x 版本的 apollo 客户端,如 1.9.1
在配置好后,可以通过如下命令检查:
java -version样例输出:
java version "1.8.0_74"
Java(TM) SE Runtime Environment (build 1.8.0_74-b02)
Java HotSpot(TM) 64-Bit Server VM (build 25.74-b02, mixed mode)
Windows用户请确保JAVA_HOME环境变量已经设置
2、MySQL
- 版本要求:5.6.5+
Apollo的表结构对timestamp使用了多个default声明,所以需要5.6.5以上版本。
连接上MySQL后,可以通过如下命令检查:
SHOW VARIABLES WHERE Variable_name = 'version';| Variable_name | Value |
|---|---|
| version | 5.7.11 |
2、下载Quick Start安装包
官网准备好了一个Quick Start安装包,大家只需要下载到本地,就可以直接使用,免去了编译、打包过程。
安装包共50M,如果访问github网速不给力的话,可以从百度网盘下载。
- 从GitHub下载
- checkout或下载apollo-build-scripts项目
- 由于Quick Start项目比较大,所以放在了另外的repository,请注意项目地址
- 从百度网盘下载
- 通过网盘链接下载,提取码: 9wwe
- 下载到本地后,在本地解压apollo-quick-start.zip
- 为啥安装包要58M这么大?
- 因为这是一个可以自启动的jar包,里面包含了所有依赖jar包以及一个内置的tomcat容器
手动打包 Quick Start安装包
Quick Start只针对本地测试使用,所以一般用户不需要自己下载源码打包,只需要下载已经打好的包即可。不过也有部分用户希望在修改代码后重新打包,那么可以参考如下步骤:
- 修改apollo-configservice, apollo-adminservice和apollo-portal的pom.xml,注释掉spring-boot-maven-plugin和maven-assembly-plugin
- 在根目录下执行
mvn clean package -pl apollo-assembly -am -DskipTests=true - 复制apollo-assembly/target下的jar包,rename为apollo-all-in-one.jar
二、安装步骤
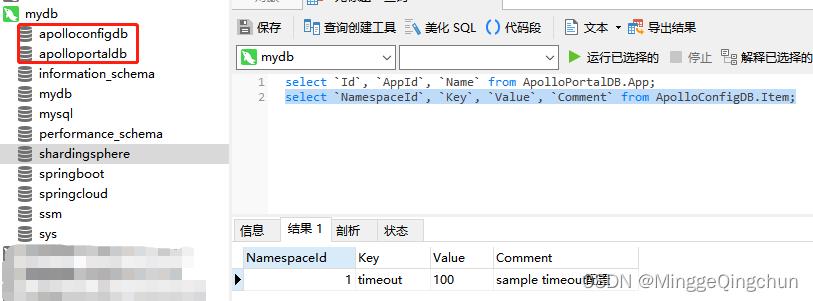
1、创建数据库
Apollo服务端共需要两个数据库:ApolloPortalDB和ApolloConfigDB,我们把数据库、表的创建和样例数据都分别准备了sql文件,只需要导入数据库即可
导入成功后,可以通过执行如下sql语句来验证:
select `Id`, `AppId`, `Name` from ApolloPortalDB.App;
select `NamespaceId`, `Key`, `Value`, `Comment` from ApolloConfigDB.Item;
2、配置数据库连接信息
#!/bin/bash

# apollo config db info
apollo_config_db_url=jdbc:mysql://localhost:3306/ApolloConfigDB?useSSL=false&&characterEncoding=utf8&&serverTimezone=Asia/Shanghai
apollo_config_db_username=root
apollo_config_db_password=admin123456

# apollo portal db info
apollo_portal_db_url=jdbc:mysql://localhost:3306/ApolloPortalDB?useSSL=false&&characterEncoding=utf8&&serverTimezone=Asia/Shanghai
apollo_portal_db_username=root
apollo_portal_db_password=admin123456
注意:不要修改demo.sh的其它部分
这里可能会出现一个问题
demo.sh 启动 报错
==== starting service ====
Service logging file is ./service/apollo-service.log
Started [3120]
Waiting for config service startup........................
Config service failed to start in 120 seconds! Please check ./service/apollo-service.log for more information.
这里有两种解决办法
1、mysql禁用SSL
(1)由于我的mysql是5.7之后的,后面得加useSSL=false,禁用SSL(安全套接字协议)
(2)属性之间的连接得用&&,用&还是启动失败
#!/bin/bash

# apollo config db info
apollo_config_db_url=jdbc:mysql://localhost:3306/ApolloConfigDB?useSSL=false&&characterEncoding=utf8&&serverTimezone=Asia/Shanghai
apollo_config_db_username=root
apollo_config_db_password=admin123456

# apollo portal db info
apollo_portal_db_url=jdbc:mysql://localhost:3306/ApolloPortalDB?useSSL=false&&characterEncoding=utf8&&serverTimezone=Asia/Shanghai
apollo_portal_db_username=root
apollo_portal_db_password=admin123456
2、 mysql修改URL
刚开始配置数据库连接url是 localhost,一直报错连接不上,回想了一下,博主是将Apollo配置在Linux端,因此将数据库 连接url换成 Linux上的 IP地址,并且启动 mysql服务
#!/bin/bash

# apollo config db info
apollo_config_db_url=jdbc:mysql://192.168.133.129:3306/ApolloConfigDB?useSSL=false&&characterEncoding=utf8&&serverTimezone=Asia/Shanghai
apollo_config_db_username=root
apollo_config_db_password=admin123456

# apollo portal db info
apollo_portal_db_url=jdbc:mysql://192.168.133.129:3306/ApolloPortalDB?useSSL=false&&characterEncoding=utf8&&serverTimezone=Asia/Shanghai
apollo_portal_db_username=root
apollo_portal_db_password=admin123456
3、启动Apollo配置中心
注:
启动之前确保 mysql服务开启,且数据库 ApolloConfigDB 和 ApolloPortalDB 已经创建好(如果是Docker启动的 MySQL,要挂载MySQL,以免删除或者停止mysql容器后能保留数据库文件,不至于导致数据库丢失)
执行启动脚本
./demo.sh start
启动成功之后,会输出如下信息
注:
./demo.sh start (里面会启动三个服务
Config-service 8080端口
Admin-service 8090端口
Portal管控台 8070端口,启动会比较慢)

./demo.sh start
==== starting service ====
Service logging file is ./service/apollo-service.log
Application is running as root (UID 0). This is considered insecure.
Started [10272]
Waiting for config service startup....
Config service started. You may visit http://localhost:8080 for service status now!
Waiting for admin service startup.
Admin service started
==== starting portal ====
Portal logging file is ./portal/apollo-portal.log
Application is running as root (UID 0). This is considered insecure.
Started [10474]
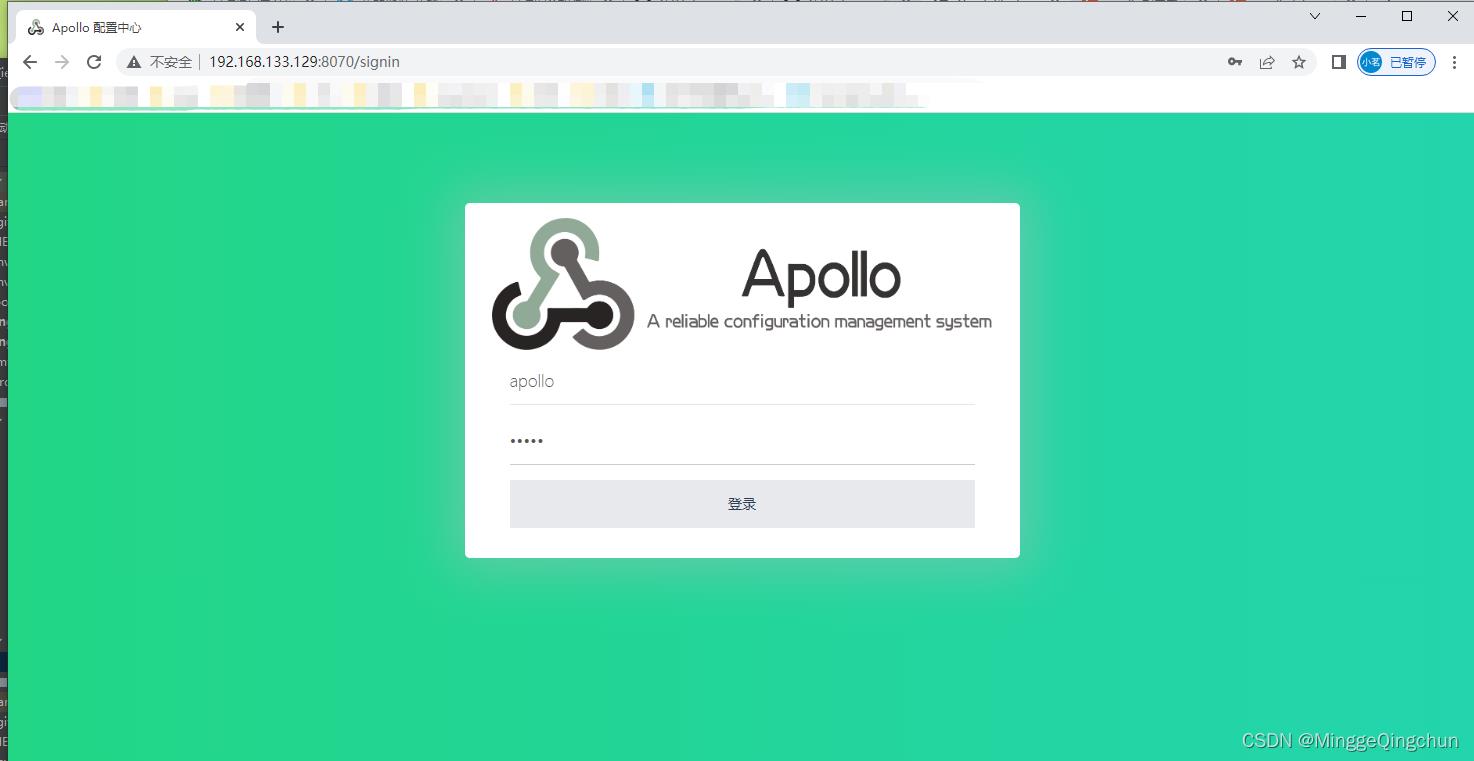
Waiting for portal startup....
Portal started. You can visit http://localhost:8070 now!启动成功后,访问:http://ip:8070 登录账号默认是: apollo/admin

三、创建应用
1、点击创建应用
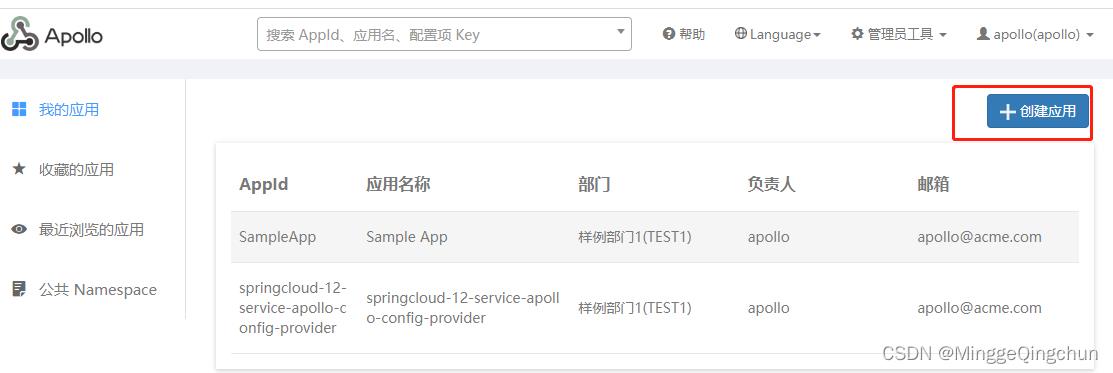
2、填写 APPId,应用名称等

3、点击“提交”,创建成功,首次会警告,点击“发布”即可

4、将项目中 application.properties 配置文件中的配置信息复制到 “文本”处,保存,点击发布

5、可以在表格中看到各项参数配置

四、Apollo应用
1、创建应用 springcloud-12-service-apollo-config-provider
2、添加 Apollo依赖
<!-- 携程apollo-client -->
        <dependency>
            <groupId>com.ctrip.framework.apollo</groupId>
            <artifactId>apollo-client</artifactId>
            <version>1.7.0</version>
        </dependency>
<!--继承统一的父项目-->
<parent>
<groupId>com.company</groupId>
<artifactId>springcloud-demo</artifactId>
<version>1.0.0</version>
</parent>
<groupId>com.company</groupId>
<artifactId>springcloud-12-service-apollo-config-provider</artifactId>
<version>0.0.1-SNAPSHOT</version>
<name>springcloud-12-service-apollo-config-provider</name>
<description>Demo project for Spring Boot</description>
<properties>
<java.version>1.8</java.version>
</properties>
<dependencies>
<!--spring web 起步依赖-->
<dependency>
<groupId>org.springframework.boot</groupId>
<artifactId>spring-boot-starter-web</artifactId>
</dependency>
<!-- mybatis-spring-boot-starter
!!!需要添加版本号,不然报错
[ERROR] 'dependencies.dependency.version' for org.mybatis.spring.boot:mybatis-spring-boot-starter:jar is missing. @ line 32, column 21
-->
<dependency>
<groupId>org.mybatis.spring.boot</groupId>
<artifactId>mybatis-spring-boot-starter</artifactId>
<version>2.2.2</version>
</dependency>
<!-- MySQL的jdbc驱动包 -->
<dependency>
<groupId>mysql</groupId>
<artifactId>mysql-connector-java</artifactId>
</dependency>
<!--依赖统一的springcloud-service-commons项目
!!!需要添加版本号,不然报错
[ERROR] 'dependencies.dependency.version' for com.company:springcloud-2-service-common:jar is missing. @ line 44, column 21
-->
<dependency>
<groupId>com.company</groupId>
<artifactId>springcloud-2-service-common</artifactId>
<version>1.0.0</version>
</dependency>
<!--spring-cloud-starter-netflix-eureka-client-->
<dependency>
<groupId>org.springframework.cloud</groupId>
<artifactId>spring-cloud-starter-netflix-eureka-client</artifactId>
</dependency>
<!-- 携程apollo-client -->
<dependency>
<groupId>com.ctrip.framework.apollo</groupId>
<artifactId>apollo-client</artifactId>
<version>1.7.0</version>
</dependency>
</dependencies>
<build>
<plugins>
<plugin>
<groupId>org.springframework.boot</groupId>
<artifactId>spring-boot-maven-plugin</artifactId>
</plugin>
</plugins>
</build>3、在 bootstrap.properties 或者 application.properties 中配置
####====使用携程Apollo配置中心---start====#####
#appId
app.id=springcloud-12-service-apollo-config-provider
#config services url
apollo.meta=http://192.168.133.129:8080
####====使用携程Apollo配置中心---end====#####我们的应用程序也就是Apollo客户端依赖于AppId,Apollo Meta Server等环境信息来工作,需要做如下配置:
AppId:AppId是应用的身份信息,是从服务端获取配置的一个重要信息;
(1)Spring Boot application.properties
Apollo 支持通过Spring Boot的application.properties或bootstrap.properties文件配置:
app.id=YOUR-APP-ID
(2)app.properties
在项目的classpath:/META-INF/app.properties文件存在,并且其中内容配置:
app.id=YOUR-APP-ID
Apollo Meta Server:元数据服务器;
Apollo可以在Spring Boot的application.properties或bootstrap.properties中指定apollo.meta=http://config-service-url
通过app.properties配置文件在classpath:/META-INF/app.properties指定apollo.meta=http://config-service-url
4、在springboot启动类上添加注解 @EnableApolloConfig ,开启apollo配置支持
@EnableApolloConfig //开启apollo配置支持
@SpringBootApplication(scanBasePackages="com.company")
public class ServiceApolloConfig12ProviderApplication
    public static void main(String[] args)
        SpringApplication.run(ServiceApolloConfig12ProviderApplication.class, args);
5、启动项目测试
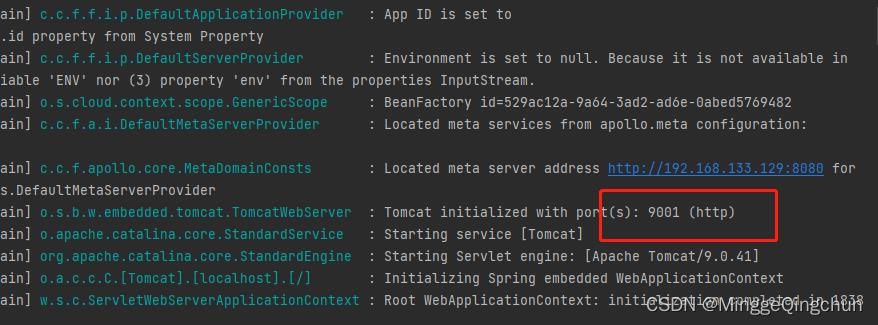
Apollo客户端会把从服务端获取到的配置在本地文件系统缓存一份,用于在遇到服务不可用,或网络不通的时候,依然能从本地恢复配置,不影响应用正常运行;
本地缓存路径默认位于以下路径,所以请确保/opt/data或C:\\opt\\data\\目录存在,且应用有读写权限;
Mac/Linux: /opt/data/appId/config-cache
Windows: C:\\opt\\data\\appId\\config-cache
appId+cluster+namespace.properties
五、Apollo客户端的实现原理
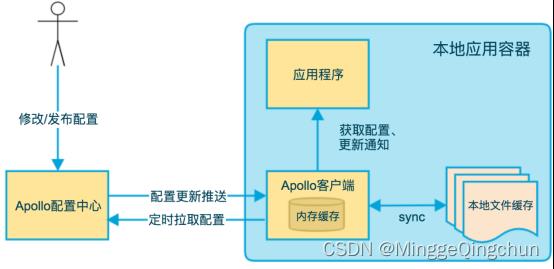
1、客户端和服务端保持了一个长连接,从而能第一时间获得配置更新的推送;
(通过Http Long Polling实现)
2、客户端还会定时从Apollo配置中心服务端拉取应用的最新配置,这是一个fallback机制,为了防止推送机制失效导致配置不更新;
3、客户端定时拉取会上报本地版本,所以一般情况下,对于定时拉取的操作,服务端都会返回304 - Not Modified;
定时频率默认为每5分钟拉取一次,客户端也可以通过在运行时指定System Property: apollo.refreshInterval来覆盖,单位为分钟;
4、客户端从Apollo配置中心服务端获取到应用的最新配置后,会保存在内存中;
客户端会把从服务端获取到的配置在本地文件系统缓存一份;
在遇到服务不可用,或网络不通的时候,依然能从本地恢复配置;
5、应用程序可以从Apollo客户端获取最新的配置、订阅配置更新通知;
六、Apollo阿波罗配置中心设计
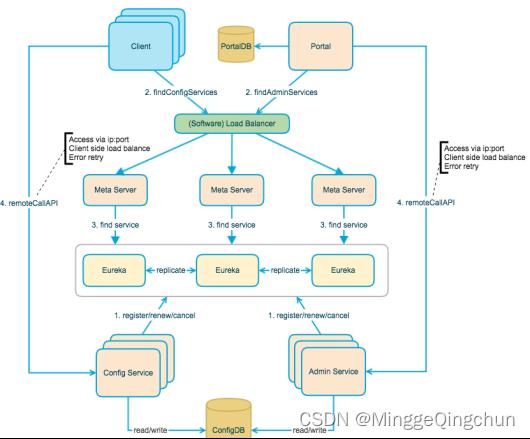
Apollo的总体设计,从下往上看分别是:
Config Service提供配置的读取、推送等功能,服务对象是Apollo客户端;
Admin Service提供配置的修改、发布等功能,服务对象是Apollo Portal(管理界面);
Config Service和Admin Service都是多实例、无状态部署,所以需要将自己注册到Eureka中并保持心跳;
在Eureka之上我们架了一层Meta Server用于封装Eureka的服务发现接口;
Client通过域名访问Meta Server获取Config Service服务列表(IP+Port),而后直接通过IP+Port访问服务,同时在Client侧会做load balance、错误重试;
Portal通过域名访问Meta Server获取Admin Service服务列表(IP+Port),而后直接通过IP+Port访问服务,同时在Portal侧会做load balance、错误重试;
为了简化部署,我们实际上会把Config Service、Eureka和Meta Server三个逻辑角色部署在同一个JVM进程中;
七、Apollo模块
1、Config Service
提供配置获取接口
提供配置更新推送接口(基于Http long polling)
服务端使用Spring DeferredResult实现异步化,从而大大增加长连接数量
目前使用的tomcat embed默认配置是最多10000个连接(可以调整),使用了4C8G的虚拟机实测可以支撑10000个连接,所以满足需求(一个应用实例只会发起一个长连接)。
接口服务对象为Apollo客户端
2、Admin Service
提供配置管理接口
提供配置修改、发布等接口
接口服务对象为Portal
3、Meta Server
Portal通过域名访问Meta Server获取Admin Service服务列表(IP+Port)
Client通过域名访问Meta Server获取Config Service服务列表(IP+Port)
Meta Server从Eureka获取Config Service和Admin Service的服务信息,相当于是一个Eureka Client
增设一个Meta Server的角色主要是为了封装服务发现的细节,对Portal和Client而言,永远通过一个Http接口获取Admin Service和Config Service的服务信息,而不需要关心背后实际的服务注册和发现组件
Meta Server只是一个逻辑角色,在部署时和Config Service是在一个JVM进程中的,所以IP、端口和Config Service一致
4、Eureka
基于Eureka和Spring Cloud Netflix提供服务注册和发现
Config Service和Admin Service会向Eureka注册服务,并保持心跳
为了简单起见,目前Eureka在部署时和Config Service是在一个JVM进程中的(通过Spring Cloud Netflix)
5、Portal
提供Web界面供用户管理配置
通过Meta Server获取Admin Service服务列表(IP+Port),通过IP+Port访问服务
在Portal侧做load balance、错误重试
6、Client
Apollo提供的客户端程序,为应用提供配置获取、实时更新等功能
通过Meta Server获取Config Service服务列表(IP+Port),通过IP+Port访问服务
在Client侧做load balance、错误重试;
以上是关于SpringCloud框架之Config分布式配置中心的主要内容,如果未能解决你的问题,请参考以下文章