深度学习服务器环境配置: Ubuntu17.04+Nvidia GTX 1080+CUDA 9.0+cuDNN 7.0+TensorFlow 1.3
Posted
tags:
篇首语:本文由小常识网(cha138.com)小编为大家整理,主要介绍了深度学习服务器环境配置: Ubuntu17.04+Nvidia GTX 1080+CUDA 9.0+cuDNN 7.0+TensorFlow 1.3相关的知识,希望对你有一定的参考价值。
本文来源地址:http://www.52nlp.cn/tag/cuda-9-0
一年前,我配置了一套“深度学习服务器”,并且写过两篇关于深度学习服务器环境配置的文章:《深度学习主机环境配置: Ubuntu16.04+Nvidia GTX 1080+CUDA8.0》 和 《深度学习主机环境配置: Ubuntu16.04+GeForce GTX 1080+TensorFlow》 , 获得了很多关注和引用。 这一年来,深度学习的大潮继续,特别是前段时间,吴恩达(Andrew Ng)在Coursera上推出了深度学习系列课程,这门面向初学者的深度学习课程,更是进一步的将深度学习的门槛降低。
前段时间这台主机出了点问题,本着“不折腾毋宁死”的原则,我重新安装了系统,并且选择了最新的Ubuntu17.04,CUDA9.0,cuDNN7.0, TensorFlow1.3,然后又是一堆坑,另外所能Google到的国内外资料目前为止基本上覆盖的还是CUDA8.0, 和cuDNN6.0, 5.0, 所以这里再次记录一下本次深度学习主机环境配置之旅。
1. 准备工作
Ubuntu17.04系统安装完毕之后,首先做两个准备工作,一个是更新apt-get的源,这次用的是网易的源:
deb http://mirrors.163.com/ubuntu/ zesty main restricted universe multiverse

deb http://mirrors.163.com/ubuntu/ zesty-security main restricted universe multiverse

deb http://mirrors.163.com/ubuntu/ zesty-updates main restricted universe multiverse

deb http://mirrors.163.com/ubuntu/ zesty-proposed main restricted universe multiverse

deb http://mirrors.163.com/ubuntu/ zesty-backports main restricted universe multiverse

deb-src http://mirrors.163.com/ubuntu/ zesty main restricted universe multiverse

deb-src http://mirrors.163.com/ubuntu/ zesty-security main restricted universe multiverse

deb-src http://mirrors.163.com/ubuntu/ zesty-updates main restricted universe multiverse

deb-src http://mirrors.163.com/ubuntu/ zesty-proposed main restricted universe multiverse

deb-src http://mirrors.163.com/ubuntu/ zesty-backports main restricted universe multiverse
另外一个事情是将pip源指向清华大学的源镜像:https://mirrors.tuna.tsinghua.edu.cn/help/pypi/,具体添加一个 ~/.config/pip/pip.conf 文件,设置为:
[global]

index-url = https://pypi.tuna.tsinghua.edu.cn/simple
这两件事情都可以加速安装相关工具包的速度,事半功倍。
然后就是给GTX1080显卡安装驱动,参考了这篇文章《How to install Nvidia Drivers on Ubuntu 17.04 & below, Linux Mint》,并且选择了这篇文章所指的最新的381.09驱动:
sudo apt-get purge nvidia*

sudo add-apt-repository ppa:graphics-drivers/ppa

sudo apt-get update && sudo apt-get install nvidia-381 nvidia-settings
安装完毕后重启电脑即可,运行nvidia-smi即可检验驱动是否安装成功。不过之后在安装CUDA9的时候,又被安利了一次384.69显卡驱动,所以我不太清楚这个过程是否有必要。
2. 安装CUDA TOOLKIT
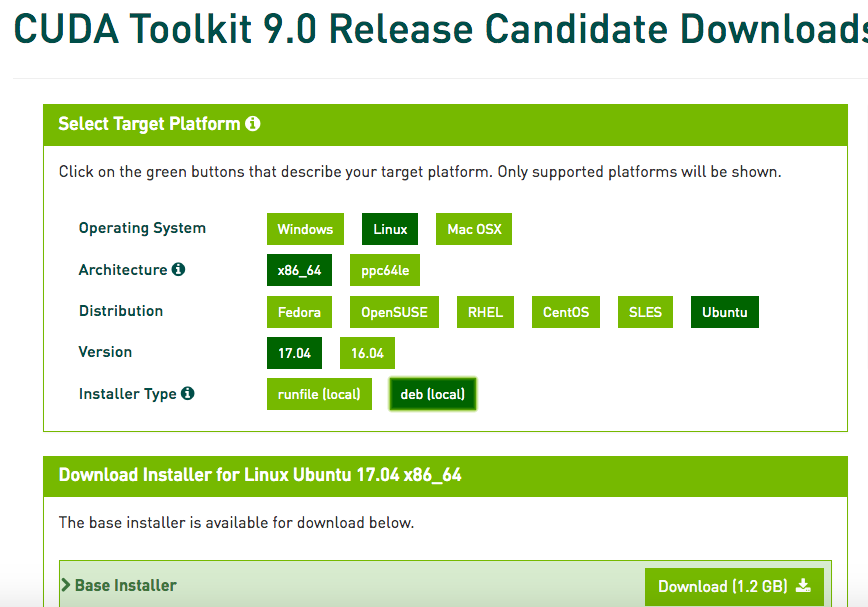
依然前往NVIDIA的CUDA官方页面,登录后可以选择CUDA9.0版本下载:CUDA Toolkit 9.0 Release Candidate Downloads, 这次我选择的是面向ubuntu17.04的deb版本:

下载完deb文件之后按照官方给的方法按如下方式安装CUDA9:
sudo dpkg -i cuda-repo-ubuntu1704-9-0-local-rc_9.0.103-1_amd64.deb

sudo apt-key add /var/cuda-repo-9-0-local-rc/7fa2af80.pub

sudo apt-get update

sudo apt-get install cuda
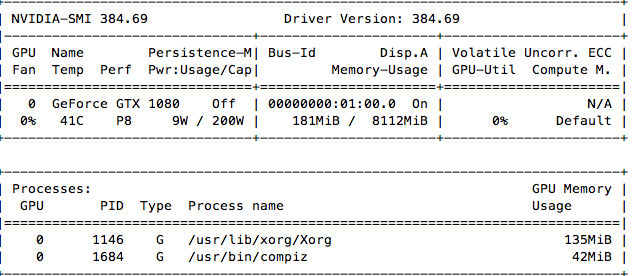
安装过程中发现貌似又一次安装了显卡驱动,版本是384.69,安装完毕后运行“nvidia-smi”提示错误:Failed to initialize NVML: Driver/library version mismatch,这个时候是需要重启机器让新的版本的显卡驱动生效,再次运行“nvidia-smi”:

之后可以测试一下CUDA的相关例子,我将cuda9.0下的sample拷贝到一个临时目录下进行编译:
cp -r /usr/local/cuda-9.0/samples/ .

cd samples/

make
然后运行几个例子看一下:
[email protected]:~/cuda_sample/samples/1_Utilities/bandwidthTest$ ./bandwidthTest
[CUDA Bandwidth Test] - Starting...

Running on...
Device 0: GeForce GTX 1080
Quick Mode
Host to Device Bandwidth, 1 Device(s)
PINNED Memory Transfers
Transfer Size (Bytes) Bandwidth(MB/s)
33554432 11258.6
Device to Host Bandwidth, 1 Device(s)
PINNED Memory Transfers
Transfer Size (Bytes) Bandwidth(MB/s)
33554432 12875.1
Device to Device Bandwidth, 1 Device(s)
PINNED Memory Transfers
Transfer Size (Bytes) Bandwidth(MB/s)
33554432 231174.2
Result = PASS
NOTE: The CUDA Samples are not meant for performance measurements. Results may vary when GPU Boost is enabled.
[email protected]:~/cuda_sample/samples/6_Advanced/c++11_cuda$ ./c++11_cuda
GPU Device 0: "GeForce GTX 1080" with compute capability 6.1
Read 3223503 byte corpus from ./warandpeace.txt

counted 107310 instances of ‘x‘, ‘y‘, ‘z‘, or ‘w‘ in "./warandpeace.txt"
最后在 ~/.bashrc 里再设置一下cuda的环境变量:
export PATH=/usr/local/cuda/bin${PATH:+:${PATH}}

export LD_LIBRARY_PATH=/usr/local/cuda/lib64${LD_LIBRARY_PATH:+:${LD_LIBRARY_PATH}}

export CUDA_HOME=/usr/local/cuda
同时 source ~/.bashrc 让其生效。
3. 安装cuDNN
安装cuDNN很简单,不过同样需要前往NVIDIA官网:https://developer.nvidia.com/cudnn,这次我们选择的是cuDNN7, 关于cuDNN7,NVIDIA官方主页是这样写的:
What’s New in cuDNN 7?
Deep learning frameworks using cuDNN 7 can leverage new features and performance of the Volta architecture to deliver up to 3x faster training performance compared to Pascal GPUs. cuDNN 7 is now available as a free download to the members of the NVIDIA Developer Program. Highlights include:Up to 2.5x faster training of ResNet50 and 3x faster training of NMT language translation LSTM RNNs on Tesla V100 vs. Tesla P100
Accelerated convolutions using mixed-precision Tensor Cores operations on Volta GPUs
Grouped Convolutions for models such as ResNeXt and Xception and CTC (Connectionist Temporal Classification) loss layer for temporal classification
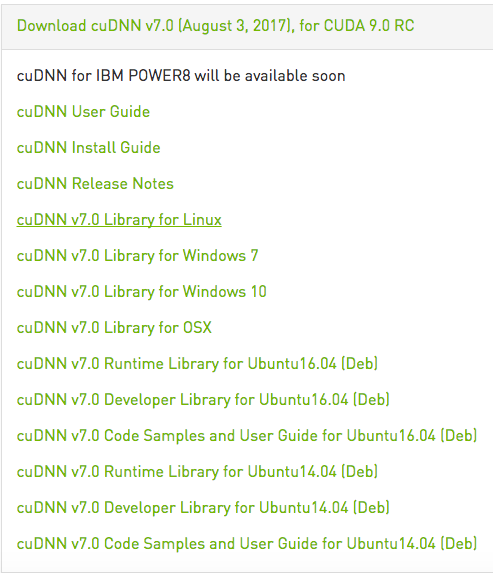
我选择的是这个版本:cuDNN v7.0 (August 3, 2017), for CUDA 9.0 RC --- cuDNN v7.0 Library for Linux

下载完毕后解压,然后将相关文件拷贝到cuda安装目录下即可:
tar -zxvf cudnn-9.0-linux-x64-v7.tgz

sudo cp cuda/include/cudnn.h /usr/local/cuda/include/

sudo cp cuda/lib64/libcudnn* /usr/local/cuda/lib64/ -d (

sudo chmod a+r /usr/local/cuda/include/cudnn.h

sudo chmod a+r /usr/local/cuda/lib64/libcudnn*
4. 安装Tensorflow1.3
在安装Tensorflow之前,按照Tensorflow官方安装文档的说明,先安装一个libcupti-dev库:
The libcupti-dev library, which is the NVIDIA CUDA Profile
Tools Interface. This library provides advanced profiling support. To
install this library, issue the following command:
$ sudo apt-get install libcupti-dev
然后通过virtualenv 的方式安装Tensorflow1.3 GUP版本,注意我用的是Python2.7:
sudo apt-get install python-pip python-dev python-virtualenv

virtualenv --system-site-packages tensorflow1.3

source tensorflow1.3/bin/activate

(tensorflow1.3) [email protected]:~/tensorflow/tensorflow1.3$ pip install --upgrade tensorflow-gpu
通过清华的pip源,用这种方式安装tensorflow-gpu版本速度很快:
Collecting tensorflow-gpu
Downloading https://pypi.tuna.tsinghua.edu.cn/packages/ca/c4/e39443dcdb80631a86c265fb07317e2c7ea5defe73cb531b7cd94692f8f5/tensorflow_gpu-1.3.0-cp27-cp27mu-manylinux1_x86_64.whl (158.8MB)
21% |███████ | 34.7MB 958kB/s eta 0:02:10Successfully built markdown html5lib
Installing collected packages: backports.weakref, protobuf, funcsigs, pbr, mock, numpy, markdown, html5lib, bleach, werkzeug, tensorflow-tensorboard, tensorflow-gpu
Successfully installed backports.weakref-1.0rc1 bleach-1.5.0 funcsigs-1.0.2 html5lib-0.9999999 markdown-2.6.9 mock-2.0.0 numpy-1.13.1 pbr-3.1.1 protobuf-3.4.0 tensorflow-gpu-1.3.0 tensorflow-tensorboard-0.1.5 werkzeug-0.12.2
这种方式安装TensorFlow很方便,并且切换tensorflow的版本也很容易,如果不是下面的坑,这是我安装Tensorflow的第一选择。然后尝试运行一下tensorflow,满心期待会出现顺利导入并且有GPU的相关信息出现:
(tensorflow1.3) textminer@textminer:~/tensorflow/tensorflow1.3$ python
Python 2.7.13 (default, Jan 19 2017, 14:48:08)
[GCC 6.3.0 20170118] on linux2
Type "help", "copyright", "credits" or "license" for more information.
>>> import tensorflow as tf
|
可是却报如下错误:
File "/home/textminer/tensorflow/tensorflow1.3/local/lib/python2.7/site-packages/tensorflow/python/pywrap_tensorflow_internal.py", line 24, in swig_import_helper
_mod = imp.load_module(‘_pywrap_tensorflow_internal‘, fp, pathname, description)
ImportError: libcusolver.so.8.0: cannot open shared object file: No such file or directoryFailed to load the native TensorFlow runtime.
See https://www.tensorflow.org/install/install_sources#common_installation_problems
我看了一下 /usr/local/cuda/lib64/ 下有 libcusolver.so.9.0 这个文件,同时google了一下相关信息,基本上确定这是由于Tensorflow官方版本目前不支持CUDA9, 支撑CUDA8的缘故,所以这个pip版本默认找得是CUDA8.0的后缀文件: libcusolver.so.8.0 。
好在天无绝人之路,虽然这方面的资料很少,还是通过google找到了github上tensorflow的最近的两条issue: Upgrade to CuDNN 7 and CUDA 9 和 CUDA 9RC + cuDNN7 。前一条是请求TensorFlow官方版本支持CUDA9和cuDNN7的讨论:Please upgrade TensorFlow to support CUDA 9 and CuDNN 7. Nvidia claims this will provide a 2x performance boost on Pascal GPUs. 后一条是一个非官方方式在Tensorflow中支持CUDA9和cuDNN7的源代码安装方案:This is an unofficial and very not supported patch to make it possible to compile TensorFlow with CUDA9RC and cuDNN 7 or CUDA8 + cuDNN 7.
又是源代码安装Tensorflow, 这个方式我是不推荐的,还记得去年夏天用源代码安装Tensorflow的种种痛苦,特别是国内网络不便的情况下,这种方式更是不愿意推荐,不过不得已,我必须试一下。特别声明,如果之后Tensorflow官方版本已经支持CUDA9和cuDNN7了,请直接按上述pip方式安装,以下可以忽略。
5. 源代码方式安装Tensorflow
平心而论,严格按照github上这个10天前的issue的方法做基本上是没问题的:
git clone https://github.com/tensorflow/tensorflow.git

wget https://storage.googleapis.com/tf-performance/public/cuda9rc_patch/0001-CUDA-9.0-and-cuDNN-7.0-support.patch

wget https://storage.googleapis.com/tf-performance/public/cuda9rc_patch/eigen.f3a22f35b044.cuda9.diff

cd tensorflow/

git status

git checkout db596594b5653b43fcb558a4753b39904bb62cbd~

git apply ../0001-CUDA-9.0-and-cuDNN-7.0-support.patch

./configure

bazel build --config=opt --config=cuda //tensorflow/tools/pip_package:build_pip_package
但是我还是遇到了一点问题在configure之后用bazel编译tensorflow的时候遇到了如下错误:
ERROR: Skipping ‘//tensorflow/tools/pip_package:build_pip_package‘: error loading package ‘tensorflow/tools/pip_package‘: Encountered error while reading extension file ‘cuda/build_defs.bzl‘: no such package ‘@local_config_cuda//cuda
google了一下之后发现我用的是最新版的bazel_0.5.4, 回退版本是个解决方案,所以回退到了bazel_0.5.2,问题解决。这里特别备注一下configure过程的选择,仅供参考:
Please specify the location of python. [Default is /usr/bin/python]:

Found possible Python library paths:

/usr/local/lib/python2.7/dist-packages

/usr/lib/python2.7/dist-packages

Please input the desired Python library path to use.  Default is /usr/local/lib/python2.7/dist-packages

Do you wish to build TensorFlow with jemalloc as malloc support? [Y/n]: Y

jemalloc as malloc support will be enabled for TensorFlow.
Do you wish to build TensorFlow with Google Cloud Platform support? [y/N]: N
No Google Cloud Platform support will be enabled for TensorFlow.
Do you wish to build TensorFlow with Hadoop File System support? [y/N]: N
No Hadoop File System support will be enabled for TensorFlow.
Do you wish to build TensorFlow with XLA JIT support? [y/N]:
No XLA JIT support will be enabled for TensorFlow.
Do you wish to build TensorFlow with VERBS support? [y/N]:
No VERBS support will be enabled for TensorFlow.
Do you wish to build TensorFlow with OpenCL support? [y/N]:
No OpenCL support will be enabled for TensorFlow.
Do you wish to build TensorFlow with CUDA support? [y/N]: y
CUDA support will be enabled for TensorFlow.
Please specify the CUDA SDK version you want to use, e.g. 7.0. [Leave empty to default to CUDA 8.0]: 9.0
Please specify the location where CUDA 9.0 toolkit is installed. Refer
to README.md for more details. [Default is /usr/local/cuda]:
"Please specify the cuDNN version you want to use. [Leave empty to default to cuDNN 6.0]: 7
Please specify the location where cuDNN 7 library is installed. Refer to
README.md for more details. [Default is /usr/local/cuda]:
Please specify a list of comma-separated Cuda compute capabilities you want to build with.
You can find the compute capability of your device at: https://developer.nvidia.com/cuda-gpus.
Please note that each additional compute capability significantly increases your build time and binary size. [Default is: 6.1]
Do you want to use clang as CUDA compiler? [y/N]: N
nvcc will be used as CUDA compiler.
Please specify which gcc should be used by nvcc as the host compiler. [Default is /usr/bin/gcc]:
Do you wish to build TensorFlow with MPI support? [y/N]:
No MPI support will be enabled for TensorFlow.
Please specify optimization flags to use during
compilation when bazel option "--config=opt" is specified [Default is
-march=native]:

Add "--config=mkl" to your bazel command to build with MKL support.

Please note that MKL on MacOS or windows is still not supported.

If you would like to use a local MKL instead of downloading, please set
the environment variable "TF_MKL_ROOT" every time before build.

Configuration finished
即使bazel版本正确和configure无误,第一次用bazel编译 Tensorflow 还是会遇到问题:
bazel build --config=opt --config=cuda //tensorflow/tools/pip_package:build_pip_package
不过这个是上述issue中专门提到的,并且给了一个Eigen patch解决方案:
Attempt to build TensorFlow, so that Eigen is downloaded. This build will fail if building for CUDA9RC but will succeed for CUDA8
bazel build --config=opt --config=cuda //tensorflow/tools/pip_package:build_pip_package

Apply the Eigen patch:

    cd -P bazel-out/../../../external/eigen_archive
    patch -p1 < ~/Downloads/eigen.f3a22f35b044.cuda9.diff

Build TensorFlow successfully
    cd -
    bazel build --config=opt --config=cuda //tensorflow/tools/pip_package:build_pip_package
再次编译Tensorflow成功,最后编译tensorflow的pip安装文件:
bazel-bin/tensorflow/tools/pip_package/build_pip_package /tmp/tensorflow_pkg

ls /tmp/tensorflow_pkg/

tensorflow-1.3.0rc1-cp27-cp27mu-linux_x86_64.whl

sudo pip install /tmp/tensorflow_pkg/tensorflow-1.3.0rc1-cp27-cp27mu-linux_x86_64.whl
我们在ipython中试一下新安装好的Tensorflow:
Python 2.7.13 (default, Jan 19 2017, 14:48:08)
Type "copyright", "credits" or "license" for more information.

IPython 5.1.0 -- An enhanced Interactive Python.
?         -> Introduction and overview of IPython‘s features.
%quickref -> Quick reference.
help      -> Python‘s own help system.
object?   -> Details about ‘object‘, use ‘object??‘ for extra details.

In [1]: import tensorflow as tf

In [2]: hello = tf.constant(‘Hello, Tensorflow‘)

In [3]: sess = tf.Session()
2017-09-01 13:32:08.828776: I tensorflow/core/common_runtime/gpu/gpu_device.cc:955] Found device 0 with properties:
name: GeForce GTX 1080
major: 6 minor: 1 memoryClockRate (GHz) 1.835
pciBusID 0000:01:00.0
Total memory: 7.92GiB
Free memory: 7.62GiB
2017-09-01 13:32:08.828808: I tensorflow/core/common_runtime/gpu/gpu_device.cc:976] DMA: 0
2017-09-01 13:32:08.828813: I tensorflow/core/common_runtime/gpu/gpu_device.cc:986] 0:   Y
2017-09-01 13:32:08.828823: I tensorflow/core/common_runtime/gpu/gpu_device.cc:1045] Creating TensorFlow device (/gpu:0) -> (device: 0, name: GeForce GTX 1080, pci bus id: 0000:01:00.0)

In [4]: print(sess.run(hello))
Hello, Tensorflow
|
终于看到GPU的相关信息了,接下来,尽情享受Tensorflow GPU版本带来的效率提升吧。
以上是关于深度学习服务器环境配置: Ubuntu17.04+Nvidia GTX 1080+CUDA 9.0+cuDNN 7.0+TensorFlow 1.3的主要内容,如果未能解决你的问题,请参考以下文章