linux--系统中的简单分区和管理
Posted
tags:
篇首语:本文由小常识网(cha138.com)小编为大家整理,主要介绍了linux--系统中的简单分区和管理相关的知识,希望对你有一定的参考价值。
一、添加文件系统空间
简单分区和文件系统
1.认识
1> 存储是每个计算机系统的基本需求。 Red Hat EnterpriseLinux 提供了一些强大的工具 , 它们能在大量的场景中管理多种类型的存储设备
2> disk 是用于管理磁盘分区的实用程序。您可以通过选择 -l选项和指定磁盘名称 ( fdisk -cul /dev/vda ) 运行该实用程序 , 以查看磁盘及其分区。您可以通过交互式地运行该实用程序 , 并选择相应的菜单选项 ( fdisk -cu /dev/vda ) 进行更改。 -c 禁用旧的 DOS 兼容模式 , -u 以扇区 ( 而不是柱面 , 已经过时 ) 的格式显示输出
xiaot
3> 查看系统设备信息
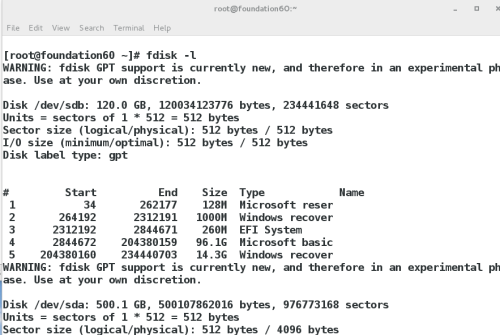
fdisk -l
显示系统中所有可以使用的设备信息
blkid
显示系统正在使用的设备 id
2.添加新设备
1> 新建分区
[[email protected] ~]# fdisk /dev/vdb ##进入/dev/vdb进行操作
Welcome to fdisk (util-linux 2.23.2).
Changes will remain in memory only, until you decide to write them.
Be careful before using the write command.
Device does not contain a recognized partition table
Building a new DOS disklabel with disk identifier 0x115e3020.
Command (m for help): m ##帮助
Command action
a toggle a bootable flag
b edit bsd disklabel
c toggle the dos compatibility flag
d delete a partition ##删除分区
g create a new empty GPT partition table
G create an IRIX (SGI) partition table
l list known partition types ##列出系统年可用的分区类型
m print this menu
n add a new partition ##新键分区
o create a new empty DOS partition table
p print the partition table ##显示分区
q quit without saving changes ##退出
s create a new empty Sun disklabel
t change a partition‘s system id ##修改分区功能id
u change display/entry units
v verify the partition table
w write table to disk and exit ##保存更改到分区表中
x extra functionality (experts only)
Command (m for help): n ##新建分区
Partition type:
p primary (0 primary, 0 extended, 4 free)##主分区,最多可以有四个主分区
e extended ##扩展分区,扩展分区内部如容器一般,在里边会建立逻辑分区
Select (default p): p ##建立新的主分区
Partition number (1-4, default 1): 1 ##选择建立1号主分区
First sector (2048-20971519, default 2048): ##默认从硬盘的使用结尾部分开始
Using default value 2048
Last sector, +sectors or +size{K,M,G} (2048-20971519, default 20971519): +100M ###设置分区大小
Partition 1 of type Linux and of size 100 MiB is set
Command (m for help): p ##显示当前分区情况
Disk /dev/vdb: 10.7 GB, 10737418240 bytes, 20971520 sectors
Units = sectors of 1 * 512 = 512 bytes
Sector size (logical/physical): 512 bytes / 512 bytes
I/O size (minimum/optimal): 512 bytes / 512 bytes
Disk label type: dos
Disk identifier: 0x115e3020
Device Boot Start End Blocks Id System
/dev/vdb1 2048 206847 102400 83 Linux
Command (m for help): n ##再次建立新的分区
Partition type:
p primary (1 primary, 0 extended, 3 free)
e extended
Select (default p): e ##选择建立新的扩展分区
Partition number (2-4, default 2): 2
First sector (206848-20971519, default 206848):
Using default value 206848
Last sector, +sectors or +size{K,M,G} (206848-20971519, default 20971519): +200M
Partition 2 of type Extended and of size 200 MiB is set
Command (m for help): p
Disk /dev/vdb: 10.7 GB, 10737418240 bytes, 20971520 sectors
Units = sectors of 1 * 512 = 512 bytes
Sector size (logical/physical): 512 bytes / 512 bytes
I/O size (minimum/optimal): 512 bytes / 512 bytes
Disk label type: dos
Disk identifier: 0x115e3020
Device Boot Start End Blocks Id System
/dev/vdb1 2048 206847 102400 83 Linux
/dev/vdb2 206848 616447 204800 5 Extended
Command (m for help): n
Partition type:
p primary (1 primary, 1 extended, 2 free)
l logical (numbered from 5)
Select (default p): l ##新建逻辑分区
Adding logical partition 5
First sector (208896-616447, default 208896):
Using default value 208896
Last sector, +sectors or +size{K,M,G} (208896-616447, default 616447): +100M
Partition 5 of type Linux and of size 100 MiB is set
Command (m for help): p
Disk /dev/vdb: 10.7 GB, 10737418240 bytes, 20971520 sectors
Units = sectors of 1 * 512 = 512 bytes
Sector size (logical/physical): 512 bytes / 512 bytes
I/O size (minimum/optimal): 512 bytes / 512 bytes
Disk label type: dos
Disk identifier: 0x115e3020
Device Boot Start End Blocks Id System
/dev/vdb1 2048 206847 102400 83 Linux
/dev/vdb2 206848 616447 204800 5 Extended
/dev/vdb5 208896 413695 102400 83 Linux
Command (m for help): w ##设置完毕后保存以上所有设置
The partition table has been altered!
Calling ioctl() to re-read partition table.
Syncing disks.
[[email protected] ~]# partprobe ##更新分区系统文件
[[email protected] ~]# cat /proc/partitions ##查看分区系统文件内分区情况
major minor #blocks name
253 0 10485760 vda
253 1 10484142 vda1
253 16 10485760 vdb
253 17 102400 vdb1
253 18 1 vdb2
253 21 102400 vdb5
[[email protected] ~]#
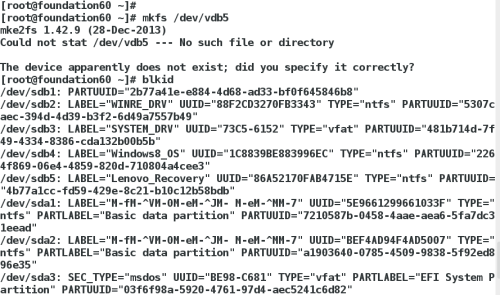
图示:fdisk显示当前存在设备
[[email protected] ~]# blkid ##当前可以使用的设备,因为新建的分区内被数据占用,未被系统认为可以使用的设备,所以没有刚才新建的设备
/dev/vda1: UUID="9bf6b9f7-92ad-441b-848e-0257cbb883d1" TYPE="xfs"
2> 格式新建分区,激活设置可被使用
文件系统:
##mkfs.btrfs mkfs.ext2 mkfs.ext4 mkfs.minix mkfs.vfat
##mkfs.cramfs mkfs.ext3 mkfs.fat mkfs.msdos mkfs.xfs 
#
# /etc/fstab
# Created by anaconda on Wed May 7 01:22:57 2014
#
# Accessible filesystems, by reference, are maintained under ‘/dev/disk‘
# See man pages fstab(5), findfs(8), mount(8) and/or blkid(8) for more info
#
UUID=9bf6b9f7-92ad-441b-848e-0257cbb883d1 / xfs defaults 1 1
/dev/vdb1 /mnt xfs defaults 0 0
设备 挂载位置 文件系统类型 0备份 0检查
二、添加swap交换分区
换空间或交换区是磁盘驱动器上的空间 , 用作当前未使用部分内存的溢出。这样 , 系统就能在主内存中留出空间用于储存当前正在处理的数据 , 并在系统面临主内存空间不足的风险时提供应急溢出
1.添加分区方式相同,在建立新的分区后,进行设置
示图:t添加分区功能id,l查看分区功能各id
示图:设置分区的swap功能id,将修改保存进硬盘,刷新
示图:swap型文件格式化设备,成为可用的swap设备
2.管理交换分区
使用 fdisk 创建新分区。此外 , 在用 fdisk 保存更改之前 , 将分区类型更改为 “ 0x82 LinuxSwap”
mkswap /dev/vdaN 会准备好将分区用作交换区
blkid /dev/vdaN 将确定 UUID
将新交换空间添加到 /etc/fstab :UUID=uuid swap swap defaults 0 0
swapon -a 将激活新交换区
swapon -s 将显示当前交换区的状态
swapoff /dev/vdaN 将停用该特定交换区
[[email protected] ~]# swapon -a /dev/vdb[1,2] ##激活/dev/vdb1和vdb2交换区
[[email protected] ~]# swapon -s ##显示当前交换区的状态
Filename Type Size Used Priority ##Filename文件名,Type类型, Size大小, Used被使用大小, Priorty优先级
/dev/vdb1 partition 102396 0 -1
/dev/vdb2 partition 102396 0 -2
三、磁盘加密保护
1.认识
LUKS ( Linux 统一密钥设置 ) 是标准的设备加密格式
LUKS 可以对分区或卷进行加密
必须首先对加密的卷进行解密 , 才能挂载其中的文件系统
2.步骤
1> 使用 fdisk 创建新分区
2> cryptsetup luksFormat /dev/vdaN 可对新分区进行加密 ,并设置解密密码
[[email protected] ~]# cryptsetup luksFormat /dev/vdb1
WARNING!
========
This will overwrite data on /dev/vdb1 irrevocably.
Are you sure? (Type uppercase yes): YES
Enter passphrase:
Verify passphrase:
3> 您输入正确的解密密码之后 , cryptsetup luksOpen /dev/vdaN name 会将加密的卷 /dev/vdaN 解锁为/dev/mapper/name
示图:
4> 解密的卷上创建 xfs 文件系统 : mkfs -t xfs /dev/mapper/name
示图:
5> 创建目录挂载点 , 并挂载文件系统 : mkdir /mnt
– mount /dev/mapper/name /mnt
6> 完成之后 , umount /dev/mapper/name 并运行cryptsetup luksClose name 以锁定加密的卷
本文出自 “13342594” 博客,请务必保留此出处http://13352594.blog.51cto.com/13342594/1978199
以上是关于linux--系统中的简单分区和管理的主要内容,如果未能解决你的问题,请参考以下文章
