web爬虫,requests请求
Posted zjltt
tags:
篇首语:本文由小常识网(cha138.com)小编为大家整理,主要介绍了web爬虫,requests请求相关的知识,希望对你有一定的参考价值。
requests请求,就是用yhthon的requests模块模拟浏览器请求,返回html源码
模拟浏览器请求有两种,一种是不需要用户登录或者验证的请求,一种是需要用户登录或者验证的请求
一、不需要用户登录或者验证的请求
这种比较简单,直接利用requests模块发一个请求即可拿到html源码
#!/usr/bin/env python
# -*- coding:utf8 -*-
import requests     #导入模拟浏览器请求模块

http =requests.get(url="http://www.iqiyi.com/")     #发送http请求
http.encoding = "utf-8"                             #http请求编码
neir = http.text                                    #获取http字符串代码
print(neir)
得到html源码
<!DOCTYPE html>
<html>
<head>
<title>抽屉新热榜-聚合每日热门、搞笑、有趣资讯</title>
        <meta charset="utf-8" />
        <meta name="keywords" content="抽屉新热榜,资讯,段子,图片,公众场合不宜,科技,新闻,节操,搞笑" />

        <meta name="description" content="
            抽屉新热榜,汇聚每日搞笑段子、热门图片、有趣新闻。它将微博、门户、社区、bbs、社交网站等海量内容聚合在一起,通过用户推荐生成最热榜单。看抽屉新热榜,每日热门、有趣资讯尽收眼底。
            " />

        <meta name="robots" content="index,follow" />
        <meta name="GOOGLEBOT" content="index,follow" />
        <meta name="Author" content="搞笑" />
        <meta http-equiv="X-UA-Compatible" content="IE=EmulateIE8">
        <link type="image/x-icon" href="/images/chouti.ico" rel="icon"/>
        <link type="image/x-icon" href="/images/chouti.ico" rel="Shortcut Icon"/>
        <link type="image/x-icon" href="/images/chouti.ico" rel="bookmark"/>
    <link type="application/opensearchdescription+xml"
          href="opensearch.xml" title="抽屉新热榜" rel="search" />
二、需要用户登录或者验证的请求
获取这种页面时,我们首先要了解整个登录过程,一般登录过程是,当用户第一次访问时,会自动在浏览器生成cookie文件,当用户输入登录信息后会携带着生成的cookie文件,如果登录信息正确会给这个cookie
授权,授权后以后访问需要登录的页面时携带授权后cookie即可
1、首先访问一下首页,然后查看是否有自动生成cookie
#!/usr/bin/env python
# -*- coding:utf8 -*-
import requests     #导入模拟浏览器请求模块


### 1、在没登录之前访问一下首页,获取cookie
i1 = requests.get(
    url="http://dig.chouti.com/",
    headers={\'Referer\': \'http://dig.chouti.com/\'}
)
i1.encoding = "utf-8"                               #http请求编码
i1_cookie = i1.cookies.get_dict()
print(i1_cookie)                                    #返回获取到的cookie
#返回:{\'JSESSIONID\': \'aaaTztKP-KaGLbX-T6R0v\', \'gpsd\': \'c227f059746c839a28ab136060fe6ebe\', \'route\': \'f8b4f4a95eeeb2efcff5fd5e417b8319\'}
可以看到生成了cookie,说明如果登陆信息正确,后台会给这里的cookie授权,以后访问需要登录的页面携带授权后的cookie即可
2、让程序自动去登录授权cookie
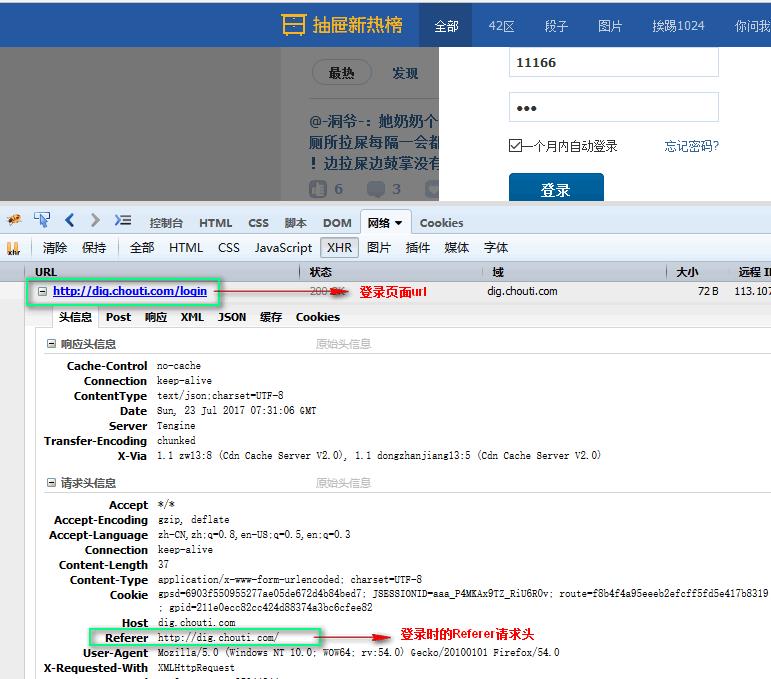
首先我们用浏览器访问登录页面,随便乱输入一下登录密码和账号,获取登录页面url,和登录所需要的字段


携带cookie登录授权
#!/usr/bin/env python
# -*- coding:utf8 -*-
import requests     #导入模拟浏览器请求模块


### 1、在没登录之前访问一下首页,获取cookie
i1 = requests.get(
    url="http://dig.chouti.com/",
    headers={\'Referer\':\'http://dig.chouti.com/\'}
)
i1.encoding = "utf-8"                               #http请求编码
i1_cookie = i1.cookies.get_dict()
print(i1_cookie)                                    #返回获取到的cookie
#返回:{\'JSESSIONID\': \'aaaTztKP-KaGLbX-T6R0v\', \'gpsd\': \'c227f059746c839a28ab136060fe6ebe\', \'route\': \'f8b4f4a95eeeb2efcff5fd5e417b8319\'}

### 2、用户登陆,携带上一次的cookie,后台对cookie中的随机字符进行授权
i2 = requests.post(
    url="http://dig.chouti.com/login",              #登录url
    data={                                          #登录字段
        \'phone\': "8615284816568",
        \'password\': "279819",
        \'oneMonth\': ""
    },
    headers={\'Referer\':\'http://dig.chouti.com/\'},
    cookies=i1_cookie                               #携带cookie
)
i2.encoding = "utf-8"
dluxxi = i2.text
print(dluxxi)                                       #查看登录后服务器的响应
#返回:{"result":{"code":"9999", "message":"", "data":{"complateReg":"0","destJid":"cdu_50072007463"}}}  登录成功
3、登录成功后,说明后台已经给cookie授权,这样我们访问需要登录的页面时,携带这个cookie即可,比如获取个人中心
#!/usr/bin/env python
# -*- coding:utf8 -*-
import requests     #导入模拟浏览器请求模块


### 1、在没登录之前访问一下首页,获取cookie
i1 = requests.get(
    url="http://dig.chouti.com/",
    headers={\'Referer\':\'http://dig.chouti.com/\'}
)
i1.encoding = "utf-8"                               #http请求编码
i1_cookie = i1.cookies.get_dict()
print(i1_cookie)                                    #返回获取到的cookie
#返回:{\'JSESSIONID\': \'aaaTztKP-KaGLbX-T6R0v\', \'gpsd\': \'c227f059746c839a28ab136060fe6ebe\', \'route\': \'f8b4f4a95eeeb2efcff5fd5e417b8319\'}

### 2、用户登陆,携带上一次的cookie,后台对cookie中的随机字符进行授权
i2 = requests.post(
    url="http://dig.chouti.com/login",              #登录url
    data={                                          #登录字段
        \'phone\': "8615284816568",
        \'password\': "279819",
        \'oneMonth\': ""
    },
    headers={\'Referer\':\'http://dig.chouti.com/\'},
    cookies=i1_cookie                               #携带cookie
)
i2.encoding = "utf-8"
dluxxi = i2.text
print(dluxxi)                                       #查看登录后服务器的响应
#返回:{"result":{"code":"9999", "message":"", "data":{"complateReg":"0","destJid":"cdu_50072007463"}}}  登录成功


### 3、访问需要登录才能查看的页面,携带着授权后的cookie访问
shouquan_cookie = i1_cookie
i3 = requests.get(
    url="http://dig.chouti.com/user/link/saved/1",
    headers={\'Referer\':\'http://dig.chouti.com/\'},
    cookies=shouquan_cookie                        #携带着授权后的cookie访问
)
i3.encoding = "utf-8"
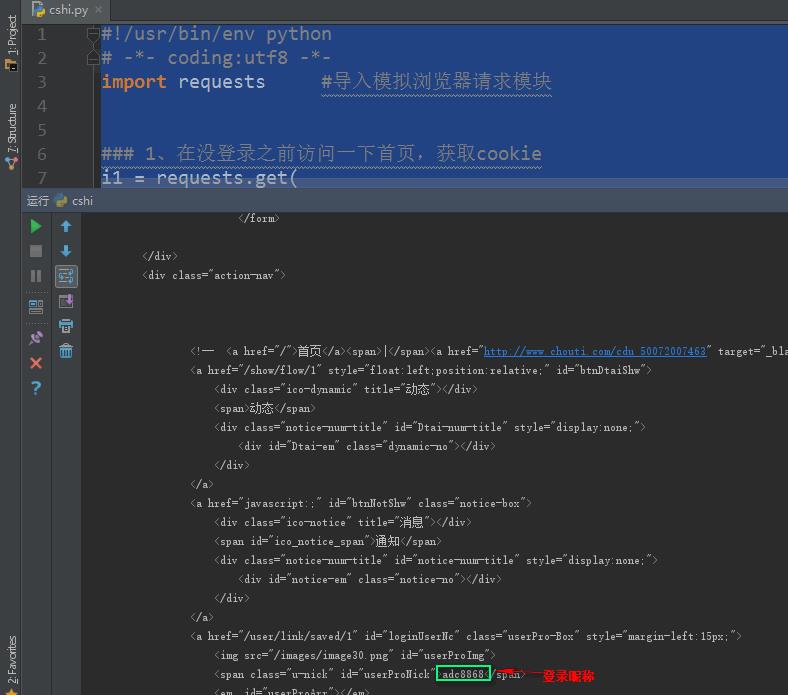
print(i3.text)                                     #查看需要登录才能查看的页面

获取需要登录页面的html源码成功
全部代码
get()方法,发送get请求
encoding属性,设置请求编码
cookies.get_dict()获取cookies
post()发送post请求
text获取服务器响应信息
#!/usr/bin/env python
# -*- coding:utf8 -*-
import requests     #导入模拟浏览器请求模块


### 1、在没登录之前访问一下首页,获取cookie
i1 = requests.get(
    url="http://dig.chouti.com/",
    headers={\'Referer\':\'http://dig.chouti.com/\'}
)
i1.encoding = "utf-8"                               #http请求编码
i1_cookie = i1.cookies.get_dict()
print(i1_cookie)                                    #返回获取到的cookie
#返回:{\'JSESSIONID\': \'aaaTztKP-KaGLbX-T6R0v\', \'gpsd\': \'c227f059746c839a28ab136060fe6ebe\', \'route\': \'f8b4f4a95eeeb2efcff5fd5e417b8319\'}

### 2、用户登陆,携带上一次的cookie,后台对cookie中的随机字符进行授权
i2 = requests.post(
    url="http://dig.chouti.com/login",              #登录url
    data={                                          #登录字段
        \'phone\': "8615284816568",
        \'password\': "279819",
        \'oneMonth\': ""
    },
    headers={\'Referer\':\'http://dig.chouti.com/\'},
    cookies=i1_cookie                               #携带cookie
)
i2.encoding = "utf-8"
dluxxi = i2.text
print(dluxxi)                                       #查看登录后服务器的响应
#返回:{"result":{"code":"9999", "message":"", "data":{"complateReg":"0","destJid":"cdu_50072007463"}}}  登录成功


### 3、访问需要登录才能查看的页面,携带着授权后的cookie访问
shouquan_cookie = i1_cookie
i3 = requests.get(
    url="http://dig.chouti.com/user/link/saved/1",
    headers={\'Referer\':\'http://dig.chouti.com/\'},
    cookies=shouquan_cookie                        #携带着授权后的cookie访问
)
i3.encoding = "utf-8"
print(i3.text)                                     #查看需要登录才能查看的页面
注意:如果登录需要验证码,那就需要做图像处理,根据验证码图片,识别出验证码,将验证码写入登录字段
以上是关于web爬虫,requests请求的主要内容,如果未能解决你的问题,请参考以下文章
