使用Web.Config Transformation配置灵活的配置文件
Posted WebEnh
tags:
篇首语:本文由小常识网(cha138.com)小编为大家整理,主要介绍了使用Web.Config Transformation配置灵活的配置文件相关的知识,希望对你有一定的参考价值。
发布Asp.net程序的时候,开发环境和发布环境的Web.Config往往不同,比如connectionstring等。如果常常有发布的需求,就需要常常修改web.config文件,这往往是一件非常麻烦的事情。
Web.Config Transformation能够在不同的发布环境下,产生不同的web.config文件,非常方便和实用。
阅读目录:
一、Web.Config Transformation
二、一个实际的例子
三、Web.Config Transformation具体语法
一. Web.Config Transformation
项目中有个默认的web.config, 还可以定义格式为web.[name].config文件, 这个配置文件定义的规则, 在发布的时候, 会对web.config文件进行修改。
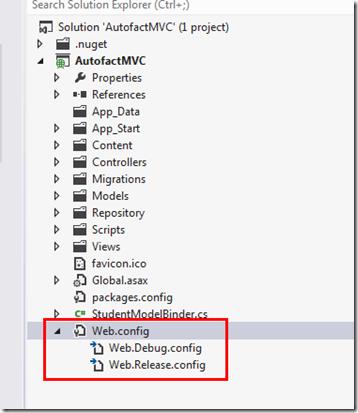
默认项目中, 会创建Web.Debug.config和Web.Release.config文件,分别对应于Debug和Release环境。
二. 一个实际的例子
假如我们要常常发布到测试服务器上,测试服务器和开发时候的connectionstring是不同的,看看如何使用Web.Config Transformation来解决这个问题。
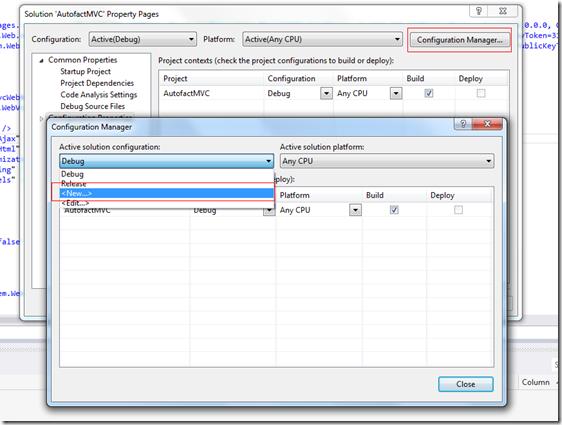
1. 添加Test配置
菜单Build->Configuration Manager, 就能看到如下的配置窗口, 添加一个新的配置Test.
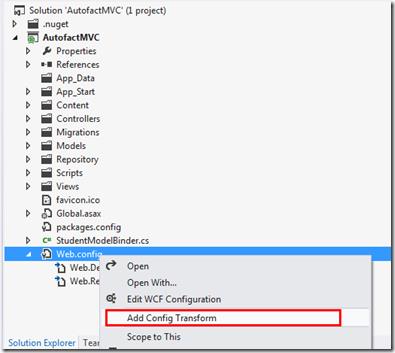
2. 添加Test config Transformation文件
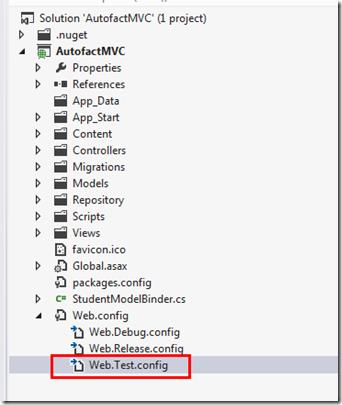
在web.confg上,点击右键,Add Config Transform, VS就会为刚刚新建的Test配置新增Transformation文件 Web.Test.config
3. 修改Web.Test.config文件
下面的Web.Test.config中能够替换web.config中的connectionstring, 关键是这一段
<add name="MyDB"
        connectionString="Data Source=TestSQLServer;Initial Catalog=MyTestDB;Integrated Security=True"
        xdt:Transform="Replace" xdt:Locator="Match(name)"/>
xdt:Transform="Replace", 指的是用来做替换操作
xdt:Locator="Match(name), 指的是匹配规则,这里是匹配name
意思是用Web.Test.config中的这个配置节用来替换web.config中name为MyDB的配置
<?xml version="1.0" encoding="utf-8"?>

<!-- For more information on using web.config transformation visit http://go.microsoft.com/fwlink/?LinkId=125889 -->

<configuration xmlns:xdt="http://schemas.microsoft.com/XML-Document-Transform">
  <!--
    In the example below, the "SetAttributes" transform will change the value of
    "connectionString" to use "ReleaseSQLServer" only when the "Match" locator
    finds an attribute "name" that has a value of "MyDB".
    <connectionStrings>
      <add name="MyDB"
        connectionString="Data Source=TestSQLServer;Initial Catalog=MyTestDB;Integrated Security=True"
        xdt:Transform="SetAttributes" xdt:Locator="Match(name)"/>
    </connectionStrings>
  -->
    <connectionStrings>
      <add name="DefaultConnection"
        connectionString="Data Source=ReleaseSQLServer;Initial Catalog=MyReleaseDB;Integrated Security=True" providerName="System.Data.SqlClient"
        xdt:Transform="Replace" xdt:Locator="Match(name)"/>
    </connectionStrings>
  <system.web>
    <compilation xdt:Transform="RemoveAttributes(debug)" />
    <!--
      In the example below, the "Replace" transform will replace the entire
      <customErrors> section of your web.config file.
      Note that because there is only one customErrors section under the
      <system.web> node, there is no need to use the "xdt:Locator" attribute.
      <customErrors defaultRedirect="GenericError.htm"
        mode="RemoteOnly" xdt:Transform="Replace">
        <error statusCode="500" redirect="InternalError.htm"/>
      </customErrors>
    -->
  </system.web>
</configuration>
4. 检查发布的结果
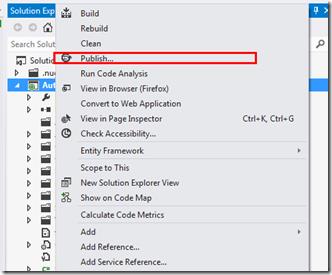
选择在Test配置下publish网站,你能看到最终的web.config文件,已经实现了替换connection string.
三. Web.Config Transformation具体语法
参考博客 http://www.cnblogs.com/worksguo/archive/2009/08/29/1556307.html
1 :locator属性
下面有个表,来详细列举locator的语法
(1)Match;
这里你需要就是在你直接匹配的属性名。
<connectionStrings>
<add name="Northwind" connectionString="connection string detail"
    providerName="System.Data.SqlClient"
    xdt:Transform="Replace"
    xdt:Locator="Match(name)" />
</connectionStrings>
Engine会再你的Web.config中找到匹配name为Norhwind的就用上面的配置文件图替换。
(2)Condition
基于XPath,在Locator中应用有逻辑性的判断表达式。
 <connectionStrings>
<add name="Northwind"
    connectionString="connection string detail"
    providerName="System.Data.SqlClient"
    xdt:Transform="Replace"
    xdt:Locator="Condition(@name=’Northwind or @providerName=\' System.Data.SqlClient\')" />
</connectionStrings>
上面就是Name属性匹配‘Norhwind’的或providerName匹配System.Data.SqlClient的配置文件节点都会被替换。
(3)XPath
这个就是直接写XPath,http://www.w3.org/TR/xpath,这里是XPath的标准
<location path="c:\\MySite\\Admin" >
<system.web xdt:Transform="Replace" xdt:Locator="XPath(//system.web)">

</system.web>
<location>
这里你会发现,这里可以写一些列的表达式。
2: Transform 属性
(1) Replace
表示所有匹配的节点都是替换
<assemblies xdt:Transform="Replace">
<add assembly="System.Core, Version=3.5.0.0, Culture=neutral, PublicKeyToken=B77A5C561934E089" />
</assemblies>
其实这里描述文件时web.release.config,将要替换的文件时Web.config .
(2) Remove
删除第一匹配的元素。
<assemblies xdt:Transform="Remove">
</assemblies>
(3)RemoveAll
删除所有匹配的元素
<connectionStrings>
<add xdt:Transform="RemoveAll"/>
</connectionStrings>
(4)Insert
插入从父节点中插入,(authorization中插入<deny users="*" />)
<authorization>
<deny users="*" xdt:Transform="Insert"/>
</authorization>
(5)SetAttributes
直接设置Attributes
<compilation  batch="false"
    xdt:Transform="SetAttributes(batch)">
</compilation>
(6)RemoveAttributes
删除出Attributes
<compilation xdt:Transform="RemoveAttributes(debug,batch)">
</compilation>
(7)InsertAfter (XPath)
通过匹配 XPath的表达式的,找到节点,并子节点后面插入 XML
<authorization>
<deny users="AName" xdt:Transform="InsertAfter(/configuration/system.web/authorization/ allow[@roles=\'Admins\']") />
</authorization>
(8)InsertBefore (XPath)
通过匹配 XPath的表达式的,找到节点,并子节点前面插入 XML
<authorization>
<allow roles=" Admins" xdt:Transform="InsertBefore(/configuration/system.web/authorization/ deny[@users=\'*\'])" />
</authorization>
(9)XSLT (filePath)
可以在外部定义 XSLT文件,来替换Web.cofig文件。
<appSettings xdt:Transform="XSLT(V:\\MyProject\\appSettings.xslt)">
</appSettings>
以上是关于使用Web.Config Transformation配置灵活的配置文件的主要内容,如果未能解决你的问题,请参考以下文章
