nginx+keepalived
Posted
tags:
篇首语:本文由小常识网(cha138.com)小编为大家整理,主要介绍了nginx+keepalived相关的知识,希望对你有一定的参考价值。
nginx+keepalived
目录
Prepare Configuration
一、实验环境
nginx_master 10.234.1.52
nginx_slaves 10.234.1.53
虚拟IP:10.234.1.57
二、需要安装的软件
1、Nginx
2、keepalived
3、PCRE(下载链接:ftp://ftp.csx.cam.ac.uk/pub/software/programming/pcre/pcre-8.36.tar.gz)
4、安装完需要安装的几个系统开发软件包:(如果已经安装,可以忽略)
#yum install -y wget
#yum install -y gcc gcc-c++ make
#yum install -y openssl-devel kernel-devel
#yum install popt-devel -y
nginx-master
1、在nginx-master服务器上安装以下软件开发包:
#yum install -y wget
#yum install -y gcc gcc-c++ make
#yum install -y openssl-devel kernel-devel
#yum install popt-devel -y
2、关闭防火墙(为了不影响keepalived的服务端口)
#service iptables stop
3、下载PCRE包
#wget ftp://ftp.csx.cam.ac.uk/pub/software/programming/pcre/pcre-8.36.tar.gz
4、编译安装PCRE
#tar -zxvf pcre-8.36.tar.gz
#cd pcre-8.36
#./configure
#make && make install
#cd
5、安装nginx编译安装包
#yum install -y zlib-devel
#yum install -y openssl-devel
#yum install -y popt-devel
6、下载并安装nginx
#wget http://sysoev.ru/nginx/nginx-0.7.64.tar.gz
#tar -zxvf nginx-0.7.64.tar.gz
#cd nginx-0.7.64
#./configure
#make && make install
#cd /lib64
#ln -s libpcre.so.0.0.1 libpcre.so.1
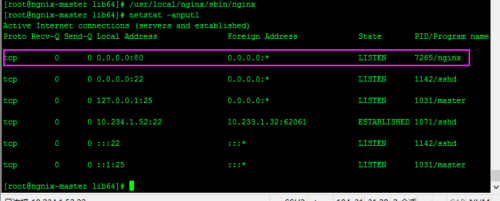
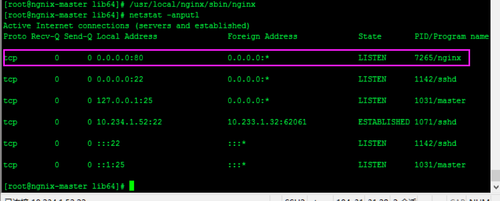
7、启动nginx
# /usr/local/nginx/sbin/nginx
8、创建供nginx使用的组和账号
#/usr/sbin/groupadd www -g 48
#/usr/sbin/useradd -u 48 -g www www
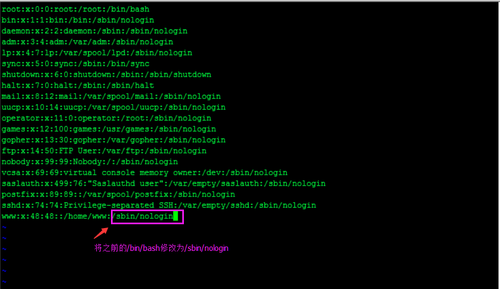
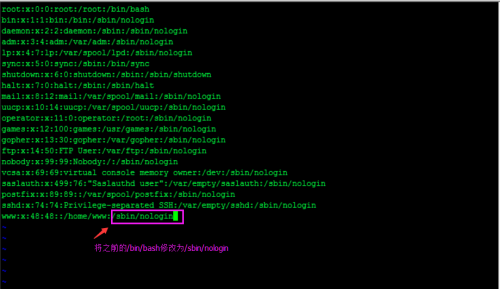
9、禁止nginx的www账号登陆,如图更改配置参数
#vi /etc/password
10、配置nginx的配置文件,将原来的配置文件做成备份
# cd /usr/local/nginx/conf/
#cp nginx.conf nginx.conf.bak
将原来的nginx.conf配置全部删除,导入以下文件配置:
#
#user www www;
worker_processes 4;
#error_log logs/error.log;
#error_log logs/error.log notice;
#error_log logs/error.log info;
#pid logs/nginx.pid;
events {
worker_connections 1024;
}
http {
include mime.types;
default_type application/octet-stream;
#log_format main ‘$remote_addr - $remote_user [$time_local] "$request" ‘
# ‘$status $body_bytes_sent "$http_referer" ‘
# ‘"$http_user_agent" "$http_x_forwarded_for"‘;
#access_log logs/access.log main;
sendfile on;
#tcp_nopush on;
#keepalive_timeout 0;
keepalive_timeout 65;
gzip on;
upstream web {
ip_hash;
server 10.234.1.52:8080;
server 10.234.1.53:8080;
}
server {
listen 80;
server_name root;
#charset koi8-r;
#access_log logs/host.access.log main;
location / {
proxy_pass http://web;
proxy_set_header Host $host;
proxy_set_header X-Real-IP $remote_addr;
proxy_set_header X-Forwarded-For
$proxy_add_x_forwarded_for;
}
#error_page 404 /404.html;
# redirect server error pages to the static page /50x.html
#
error_page 500 502 503 504 /50x.html;
location = /50x.html {
root html;
}
# proxy the php scripts to Apache listening on 127.0.0.1:80
#
#location ~ \.php$ {
# proxy_pass http://127.0.0.1;
#}
# pass the PHP scripts to FastCGI server listening on 127.0.0.1:9000
#
#location ~ \.php$ {
# root html;
# fastcgi_pass 127.0.0.1:9000;
# fastcgi_index index.php;
# fastcgi_param SCRIPT_FILENAME /scripts$fastcgi_script_name;
# include fastcgi_params;
#}
# deny access to .htaccess files, if Apache‘s document root
# concurs with nginx‘s one
#
#location ~ /\.ht {
# deny all;
#}
}
# another virtual host using mix of IP-, name-, and port-based configuration
#
#server {
# listen 8000;
# listen somename:8080;
# server_name somename alias another.alias;
# location / {
# root html;
# index index.html index.htm;
# }
#}
# HTTPS server
#
#server {
# listen 443;
# server_name localhost;
# ssl on;
# ssl_certificate cert.pem;
# ssl_certificate_key cert.key;
# ssl_session_timeout 5m;
# ssl_protocols SSLv2 SSLv3 TLSv1;
# ssl_ciphers ALL:!ADH:!EXPORT56:RC4+RSA:+HIGH:+MEDIUM:+LOW:+SSLv2:+EXP;
# ssl_prefer_server_ciphers on;
# location / {
# root html;
# index index.html index.htm;
# }
#}
}
11、新建check_nginx.sh的配置文件用于监控
#vi check_nginx.sh
TH=/usr/sbin:/usr/bin:$PATH
export PATH
n=`netstat -ant|grep LISTEN|egrep "0 0.0.0.0:80"|wc -l`
if [ $n -eq 0 ];then
/etc/init.d/keepalived stop
exit
else
#echo $n
exit
fi
12、对刚刚check_nginx.sh的配置文件,设置计划任务(每分钟检测一次nginx是否存活)
#crontab -e
*/1 * * * * sh /root/check_nginx.sh
keepalived-A
1、安装keepalived
#wget http://www.keepalived.org/software/keepalived-1.2.1.tar.gz
#ln -s /usr/src/kernels/2.6.32-573.7.1.el6.x86_64/ /usr/src/linux #使用最新版本的内核
#tar zxvf keepalived-1.2.1.tar.gz
#cd keepalived-1.2.1
# ./configure --with-kenel-dir=/usr/src/kernels/2.6.32-573.7.1.el6.x86_64/
# make && make install
2、配置keepalived
# cp /usr/local/etc/rc.d/init.d/keepalived /etc/rc.d/init.d/
#cp /usr/local/etc/sysconfig/keepalived /etc/sysconfig/
#mkdir /etc/keepalived
#cp /usr/local/etc/keepalived/keepalived.conf /etc/keepalived/
#cp /usr/local/sbin/keepalived /usr/sbin/
#chkconfig --add keepalived
#chkconfig --level 2345 keepalived on
3、配置keepalived的配置文件,将原来的配置文件做成备份
# cd /etc/keepalived/
#cp keepalived.conf keepalived.conf.bak
将原来的nginx.conf配置全部删除,导入以下文件配置:
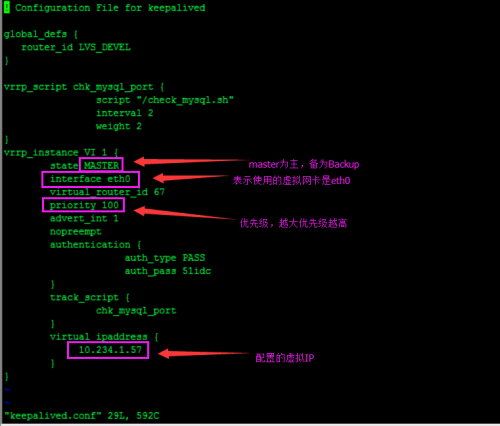
#
! Configuration File for keepalived
global_defs {
router_id LVS_DEVEL
}
vrrp_script chk_mysql_port {
script "/check_mysql.sh"
interval 2
weight 2
}
vrrp_instance VI_1 {
state MASTER
interface eth0
virtual_router_id 67
priority 100
advert_int 1
nopreempt
authentication {
auth_type PASS
auth_pass 51idc
}
track_script {
chk_mysql_port
}
virtual_ipaddress {
10.234.1.57
}
}
nginx-slave
1、在nginx-master服务器上安装以下软件开发包:
#yum install -y wget
#yum install -y gcc gcc-c++ make
#yum install -y openssl-devel kernel-devel
#yum install popt-devel -y
2、关闭防火墙(为了不影响keepalived的服务端口)
#service iptables stop
3、下载PCRE包
#wget ftp://ftp.csx.cam.ac.uk/pub/software/programming/pcre/pcre-8.36.tar.gz
4、编译安装PCRE
#tar -zxvf pcre-8.36.tar.gz
#cd pcre-8.36
#./configure
#make && make install
#cd
5、安装nginx编译安装包
#yum install -y zlib-devel
#yum install -y openssl-devel
#yum install -y popt-devel
6、下载并安装nginx
#wget http://sysoev.ru/nginx/nginx-0.7.64.tar.gz
#tar -zxvf nginx-0.7.64.tar.gz
#cd nginx-0.7.64
#./configure
#make && make install
#cd /lib64
#ln -s libpcre.so.0.0.1 libpcre.so.1
7、启动nginx
# /usr/local/nginx/sbin/nginx
8、创建供nginx使用的组和账号
#/usr/sbin/groupadd www -g 48
#/usr/sbin/useradd -u 48 -g www www
9、禁止nginx的www账号登陆,如图更改配置参数
#vi /etc/password
10、配置nginx的配置文件,将原来的配置文件做成备份
# cd /usr/local/nginx/conf/
#cp nginx.conf nginx.conf.bak
将原来的nginx.conf配置全部删除,导入以下文件配置:
#
#user www www;
worker_processes 4;
#error_log logs/error.log;
#error_log logs/error.log notice;
#error_log logs/error.log info;
#pid logs/nginx.pid;
events {
worker_connections 1024;
}
http {
include mime.types;
default_type application/octet-stream;
#log_format main ‘$remote_addr - $remote_user [$time_local] "$request" ‘
# ‘$status $body_bytes_sent "$http_referer" ‘
# ‘"$http_user_agent" "$http_x_forwarded_for"‘;
#access_log logs/access.log main;
sendfile on;
#tcp_nopush on;
#keepalive_timeout 0;
keepalive_timeout 65;
gzip on;
upstream web {
ip_hash;
server 192.168.10.200:8080;
server 192.168.10.201:8080;
}
server {
listen 80;
server_name root;
#charset koi8-r;
#access_log logs/host.access.log main;
location / {
proxy_pass http://web;
proxy_set_header Host $host;
proxy_set_header X-Real-IP $remote_addr;
proxy_set_header X-Forwarded-For
$proxy_add_x_forwarded_for;
}
#error_page 404 /404.html;
# redirect server error pages to the static page /50x.html
#
error_page 500 502 503 504 /50x.html;
location = /50x.html {
root html;
}
# proxy the PHP scripts to Apache listening on 127.0.0.1:80
#
#location ~ \.php$ {
# proxy_pass http://127.0.0.1;
#}
# pass the PHP scripts to FastCGI server listening on 127.0.0.1:9000
#
#location ~ \.php$ {
# root html;
# fastcgi_pass 127.0.0.1:9000;
# fastcgi_index index.php;
# fastcgi_param SCRIPT_FILENAME /scripts$fastcgi_script_name;
# include fastcgi_params;
#}
# deny access to .htaccess files, if Apache‘s document root
# concurs with nginx‘s one
#
#location ~ /\.ht {
# deny all;
#}
}
# another virtual host using mix of IP-, name-, and port-based configuration
#
#server {
# listen 8000;
# listen somename:8080;
# server_name somename alias another.alias;
# location / {
# root html;
# index index.html index.htm;
# }
#}
# HTTPS server
#
#server {
# listen 443;
# server_name localhost;
# ssl on;
# ssl_certificate cert.pem;
# ssl_certificate_key cert.key;
# ssl_session_timeout 5m;
# ssl_protocols SSLv2 SSLv3 TLSv1;
# ssl_ciphers ALL:!ADH:!EXPORT56:RC4+RSA:+HIGH:+MEDIUM:+LOW:+SSLv2:+EXP;
# ssl_prefer_server_ciphers on;
# location / {
# root html;
# index index.html index.htm;
# }
#}
}
keepalived-B
1、安装keepalived
#wget http://www.keepalived.org/software/keepalived-1.2.1.tar.gz
#ln -s /usr/src/kernels/2.6.32-573.7.1.el6.x86_64/ /usr/src/linux #使用最新版本的内核
#tar zxvf keepalived-1.2.1.tar.gz
#cd keepalived-1.2.1
# ./configure --with-kenel-dir=/usr/src/kernels/2.6.32-573.7.1.el6.x86_64/
# make && make install
2、配置keepalived
# cp /usr/local/etc/rc.d/init.d/keepalived /etc/rc.d/init.d/
#cp /usr/local/etc/sysconfig/keepalived /etc/sysconfig/
#mkdir /etc/keepalived
#cp /usr/local/etc/keepalived/keepalived.conf /etc/keepalived/
#cp /usr/local/sbin/keepalived /usr/sbin/
#chkconfig --add keepalived
#chkconfig --level 2345 keepalived on
3、配置keepalived的配置文件,将原来的配置文件做成备份
# cd /etc/keepalived/
#cp keepalived.conf keepalived.conf.bak
将原来的nginx.conf配置全部删除,导入以下文件配置:
#
Configuration File for keepalived
global_defs {
router_id LVS_DEVEL
}
vrrp_script chk_mysql_port {
script "/check_mysql.sh"
interval 2
weight 2
}
vrrp_instance VI_1 {
state BACKUP
interface eth0
virtual_router_id 67
priority 80
advert_int 1
nopreempt
authentication {
auth_type PASS
auth_pass 51idc
}
track_script {
chk_mysql_port
}
virtual_ipaddress {
10.234.1.57
}
}
Test keepalived
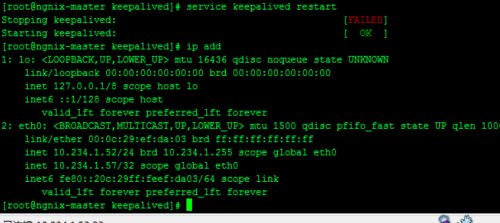
1、在nginx-master和nginx-slave的服务器上,重启一下,keepalived,查看nginx-master上虚IP:10.234.1.57是否正常生成
# service keepalived restart
#ip add
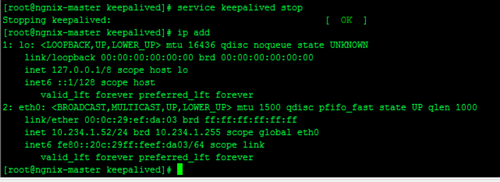
2、在nginx-master上停掉keepalived
3、在nginx-slave上查看,虚IP:10.234.1.57是否有自动切换
本文出自 “从心出发,一路向前” 博客,转载请与作者联系!
以上是关于nginx+keepalived的主要内容,如果未能解决你的问题,请参考以下文章
