DNS+keepalived+lvs实现高可用负载均衡集群
Posted
tags:
篇首语:本文由小常识网(cha138.com)小编为大家整理,主要介绍了DNS+keepalived+lvs实现高可用负载均衡集群相关的知识,希望对你有一定的参考价值。
1、目的:
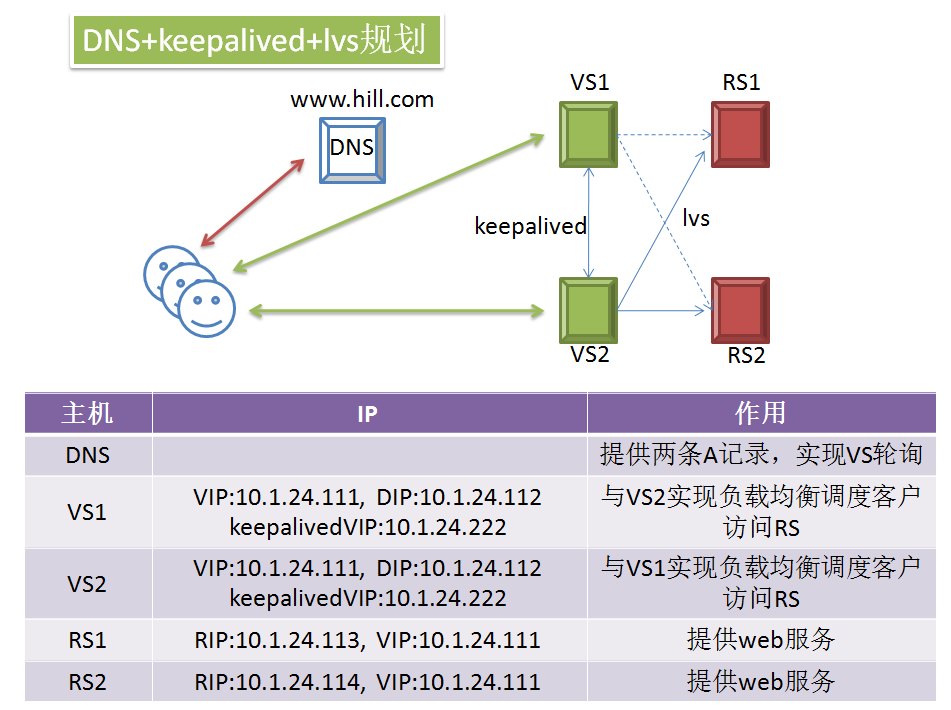
部署两台lvs调度器并利用keepalived实现主主模型,DNS添加两条A记录指向lvs调度器实现轮询,最终实现高可用负载均衡集群效果
2、拓扑规划:
3、配置实践
(1)同步所有机器时间
在每台机器实行ntp同步:
[[email protected] ~]# ntpdate 10.1.0.1
26 Oct 20:10:57 ntpdate[5533]: step time server 10.1.0.1 offset -32408.643564 sec
(2)先配置RS,在RS1和RS2中中设置相同的VIP,这里使用脚本来快速定义
RS的预配置脚本:
#!/bin/bash
    #
    vip=10.1.24.111
    mask=‘255.255.255.255‘

    case $1 in
    start)
    echo 1 > /proc/sys/net/ipv4/conf/all/arp_ignore
    echo 1 > /proc/sys/net/ipv4/conf/lo/arp_ignore
    echo 2 > /proc/sys/net/ipv4/conf/all/arp_announce
    echo 2 > /proc/sys/net/ipv4/conf/lo/arp_announce

    ifconfig lo:0 $vip netmask $mask broadcast $vip up
    route add -host $vip dev lo:0
    ;;
    stop)
    ifconfig lo:0 down

    echo 0 > /proc/sys/net/ipv4/conf/all/arp_ignore
    echo 0 > /proc/sys/net/ipv4/conf/lo/arp_ignore
    echo 0 > /proc/sys/net/ipv4/conf/all/arp_announce
    echo 0 > /proc/sys/net/ipv4/conf/lo/arp_announce

    ;;
    *)
    echo "Usage $(basename $0) start|stop"
    exit 1
    ;;
    esac
(3)查看IP已经正确配置:
RS1:
eth0:11   Link encap:Ethernet  HWaddr 00:0C:29:7E:C0:90
          inet addr:10.1.24.113  Bcast:10.1.255.255  Mask:255.255.0.0
          UP BROADCAST RUNNING MULTICAST  MTU:1500  Metric:1
lo        Link encap:Local Loopback
          inet addr:127.0.0.1  Mask:255.0.0.0
          inet6 addr: ::1/128 Scope:Host
          UP LOOPBACK RUNNING  MTU:65536  Metric:1
          RX packets:0 errors:0 dropped:0 overruns:0 frame:0
          TX packets:0 errors:0 dropped:0 overruns:0 carrier:0
          collisions:0 txqueuelen:0
          RX bytes:0 (0.0 b)  TX bytes:0 (0.0 b)
lo:0      Link encap:Local Loopback
          inet addr:10.1.24.111  Mask:255.255.255.255
          UP LOOPBACK RUNNING  MTU:65536  Metric:1
lo:1      Link encap:Local Loopback
          inet addr:10.1.24.110  Mask:255.255.255.255
          UP LOOPBACK RUNNING  MTU:65536  Metric:1
RS2:
eth1:11   Link encap:Ethernet  HWaddr 00:0C:29:00:E0:C5
          inet addr:10.1.24.114  Bcast:10.1.255.255  Mask:255.255.0.0
          UP BROADCAST RUNNING MULTICAST  MTU:1500  Metric:1
lo        Link encap:Local Loopback
          inet addr:127.0.0.1  Mask:255.0.0.0
          inet6 addr: ::1/128 Scope:Host
          UP LOOPBACK RUNNING  MTU:65536  Metric:1
          RX packets:0 errors:0 dropped:0 overruns:0 frame:0
          TX packets:0 errors:0 dropped:0 overruns:0 carrier:0
          collisions:0 txqueuelen:0
          RX bytes:0 (0.0 b)  TX bytes:0 (0.0 b)
lo:0      Link encap:Local Loopback
          inet addr:10.1.24.111  Mask:255.255.255.255
          UP LOOPBACK RUNNING  MTU:65536  Metric:1
lo:1      Link encap:Local Loopback
          inet addr:10.1.24.110  Mask:255.255.255.255
          UP LOOPBACK RUNNING  MTU:65536  Metric:1
(4)设置VS配置文件keepalived.conf
VS1:
[[email protected] ~]# cat /etc/keepalived/keepalived.conf
[[email protected] keepalived]# cat /etc/keepalived/keepalived.conf
! Configuration File for keepalived
global_defs {
notification_email {
[email protected]
}
notification_email_from [email protected]
smtp_server 127.0.0.1
smtp_connect_timeout 30
router_id node1
vrrp_mcast_group4 224.0.24.111
}
vrrp_instance VI_1 {
state MASTER
interface eth0
virtual_router_id 24
priority 100
advert_int 1
authentication {
auth_type PASS
auth_pass 571f97b2
}
virtual_ipaddress {
10.1.24.111/16 dev eth0 label eth0:1
}
}
virtual_server 10.1.24.111 80 {
delay_loop 3
lb_algo rr
lb_kind DR
protocol TCP
sorry_server 127.0.0.1 80
real_server 10.1.24.114 80 {
weight 1
HTTP_GET {
url {
path /
status_code 200
}
connect_timeout 1
nb_get_retry 3
delay_before_retry 1
}
}
real_server 10.1.24.113 80 {
weight 1
HTTP_GET {
url {
path /
status_code 200
}
connect_timeout 1
nb_get_retry 3
delay_before_retry 1
}
}
}
vrrp_instance VI_2 {
state BACKUP
interface eth0
virtual_router_id 25
priority 90
advert_int 1
authentication {
auth_type PASS
auth_pass 571f97b2
}
virtual_ipaddress {
10.1.24.110/16 dev eth0 label eth0:2
}
}
virtual_server 10.1.24.110 80 {
delay_loop 3
lb_algo rr
lb_kind DR
protocol TCP
sorry_server 127.0.0.1 80
real_server 10.1.24.114 80 {
weight 1
HTTP_GET {
url {
path /
status_code 200
}
connect_timeout 1
nb_get_retry 3
delay_before_retry 1
}
}
real_server 10.1.24.113 80 {
weight 1
HTTP_GET {
url {
path /
status_code 200
}
connect_timeout 1
nb_get_retry 3
delay_before_retry 1
}
}
}
VS2:
[[email protected] ~]# cat !$
cat /etc/keepalived/keepalived.conf
! Configuration File for keepalived
global_defs {
notification_email {
[email protected]
}
notification_email_from [email protected]
smtp_server 127.0.0.1
smtp_connect_timeout 30
router_id node2
vrrp_mcast_group4 224.0.24.111
}
vrrp_instance VI_1 {
state BACKUP
interface eth1
virtual_router_id 24
priority 90
advert_int 1
authentication {
auth_type PASS
auth_pass 571f97b2
}
virtual_ipaddress {
10.1.24.111/16 dev eth1 label eth1:1
}
}
virtual_server 10.1.24.111 80 {
delay_loop 3
lb_algo rr
lb_kind DR
protocol TCP
sorry_server 127.0.0.1 80
real_server 10.1.24.114 80 {
weight 1
HTTP_GET {
url {
path /
status_code 200
}
connect_timeout 1
nb_get_retry 3
delay_before_retry 1
}
}
real_server 10.1.24.113 80 {
weight 1
HTTP_GET {
url {
path /
status_code 200
}
connect_timeout 1
nb_get_retry 3
delay_before_retry 1
}
}
}
vrrp_instance VI_2 {
state MASTER
interface eth1
virtual_router_id 25
priority 100
advert_int 1
authentication {
auth_type PASS
auth_pass 571f97b2
}
virtual_ipaddress {
10.1.24.110/16 dev eth1 label eth1:2
}
}
virtual_server 10.1.24.110 80 {
delay_loop 3
lb_algo rr
lb_kind DR
protocol TCP
sorry_server 127.0.0.1 80
real_server 10.1.24.114 80 {
weight 1
HTTP_GET {
url {
path /
status_code 200
}
connect_timeout 1
nb_get_retry 3
delay_before_retry 1
}
}
real_server 10.1.24.113 80 {
weight 1
HTTP_GET {
url {
path /
status_code 200
}
connect_timeout 1
nb_get_retry 3
delay_before_retry 1
}
}
}
(5)只启动一个keepalived查看,两个IP都已经添加:
[[email protected] keepalived]# ifconfig
eth0      Link encap:Ethernet  HWaddr 00:0C:29:DA:A5:4C
          inet addr:10.1.252.36  Bcast:10.1.255.255  Mask:255.255.0.0
          inet6 addr: fe80::20c:29ff:feda:a54c/64 Scope:Link
          UP BROADCAST RUNNING MULTICAST  MTU:1500  Metric:1
          RX packets:76726 errors:0 dropped:0 overruns:0 frame:0
          TX packets:12744 errors:0 dropped:0 overruns:0 carrier:0
          collisions:0 txqueuelen:1000
          RX bytes:6665499 (6.3 MiB)  TX bytes:1217927 (1.1 MiB)
eth0:1    Link encap:Ethernet  HWaddr 00:0C:29:DA:A5:4C
          inet addr:10.1.24.111  Bcast:0.0.0.0  Mask:255.255.0.0
          UP BROADCAST RUNNING MULTICAST  MTU:1500  Metric:1
eth0:2    Link encap:Ethernet  HWaddr 00:0C:29:DA:A5:4C
          inet addr:10.1.24.110  Bcast:0.0.0.0  Mask:255.255.0.0
          UP BROADCAST RUNNING MULTICAST  MTU:1500  Metric:1
lo        Link encap:Local Loopback
          inet addr:127.0.0.1  Mask:255.0.0.0
          inet6 addr: ::1/128 Scope:Host
          UP LOOPBACK RUNNING  MTU:65536  Metric:1
          RX packets:381 errors:0 dropped:0 overruns:0 frame:0
          TX packets:381 errors:0 dropped:0 overruns:0 carrier:0
          collisions:0 txqueuelen:0
          RX bytes:32271 (31.5 KiB)  TX bytes:32271 (31.5 KiB)
(6)在客户机测试,依然成功:
[[email protected] ~]# for i in `seq 10`;do curl 10.1.24.110;done
RS2
RS1
RS2
RS1
RS2
RS1
RS2
RS1
RS2
RS1
[[email protected] ~]# for i in `seq 10`;do curl 10.1.24.111;done
RS1
RS2
RS1
RS2
RS1
RS2
RS1
RS2
RS1
RS2
(7)接下来把keepalived服务启动,并搭建一个DNS服务器,www.hill.com两条A记录分别指向10.1.24.110和10.1.24.111即可
配置DNS
(8)添加域
[[email protected] named]# tail -14 /etc/named.conf
zone "hillboy.com" IN {
type master;
file "hillboy.zone";
};
include "/etc/named.rfc1912.zones";
include "/etc/named.root.key";
(9)添加RR:
[[email protected] named]# cat /var/named/hillboy.zone
$TTL 86400
@ IN SOA ns.hillboy.com. admin.hillboy.com. (
1015
1H
30M
1W
1D
)
@ IN NS ns.hillboy.com.
ns IN A 10.1.24.18
www IN A 10.1.24.111
www IN A 10.1.24.110
(10)访问测试,已然成功:
[[email protected] ~]# for I in `seq 10`;do curl www.hill.com;done
RS1
RS2
RS1
RS2
RS1
RS2
RS1
RS2
RS1
RS2
至此,DNS+keepalived+lvs实现高可用负载均衡集群的实验已然顺利结束,更多文章请关注我的博客。
本文出自 “6638225” 博客,转载请与作者联系!
以上是关于DNS+keepalived+lvs实现高可用负载均衡集群的主要内容,如果未能解决你的问题,请参考以下文章
