linux[基础]-29-[Apache服务]-[虚拟主机]-[04]
Posted
tags:
篇首语:本文由小常识网(cha138.com)小编为大家整理,主要介绍了linux[基础]-29-[Apache服务]-[虚拟主机]-[04]相关的知识,希望对你有一定的参考价值。
Apache服务
top4:虚拟网站主机功能
Apache虚拟主机功能是可以让一台服务器基于IP、主机名、端口实现提供多个网站服务
p1:基于IP地址
使用nmtui命令为网卡添加多个IP地址(192.168.200.102/103/104):
[[email protected] ~]# nmtui
重启网络服务:
[[email protected] ~]# systemctl restart network
分别创建网站数据目录:
[[email protected] ~]# mkdir -p /home/wwwroot/102

[[email protected] ~]# mkdir -p /home/wwwroot/103

[[email protected] ~]# mkdir -p /home/wwwroot/104
分别将数据写入各个网站的index.html文件中:
[[email protected] ~]# echo "ip: 192.168.200.102" >> /home/wwwroot/102/index.html

[[email protected] ~]# echo "ip: 192.168.200.103" >> /home/wwwroot/103/index.html

[[email protected] ~]# echo "ip: 192.168.200.104" >> /home/wwwroot/104/index.html
在配置文件中添加描述基于IP地址:
<VirtualHost 192.168.200.102>

DocumentRoot /home/wwwroot/102

ServerName www.CnBlogs.com

<Directory /home/wwwroot/102>

AllowOverride None

Require all granted

</Directory>

</VirtualHost>


<VirtualHost 192.168.200.103>

DocumentRoot /home/wwwroot/103

ServerName news.CnBlogs.com

<Directory /home/wwwroot/103>

AllowOverride None

Require all granted

</Directory>

</VirtualHost>


<VirtualHost 192.168.200.104>

DocumentRoot /home/wwwroot/104

ServerName bbs.CnBlogs.com

<Directory /home/wwwroot/104>

AllowOverride None

Require all granted

</Directory>

</VirtualHost>
修改网站数据目录的selinux安全上下文:
[[email protected] ~]# semanage fcontext -a -t httpd_sys_content_t /home/wwwroot/102/

[[email protected] ~]# semanage fcontext -a -t httpd_sys_content_t /home/wwwroot/102/*

[[email protected] ~]# semanage fcontext -a -t httpd_sys_content_t /home/wwwroot/103/

[[email protected] ~]# semanage fcontext -a -t httpd_sys_content_t /home/wwwroot/103/*

[[email protected] ~]# semanage fcontext -a -t httpd_sys_content_t /home/wwwroot/104

[[email protected] ~]# semanage fcontext -a -t httpd_sys_content_t /home/wwwroot/104/*

[[email protected] ~]# semanage fcontext -a -t httpd_sys_content_t /home/wwwroot/
恢复selinux安全上下文:
[[email protected] ~]# restorecon -Rv /home/wwwroot/

[[email protected] ~]# systemctl restart httpd.service
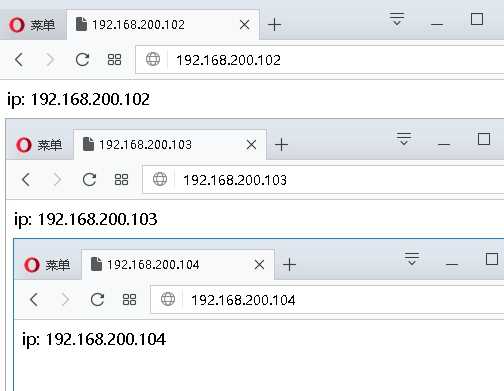
结果:
p2:基于主机名
配置本地hosts解析:
[[email protected] ~]# echo "192.168.200.102 www.cnblogs.com" >> /etc/hosts

[[email protected] ~]# echo "192.168.200.103 news.cnblogs.com" >> /etc/hosts

[[email protected] ~]# echo "192.168.200.104 bbs.cnblogs.com" >> /etc/hosts

[[email protected] ~]# cat /etc/hosts | grep "cnblogs"

  192.168.200.102 www.cnblogs.com

  192.168.200.103 news.cnblogs.com

  192.168.200.104 bbs.cnblogs.com
创建网站数据目录:
[[email protected] ~]# mkdir -p /home/wwwroot/www

[[email protected] ~]# mkdir -p /home/wwwroot/news

[[email protected] ~]# mkdir -p /home/wwwroot/bbs
分别写入数据到各个网站:
[[email protected] ~]# echo "www.cnblogs.com" >> /home/wwwroot/www/index.html

[[email protected] ~]# echo "news.cnblogs.com" >> /home/wwwroot/news/index.html

[[email protected] ~]# echo "bbs.cnblogs.com" >> /home/wwwroot/bbs/index.html
修改配置文件:
[[email protected] ~]# vim /etc/httpd/conf/httpd.conf

  <VirtualHost 192.168.200.102>

  DocumentRoot /home/wwwroot/www

  ServerName "www.CnBlogs.com"

  <Directory /home/wwwroot/www>

  AllowOverride None

  Require all granted

  </Directory>

  </VirtualHost>

  <VirtualHost 192.168.200.103>

  DocumentRoot /home/wwwroot/news

  ServerName "news.CnBlogs.com"

  <Directory /home/wwwroot/news>

  AllowOverride None

  Require all granted

  </Directory>

  </VirtualHost>

  <VirtualHost 192.168.200.104>

  DocumentRoot /home/wwwroot/bbs

  ServerName "bbs.CnBlogs.com"

  <Directory /home/wwwroot/bbs>

  AllowOverride None

  Require all granted

  </Directory>

  </VirtualHost>
重启apache:
[[email protected] ~]# systemctl restart httpd.service
修改网站目录的selinux安全上下文:
[[email protected] ~]# semanage fcontext -a -t httpd_sys_content_t /home/wwwroot/www/

[[email protected] ~]# semanage fcontext -a -t httpd_sys_content_t /home/wwwroot/www/*

[[email protected] ~]# semanage fcontext -a -t httpd_sys_content_t /home/wwwroot/news/

[[email protected] ~]# semanage fcontext -a -t httpd_sys_content_t /home/wwwroot/news/*

[[email protected] ~]# semanage fcontext -a -t httpd_sys_content_t /home/wwwroot/bbs/

[[email protected] ~]# semanage fcontext -a -t httpd_sys_content_t /home/wwwroot/bbs/*
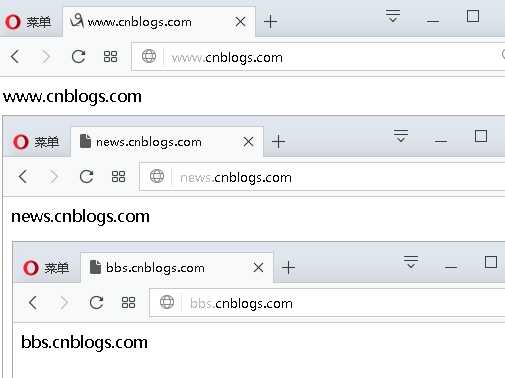
结果:
需要在本地hosts文件添加解析记录
p3:基于端口号
创建网站数据目录:
[[email protected] ~]# mkdir -p /home/wwwroot/6666

[[email protected] ~]# mkdir -p /home/wwwroot/8888
写入数据到网站目录:
[[email protected] ~]# echo "port:6666" >> /home/wwwroot/6666/index.html

[[email protected] ~]# echo "port:8888" >> /home/wwwroot/8888/index.html
编辑配置文件:
[[email protected] ~]# vim /etc/httpd/conf/httpd.conf
- 添加监听端口
Listen 6666

Listen 8888
- 修改配置文件
<VirtualHost 192.168.200.102:6666>

DocumentRoot /home/wwwroot/6666

ServerName www.CnBlogs.com

<Directory /home/wwwroot/6666>

AllowOverride None

Require all granted

</Directory>

</VirtualHost>


<VirtualHost 192.168.200.102:8888>

DocumentRoot /home/wwwroot/8888

ServerName news.CnBlogs.com

<Directory /home/wwwroot/8888>

AllowOverride None

Require all granted

</Directory>

</VirtualHost>
重启apache:
[[email protected] ~]# systemctl restart httpd.service
设置网站目录的selinux安全上下文:
[[email protected] ~]# semanage fcontext -a -t httpd_sys_content_t /home/wwwroot/6666/

[[email protected] ~]# semanage fcontext -a -t httpd_sys_content_t /home/wwwroot/6666/*

[[email protected] ~]# semanage fcontext -a -t httpd_sys_content_t /home/wwwroot/8888/

[[email protected] ~]# semanage fcontext -a -t httpd_sys_content_t /home/wwwroot/8888/*
设置selinux服务中有关http服务的端口号:
[[email protected] ~]# semanage port -l | grep -e "^http_port_t"

http_port_t       tcp      80, 81, 443, 488, 8008, 8009, 8443, 9000

[[email protected] ~]# semanage port -a -t http_port_t -p tcp 6666

[[email protected] ~]# semanage port -a -t http_port_t -p tcp 8888

[[email protected] ~]# semanage port -l | grep -e "^http_port_t"

http_port_t     tcp      8888, 6666, 80, 81, 443, 488, 8008, 8009,
添加防火墙规则(允许6666、8888端口):
[[email protected] ~]# firewall-cmd --permanent --add-port=6666/tcp

success

[[email protected] ~]# firewall-cmd --permanent --add-port=8888/tcp

success

[[email protected] ~]# firewall-cmd --reload

success

[[email protected] ~]# firewall-cmd --permanent --list-ports

6666/tcp 8888/tcp
结果:

以上是关于linux[基础]-29-[Apache服务]-[虚拟主机]-[04]的主要内容,如果未能解决你的问题,请参考以下文章