ubuntu下部署django
Posted icefox
tags:
篇首语:本文由小常识网(cha138.com)小编为大家整理,主要介绍了ubuntu下部署django相关的知识,希望对你有一定的参考价值。
一:保证python运行环境安装
apt-get install python
如果需要进行开发则还要安装python-dev
apt-get install python-dev
二:安装django
首先保证安装了pip包
利用pip进行django安装
pip install django
三:安装nginx
studo apt-get install nginx
nginx的服务启动与关闭
/etc/init.d/nginx start
/etc/init.d/nginx stop
/etc/init.d/nginx restart
同时nginx的配置文件路径为/etc/nginx/nginx.conf
在配置文件中可以修改端口等相关参数
修改完成后访问nginx服务保证服务可用,如出现以下界面则表示服务可用

四:安装uwsgi
root@ubuntu:/etc# python3 -m pip install uwsgi
五:在web目录下建立uwsgi的配置文件用以打通django与nginx的服务
例如在web根目录下建立:loveservice_wsgi.ini文件
配置文件内容如下:
[uwsgi]
socket =127.0.0.1 :8000 指定端口号
# Django-related settings
# the django project directory (full path)
chdir= /python_dev/wwwroot/loveservice 网站目录
# Django\'s wsgi file
module = loveservice.wsgi 网站目录下django的wsgi文件
# process-related settings
# master
master = true
# maximum number of worker processes
processes = 2
threads = 2
max-requests = 6000
# ... with appropriate permissions - may be needed
chmod-socket = 664
# clear environment on exit
vacuum = true
六:在web根目录下建立uwsgi_params文件
文件内容可以从https://github.com/nginx/nginx/blob/master/conf/uwsgi_params复制
内容如下:
|
uwsgi_param QUERY_STRING $query_string; |
|
uwsgi_param REQUEST_METHOD $request_method; |
|
uwsgi_param CONTENT_TYPE $content_type; |
|
uwsgi_param CONTENT_LENGTH $content_length; |
|
uwsgi_param REQUEST_URI $request_uri; |
|
uwsgi_param PATH_INFO $document_uri; |
|
uwsgi_param DOCUMENT_ROOT $document_root; |
|
uwsgi_param SERVER_PROTOCOL $server_protocol; |
|
uwsgi_param REQUEST_SCHEME $scheme; |
|
uwsgi_param HTTPS $https if_not_empty; |
|
uwsgi_param REMOTE_ADDR $remote_addr; |
|
uwsgi_param REMOTE_PORT $remote_port; |
|
uwsgi_param SERVER_PORT $server_port; |
uwsgi_param SERVER_NAME $server_name;
七:编缉/etc/nginx/nginx.conf
在http的节点下添加以下内容:
upstream django {
# server unix:///path/to/your/mysite/mysite.sock; # for a file socket
server 127.0.0.1:8001; # for a web port socket (we\'ll use this first)
}
server{
listen 8080; 网站访问端口
server_name localhost;
charset utf-8;
location / {
include /python_dev/wwwroot/loveservice/uwsgi_params; 指定uwsgi_params文件位置
client_max_body_size 75M;
location /media {
uwsgi_pass django;
alias /python_dev/wwwroot/loveservice; 指定网站目录
}
uwsgi_pass 127.0.0.1:8000; 与ini文件中的端口号保持一致
uwsgi_read_timeout 2;
}
location /static{
expires 30d;
autoindex on;
add_header cache-control private;
alias /python_dev/wwwroot/loveservice/collectstatic; 指定静态文件目录
}
注意: 配置为location /static 而非 location /static/,按后者配置将无法找到配置文件
八:编缉网站下setting.py文件
修改以下内容:
DEBUG = False
ALLOWED_HOSTS = [\'*\']
\'DIRS\': [os.path.join(BASE_DIR, \'templates\')]
STATIC_URL = \'/static/\'
STATIC_ROOT = os.path.join(BASE_DIR, "collectstatic")
STATICFILES_DIRS = (
os.path.join(BASE_DIR, "static"),
)
说明:STATIC_ROOT = os.path.join(BASE_DIR, "collectstatic")
collectstatic名称可以为任意名称,在执行python manage.py collectstatic时django将自动建立该名称目录,并将静态文件从static目录复制到该目录下
同时注意修改nginx的静态文件目录路径
python manage.py collectstatic
九:对网站目录授权在测试中可以采用类似chown -R 755 test的方法保证文件有权读取执行,在生产环境中在根据具体需要调整权限,否则容易出现读取静态资源时403的错误信息,导致静态资源无法加载
九:uwsgi服务:
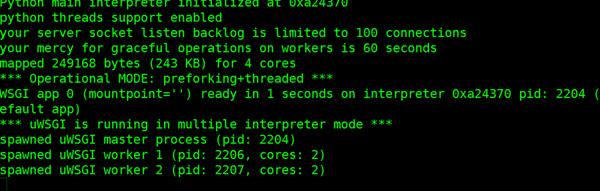
返回到ini配置文件所在的目录下,执行以下命令:
uwsgi --ini loveservice_wsgi.ini
执行过程中如无报错信息将如下所示
让nginx重新读取配置文件:
/etc/init.d/nginx reload
十:访问django服务:端口为nginx.conf中配置的端口,在本例中为8080端口,http://127.0.0.1:8080
如可以下常显示图片等静态资源则表示配置已生效服务已经成功启动
以上是关于ubuntu下部署django的主要内容,如果未能解决你的问题,请参考以下文章