keepalived+nginx+tomcat的简单部署
Posted
tags:
篇首语:本文由小常识网(cha138.com)小编为大家整理,主要介绍了keepalived+nginx+tomcat的简单部署相关的知识,希望对你有一定的参考价值。
keepalived+nginx
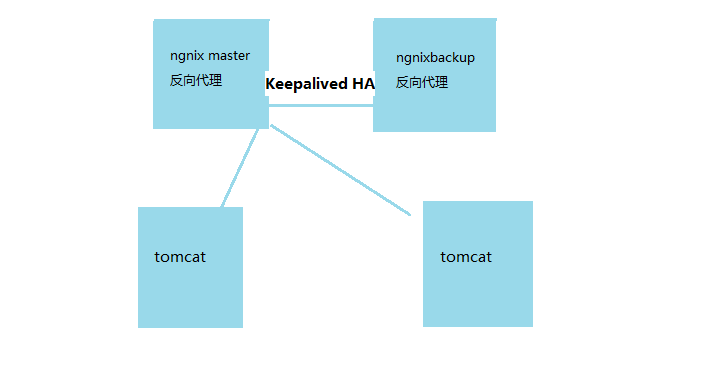
Keepalived是一个基于VRRP协议来实现的服务高可用方案,也是一种高性能的服务器高可用或热备解决方案,可以利用其来避免IP单点故障,类似的工具还有heartbeat、corosync、pacemaker。但是它一般不会单独出现,而是与其它负载均衡技术(如lvs、haproxy、nginx)一起工作来达到集群的高可用。为了更好的实现页面的调用,通过部署Keepalived+nginx来实现负载均衡,使得nginx高可靠性运行。基于Keepalived设计的服务模式能够真正做到主服务器和备份服务器故障时IP瞬间无缝交接,实现Web服务器负载均衡。
架构规划:
tomcat服务器:172.25.0.31、172.25.0.32
负载均衡服务器nginx、调度器:172.25.0.41、172.25.0.42
虚拟服务器(VIP):172.25.0.251
一、服务的安装:
两台负载均衡服务器服务分别安装nginx
安装nginx
1、安装软件依赖包:
yum -y groupinstall "Development Tools""Server Platform Deveopment"
yum -y install gcc pcre-devel zlib-devel openssl-devel
2、在所有的主机上面都操作,在两台nginx上执行以下操作;下载nginx包:
cd /usr/local/src/
[[email protected] src]# yum install wget –y ##安装wget工具
3、下载nginx包:
[[email protected] nginx src]# wget http://nginx.org/download/nginx-1.12.0.tar.gz
4、添加nginx运行的用户:
[[email protected] nginx sbin]# useradd nginx
5解压nginx包,并且安装:
[[email protected] src]# tar zxvf nginx-1.12.0.tar.gz
[[email protected] src]# cd nginx-1.12.0/
6、安装nginx包:
[[email protected] nginx-1.12.0]# ./configure --prefix=/usr/local/nginx--user=nginx --group=nginx --with-http_ssl_module --with-http_flv_module--with-http_stub_status_module --with-http_gzip_static_module --with-pcre
###编译安装
[[email protected] nginx-1.12.0]# make && make install
7、然后我们可以启动nginx:
[[email protected] nginx]# cd /usr/local/nginx/sbin/
[[email protected] sbin]# ./nginx
8、查看一下是否监听到端口:
[[email protected] sbin]# netstat -ntlp
Active Internet connections (only servers)
Proto Recv-Q Send-Q Local Address Foreign Address State PID/Program name
tcp 0 0 0.0.0.0:80 0.0.0.0:* LISTEN 8035/nginx:master
两台tomcat服务器都安装tomcat
1、[[email protected] src]# cd /usr/local/src
[[email protected] src]# tar -xf jdk-8u111-linux-x64.gz
[[email protected] tomcat src]# ln -s /usr/local/src/jdk1.8.0_111/usr/local/jdk
2、设置环境变量JAVA_HOME,添加以下三项:
[[email protected] tomcat src]#cat /etc/procfile
export JAVA_HOME=/usr/local/jdk
export PATH=$JAVA_HOME/bin:$JAVA_HOME/jre/bin:$PATH
export CLASSPATH=.$CLASSPATH:$JAVA_HOME/lib:$JAVA_HOME/jre/lib:$JAVA_HOME/lib/tools.jar
3、测试看是否安装成功:
[[email protected] centos src]# java -version
java version "1.8.0_111"
Java(TM) SE Runtime Environment (build 1.8.0_111-b14)
Java HotSpot(TM) 64-Bit Server VM (build 25.111-b14, mixedmode)
4、[[email protected] src]#Wget http://mirror.bit.edu.cn/apache/tomcat/tomcat-8/v8.5.20/bin/apache-tomcat-8.5.20.tar.gz
5、安装tomcat:
[[email protected] src]# tar zxvf apache-tomcat-8.5.20.tar.gz
[[email protected] src]# ln -s /usr/local/src/apache-tomcat-8.5.20/usr/local/tomcat
[[email protected] src]# chown -R root.root /usr/local/tomcat/
设置环境变量:
[[email protected] src]# tail -1 /etc/profile
export TOMCAT_HOME=/usr/local/tomcat/
[[email protected] tomcat ~]# vim /usr/local/tomcat/conf/server.xml
在<Hostname="localhost" appBase="webapps"
unpackWARs="true"autoDeploy="true">
添加
<Context path="" docBase=""debug="0" reloadable="false"crossContext="true"/>
把监听端口改为80
<Connector port="80"protocol="HTTP/1.1" connectionTimeout="20000" redirectPort="8443" />
[[email protected] tomcat ~]# cd /usr/local/tomcat/bin/
[[email protected] tomcat bin]# ./catalina.sh start
配置Keepalived服务
在nginx主机上配置该服务
[[email protected] src]#wget http://www.keepalived.org/software/keepalived-1.2.7.tar.gz
[[email protected] src]#tar zxvf keepalived-1.2.7.tar.gz -C /usr/local
[[email protected] src]#cd ../keepalived-1.2.7
[[email protected] keepalived-1.2.7]#./configure
[[email protected] keepalived-1.2.7]# make && make install
[[email protected] keepalived-1.2.7]#cp/usr/local/etc/rc.d/init.d/keepalived /etc/rc.d/init.d/
[[email protected] keepalived-1.2.7]#cp/usr/local/etc/sysconfig/keepalived /etc/sysconfig/
[[email protected] keepalived-1.2.7]#mkdir /etc/keepalived
[[email protected] keepalived-1.2.7]cp/usr/local/etc/keepalived/keepalived.conf /etc/keepalived/
[[email protected] keepalived-1.2.7]#cp/usr/local/sbin/keepalived /usr/sbin/
加入启动服务
[[email protected] keepalived-1.2.7]#echo"/usr/local/nginx/sbin/nginx" >> /etc/rc.local
[[email protected] keepalived-1.2.7]#echo"/etc/init.d/keepalived start" >> /etc/rc.local
二、服务的配置:
2.1配置两台的nginx反向代理
[[email protected] keepalived-1.2.7]#vim /usr/local/nginx/conf/nginx.conf
upstream web_up{
server 172.25.0.31 max_fails=3 fail_timeout=20s weight=2;
server 172.25.0.32 max_fails=3 fail_timeout=20s weight=2;
}
server {
listen 80;
server_name 127.0.0.1;
location / {
proxy_pass http://web_up;
proxy_set_header Host $host;
proxy_set_header X-Real-IP $remote_addr;
proxy_set_header X-Forwared-For $proxy_add_x_forwarded_for;
}
2.2 配置keepalived
按照上面的安装方法,keepalived的配置文件在/etc/keepalived/keepalived.conf。主、从服务器的配置相关联但有所不同。如下:
Master:
[[email protected] keepalived-1.2.7]# cd /etc/keepalived/
[[email protected] keepalived-1.2.7]#vim keepalived.conf
! Configuration File for keepalived
global_defs {
notification_email {
notification_email {
}
#notification_email_from [email protected]
#smtp_serversmtp.hysec.com
#smtp_connect_timeout 30
router_id LVS_DEVEL
}
vrrp_instance VI_1 {
state MASTER
interface eth1
virtual_router_id51
priority 100
advert_int 1
authentication {
auth_type PASS
auth_pass 1111
}
virtual_ipaddress {
172.25.0.251
}
}
2.3另一台nginx配置keepalived的状态为backup。
Backup:
[[email protected] keepalived-1.2.7]# cd /etc/keepalived/
[[email protected] nginx keepalived-1.2.7]#vim keepalived.conf
! Configuration File for keepalived
global_defs {
notification_email {
notification_email {
}
#notification_email_from [email protected]
#smtp_serversmtp.hysec.com
#smtp_connect_timeout 30
router_id LVS_DEVEL
}
vrrp_instance VI_1 {
state BACKUP
interface eth1
virtual_router_id51
priority 99
advert_int 1
authentication {
auth_type PASS
auth_pass 1111
}
virtual_ipaddress {
172.25.0.251
}
}
三、测试keepalived获取的vip情况:
先后在主、从服务器上启动keepalived:/etc/init.d/keepalived start
在主服务器上查看是否已经绑定了虚拟IP: ip addr
停止主服务器上的keepalived:/etc/init.d/keepalived stop 然后在从服务器上查看是否已经绑定了虚拟IP:
启动主服务器上的keepalived,看看主服务器能否重新接管虚拟IP
四、配置nginx的监控脚本
【简单脚本】
cd /etc/keepalived/
Vim chk_nginx.sh
#!/bin/bash
Pgrep ngnix
port=80
if [ $? –eq 0 ] ; then
echo ”nginx isrunning”
else
/usr/local/nginx/sbin/nginx
fi
[[email protected]keepalived/]#chmod a+x chk_nginx.sh
然后在keepalived.conf添加脚本路径,在keepalived.conf中增加如下配置:
vrrp_script chk_http_port {
script " /etc/keepalived/chk_nginx.sh"
interval 2
weight 2
}
track_script {
chk_http_port
}
测试结果:当一台主机的nginx停止时,另一台nginx将会接管web服务。
写的不好敬请原谅
本文出自 “我的运维” 博客,谢绝转载!
以上是关于keepalived+nginx+tomcat的简单部署的主要内容,如果未能解决你的问题,请参考以下文章
