Godot数据响应的方式执行功能
Posted 张学徒
tags:
篇首语:本文由小常识网(cha138.com)小编为大家整理,主要介绍了Godot数据响应的方式执行功能相关的知识,希望对你有一定的参考价值。
Godot Engine 版本:4.0 beta 6
下载地址:Index of /godotengine/4.0/beta6/ (downloads.tuxfamily.org)
在这个教程中,学会理解以数据为主的进行处理执行逻辑的代码编写方式,虽然看似简单,但是确是方便又好用。
以及下方会有一个 buff 的示例,触类旁通,你可以设计更高复杂更强大的功能
基础代码
在游戏开发中,对数据的处理那绝对是重中之重。角色的属性、游戏配置等一系列的玩家数据都要进行保存处理。有时还要根据数据的变化进行响应处理其他代码逻辑,那有没有一种比较方便的方式对数据的变化进行处理呢?那肯定是有的,要不我来干嘛(#滑稽)
算了,我也不太会说话,直接先看代码:
data_management.gd
#============================================================
#    Data Management
#============================================================
# - datetime: 2022-11-23 19:35:39
#============================================================
## 数据管理
class_name DataManagement
extends Node


##  数据发生改变
##[br]
##[br][code]property[/code]  属性名
##[br][code]previous[/code]  改变前的属性的值
##[br][code]current[/code]  当前的属性值
signal property_changed(property, previous, current)


var _data : Dictionary =
var _tmp_value


#============================================================
#  SetGet
#============================================================
##  设置属性值
func set_property(property, value):
	_tmp_value = _data.get(property)
	if _tmp_value != value:
		_data[property] = value
		property_changed.emit(property, _tmp_value, value)


##  获取属性值
##[br]
##[br][code]default[/code]  如果没有这个属性时返回的默认值
func get_property(property, default = null):
	return _data.get(property, default)


##  添加属性
func add_property(property, value):
	if value is float or value is int:
		set_property(property, _data.get(property, 0) + value )
	else:
		set_property(property, value)

## 减去属性值
func sub_property(property, value):
	if value is float or value is int:
		set_property(property, _data.get(property, 0) - value )
	else:
		set_property(property, value)

##  移除属性值
func remove_property(property):
	_data.erase(property)
很简单的代码,几个对属性进行增删改的操作,有个地方很关键:signal property_changed(property, previous, current),属性改变信号,对属性发生改变能够有方便判断监听的地方,好在 Godot 的信号非常方便就能实现这一功能。
使用 Dictionary 对属性进行记录管理很方便,最终通过 set_property 方法对属性的改变进行判断处理。这样,只要连接完信号,通过调用这些方法进行操作,就能判断属性何时发生了变化。
创建一个编辑器脚本进行测试
data_mana_test.gd
#============================================================
#    Data Mana Test
#============================================================
# - datetime: 2022-11-23 19:58:42
#============================================================
@tool
extends EditorScript


var data_management = DataManagement.new()


func _run():
	# 连接 property_changed 属性到当前对象的 _property_changed 方法上 (4.0 版本之后的新的连接方式)
	data_management.property_changed.connect(_property_changed)

	# 设置属性
	data_management.set_property("health", 2)
	# 添加属性值
	data_management.add_property("health", 1)


func _property_changed(property, previous, current):
	print(property, " 属性发生改变: previous = ", previous, ", current = ", current)
点击脚本代码左上角的“文件 > 运行”菜单或者按下 ctrl + shift + x 快捷键运行当前脚本,可以看到底部“输出”面板中的如下信息
health 属性发生改变: previous = <null>, current = 2
health 属性发生改变: previous = 2, current = 3
是的,非常简陋,但是核心就是这个,非常重要,必不可少,现在我们需要稍微增强一下这个类,比如我想知道这是否是新添加的属性数据:
#============================================================
#    Data Management
#============================================================
# - datetime: 2022-11-23 19:35:39
#============================================================
## 数据管理
class_name DataManagement
extends Node


##  数据发生改变
##[br]
##[br][code]property[/code]  属性名
##[br][code]previous[/code]  改变前的属性的值
##[br][code]current[/code]  当前的属性值
signal property_changed(property, previous, current)
## 新添加属性
signal newly_added_property(property, value)
## 移除了属性
signal removed_property(property, value)


var _data : Dictionary =
var _tmp_value


#============================================================
#  SetGet
#============================================================
##  设置属性值
##  set_property
##[br]
##[br][code]force_change[/code]  强制进行修改
func set_property(property, value, force_change: bool = false):
	_tmp_value = _data.get(property)
	if _data.has(property):
		if _tmp_value != value or force_change:
			_data[property] = value
			property_changed.emit(property, _tmp_value, value)
	else:
		_data[property] = value
		newly_added_property.emit(property, value)


##  获取属性值
##[br]
##[br][code]default[/code]  如果没有这个属性时返回的默认值
func get_property(property, default = null):
	return _data.get(property, default)


##  添加属性
func add_property(property, value):
	if value is float or value is int:
		set_property(property, _data.get(property, 0) + value )
	else:
		set_property(property, value, true)

## 减去属性值
func sub_property(property, value):
	if value is float or value is int:
		set_property(property, _data.get(property, 0) - value )
	else:
		set_property(property, value, true)

##  移除属性值
func remove_property(property):
	if _data.has(property):
		removed_property.emit(property, _data[property])
		_data.erase(property)
添加了两个新的信号:newly_added_property,removed_property,这样我们就可以做更多判断操作,以及部分更新,尤其是 func set_property(property, value, force_change: bool = false) 方法部分新增了 force_change 参数,这样在增加和减少非数字属性的时候也会发出信号。
修改上次的编辑器脚本,再次运行测试
#============================================================
#    Data Mana Test
#============================================================
# - datetime: 2022-11-23 19:58:42
#============================================================
@tool
extends EditorScript


var data_management = DataManagement.new()


func _run():
	# 连接信号当前对象的方法 (4.0 版本之后的新的连接方式)
	data_management.property_changed.connect(_property_changed)
	data_management.newly_added_property.connect(_newly_added_property)
	data_management.removed_property.connect(_removed_property)

	# 设置属性
	data_management.set_property("health", 2)
	# 添加属性值
	data_management.add_property("health", 1)
	# 移除属性
	data_management.remove_property("health")

	print("移除 health 属性后的值:", data_management.get_property("health") )


func _newly_added_property(property, value):
	print("新增属性:", property, ", value = ", value)


func _removed_property(property, value):
	print("移除属性:", property)


func _property_changed(property, previous, current):
	print(property, " 属性发生改变: previous = ", previous, ", current = ", current)
运行结果:
新增属性:health, value = 2
health 属性发生改变: previous = 2, current = 3
移除属性:health
移除 health 属性后的值:<null>
非常方便就可以对属性发生改变进行响应
简单的生命发生改变的示例
我们对这个功能进行一个实例操作演示。
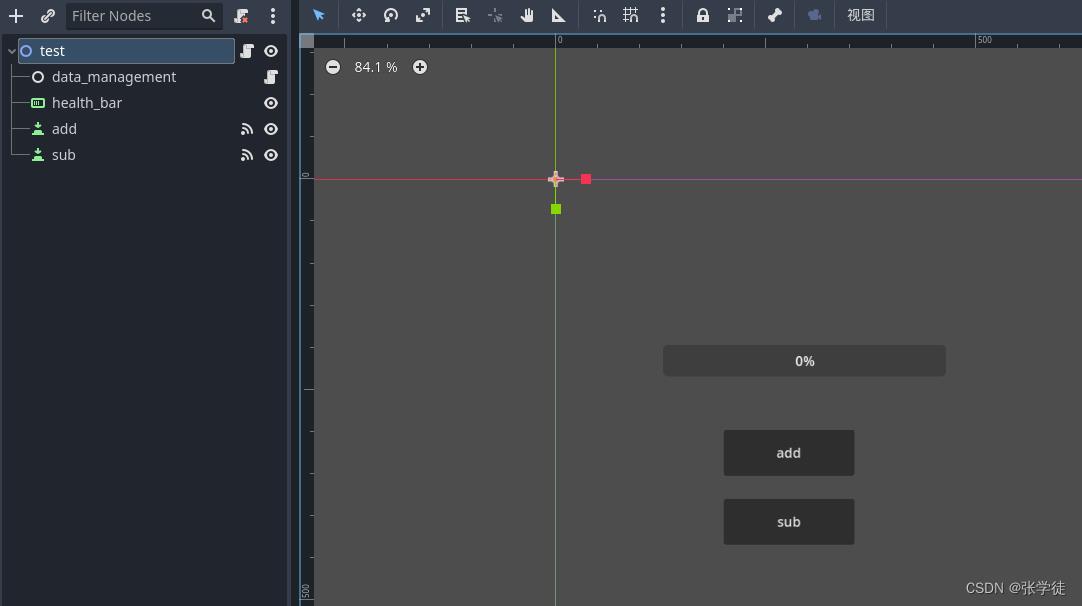
创建一个场景,创建一个名称为 test_01 的文件夹保存到这个文件夹下。节点名称和类型如下,左边名称,右边括号内的是类名
|- test (Node2D)
	|- data_management (DataManagement,刚刚创建的那个脚本类)
	|- health_bar (ProgressBar)
	|- add (Button)
	|- sub (Button)
给 test 节点添加一个脚本,然后修改 add 和 sub 的 text 属性为 add 和 sub,连接两个按钮的 pressed 信号到脚本里,调整一下几个节点的位置
然后就是写代码逻辑,test 代码如下
extends Node2D


@onready var health_bar = $health_bar as ProgressBar
@onready var data_management = $data_management as DataManagement


#============================================================
#  内置
#============================================================
func _ready():
	health_bar.max_value = 10
	data_management.property_changed.connect(_property_changed)
	data_management.set_property("health", 0)


#============================================================
#  连接信号
#============================================================
func _property_changed(property, previous, current):
	if property == "health":
		health_bar.value = current


func _on_add_pressed():
	data_management.add_property("health", 1)


func _on_sub_pressed():
	data_management.sub_property("health", 1)
按 F6 运行场景进行测试,点击 add 和 sub 按钮,可以看到点击之后属性发生了改变

但是还不完善,因为点击完会一直增加或减少,我们稍作一点限制即可,添加一个 health_max 属性,根据这个属性进行判断
extends Node2D


@onready var health_bar = $health_bar as ProgressBar
@onready var data_management = $data_management as DataManagement


#============================================================
#  内置
#============================================================
func _ready():
	data_management.newly_added_property.connect(_newly_added_property)
	data_management.property_changed.connect(_property_changed)
	data_management.set_property("health", 0)
	data_management.set_property("health_max", 10)


#============================================================
#  连接信号
#============================================================
func _newly_added_property(property, value):
	if property == "health_max":
		health_bar.max_value = value


func _property_changed(property, previous, current):
	if property == "health":
		health_bar.value = current


func _on_add_pressed():
	if data_management.get_property("health") < data_management.get_property("health_max"):
		data_management.add_property("health", 1)


func _on_sub_pressed():
	if data_management.get_property("health") > 0:
		data_management.sub_property("health", 1)
再次运行,可以不断点击,再点击减少,就可以看到超出最大值则不再增加了
不过像上面不断手动输入属性值,这样需要手动输入的值我们把它叫做“魔法值”,这种值有时候可能会因为手误输入错误,导致逻辑错误,所以我们需要给他专门做一个类存储这个属性名称
property_consts.gd
## 属性名常量
class_name PropertyConsts


const HEALTH = "health"
const HEALTH_MAX = "health_max"
将手动输入的值替换成常量
extends Node2D


@onready var health_bar = $health_bar as ProgressBar
@onready var data_management = $data_management as DataManagement


#============================================================
#  内置
#============================================================
func _ready():
	data_management.newly_added_property.connect(_newly_added_property)
	data_management.property_changed.connect(_property_changed)
	data_management.set_property(PropertyConsts.HEALTH, 0)
	data_management.set_property(PropertyConsts.HEALTH_MAX, 10)


#============================================================
#  连接信号
#============================================================
func _newly_added_property(property, value):
	if property == PropertyConsts.HEALTH_MAX:
		health_bar.max_value = value


func _property_changed(property, previous, current):
	if property == PropertyConsts.HEALTH:
		health_bar.value = current


func _on_add_pressed():
	if data_management.get_property(PropertyConsts.HEALTH) < data_management.get_property(PropertyConsts.HEALTH_MAX):
		data_management.add_property(PropertyConsts.HEALTH, 1)


func _on_sub_pressed():
	if data_management.get_property(PropertyConsts.HEALTH) > 0:
		data_management.sub_property(PropertyConsts.HEALTH, 1)
可以看到完全没有手动输入的值了,当然这里不仅仅只适用于这个地方,魔法值,其他数据的改变都可以通过次方式进行
Buff 功能示例
上面的生命改变功能还是比较简单的,这里我们可以进阶做个比较高级点的功能,通过数据属性新增移除进行增加 buff 的功能,其实游戏就是这样,关键在于对数据的操控
创建一个测试场景 test,保存到一个文件夹名为 test_02 的文件夹下,场景节点结构如下
|- test (Node2D)
	|- data_management (DataManagement)
		|- fire_buff (Node,给这个节点添加下面的 fire_buff.gd 脚本)
	|- add_buff (Button)
我们创建一个 FireBuff 脚本,意为火焰buff
fire_buff.gd
#============================================================
#    Fire Buff
#============================================================
# - datetime: 2022-11-23 21:26:51
#============================================================
##火焰魔法buff
##[br]
##[br]放到 DataManagement 节点下边自动连接信号,每次添加属性值和下方的 FireBuff.NAME 的值一样的
##时候会自动添加这个buff
class_name FireBuff
extends Node


@onready
var data_management := get_parent() as DataManagement


# 叠加的伤害数据
var _damage_data : Array[Dictionary] = []


#============================================================
#  常量
#============================================================
## 当前 Buff 名称常量
const NAME = "火焰魔法BUFF"


## Buff 参数值常量
class BuffParamConsts:

	const DURATION = "duration"
	const DAMAGE = "damage"


#============================================================
#  内置
#============================================================
func _ready():
	if data_management != null:
		data_management.newly_added_property.connect(_newly_added_property)
		data_management.property_changed.connect(_property_changed)
		data_management.removed_property.connect(_removed_property)
	else:
		printerr("父节点不是 DataManager 类型的节点!")


#============================================================
#  自定义
#==============================以上是关于Godot数据响应的方式执行功能的主要内容,如果未能解决你的问题,请参考以下文章